
包阅导读总结
1. `Google Sheets`、`React`、`Next.js`、`数据库`、`用户投票`
2. 本文介绍如何使用 Google Sheets 作为数据库通过 Next.js 在 React 中存储用户投票结果。阐述了服务器动作的作用、Google Sheets 的设置步骤,包括创建项目、服务账号、配置权限等,并详细说明了创建用户投票应用的各个部分。
3.
– 介绍使用 Google Sheets 作为数据库存储用户投票结果的原因
– 数据检索方便,团队成员易查看
– 讲解 Next.js 中的服务器动作
– 异步函数,可处理表单提交和数据突变
– 前端可通过页面向服务器动作发送请求,服务器动作接收并处理
– 如何设置 Google Sheets
– 创建 Google Cloud 项目和服务账号
– 启用 Google Sheets API 并创建凭据
– 创建 Google Sheet 并添加列标题、分享
– 创建用户投票应用
– 服务和工具配置
– 投票页面、布局和服务器动作的创建
– 结果页面、布局和服务器动作的创建
思维导图:
文章地址:https://thenewstack.io/how-to-use-google-sheets-as-a-database-with-react-and-ssr/
文章来源:thenewstack.io
作者:Paul Scanlon
发布时间:2024/6/23 21:23
语言:英文
总字数:1563字
预计阅读时间:7分钟
评分:81分
标签:教程,React,Next.js,Google Sheets,数据库
以下为原文内容
本内容来源于用户推荐转载,旨在分享知识与观点,如有侵权请联系删除 联系邮箱 media@ilingban.com
In this tutorial I’ll be explaining how to use Google Sheets as a database to store the results of a user poll. I’ve used this React Google Sheets approach for a number of marketing campaigns. I chose this method over a more traditional Database solution for one reason: Data retrieval.
It does of course entirely depend on your requirements, but having the ability to simply share a Google Sheet with a technical or non-technical member of my team — so they can easily see captured data — has, on more than one occasion, proved really valuable.
Data is sent from the browser to a Server Action that securely posts to a Google Sheet, which stores the data. To use Server Actions in React, I’ll be using Next.js.
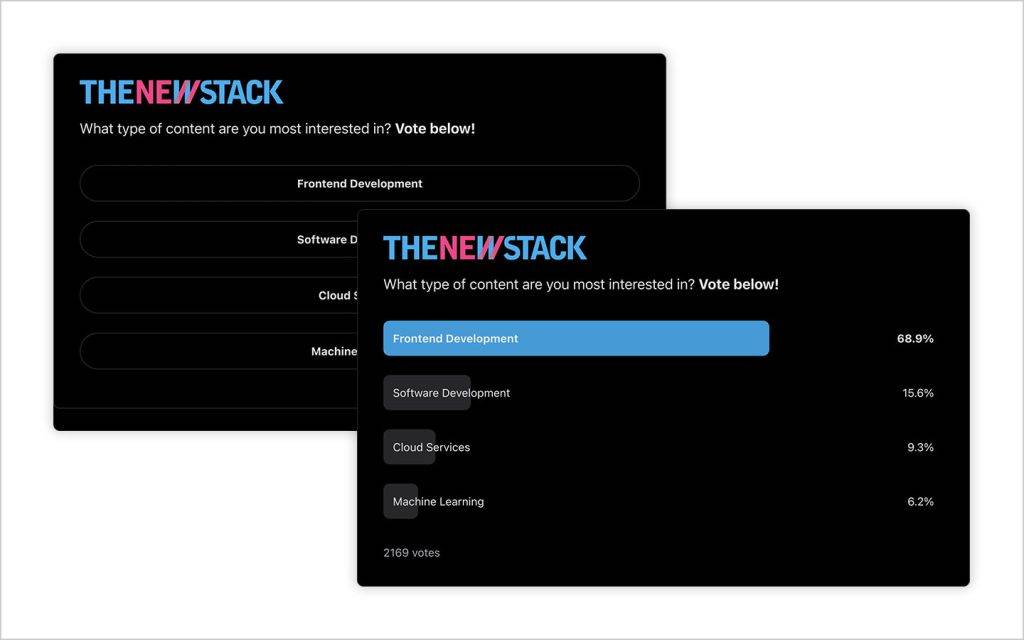
On the following links you will find a Live Preview and GitHub Repository for the completed user poll application.
I won’t be covering how to get started with Next.js, so please consult the docs if you’re not familiar with how to use Next.js.
What Are Server Actions?
Server Actions are asynchronous functions that are executed on the server. They can be used in React server and client Components to handle form submissions and data mutations in Next.js applications.
Using a Server Action allows you to POST data from your front-end to your back-end in the same project. A Server Action can then be used to securely INSERT data into a database, or in the case of this article, a Google Sheet.
The way to achieve this using Next.js is to have a page that handles sending a request to a Server Action, and a Server Action that handles receiving the request and performing the INSERT.
Example Next.js Server Action
The page is saved in app/some-page/page.tsx and sends a request to the Action saved in app/some-page/some-action.ts
You can see the src for this simple example on the following links:
In this example the Server Action simply returns the id string that was passed in when the Action was invoked. In the User Poll example, the action would perform an INSERT into a Google Sheets database and redirect to a results page, where a second Action is used to retrieve the data ready to be displayed.
But before you get on to any of the code, you’ll need to complete all the Google setup steps.
How to Setup Google Sheets
Before you get going with the Google Sheet, you’ll first need to set up what Google refers to as a Service Account. You can read more about Service Accounts in the Google docs: Understanding Google Service Account.
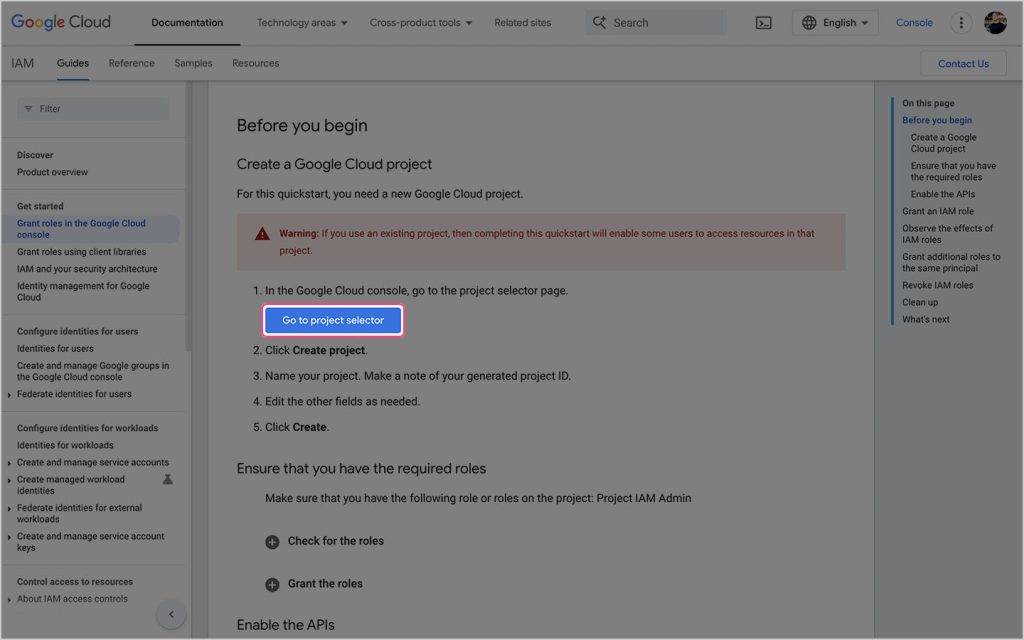
Create a Google Cloud Project
Step one is to create a project. You’ll configure this project so it can grant access to the Google Sheets API, via a Service Account user/email address, and use it to generate the required API keys needed to “post” data to the Google Sheet.
The steps to create a Google Cloud project are outlined in the following guide: Grant an IAM role by using the Google Cloud console.
From the above link, start by clicking on the Go to project selector button.
Now click CREATE PROJECT.
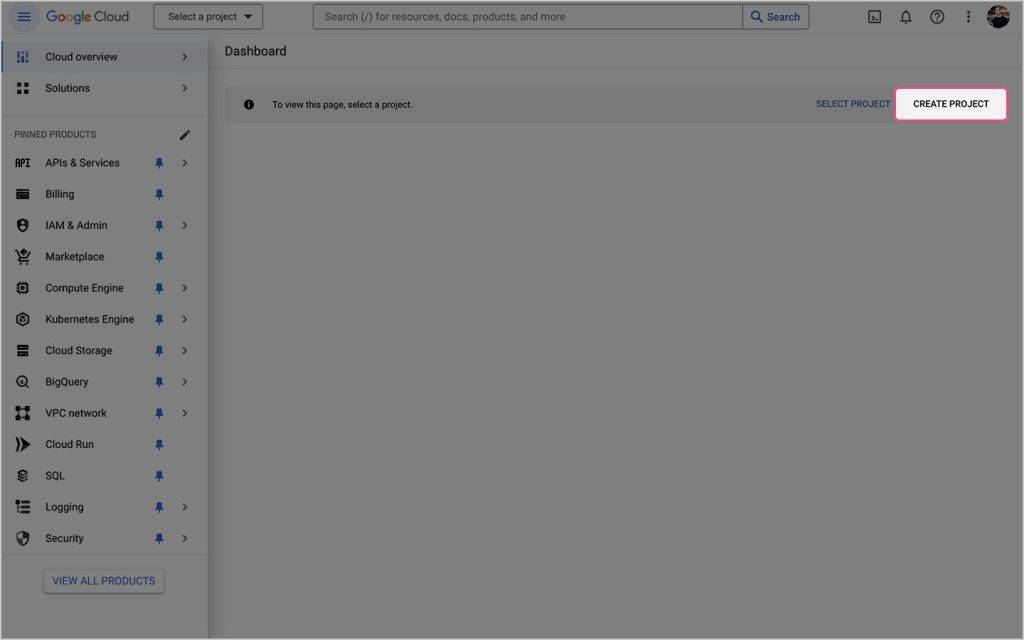
Give your project a name and click CREATE.

You should now be redirected to the Project info dashboard. Click on the API’s & Services navigation item in the sidebar.
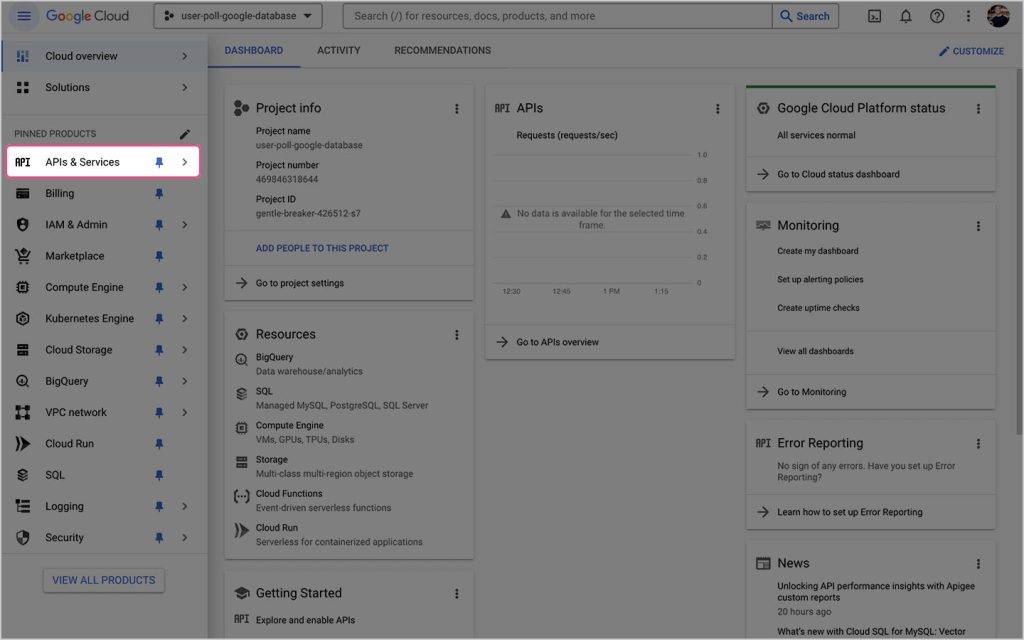
To enable access to the Google Sheets API, click the + ENABLE APIS AND SERVICES button.

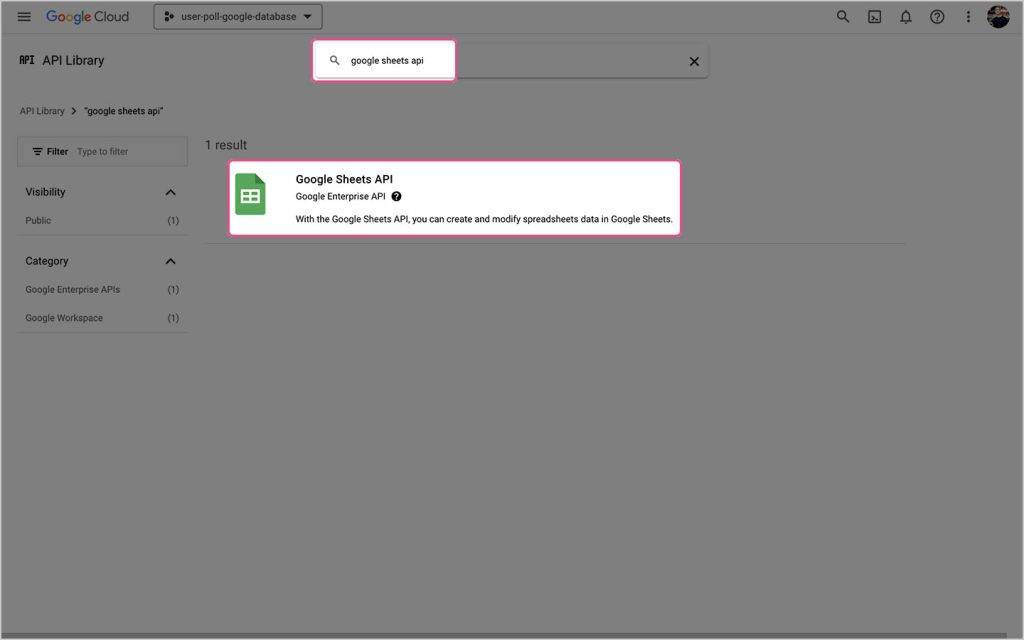
Search for “google sheets api” and select the Google Sheets API.
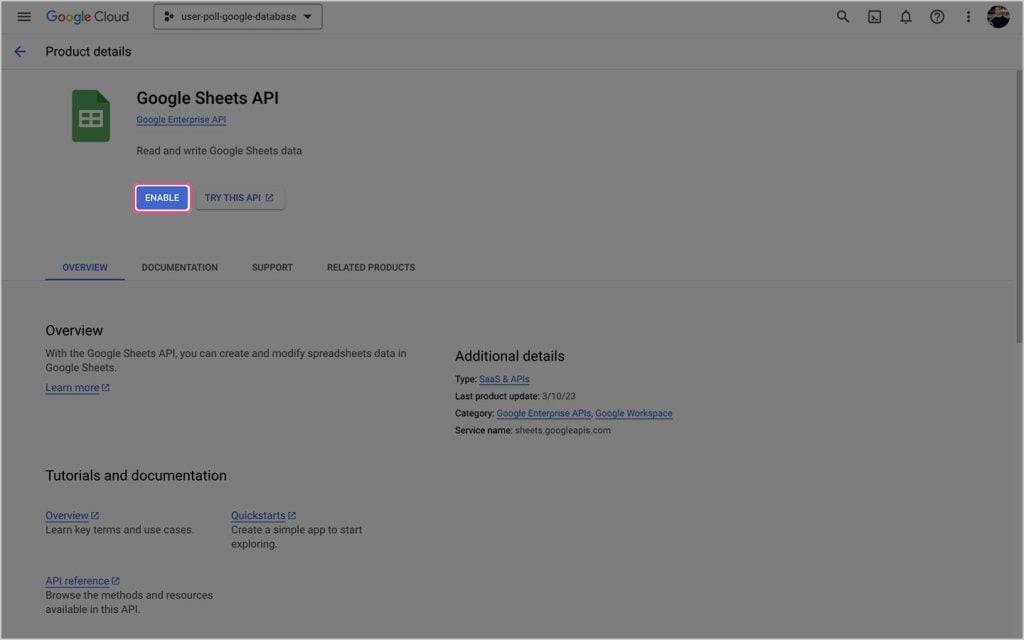
To enable access to the Google Sheets API, click the ENABLE button.
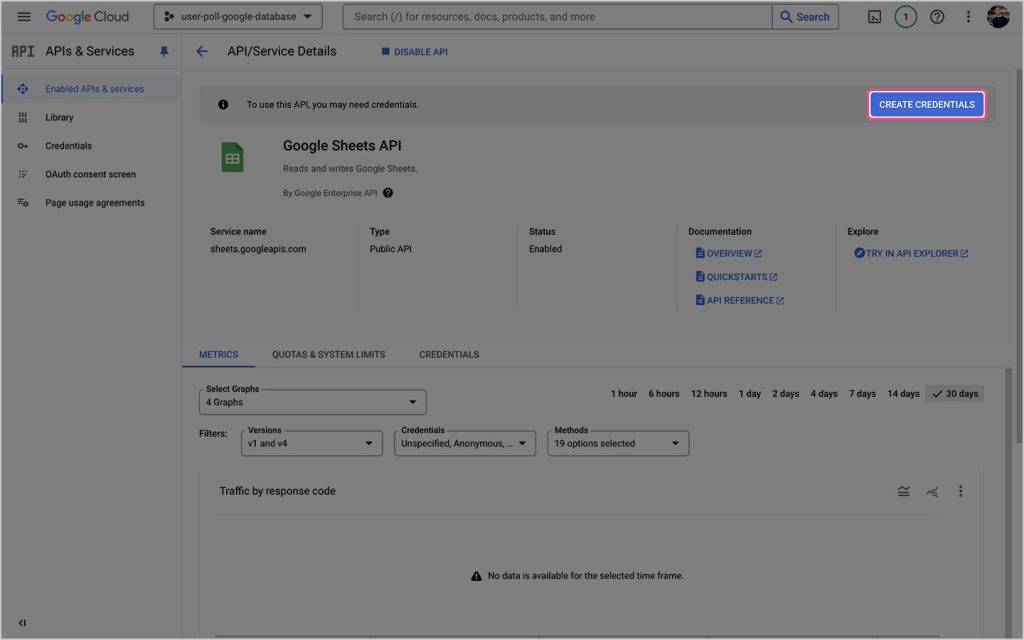
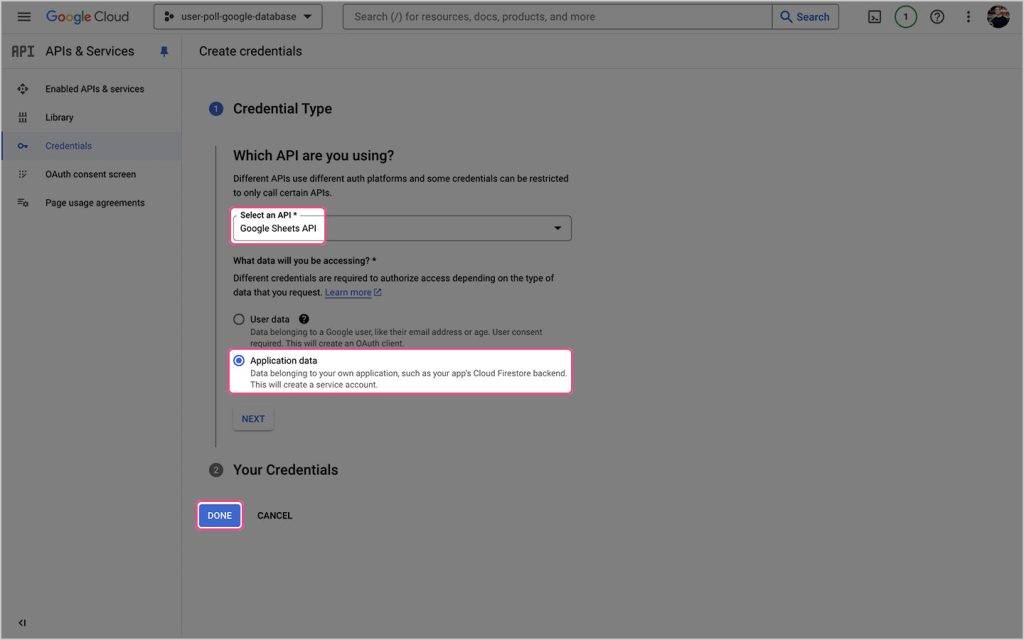
To create the necessary credentials for the Google Sheets API, click the CREATE CREDENTIALS button.
Select the Google Sheets API and check the Application Data radio button. You can skip the Your Credentials section and just click the DONE button.
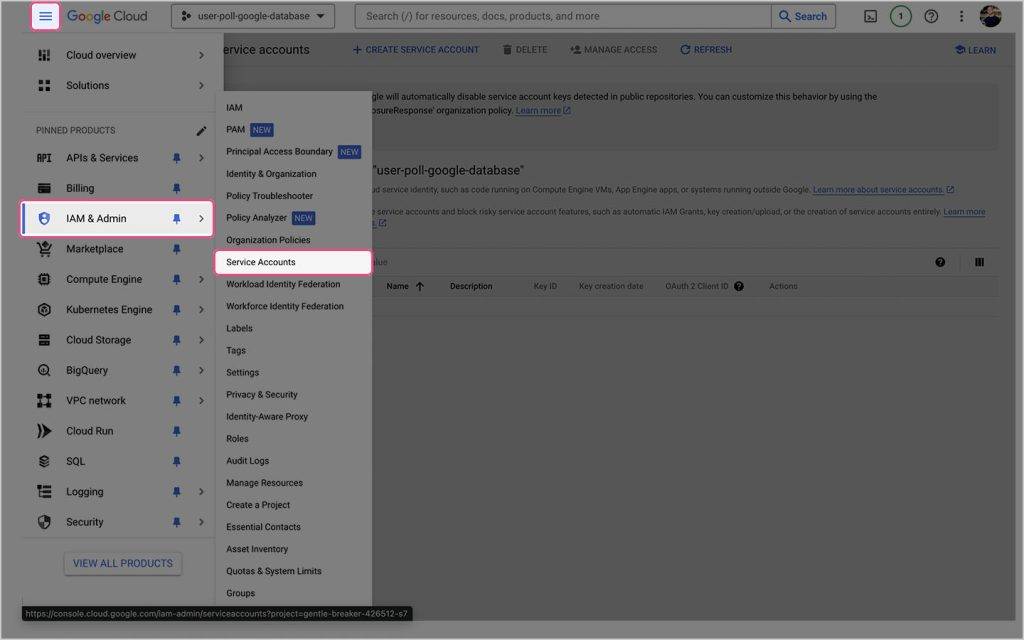
Click on the IAM & Admin navigation item in the sidebar, then click Service Accounts.
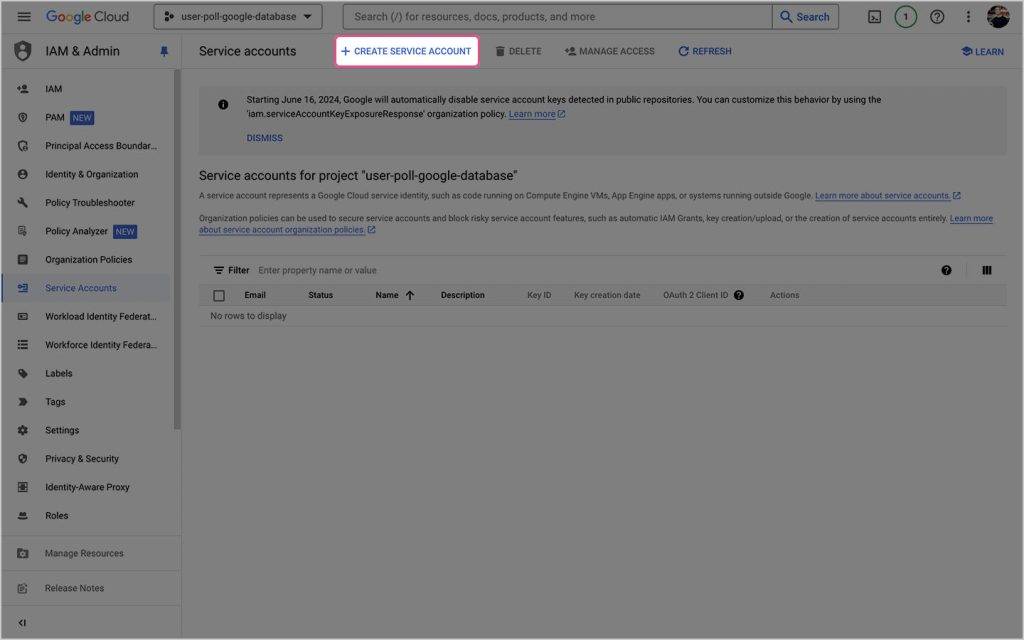
Click on + CREATE SERVICE ACCOUNT to create a new service account.
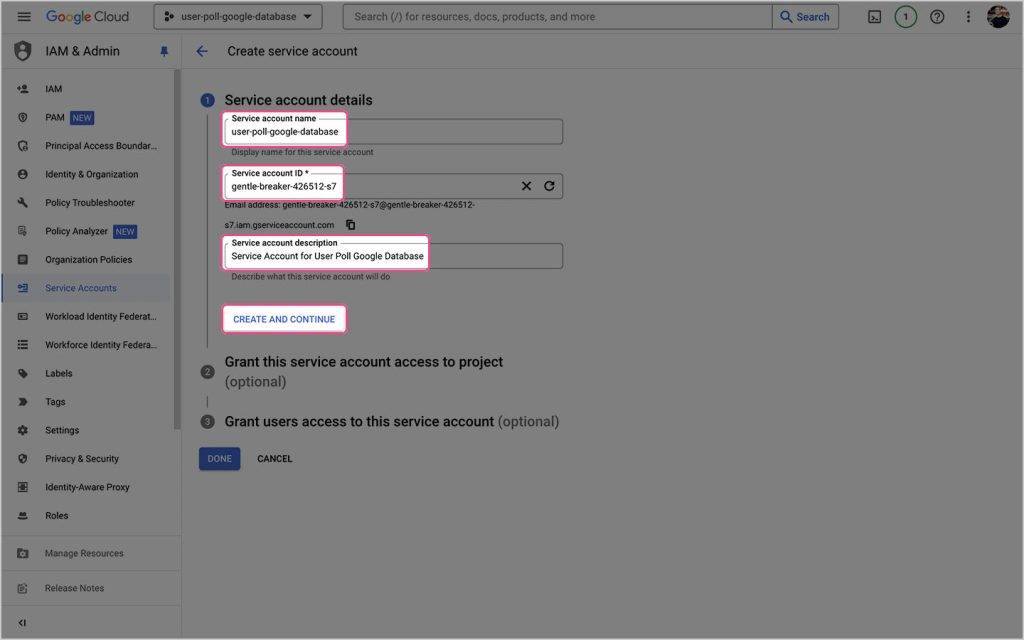
Create a service account for your project by giving it a Service account name, Service account ID and Service account description. When you’re ready, click CREATE AND CONTINUE.
Set the Role to Owner and click CONTINUE.
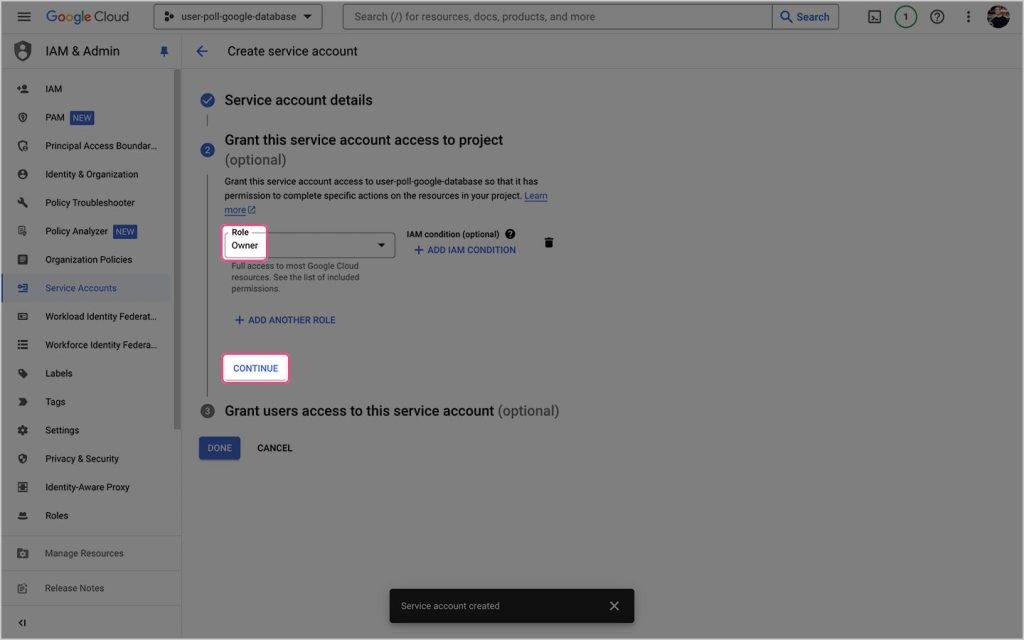
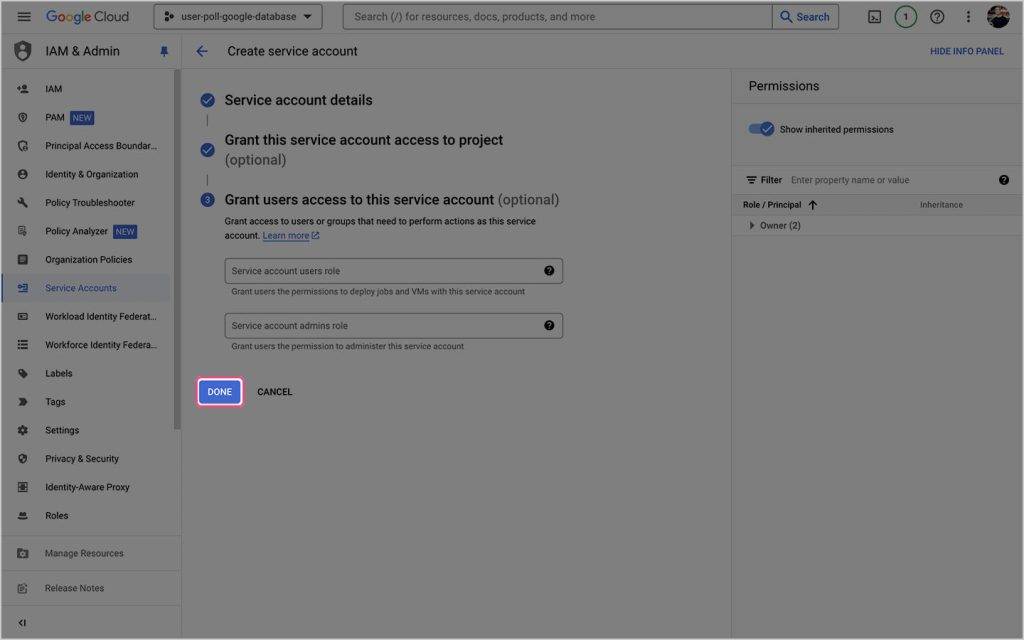
You can skip the final step and click DONE when you’re ready.
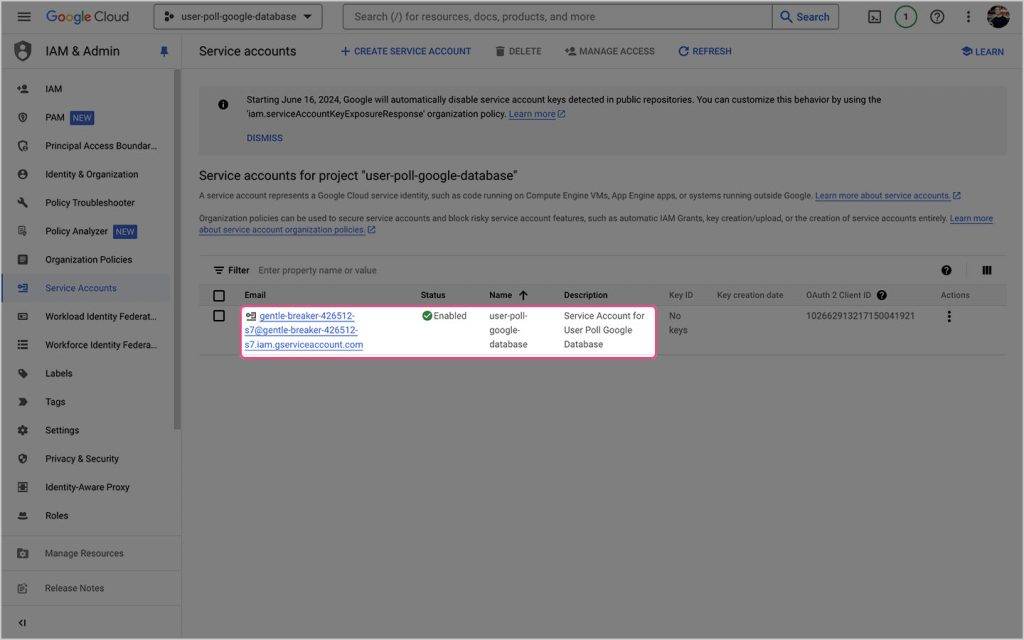
Check that the permissions for service account details are correct.
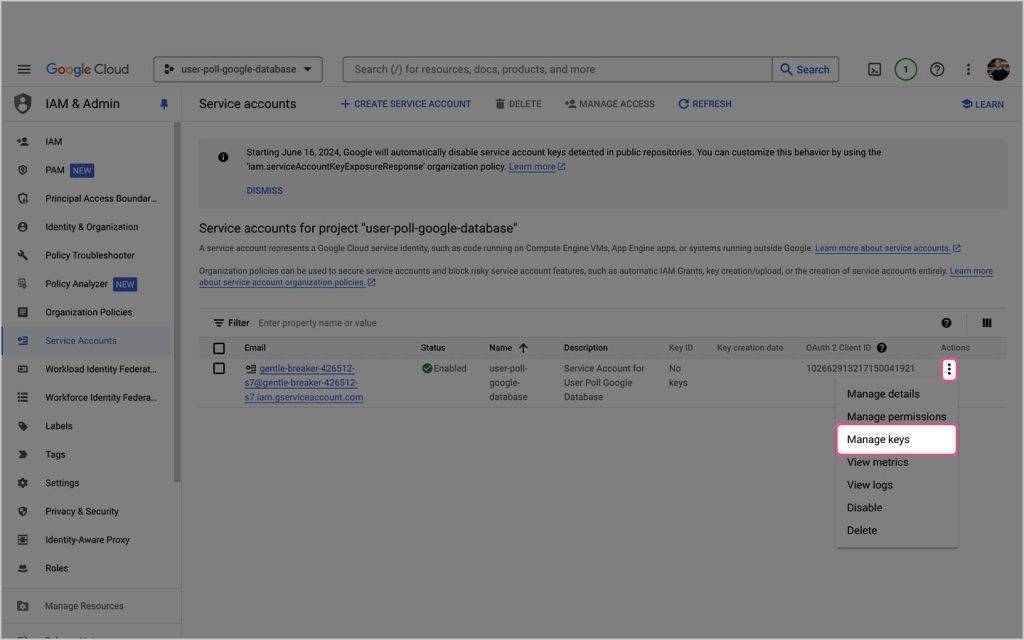
On the same screen click the more dots and select Manage Keys.
On the KEYS tab, click the ADD KEY button, then click Create new key.
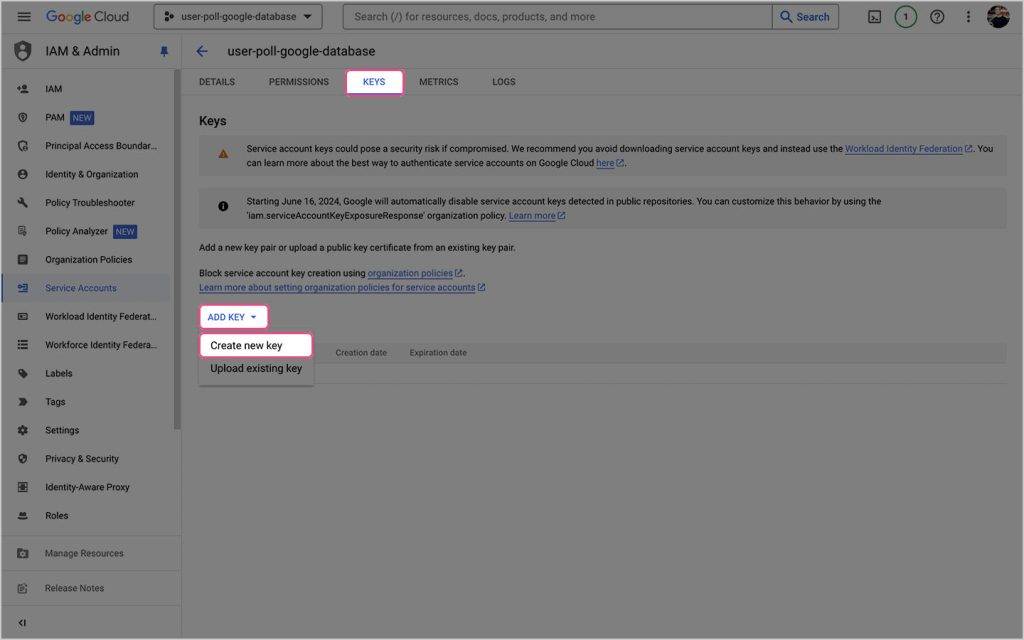
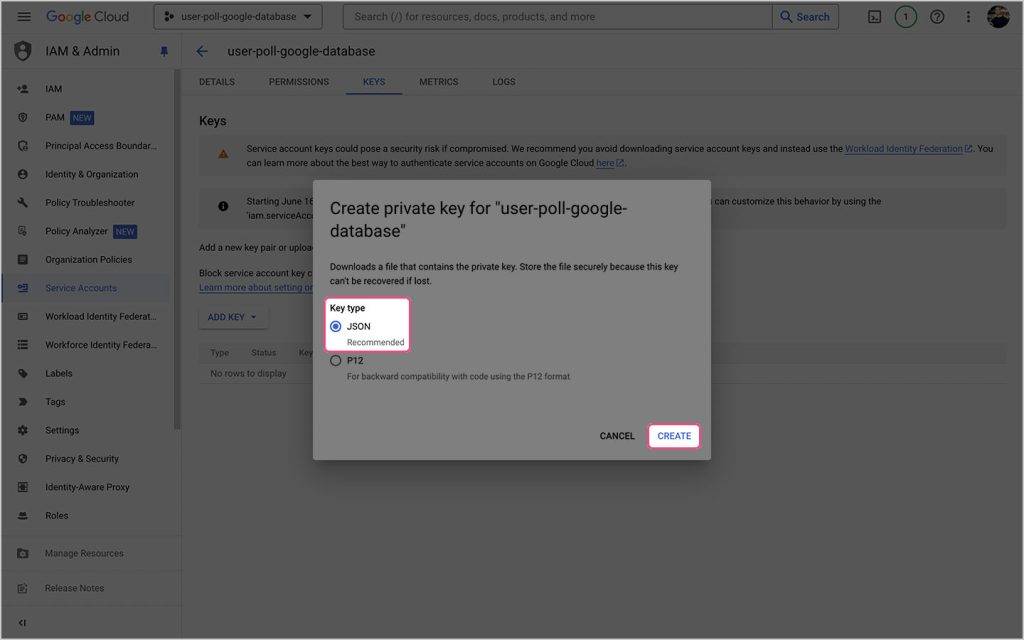
Select JSON as the key type, then click the CREATE button to download a .json file containing your keys.
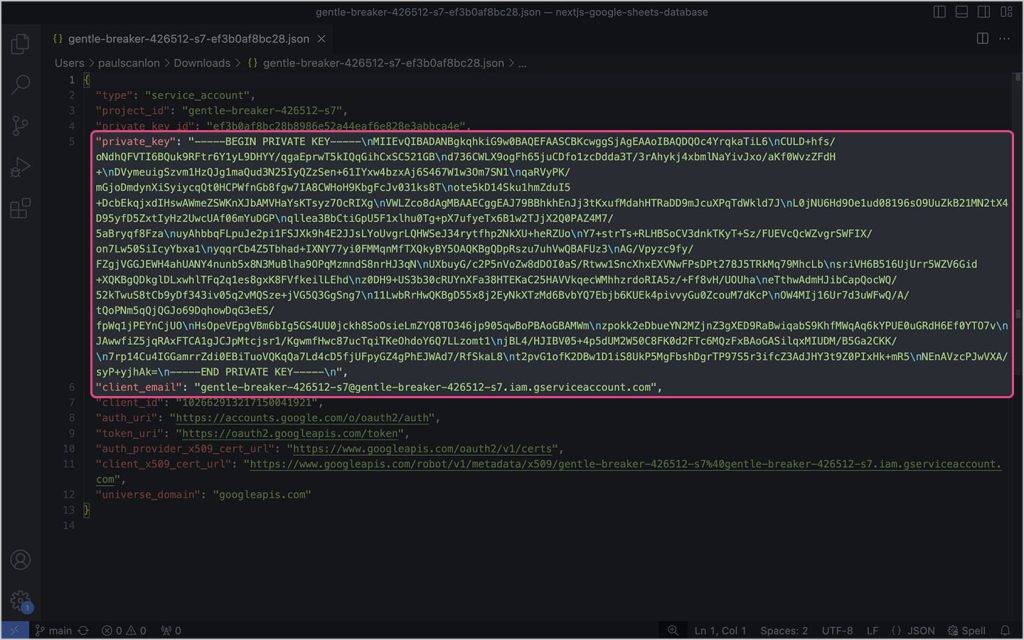
The .json file you’ve just downloaded will look a little like the below. The two keys you’ll need to save as environment variables are. priviate_key and client_email.
In the example repo, I created the following environment variables.
You can read more about configuring environment variables for Next.js on the following link:
Creating a Google Sheet
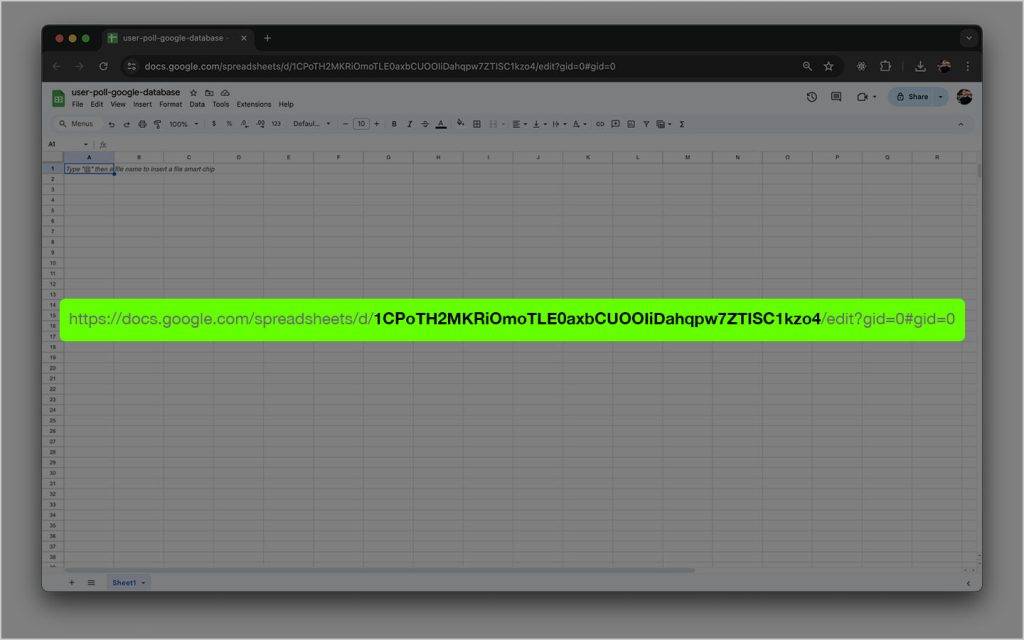
Create a new Google Sheet and copy of the id in the URL address bar and add it to your environment variables.
Add Column Headings to Google Sheet
You can add as many headings as you like. It’s worth noting that spaces are replaced with underscores.

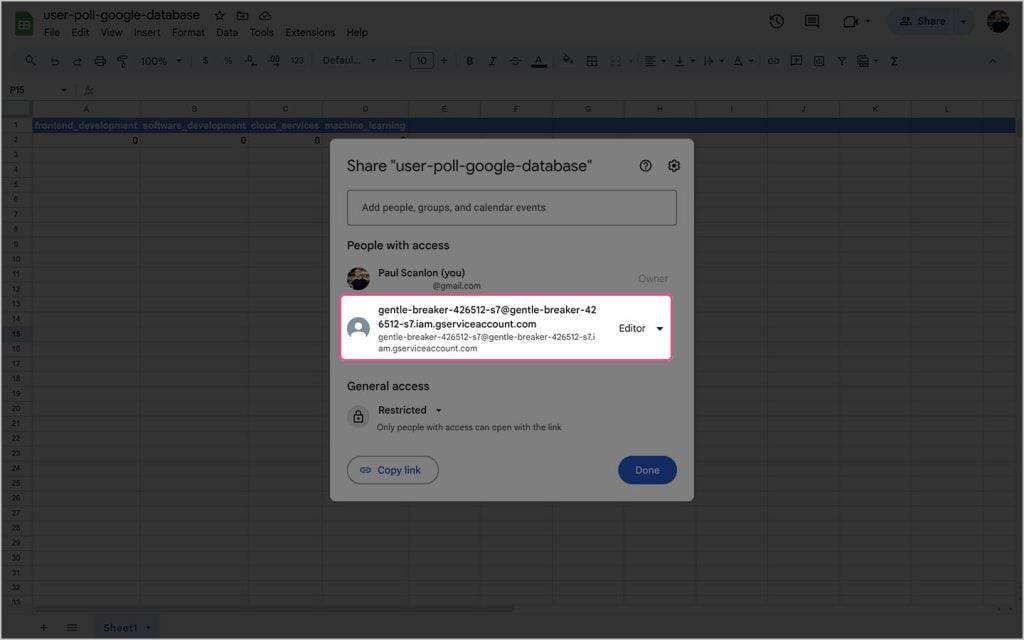
Share the Google Sheet
With your new Sheet created, share it with your Service Account email address / the client_email from the .json file. Make sure the Service Account has Editor access.
Creating a User Poll
To create the User Poll there’s a page, layout, and server action for both the vote and the results page.
In the following steps, I’ll explain how to create each of these. There’s an unstyled version of the user poll available on the following branch in the repo: example/minimal. This contains just the code you’ll see in the following steps.
Services and Utils
In addition to the “pages” you’ll also need to configure google-spreadsheet, google-auth-library and the poll-config which contains the titles seen in the interface.
Services
Install the following dependencies:
Create a new directory at the root of your project and name it services.
Create a new file named google-spreadsheet.ts and add the following code:
You can read more about google-spreadsheet in the docs.
Utils
The headings and ids seen in the interface can be changed to accommodate your specific requirements; just make sure they match the headings in your Google Sheet.
Create a new directory at the root of your project and name it utils.
Create a new file named poll-config.ts and add the following code. The id for each should match the column headings in your Google Sheet. The name is what will be displayed in the user interface.
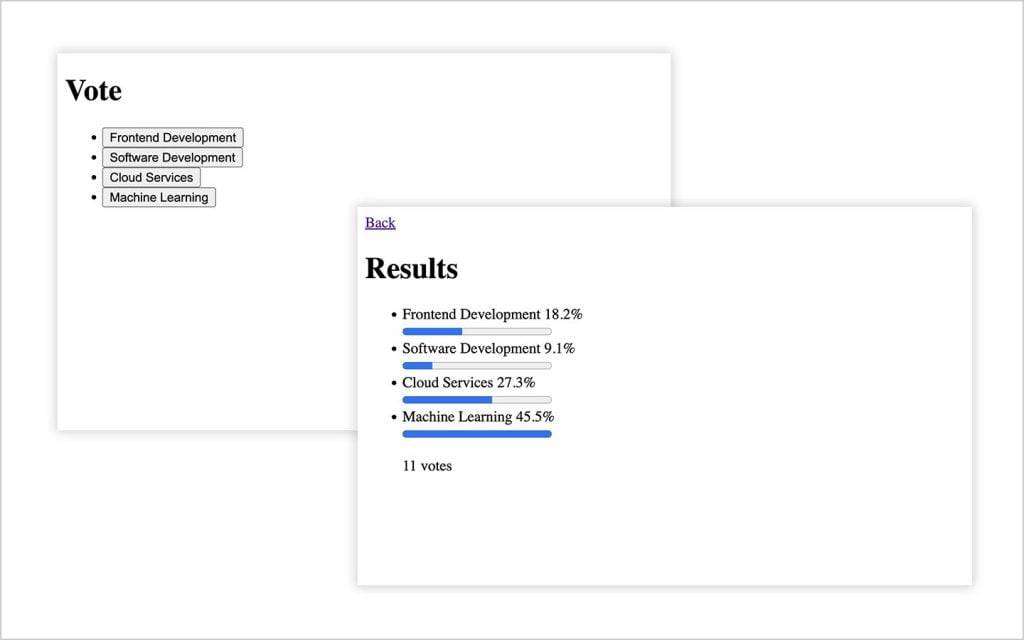
Vote
Create the Vote Page
Create a new file inside the app directory named page.tsx and add the following code:
This page includes a tiny bit of React useState to disable the buttons when a request is in progress. To enable client-side React in Next.js you can use the use client directive.
The list is created by using an array.map to iterate over the items in the config and a button for each item is returned. An onClick handler is added to each button which calls the handleClick function and passes the id from the config.
Create the Vote Layout
Create a new file inside the app directory named layout.tsx and add the following code:
This is a standard layout for the vote page, you can change the metadata to suit your requirements.
Create the Vote Server Action
Create a new file inside the app directory named submit-vote.ts and add the following code:
This server action is responsible for receiving the id sent on the request made by the page, and uses it to find the correct cell and increment the count by + 1.
If the update to the Google Sheet is successful, it redirects to /results. If there’s an error, it redirects to the index page but tacks on a search parameter of error=true, which determines if the error message in the page is displayed.
Results
Create a new directory inside the app directory named results.
Create the Results Page
Create a new file inside the results directory named page.tsx and add the following code:
This page is server rendered and doesn’t include any React useState, so the use client directive is not required. Unlike before, in this component I iterative over the results sent back from the get-all-votes server action (which I’ll cover next) and return a progress indicator, name and percent for each item.
Create the Results Layout
Create a new file inside the results directory named layout.tsx and add the following code:
This is a standard layout for the results page; you can change the metadata to suit your requirements.
Create the Results Server Action
Create a new file inside the app directory named get-all-votes.ts and add the following code:
This server action is responsible for querying all the data from the Google Sheet, iterating over each value to produce a total, a max value, and a percent for each item. These values are then returned ready to be used by the results page.
Finished
And that’s it, you now have a user poll application that stores data in a Google Sheet that can be shared and viewed by anyone with access.
YOUTUBE.COM/THENEWSTACK
Tech moves fast, don’t miss an episode. Subscribe to our YouTubechannel to stream all our podcasts, interviews, demos, and more.