
包阅导读总结
1. 关键词:AI 大模型、电商平台、测试用例、性能测试、结果分析
2. 总结:
本文介绍了在简单电商平台测试中应用 AI 大模型的项目背景,包括环境准备、代码实现,涵盖自动生成测试用例、编写自动化测试脚本、进行性能测试和结果分析,还探讨了进一步深入的方向,如集成 CI/CD 管道、详细负载测试和性能监控、优化测试流程等。
3. 主要内容:
– 项目背景
– 简单电商平台的主要功能
– 使用大模型进行测试用例生成和结果分析
– 环境准备
– 安装 OpenAI 的 API 客户端和必要库
– 代码实现
– 自动生成测试用例
– 自动化测试脚本
– 性能测试
– 结果分析
– 进一步深入
– 集成 CI/CD 管道
– Jenkins 示例
– 详细的负载测试和性能监控
– Locust 示例
– 测试结果分析与报告
– 进一步集成和优化
– 完善测试用例生成和管理
– 配置文件管理测试用例
– 高级性能监控和分析
– 使用 Grafana 和 Prometheus 进行性能监控
– 使用 Jaeger 进行分布式跟踪
思维导图: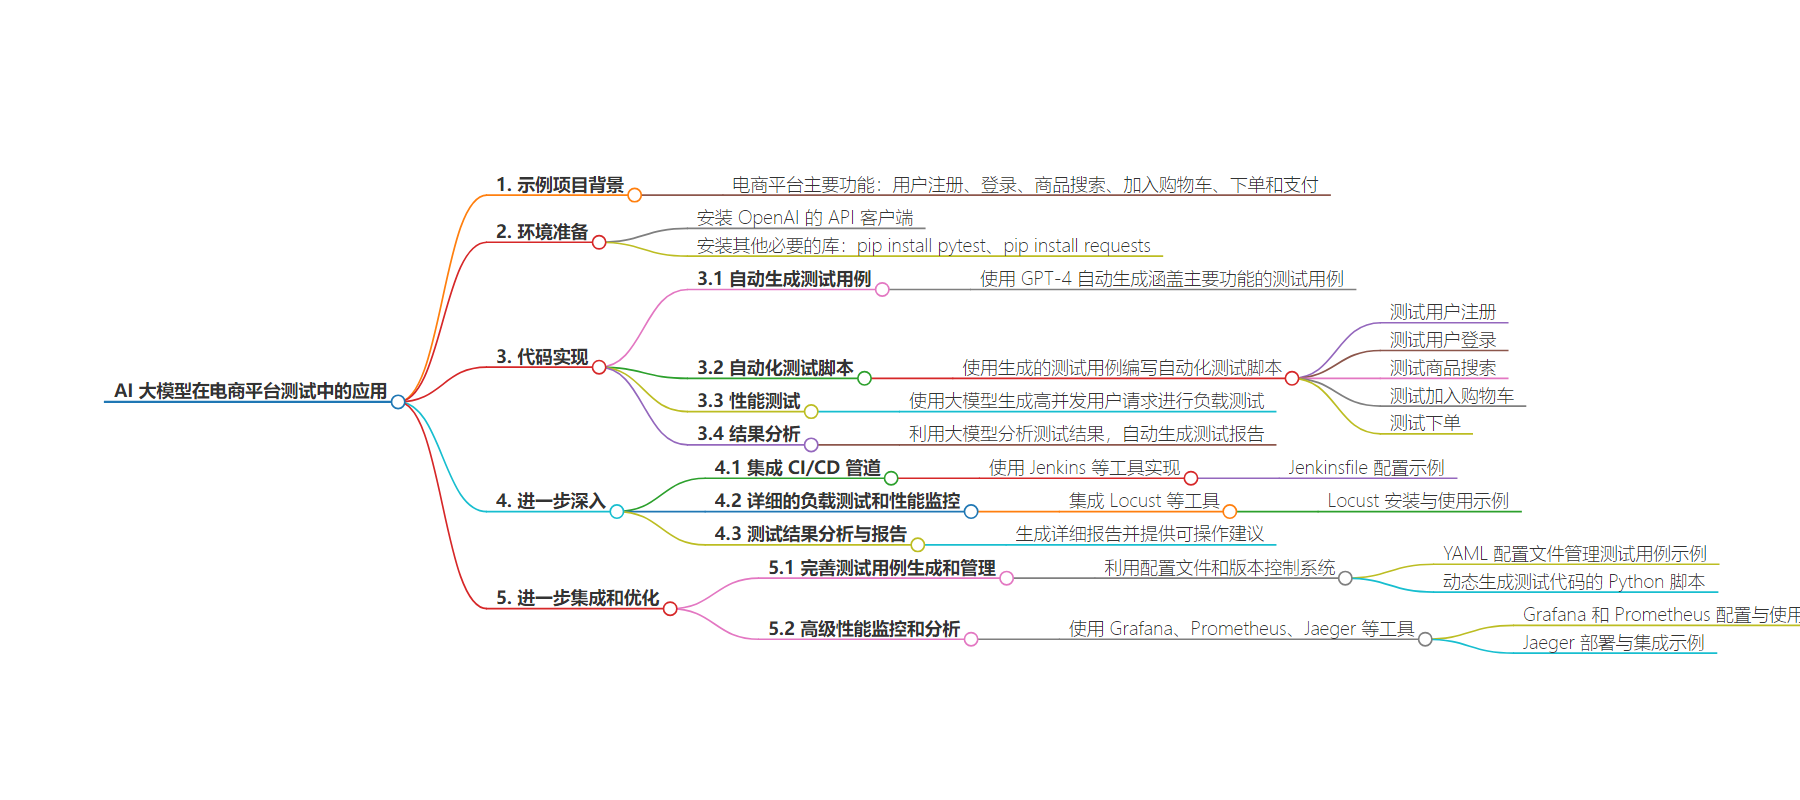
文章地址:https://juejin.cn/post/7384792106827972642
文章来源:juejin.cn
作者:邓瑞军说HelloWorld
发布时间:2024/6/27 7:51
语言:中文
总字数:2900字
预计阅读时间:12分钟
评分:89分
标签:AI大模型,自动化测试,性能测试,测试用例生成,持续集成/持续交付
以下为原文内容
本内容来源于用户推荐转载,旨在分享知识与观点,如有侵权请联系删除 联系邮箱 media@ilingban.com

1. 示例项目背景
我们有一个简单的电商平台,主要功能包括用户注册、登录、商品搜索、加入购物车、下单和支付。我们将使用大模型来自动生成测试用例,并进行一些基本的测试结果分析。
2. 环境准备
首先,我们需要安装OpenAI的API客户端和其他必要的库:
pip install openaipip install pytestpip install requests3. 代码实现
3.1. 自动生成测试用例
使用GPT-4自动生成测试用例,涵盖主要功能。
import openaiopenai.api_key = "YOUR_API_KEY"def generate_test_cases(prompt): response = openai.Completion.create( engine="text-davinci-003", prompt=prompt, max_tokens=500 ) return response.choices[0].text.strip()prompt = """Generate test cases for an e-commerce platform with the following features:1. User Registration2. User Login3. Product Search4. Add to Cart5. Place Order6. PaymentPlease provide detailed test cases including steps, expected results, and any necessary data."""test_cases = generate_test_cases(prompt)print(test_cases)3.2. 自动化测试脚本
使用生成的测试用例编写自动化测试脚本。例如,我们使用pytest框架进行功能测试。
import requestsBASE_URL = "http://example.com/api"def test_user_registration(): url = f"{BASE_URL}/register" data = { "username": "testuser", "email": "testuser@example.com", "password": "password123" } response = requests.post(url, json=data) assert response.status_code == 201 assert response.json()["message"] == "User registered successfully."def test_user_login(): url = f"{BASE_URL}/login" data = { "email": "testuser@example.com", "password": "password123" } response = requests.post(url, json=data) assert response.status_code == 200 assert "token" in response.json()def test_product_search(): url = f"{BASE_URL}/search" params = {"query": "laptop"} response = requests.get(url, params=params) assert response.status_code == 200 assert len(response.json()["products"]) > 0def test_add_to_cart(): token = "VALID_USER_TOKEN" url = f"{BASE_URL}/cart" headers = {"Authorization": f"Bearer {token}"} data = {"product_id": 1, "quantity": 1} response = requests.post(url, json=data, headers=headers) assert response.status_code == 200 assert response.json()["message"] == "Product added to cart."def test_place_order(): token = "VALID_USER_TOKEN" url = f"{BASE_URL}/order" headers = {"Authorization": f"Bearer {token}"} data = {"cart_id": 1, "payment_method": "credit_card"} response = requests.post(url, json=data, headers=headers) assert response.status_code == 200 assert response.json()["message"] == "Order placed successfully."3.3. 性能测试
使用大模型生成高并发用户请求,进行负载测试。
import threadingimport timedef perform_load_test(url, headers, data, num_requests): def send_request(): response = requests.post(url, json=data, headers=headers) print(response.status_code, response.json()) threads = [] for _ in range(num_requests): thread = threading.Thread(target=send_request) threads.append(thread) thread.start() for thread in threads: thread.join()url = f"{BASE_URL}/order"headers = {"Authorization": "Bearer VALID_USER_TOKEN"}data = {"cart_id": 1, "payment_method": "credit_card"}perform_load_test(url, headers, data, num_requests=100)3.4. 结果分析
利用大模型分析测试结果,自动生成测试报告。
def analyze_test_results(results): prompt = f"""Analyze the following test results and provide a summary report including the number of successful tests, failures, and any recommendations for improvement:{results}""" response = openai.Completion.create( engine="text-davinci-003", prompt=prompt, max_tokens=500 ) return response.choices[0].text.strip()test_results = """Test User Registration: SuccessTest User Login: SuccessTest Product Search: SuccessTest Add to Cart: Failure (Product not found)Test Place Order: Success"""report = analyze_test_results(test_results)print(report)4. 进一步深入
为了使大模型在实际项目中的测试应用更加完整,我们可以进一步探讨如何将上述代码整合到一个持续集成(CI)/持续交付(CD)管道中,以及如何处理和报告测试结果。这将确保我们的测试过程高效、自动化,并且易于维护。
4.1. 集成CI/CD管道
我们可以使用诸如Jenkins、GitLab CI、GitHub Actions等CI/CD工具,将测试流程自动化。这些工具能够在代码提交时自动运行测试,并生成报告。
4.1.1 Jenkins示例
假设我们使用Jenkins来实现CI/CD。以下是一个示例Jenkinsfile配置:
pipeline { agent any stages { stage('Checkout') { steps { git 'https://github.com/your-repo/your-project.git' } } stage('Install dependencies') { steps { sh 'pip install -r requirements.txt' } } stage('Run tests') { steps { sh 'pytest --junitxml=report.xml' } } stage('Publish test results') { steps { junit 'report.xml' } } stage('Load testing') { steps { sh 'python load_test.py' } } stage('Analyze results') { steps { script { def results = readFile('results.txt') def analysis = analyze_test_results(results) echo analysis } } } } post { always { archiveArtifacts artifacts: 'report.xml', allowEmptyArchive: true junit 'report.xml' } }}4.2. 详细的负载测试和性能监控
为了更全面的性能测试,我们可以集成如Locust、JMeter等工具。
4.2.1 Locust示例
Locust是一个易于使用的负载测试工具,可以用Python编写用户行为脚本。
安装Locust:
pip install locust编写Locust脚本(locustfile.py):
from locust import HttpUser, task, betweenclass EcommerceUser(HttpUser): wait_time = between(1, 2.5) @task def login(self): self.client.post("/api/login", json={"email": "testuser@example.com", "password": "password123"}) @task def search_product(self): self.client.get("/api/search?query=laptop") @task def add_to_cart(self): self.client.post("/api/cart", json={"product_id": 1, "quantity": 1}, headers={"Authorization": "Bearer VALID_USER_TOKEN"}) @task def place_order(self): self.client.post("/api/order", json={"cart_id": 1, "payment_method": "credit_card"}, headers={"Authorization": "Bearer VALID_USER_TOKEN"})运行Locust:
locust -f locustfile.py --host=http://example.com4.3. 测试结果分析与报告
通过分析测试结果生成详细报告,并提供可操作的建议。可以使用Python脚本实现结果分析,并利用大模型生成报告。
import openaidef analyze_test_results_detailed(results): prompt = f"""Analyze the following test results in detail, provide a summary report including the number of successful tests, failures, performance metrics, and any recommendations for improvement:{results}""" response = openai.Completion.create( engine="text-davinci-003", prompt=prompt, max_tokens=1000 ) return response.choices[0].text.strip()with open('results.txt', 'r') as file: test_results = file.read()detailed_report = analyze_test_results_detailed(test_results)print(detailed_report)with open('detailed_report.txt', 'w') as file: file.write(detailed_report)5. 进一步集成和优化
为了使上述测试流程更高效和全面,我们可以进一步优化和扩展,包括:
- 完善测试用例生成和管理
- 高级性能监控和分析
- 持续反馈与改进
5.1. 完善测试用例生成和管理
我们可以利用配置文件和版本控制系统来管理测试用例,确保测试用例的可维护性和可追溯性。
5.1.1 配置文件管理测试用例
我们可以使用YAML或JSON文件来管理测试用例,并通过脚本动态生成测试代码。
示例YAML配置文件(test_cases.yaml):
test_cases: - name: test_user_registration endpoint: "/api/register" method: "POST" data: username: "testuser" email: "testuser@example.com" password: "password123" expected_status: 201 expected_response: message: "User registered successfully." - name: test_user_login endpoint: "/api/login" method: "POST" data: email: "testuser@example.com" password: "password123" expected_status: 200 expected_response_contains: ["token"] - name: test_product_search endpoint: "/api/search" method: "GET" params: query: "laptop" expected_status: 200 expected_response_contains: ["products"] 动态生成测试代码的Python脚本:
import yamlimport requestswith open('test_cases.yaml', 'r') as file: test_cases = yaml.safe_load(file)for case in test_cases['test_cases']: def test_function(): if case['method'] == 'POST': response = requests.post( f"http://example.com{case['endpoint']}", json=case.get('data', {}) ) elif case['method'] == 'GET': response = requests.get( f"http://example.com{case['endpoint']}", params=case.get('params', {}) ) assert response.status_code == case['expected_status'] if 'expected_response' in case: assert response.json() == case['expected_response'] if 'expected_response_contains' in case: for item in case['expected_response_contains']: assert item in response.json() globals()[case['name']] = test_function5.2. 高级性能监控和分析
除了基础的负载测试,我们可以使用更多高级工具进行性能监控和分析,如Grafana、Prometheus、Jaeger等。
5.2.1 使用Grafana和Prometheus进行性能监控
Grafana和Prometheus是一对强大的开源监控工具,可以实时监控和分析系统性能。
- Prometheus配置:采集应用性能数据。
- Grafana配置:展示实时性能数据仪表盘。
Prometheus配置文件(prometheus.yml):
global: scrape_interval: 15sscrape_configs: - job_name: 'ecommerce_app' static_configs: - targets: ['localhost:9090']在应用代码中集成Prometheus客户端(例如使用prometheus_client库):
from prometheus_client import start_http_server, Summarystart_http_server(8000)REQUEST_TIME = Summary('request_processing_seconds', 'Time spent processing request')@REQUEST_TIME.time()def process_request(): time.sleep(2)Grafana仪表盘配置:
- 安装Grafana并配置数据源为Prometheus。
- 创建仪表盘以可视化系统的实时性能数据。
5.2.2 使用Jaeger进行分布式跟踪
Jaeger是一种开源的端到端分布式跟踪工具,用于监控和排查微服务架构中的交易。
- 部署Jaeger:使用Docker或Kubernetes部署Jaeger。
- 集成Jaeger客户端:在应用代码中添加分布式跟踪代码。
示例代码:
from jaeger_client import Configdef init_tracer(service_name='ecommerce_service'): config = Config( config={ 'sampler': {'type': 'const', 'param': 1}, 'logging': True, }, service_name=service_name, ) return config.initialize_tracer()tracer = init_tracer()def some_function(): with tracer.start_span('some_function') as span: span.log_kv({'event': 'function_start'}) time.sleep(2) span.log_kv({'event': 'function_end'})5.3. 持续反馈与改进
通过自动化的反馈机制,不断优化和改进测试流程。
5.3.1 生成测试报告并通知
通过邮件、Slack等方式通知团队测试结果和改进建议。
示例代码:
import smtplibfrom email.mime.text import MIMETextdef send_email_report(subject, body): msg = MIMEText(body) msg['Subject'] = subject msg['From'] = 'your_email@example.com' msg['To'] = 'team@example.com' with smtplib.SMTP('smtp.example.com') as server: server.login('your_email@example.com', 'your_password') server.send_message(msg)report = "Test Report: All tests passed."send_email_report("Daily Test Report", report)通过上述步骤,进一步集成和优化大模型在测试中的应用,可以实现更加全面、高效、智能的测试流程,确保系统的稳定性和可靠性。不断迭代和改进测试流程,将使产品在实际应用中更加稳定和高效。
6. 总结
通过上述示例,我们展示了如何利用大模型生成测试用例、编写自动化测试脚本、进行性能测试和结果分析。在实际项目中,使用大模型可以显著提高测试的自动化水平和效率,确保产品的高质量交付。
通过上述步骤,我们可以实现:
- 自动生成测试用例:利用大模型生成详细的测试用例,涵盖主要功能。
- 自动化测试执行:使用
pytest和CI/CD工具自动执行测试。 - 性能测试:利用Locust等工具进行负载测试,模拟高并发用户请求。
- 测试结果分析:通过大模型分析测试结果,生成详细报告并提供改进建议。
这些步骤不仅提高了测试的自动化程度和效率,还确保了测试覆盖的全面性和结果分析的深度,为产品的高质量交付提供了有力保障。在实际项目中,通过持续集成和持续交付,可以保持测试过程的持续改进和优化。
欢迎点赞|关注|收藏|评论,您的肯定是我创作的动力