
包阅导读总结
1.
关键词:FLUX.1、图像生成、微调、触发词、训练图像
2.
总结:本文介绍了如何对 FLUX.1 模型进行微调来生成自己的图像,包括准备工作(账号、训练图像、资金)、收集图像、选择触发词、创建和训练模型、生成图像(网页和 API 两种方式)、利用语言模型写更好的提示词以及享受创作和迭代。
3.
主要内容:
– 介绍 FLUX.1 图像生成模型及其微调优势
– 月初发布,图像质量超越现有开源模型
– 可在 Replicate 上轻松微调,无需深技术知识
– 微调准备工作
– 注册 Replicate 账号
– 准备少量训练图像(至少 10 张,不同角度、光照等)
– 准备 2 – 3 美元
– 微调步骤
– 收集并压缩训练图像
– 选择独特触发词
– 在 Replicate 网页创建并训练模型(1000 步)
– 训练完成,在网页或通过 API 生成图像
– 利用语言模型写更好的提示词来生成有趣图像
– 享受创作,分享成果
思维导图: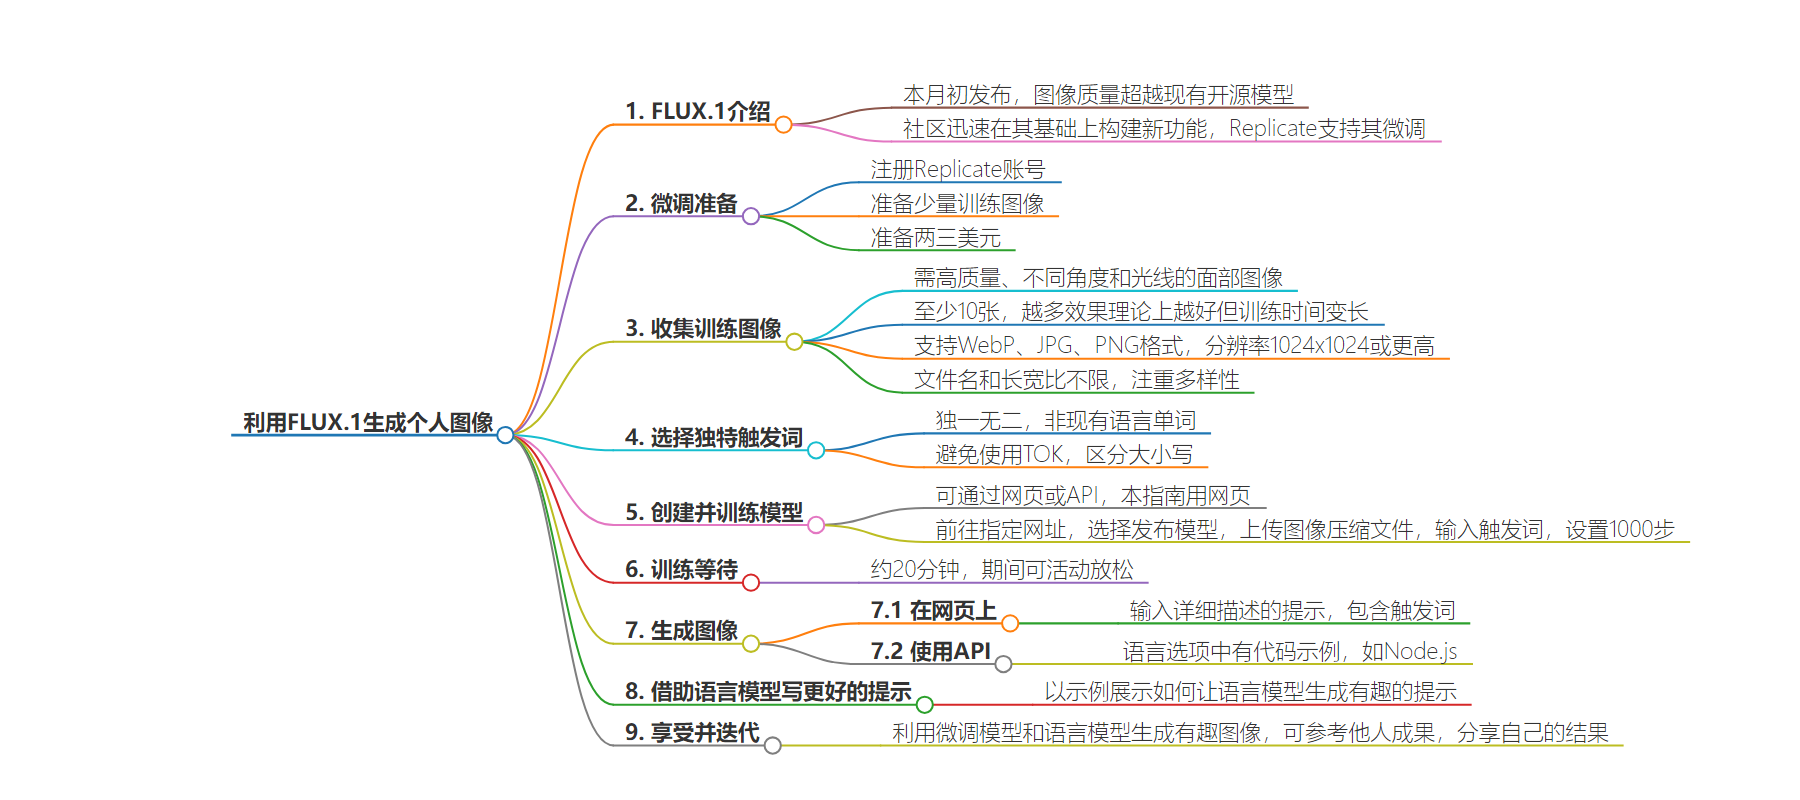
文章地址:https://replicate.com/blog/fine-tune-flux-with-faces
文章来源:replicate.com
作者:Replicate’s blog
发布时间:2024/9/3 21:15
语言:英文
总字数:1567字
预计阅读时间:7分钟
评分:91分
标签:图像生成,AI 模型微调,FLUX.1,复制平台,个性化内容创作
以下为原文内容
本内容来源于用户推荐转载,旨在分享知识与观点,如有侵权请联系删除 联系邮箱 media@ilingban.com
The FLUX.1 family of image generation models was released earlier this month and took the world by storm, producing images surpassing the quality of existing open-source models. The community quickly started to build new capabilities on top of Flux, and not long after the release we announced Flux fine-tuning support on Replicate.
Fine-tuning Flux on Replicate is easy: you just need a handful of images to get started. No deep technical knowledge is required. You can even create a fine-tune entirely on the web, without writing a single line of code. The community has already published hundreds of public Flux fine-tunes on Replicate, plus thousands of private fine-tunes too.
One of the most exciting things about Flux is its capability to fine-tune on faces in a way that was not easily achievable with previous generations of open-source image generation models like Stable Diffusion or SDXL. Not since Dreambooth has it been this easy to get great results from just a handful of training images.
In this blog post I’ll walk you through the process of creating your own Flux fine-tune using images of yourself, so you can create novel and imaginative images of yourself as a superhero, a cartoon character, an adventurer, or just a regular person in a variety of interesting situations.
Step 0: Prerequisites
Here’s what you’ll need to get started:
- A Replicate account
- A handful of training images
- Two to three US dollars
Step 1: Gather your training images
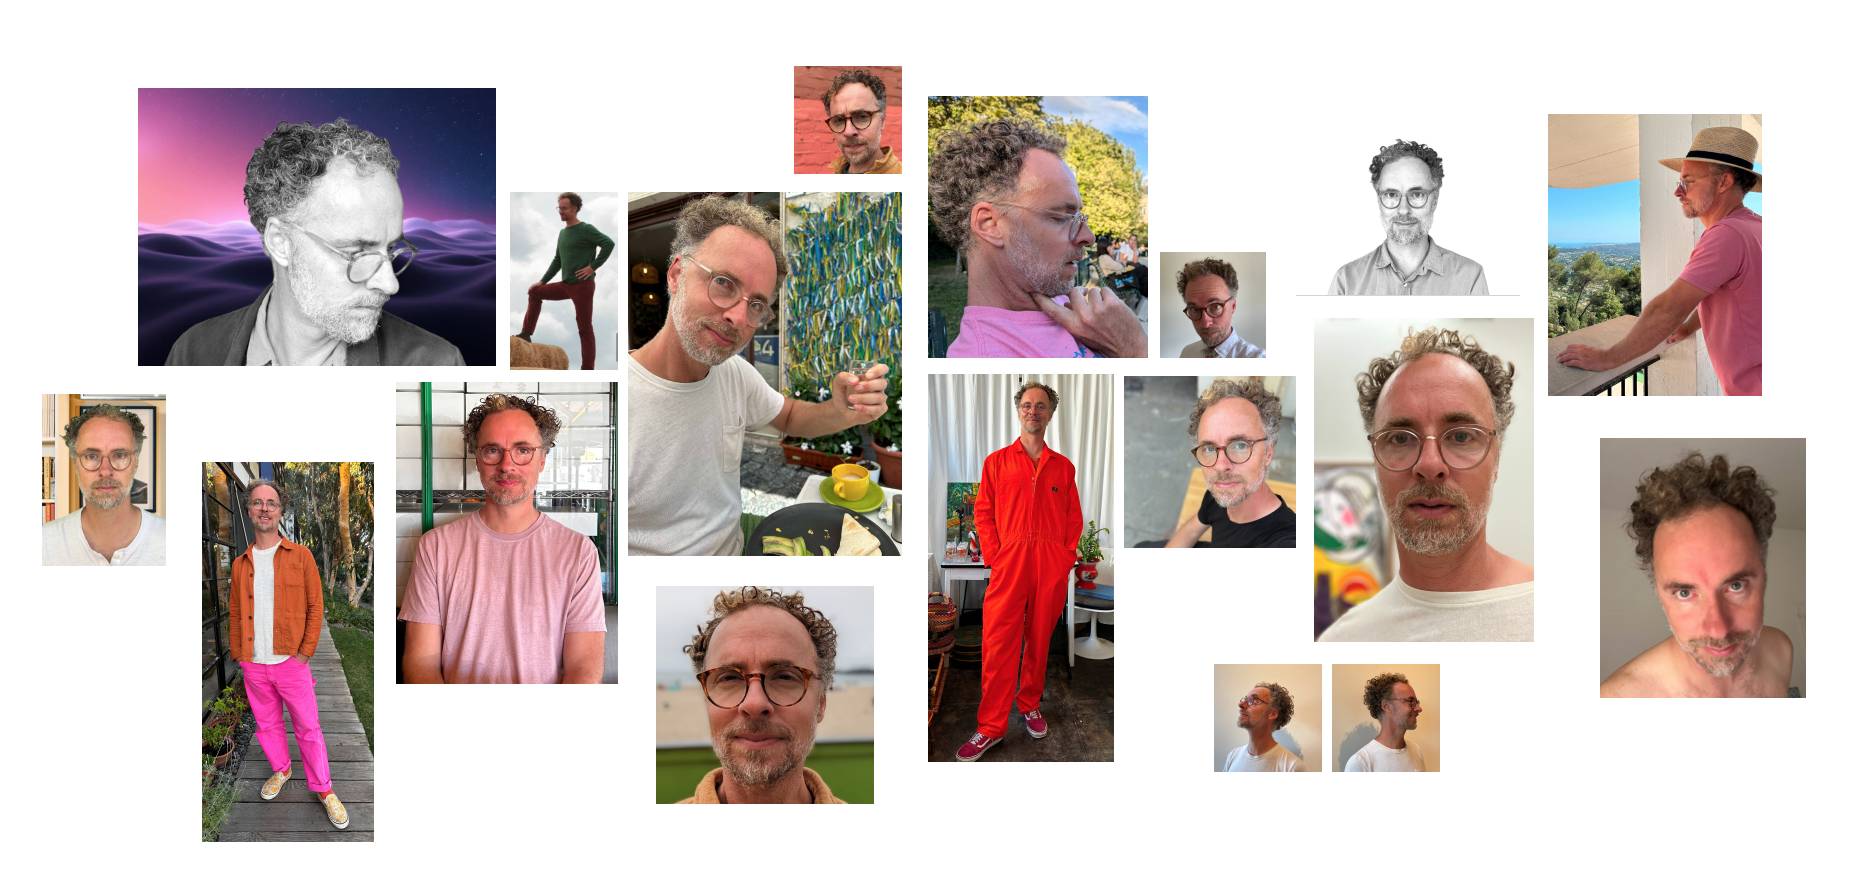
You’ll need a few images of yourself to get started. These should be high-quality images of your face, taken from various angles and in different lighting conditions.
You can fine-tune Flux with as few as two training images, but for best results you’ll want to use at least 10 images or more. In theory you’ll get continually better results as you include more images in the training data, but the training process can take longer the more images you add.
Consider the following when gathering your training images:
- WebP, JPG, and PNG formats are all supported.
- Use 1024×1024 or higher resolution if possible.
- Filenames don’t matter. Name your files whatever you like.
- Aspect ratio doesn’t matter. Images can be square, landscape, portrait, etc.
- 10 images is a good minimum.
Once you’ve gathered your images, put them in a zip file. Assuming you put them all in a folder called data, run this command to generate a file called data.zip:
zip -r data.zip dataStep 2: Choose a unique trigger word
Whenever you fine-tune an image model, you also choose a unique “trigger word” that you’ll use later in your text prompts when generating images:
photo of YOUR_TRIGGER_WORD_HERE looking super-cool, riding on a segway scooterHere are some things to consider when choosing a trigger word:
- It should be something unique like
MY_UNIQ_TRGGR. Think “vanity license plates”, but without any length limits. - It should not be an existing word in any language, like
dogorcyberpunk. - It should not be
TOK, because it will clash with other fine-tunes if you ever want to combine them. - Case doesn’t matter, but capital letters can help visually distinguish the trigger word from the rest of the text prompt.
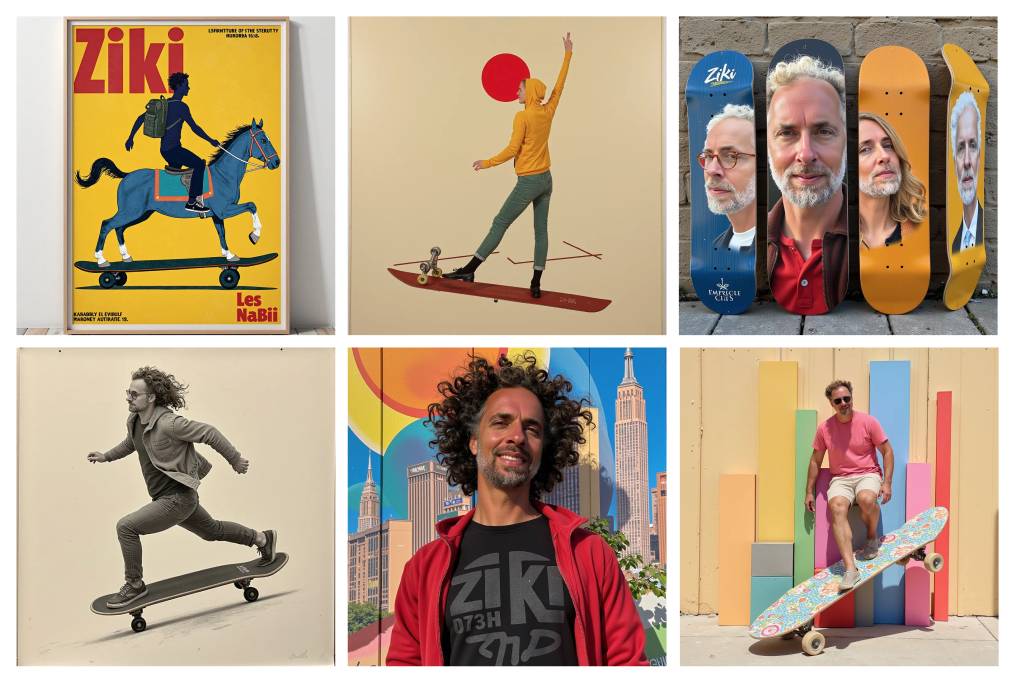
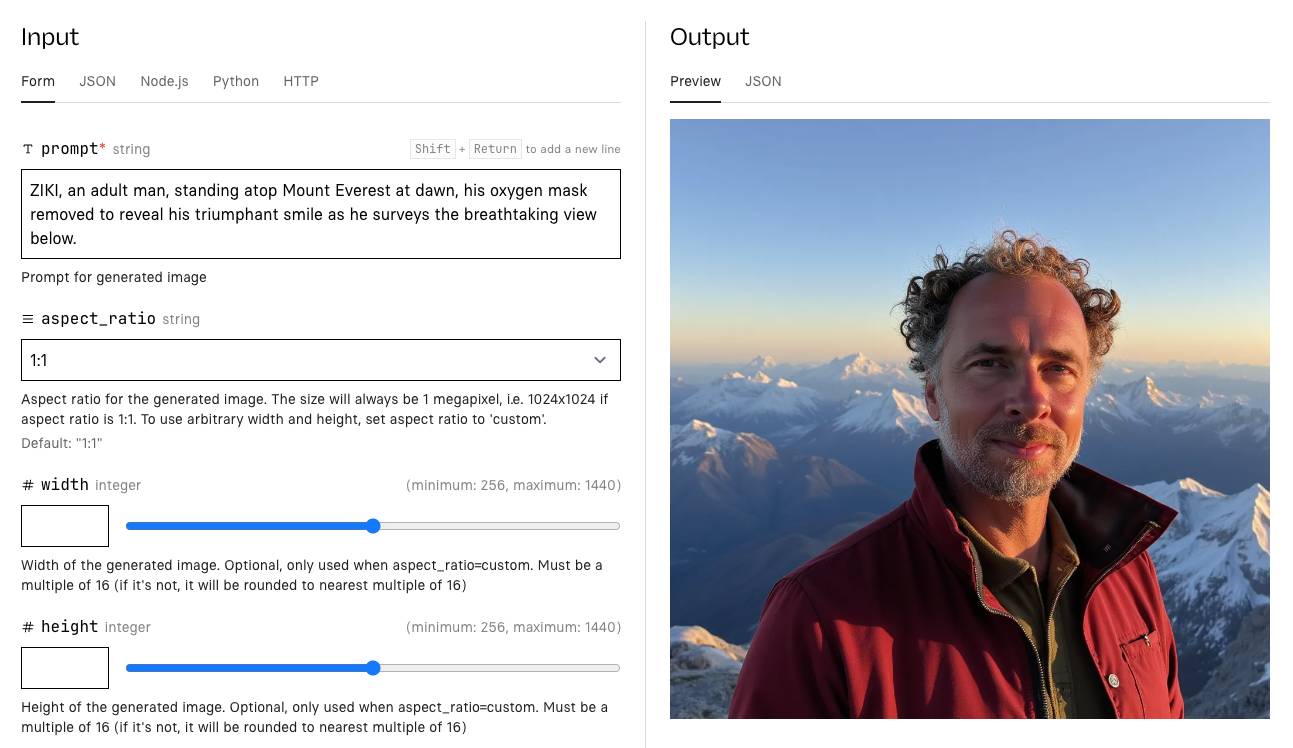
For my zeke/ziki-flux fine-tune, I chose ZIKI as a trigger word. Short, unique, and memorable.
Got your trigger word? Hold it in your mind for a second. You’ll use it in the next step.
Step 3: Create and train a model
There are a couple ways to fine-tune Flux on Replicate. You can use the web-based training form, or the API. The API is great for creating and updating fine-tunes in an automated or programmatic way, but in this guide we’ll just use the web-based form. It’s easier.
Go to replicate.com/ostris/flux-dev-lora-trainer to start the web-based training process.
For the destination input, you’ll choose a model to publish to. This can be an existing model you’ve already created, or a new model:
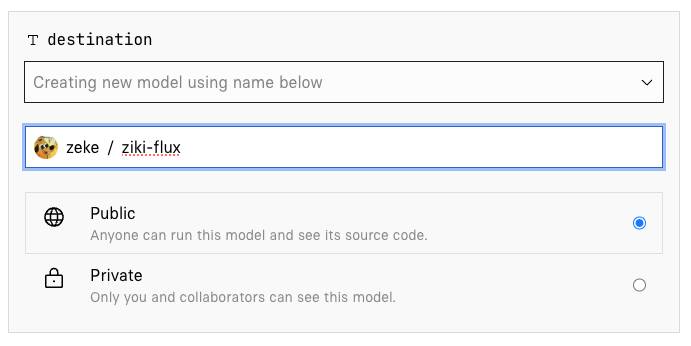
For the input_images input, drag and drop the zip file you created earlier.
For the trigger_word input, enter the string you chose earlier. Make sure it’s unique!
For steps, leave it at 1000. Any less and your training process will not properly learn the concept in your training images. Any more and you could be incurring extra time and cost without much improvement in the model performance.
Leave the rest of the inputs at their default values and click Create training.
Step 4: Stand up and stretch
The training process is pretty fast, but it still takes a few minutes. If you’re using ten images and 1000 steps, it will take approximately 20 minutes. Use this opportunity to get up from your computer, stretch your arms and legs, grab a drink of water, etc.
Then come back and your model should be ready to go.
Step 5: Generate images on the web
Once the training process is complete, your model will be ready to run. The easiest way to get started is by running it on the web.
The only input you’ll need to enter is the prompt. The rest you can leave alone to start. Flux is great at following long prompts, so the more detailed and descriptive you make the prompt the better. Be sure to include your trigger_word in the prompt to activate your newly trained concept in the resulting images.
Step 6: Generate images using the API
The web playground is a great place to start playing with your new model, but generating images one click at a time can get old pretty fast. Luckily your model is also hosted in the cloud with an API, so you can run it from your own code using the programming language of your choice.
When you run a model, you’ll see tabs for different languages like Node.js and Python. These tabs contain code snippets that show you how to construct an API call to reproduce the exact inputs you just entered in the browser form.
Click the Node.js tab in the web playground to see the API code:
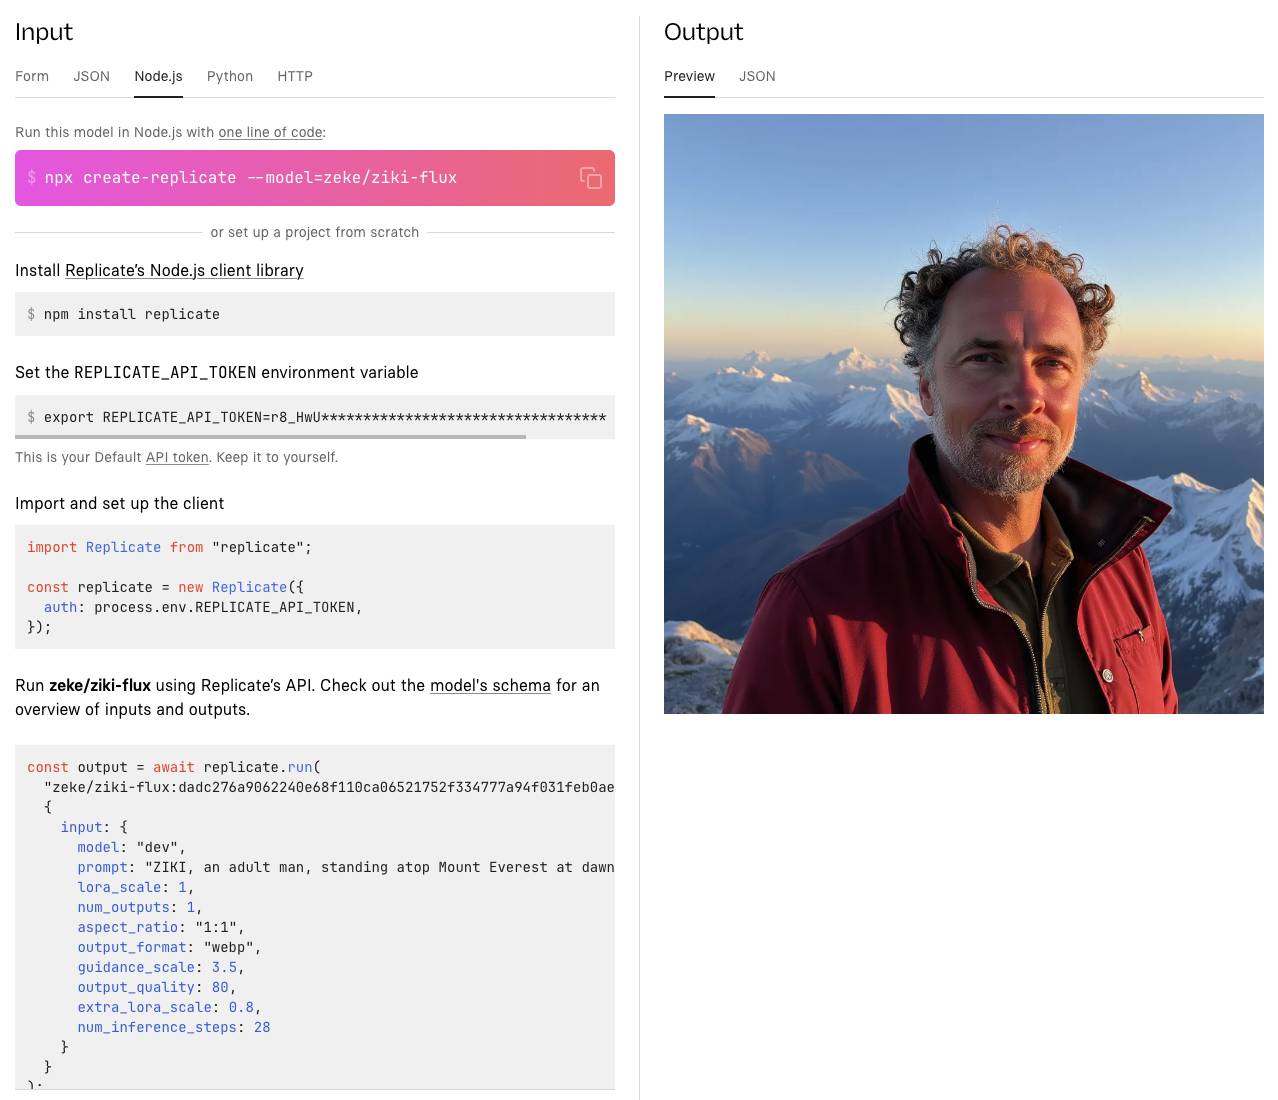
This will show the exact setup steps and code snippet you’ll need to run the model on your own. Here’s an abbreviated version of the Node.js code to get you started:
import Replicate from "replicate"const replicate = new Replicate()const model = "zeke/ziki-flux:dadc276a9062240e68f110ca06521752f334777a94f031feb0ae78ae3edca58e"const prompt = "ZIKI, an adult man, standing atop Mount Everest at dawn..."const output = await replicate.run(model, { input: { prompt } })console.log(output)Step 7: Use a language model to write better prompts
Sometimes it’s hard to think of a good prompt from scratch, and using a really simple prompt like “ZIKI wearing a turtleneck holiday sweater” is not going to give you very interesting results.
This is where language models come to the rescue. Here’s an example language model prompt to help crank out some ideas for interesting image-generation prompts:
Write ten prompts for an image generation model. The prompts should describe a fictitious person named ZIKI in various scenarios. Make sure to use the word ZIKI in all caps in every prompt. Make the prompts highly detailed and interesting, and make them varied in subject matter. Make sure the prompts will generate images that include unobscured facial details. ZIKI is a 43 year old adult male. Include some reference to this in prompt to avoid misrepresenting ZIKI’s age or gender. Do not allude to ZIKI’s eye color.
This generates some interesting prompts:
Close-up of ZIKI, a male street artist in his 40s, spray-painting a vibrant mural on a city wall. His face shows intense concentration, with flecks of paint on his cheeks and forehead. He wears a respirator mask around his neck and a beanie on his head. The partially completed mural is visible behind him.
ZIKI, a dapper gentleman spy in his 40s, engaged in a high-stakes poker game in a luxurious Monte Carlo casino. His face betrays no emotion as he studies his cards, one eyebrow slightly raised. He wears a tailored tuxedo and a bow tie, with a martini glass on the table in front of him.
ZIKI, a distinguished-looking gentleman in his 40s, conducting a symphony orchestra. His expressive face shows intense concentration as he gestures dramatically with a baton. He wears a crisp tuxedo, and his salt-and-pepper hair is slightly disheveled from his passionate movements.
To get started writing your own prompts, check out Meta Llama 3.1 405b, a fast and powerful language model that you can in the web or with an API on Replicate, just like your own model:
import Replicate from "replicate"const replicate = new Replicate()const model = "meta/meta-llama-3.1-405b-instruct"const prompt = "Write ten prompts for an image generation model..."const output = await replicate.run(model, { input: { prompt } })console.log(output)Step 8: Have fun and iterate
Now that you’ve got a fine-tuned image generation model and a language model to help generate prompts, it’s time to start playing around and generating fun images.
If you need inspiration, check the collection of Flux fine-tunes on Replicate to see what other people have created.
Have fun and share your results with the community on X or Discord.