
包阅导读总结
1. 关键词:Cachet、服务器状态、开源、集中管理、手动系统
2. 总结:本文介绍了 Cachet 这一开源的服务器状态跟踪系统,适用于管理大量服务器,指出其为手动集中化管理工具,详细说明了在 Ubuntu Server 22.04 上的安装部署过程。
3. 主要内容:
– Cachet 简介
– 用于跟踪服务器和桌面状态
– 适用于大量机器管理
– 特点
– 手动操作,方便集中管理
– 可跟踪维护、组件、事件等,成员可订阅邮件更新
– 安装部署
– 在 Ubuntu Server 22.04 上进行
– 安装 Docker CE
– 部署 Cachet
– 克隆源文件
– 编辑配置文件
– 构建和启动容器
– 完成设置,包括数据库、邮件等配置
– 登录使用
思维导图: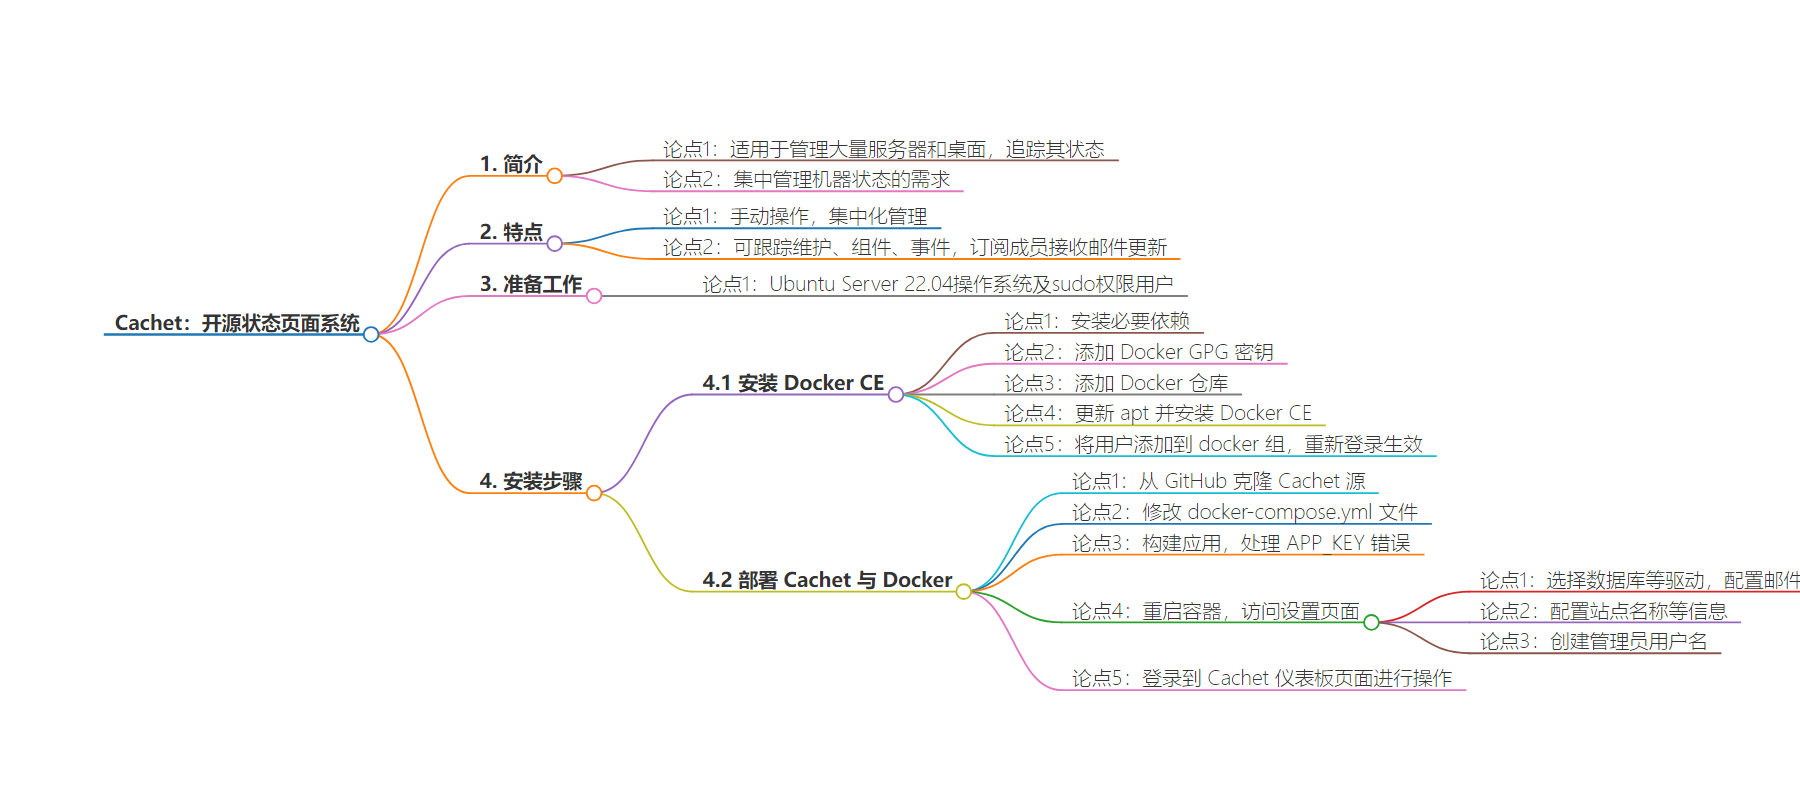
文章地址:https://thenewstack.io/cachet-the-open-source-status-page-system-for-tracking-servers/
文章来源:thenewstack.io
作者:Jack Wallen
发布时间:2024/7/19 15:44
语言:英文
总字数:908字
预计阅读时间:4分钟
评分:86分
标签:服务状态页面,开源,服务器管理,Docker 部署,事件管理
以下为原文内容
本内容来源于用户推荐转载,旨在分享知识与观点,如有侵权请联系删除 联系邮箱 media@ilingban.com
Do you manage a large number of servers and/or desktops and have been looking for a way to keep track of their statuses? Depending on many machines you admin, that task can be very challenging. Do you know which machines are operational? What about those that are performing poorly or are suffering from outages?
You might have a team and have assigned specific members to manage certain devices. Even with that, you’ll need a centralized location so you and your teams can check to see the status of every machine.
That’s where a tool like Cachet comes in. This system allows you (and your team) to tag machines and change their statuses as needed. Say, for example, your back up web server isn’t performing well. You could log into Cachet and mark it as such so that everyone knows machine needs attention.
Note that Cachet is not an automated system. Instead, this is a manual option that makes it easy to centralize the status of all of the machines you manage. With Cachet, you can keep track of maintenance, components, incidents and even subscribe team members to receive email updates when incidents are created or components are updated.
Cachet is very handy to have available, especially as the number of machines you manage grows to the point where they become unwieldy to keep track of.
Let me walk you through the process of getting Cachet up and running.
What You’ll Need
I’m going to demonstrate this process on Ubuntu Server 22.04, so you’ll need an instance of that operating system and a user with sudo privileges. That’s it. Let’s get to work.
Installing Docker CE
The first thing we must do is install Docker CE on our Linux Server. To do that, log in to your machine and first install the necessary dependencies with:
|
sudo apt install apt–transport–https ca–certificates curl software–properties–common –y |
Next add the required Docker GPG key with:
|
sudo curl –fsSL https://download.docker.com/linux/ubuntu/gpg | sudo gpg —dearmor –o /usr/share/keyrings/docker–archive–keyring.gpg |
Add the Docker repository with the command:
Update apt with:
Install Docker CE:
|
sudo apt install docker–ce –y |
Docker will install and the service will start. You then need to add your user to the docker group with:
|
sudo usermod –aG docker $USER |
Log out and log back in for the changes to take effect.
Deploying Cachet With Docker
We’ll first clone the Cachet source from the official GitHub page with:
|
git clone https://github.com/cachethq/Docker.git cachet–docker |
Change to the newly created directory with:
Next, open the docker-compose.yml file for editing with:
In that file, look for the lines:
Change that to:
Save and close the file.
It’s time to build the app with the command:
When that completes, bring the container up with:
During the deployment, you’ll spot an error regarding the APP_KEY (you’ll probably have to scroll up to see it). That error will also include the autogenerated key required for the installation. Copy that key and then reclaim your terminal prompt with the Ctrl-C key combination.
Open the docker-compose.yml file again with:
In that file, look for the line that starts with:
You’ll want to paste your key here. The key will start with base64 and will end with =.
Save and close the file.
Bring down the container with:
docker compose down
Once the container is stopped, restart it in detached mode with:
Give the container a bit of time to start. After a moment, open a web browser and point it to http://SERVER:8000 (where SERVER is the IP address of the hosting server). You’ll be greeted by the initial setup page (Figure 1).
-
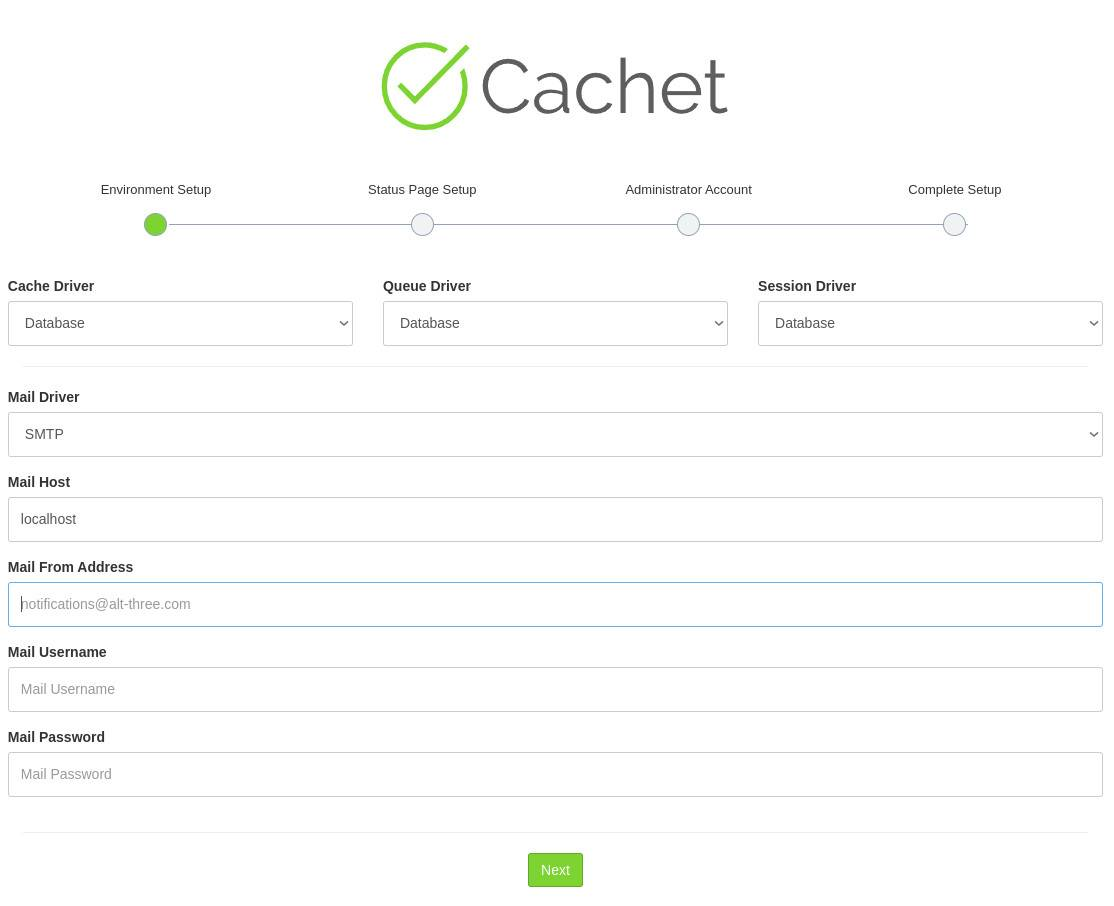
Figure 1: The first Cachet setup page.
Make sure to select database for Cachet Driver, Queue Driver and Session Driver. After that, select a Mail driver and then configure outgoing mail (you can use Gmail SMTP, if needed). After completing the setup, click Next.
On the resulting page (Figure 2), configure the site name, domain, time zone, and language and click Next.
-
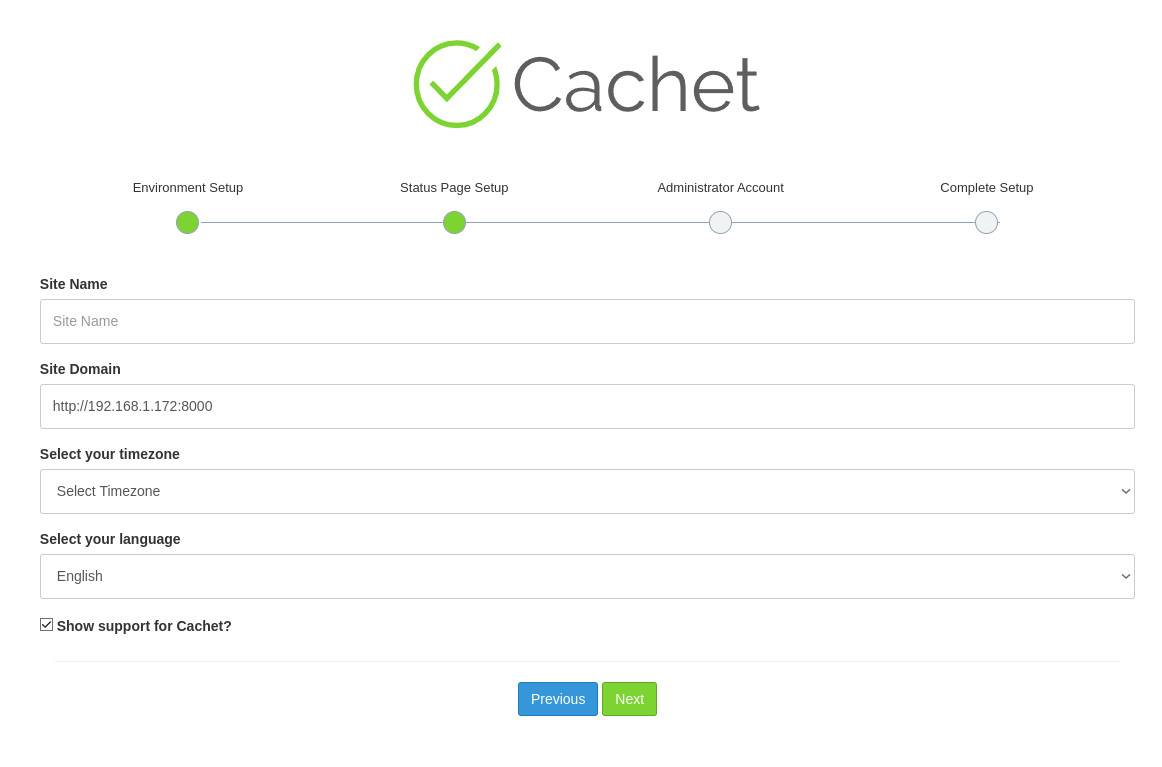
Figure 2: The Status Page setup screen.
On the final setup page (Figure 3), create an admin username.
-

Figure 3: Adding the initial admin user for Cachet.
Click Go to Dashboard and you’ll be prompted to log in with your new admin user. Once you’ve successfully authenticated, you’ll find yourself on the Cachet Dashboard page (Figure 4), where you can start adding Components (any hardware that needs to have its status tracked), create teams and team members, and more.
-
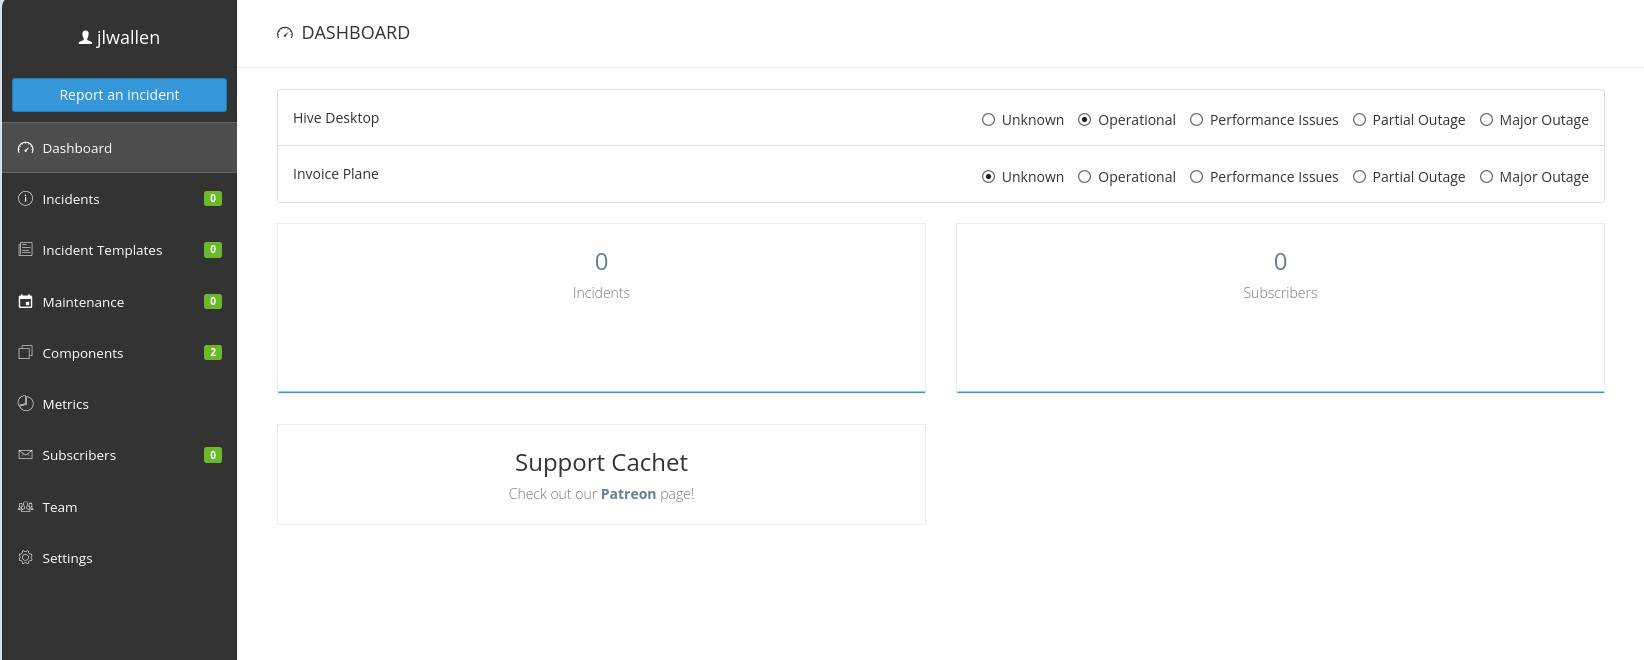
Figure 4: The main Cachet Dashboard page.
There you go. You now have a site deployed for keeping tabs on hardware statuses within your company. Cachet should serve you well, but you’ll need to make sure to use it regularly (because, well, it is a manual system).
YOUTUBE.COM/THENEWSTACK
Tech moves fast, don’t miss an episode. Subscribe to our YouTubechannel to stream all our podcasts, interviews, demos, and more.