
包阅导读总结
1.
关键词:NestJS、JWT 认证、MongoDB、用户模型、身份验证
2.
总结:本文主要介绍了在 NestJS 中添加基于 JWT 的认证,包括创建项目、安装依赖、设置数据库、定义用户模型和模式、编写用户服务和控制器,以及实现注册和登录并生成 JWT 令牌。
3.
主要内容:
– 身份验证重要性及本教程概述
– 强调身份验证在软件开发中的重要性
– 说明本教程将指导在 NestJS 和 MongoDB 中构建 JWT 认证
– 项目设置
– 安装 Nest CLI 并创建新的 NestJS 项目
– 安装数据库相关依赖
– 在 `app.module.ts` 中配置数据库连接
– 用户模型和模式
– 定义用户模型和模式
– 在 `users.module.ts` 中注册模式
– 定义数据传输对象(DTO)
– 用户服务和控制器
– 在 `users.service.ts` 中编写基本的 CRUD 方法
– 在 `users.controller.ts` 中创建相应的控制器方法
– 实现注册和登录
– 创建认证资源模块
– 定义注册和登录的 DTO
– 创建生成 JWT 令牌的认证服务
思维导图:
文章地址:https://www.freecodecamp.org/news/how-to-add-jwt-based-authentication-in-nest-js/
文章来源:freecodecamp.org
作者:Abimbola Adedotun
发布时间:2024/7/31 14:33
语言:英文
总字数:2179字
预计阅读时间:9分钟
评分:85分
标签:NestJS,JWT,身份验证,MongoDB,Node.js
以下为原文内容
本内容来源于用户推荐转载,旨在分享知识与观点,如有侵权请联系删除 联系邮箱 media@ilingban.com
Authentication is a very important aspect of software development. It is the process of verifying a user’s identity.
Authentication ensures that only authorized individuals access specific resources or perform certain actions within a system. It provides accountability by enabling the tracking of user actions and holding individuals responsible for their activities.
It also gives companies data on the number of people using their products. Without proper authentication of your software, you may face security risks. Proper implementation prevents unauthorized access and protects sensitive data.
This tutorial will guide you through building a JWT-based user authentication in NestJS and MongoDb.
NestJS is a powerful Node.js framework for building server-side
applications. MongoDB is popular NoSQL database and we’ll use it to build the basic authentication endpoints.
In this tutorial, we’ll cover the following topics:
- How to creating a new NestJS project and install the necessary dependencies.
- How to create user models and schemas.
- How to implementing login and signup with JWT token.
- How to test the endpoints with postman.
Prerequisites
This tutorial is a hands-on demo. To follow along, you must have the
following:
How to Set Up the Project.
In this section, we’ll set up the project to build our REST API with
NestJS and MongoDB. We’ll start by installing the NestJS CLI and use it to generate new projects.
Install Nest CLI:
$ npm i -g @nestjs/cli
Then create a new NestJS project with this command:
$ nest new project-name
Let’s call the project authentication:
$ nest new authentication
You will see options about which package manager you prefer to install. I
used npm.
After successful installation, move into the created directory and open
the project with your preferred code editor.
Before we go into creating resources and configuring the project, let’s
take a quick look at the src directory and its files:
-
src: The root directory for the source code. -
src/app.module.ts: The application’s main module for configuring and
integrating other modules. -
src/app.controller.ts: Contains a default controller with a single
route. -
src/app.service.ts: This includes a basic service using a single
method. -
src/main.ts: The entry point of the application.
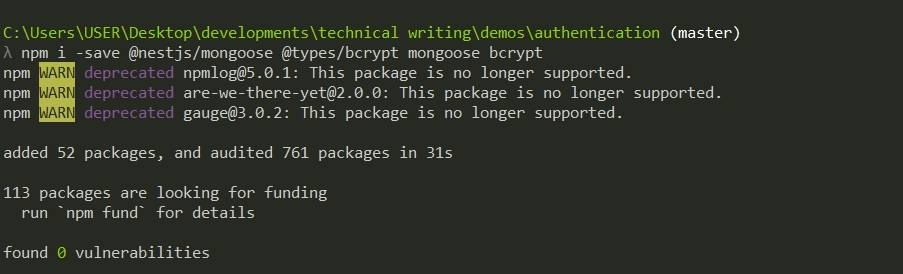
Next, install dependencies to set up and connect the database. You will have to install the mongoose package, bcrypt:
$ npm i -save @nestjs/mongoose @types/bcrypt mongoose bcrypt
Next, set up your database. The MongooseModule from the @nestjs/mongoose dependency will be used to set up the database.
Go to src/app.module.ts file:
import { AppController } from './app.controller';import { AppService } from './app.service';import { MongooseModule } from '@nestjs/mongoose';import { UsersModule } from './users/users.module';import { AuthModule } from './auth/auth.module';import { ConfigModule } from '@nestjs/config';@Module({imports: [MongooseModule.forRoot('mongodb://localhost:27017/auth-workshop'),UsersModule,AuthModule,ConfigModule.forRoot({envFilePath: '.env',isGlobal: true,}),],controllers: [AppController],providers: [AppService],})export class AppModule {}Let’s breakdown the code above.
The app.module.ts is the root module of the nestjs application and it is responsible for importing dependecies and other modules required by the application, configuring the application such as database connections and environment variables.
We first specified the app.module.ts file as a module by using the @Module({}) decorator:
@Module({})The imports array specifies the module that this module depends on. We have the MongooseModule.forRoot('') for database connection using mongoose, ConfigModule.forRoot import sets up the configuration module to read from a .env file:
import { MongooseModule } from '@nestjs/mongoose';import { UsersModule } from './users/users.module';import { AuthModule } from './auth/auth.module';import { ConfigModule } from '@nestjs/config';imports: [MongooseModule.forRoot('mongodb://localhost:27017/auth-workshop'),UsersModule,AuthModule,ConfigModule.forRoot({envFilePath: '.env',isGlobal: true,}),]You can replace the MongooseModule.forRoot() URI string with your own database
string.
The controllers array specifies the controller that belongs to this module:
controllers: [AppController]The providers array specifies the services that belongs to this module:
providers: [AppService]With these configurations, you can start your application by using thenpm run start:dev.
User models and schemas
In this section, we’ll define the User model and schema usingmongoose. The User model will represent the users of the application,
and the schema will define the structure of the data stored in MongoDB.
Let’s start by creating a resource module for the users API:
First, create a users resource with the nest CLI:
$ nest generate res users
This command will create a new users resource in the src/users
directory with a basic structure of controllers and services.
Then define the schema for the Users in src/users/entities/users.entity.ts:
import { Prop, Schema, SchemaFactory }from '@nestjs/mongoose';@Schema()export class User {@Prop()name: string;@Prop({ unique: true })email: string;@Prop()password: string;}export const UserSchema = SchemaFactory.createForClass(User);The @Schema decorator is what makes the class a schema. This schema defines three fields for the users: name, email, and password. They are all typed string.
Next, register the schema in the users.module.ts file located in src/users/users.module.ts:
import { Module } from '@nestjs/common';import { UsersService } from './users.service';import { UsersController } from './users.controller';import { MongooseModule } from '@nestjs/mongoose';import { UserSchema, User } from './entities/user.entity';@Module({imports: [MongooseModule.forFeature([{ name: User.name, schema:UserSchema }])],controllers: [UsersController],providers: [UsersService],})export class UsersModule {}By importing the MongooseModule.forFeature([{}]), this configures mongoose to use the UserSchema for the User model.
By registering the schema with Mongoose, we created a model that’s ready to use in our application. This sets the stage for building services and controllers that can interact with our data and handle incoming requests.
Lastly, define the DTO (data transfer object). This object transfers data between systems. It is a simple object that contains only data and has no behaviour.
Create your CreateUserDto in the src/users/dto/create-user.dto.ts directory:
export class CreateUserDto {username: string;email: string;password: string;}User Services and Controllers
We have connected to the database and created the schema and model of Users. Let’s write the basic CRUD methods for the users.
Update your users.service.ts located in src/users/users.service.ts:
import { Injectable, NotFoundException} from '@nestjs/common';import { CreateUserDto } from './dto/create-user.dto';import { UpdateUserDto } from './dto/update-user.dto';import { InjectModel } from '@nestjs/mongoose';import { User } from './entities/user.entity';import { Model } from 'mongoose';@Injectable()export class UsersService {constructor(@InjectModel(User.name) private userModel:Model<User>) {}async createUsers(createUserDto: CreateUserDto) {const user = await this.userModel.create(createUserDto);return user.save();}async findAllUsers() {const users = this.userModel.find();return users;}async findUser(id: number) {const user = await this.userModel.findById(id);if (!user) throw new NotFoundException('could not find the user');return user;}updateUser(id: number, updateUserDto: UpdateUserDto) {return this.userModel.findByIdAndUpdate(id, updateUserDto, { new: true});}removeUser(id: number) {return this.userModel.findByIdAndDelete(id);};}Update your users.controller.ts located in src/users/users.controller.ts:
import { Controller, Get, Post, Body, Patch, Param, Delete, } from '@nestjs/common';import { UsersService } from './users.service';import { CreateUserDto } from './dto/create-user.dto';import { UpdateUserDto } from './dto/update-user.dto';@Controller('users')export class UsersController {constructor(private readonly usersService: UsersService) {}@Post()async create(@Body() createUserDto: CreateUserDto) {return await this.usersService.createUsers(createUserDto);}@Get()async findAll() {return await this.usersService.findAllUsers();}@Get(':id')async findOne(@Param('id') id: string) {return await this.usersService.findOneUser(+id);}@Patch(':id')async update(@Param('id') id: string, @Body() updateUserDto:UpdateUserDto) {return await this.usersService.updateUser(+id, updateUserDto);}@Delete(':id')async remove(@Param('id') id: string) {return await this.usersService.removeUser(+id);}}We created RESTful APIs using mongoose. The methods include:
-
findAllUsers: Retrieves all user documents from the collection. -
getUserById: Finds a single user document by ID. -
createUsers: Adds a new user document to the collection. -
updateUser: Updates details of existing user in the collection. -
removeUser: Removes user document by ID.
How to Implement Sign-up and Log-in
In this section, we’ll create an authentication service that generates JSON Web Tokens (JWTs).
This service will have two methods: signup and login. The signup
method will take a signup request object containing name, email, andpassword),and the login method will take a login request object
containing email and password. Both methods will return a JWT.
Let’s start by creating a resource module for the authentication APIs.
Create auth resource with Nest CLI:
$ nest generate res auth
Then define the DTO for both signup and login. Go to the dto folder in the src/auth/dto folder:
signup.dto.ts:
export class SignUpDto {name: string;email: string;password: string;}login.dto.ts:
export class Login {email: string;password: string;}Next, create a .env file in the root directory:
JWT_SECRET=secretJWT_EXPIRES=3dThen add the PassportModule, JwtModule and JwtStrategy to AuthModule. We’ll start by installing these packages:
$ npm i @nestjs/passport @nestjs/jwt passport passport-jwt bcryptjs
Go to src/auth/auth.module.ts and import these packages:
import { Module } from '@nestjs/common';import { AuthService } from './auth.service';import { AuthController } from './auth.controller';import { PassportModule } from '@nestjs/passport';import { JwtModule } from '@nestjs/jwt';import { ConfigModule, ConfigService } from '@nestjs/config';import { MongooseModule } from '@nestjs/mongoose';import { UserSchema } from 'src/users/entities/user.entity';@Module({imports: [PassportModule.register({ defaultStrategy: 'jwt' }),JwtModule.registerAsync({imports: [ConfigModule],inject: [ConfigService],useFactory: (config: ConfigService) => {return {secret: config.get<string>('JWT_SECRET'),signOptions: {expiresIn: config.get<string | number>('JWT_EXPIRES'),},};},}),MongooseModule.forFeature([{ name: 'User', schema: UserSchema }]),],controllers: [AuthController],providers: [AuthService],})export class AuthModule {}The PassportModule.register configures the Passport module to use the JWT strategy as the authentication mechanism.
The JwtModule.registerAsync configures the JWT module using asynchronous registration process, such a the token expiration time.
The MongooseModule.forFeature() configures mongoose to us the UserSchema for the User model
These imports enable the authentication module to manage user authentication, JWT generation, and database interaction.
Next, create the AuthServices for signup and login in the src/auth/auth.service.ts directory:
import { Injectable, UnauthorizedException} from '@nestjs/common';import { JwtService } from '@nestjs/jwt';import { InjectModel } from '@nestjs/mongoose';import { Model } from 'mongoose';import { User } from 'src/users/entities/user.entity';import { SignUpDto } from './dto/signup.dto';import * as bcrypt from 'bcryptjs';import { LoginDto } from './dto/login.dto';import { ConfigService } from '@nestjs/config';@Injectable()export class AuthService {constructor(@InjectModel(User.name) private userModel: Model<User>,private jwtService: JwtService,private configService: ConfigService,) {}async signUp(signupDto: SignUpDto) {const { name, email, password } = signupDto;const hashedPassword = await bcrypt.hash(password, 10);const user = await this.userModel.create({name,email,password: hashedPassword,});await user.save();const token = await this.jwtService.sign({ id: user.id },{secret: this.configService.get('JWT_SECRET'),expiresIn: this.configService.get('JWT_EXPIRES'),},);return { token };}async login(loginDto: LoginDto) {const { email, password } = loginDto;const user = await this.userModel.findOne({email,});if (!user) throw new UnauthorizedException('invalid email orpassword');const passwordMatch = await bcrypt.compare(password,user.password);if (!passwordMatch)throw new UnauthorizedException('invalid email or password');const token = await this.jwtService.sign({ id: user.id },{secret: this.configService.get('JWT_SECRET'),},);return { token };}}In the AuthService, the signUp method facilitates user registration by:
- Destructuring the
SignupDtoobject to extract user credentials. - Hashing the password using
bcryptfor secure storage. - Creating a new user document in the database via the
userModel. - Saving the user document to the database.
- Generating a JWT token using
jwtServiceupon successful registration. - Returning the JWT token to the client.
The login method authenticates users by:
- Destructuring the
LoginDtoobject to verify user credentials. - Comparing the input password with the stored hash to ensure a match.
- Throwing an
UnauthorizedExceptionerror if the passwords do not match. - Utilizing the
jwtServiceto sign the user and generate a JWT token upon successful authentication. - Returning the JWT token to the client.
Update the AuthController for signup and login in the src/auth/auth.controller.ts directory:
import { Controller, Post, Body } from '@nestjs/common';import { AuthService } from './auth.service';import { SignUpDto } from './dto/signup.dto';import { LoginDto } from './dto/login.dto';@Controller('auth')export class AuthController {constructor(private readonly authService: AuthService) {}@Post('signup')signUp(@Body() signupDto: SignUpDto) {return this.authService.signUp(signupDto);}@Post('login')signin(@Body() loginDto: LoginDto) {return this.authService.login(loginDto);}}With these steps, you’ve implemented a basic user login and signup in your application. In the next sections, we’ll test the login and signup routes.
Testing in Postman
Now that we’ve set up our endpoints, it’s time to put them to the test.
For this example, I’ll be using Postman as my API client, but feel free
to use any tool or client that suits your needs. Let’s see our API in
action!
How to Create a User With the /signup Endpoint:
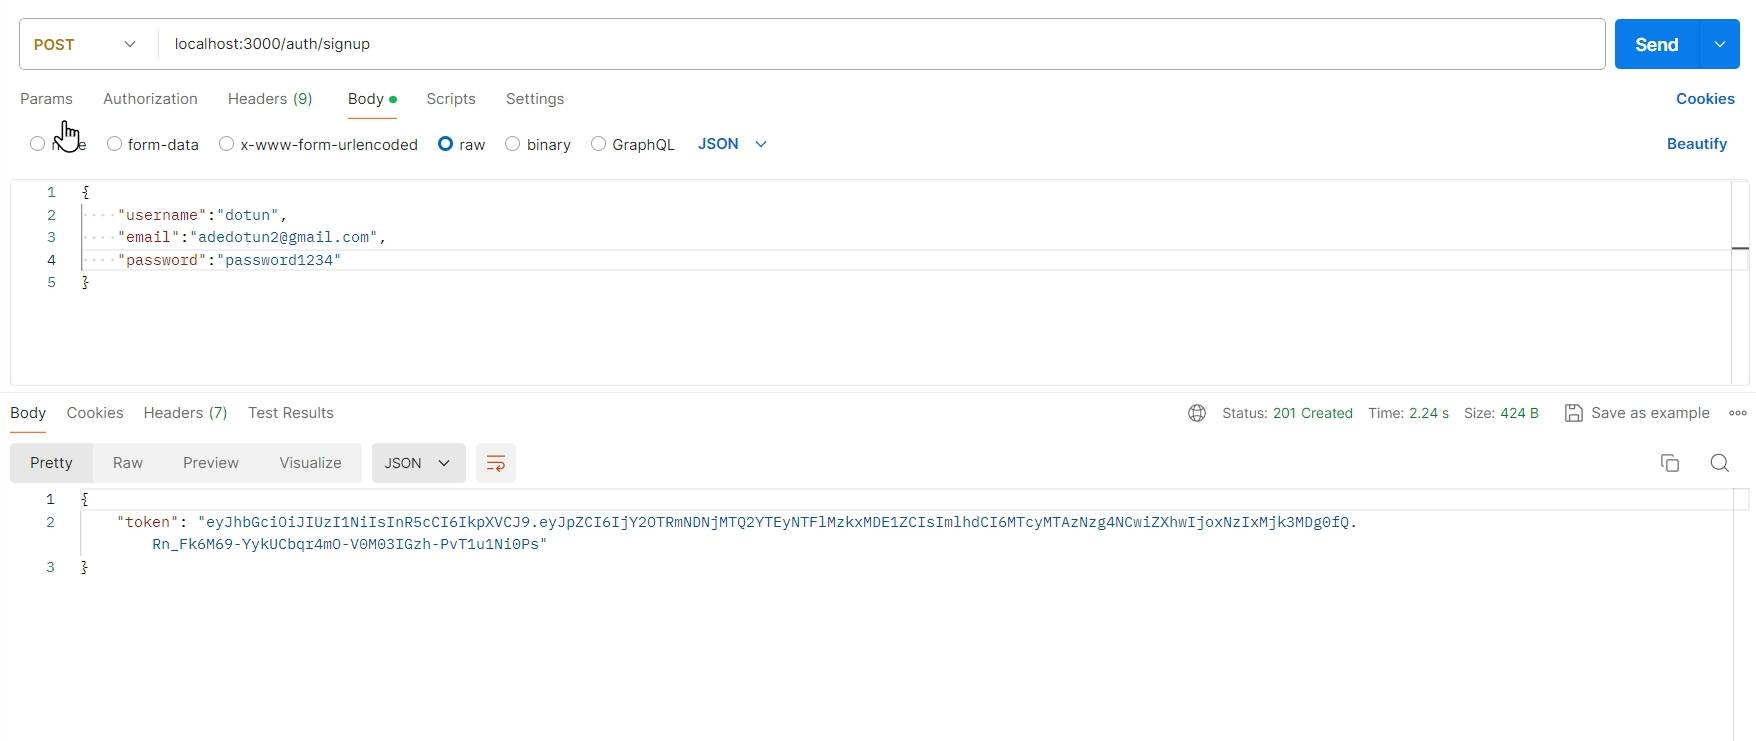
After sending a POST request to the /signup endpoint using Postman, we
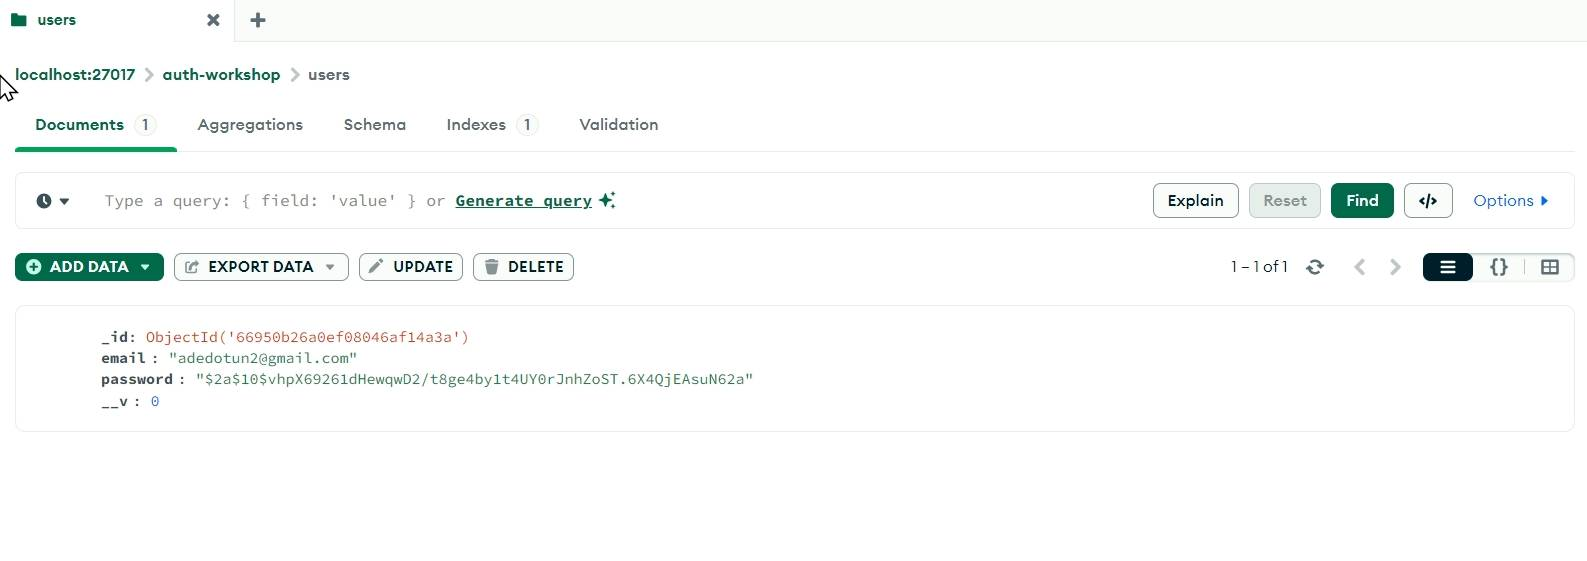
received a response containing the accessToken. You can verify that a new
user has been successfully created by checking the database.
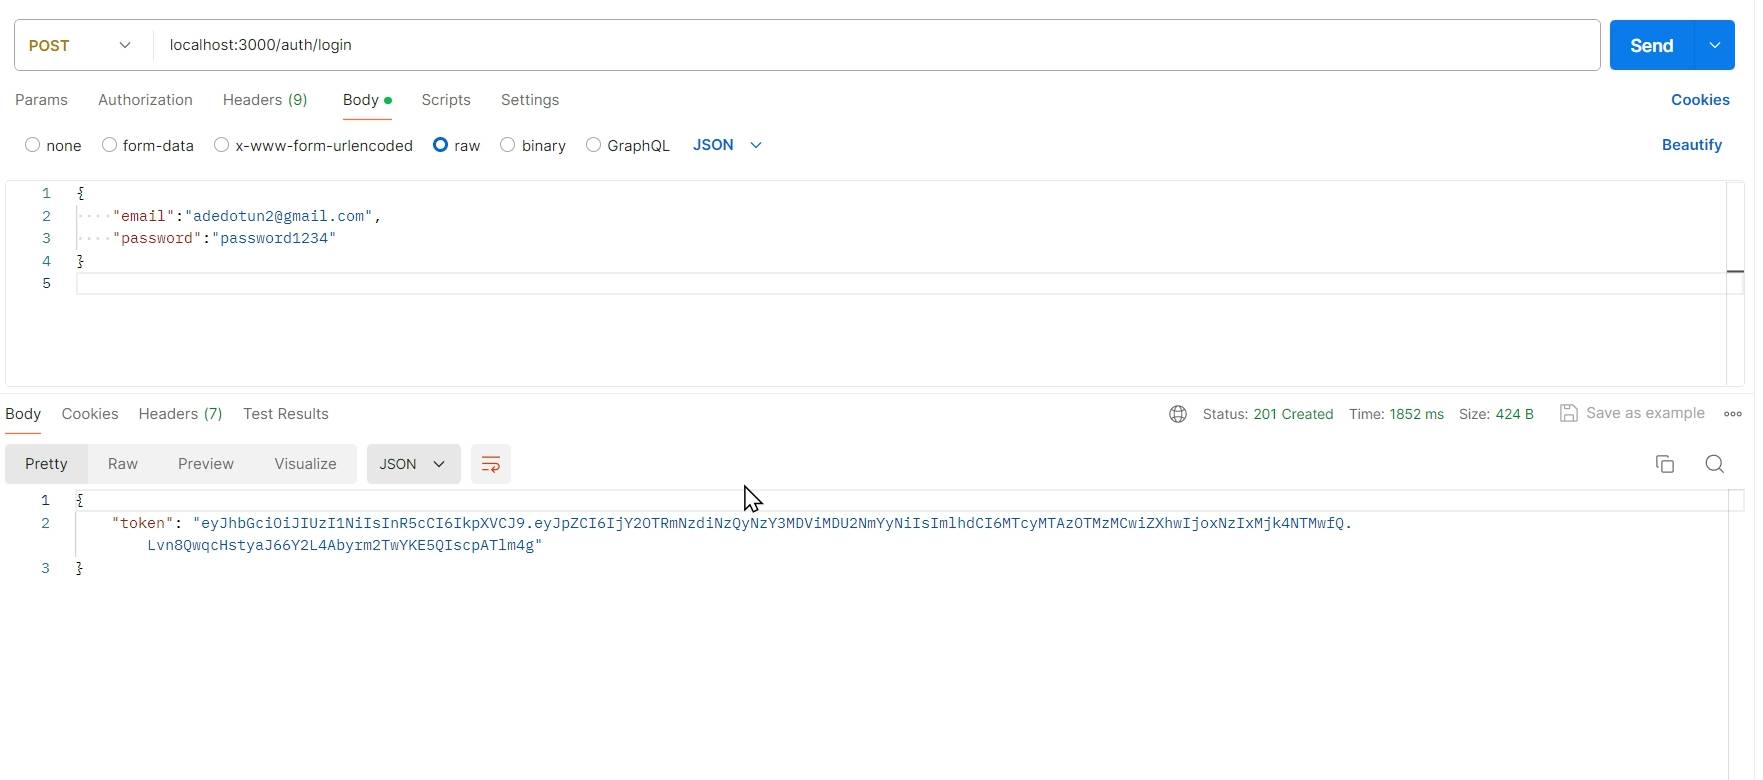
Login as an existing user with the /login endpoint:
Conclusion
Congratulations, you’ve successfully implemented comprehensive
authentication using NestJS, Mongoose, and Passport. We designed a secure
signup and login process, and generated JSON Web Tokens (JWTs).
To further improve and expand your knowledge on authentication, look
into authorization, protecting routes with authentication middleware,
and implementing email verification and password reset functionality.
This foundation provides a solid starting point for building a robust
and scalable authentication system. This project was a pleasure to work
on, and I hope you found it equally enjoyable.
For your convenience, the project repository is available on Github.
Please don’t hesitate to connect with me on Twitter at @Adedot1Abimbola.
I’d love to hear from you