
包阅导读总结
1.
关键词:Nextcloud、AlmaLinux、部署、云服务、开源平台
2.
总结:本文主要介绍了如何在开源的 AlmaLinux 操作系统上部署 Nextcloud 云服务器,包括所需条件、安装依赖、配置环境、下载 Nextcloud 以及解决可能遇到的问题等。
3.
主要内容:
– 部署 Nextcloud 云服务器的背景
– 云服务众多,Nextcloud 开源且能自部署,掌控数据更安全
– 部署前准备
– 运行的 AlmaLinux 9 实例和有 sudo 权限的用户
– 安装要求
– 安装 Apache 网页服务器
– 安装所需 PHP 版本及配置
– 安装 MariaDB 数据库并进行相关设置
– 下载 Nextcloud 并处理相关权限
– 配置 SELinux
– 创建虚拟主机文件
– 完成安装
– 通过网页浏览器完成安装流程,解决可能的错误,完成后重启机器使 SELinux 恢复运行
思维导图: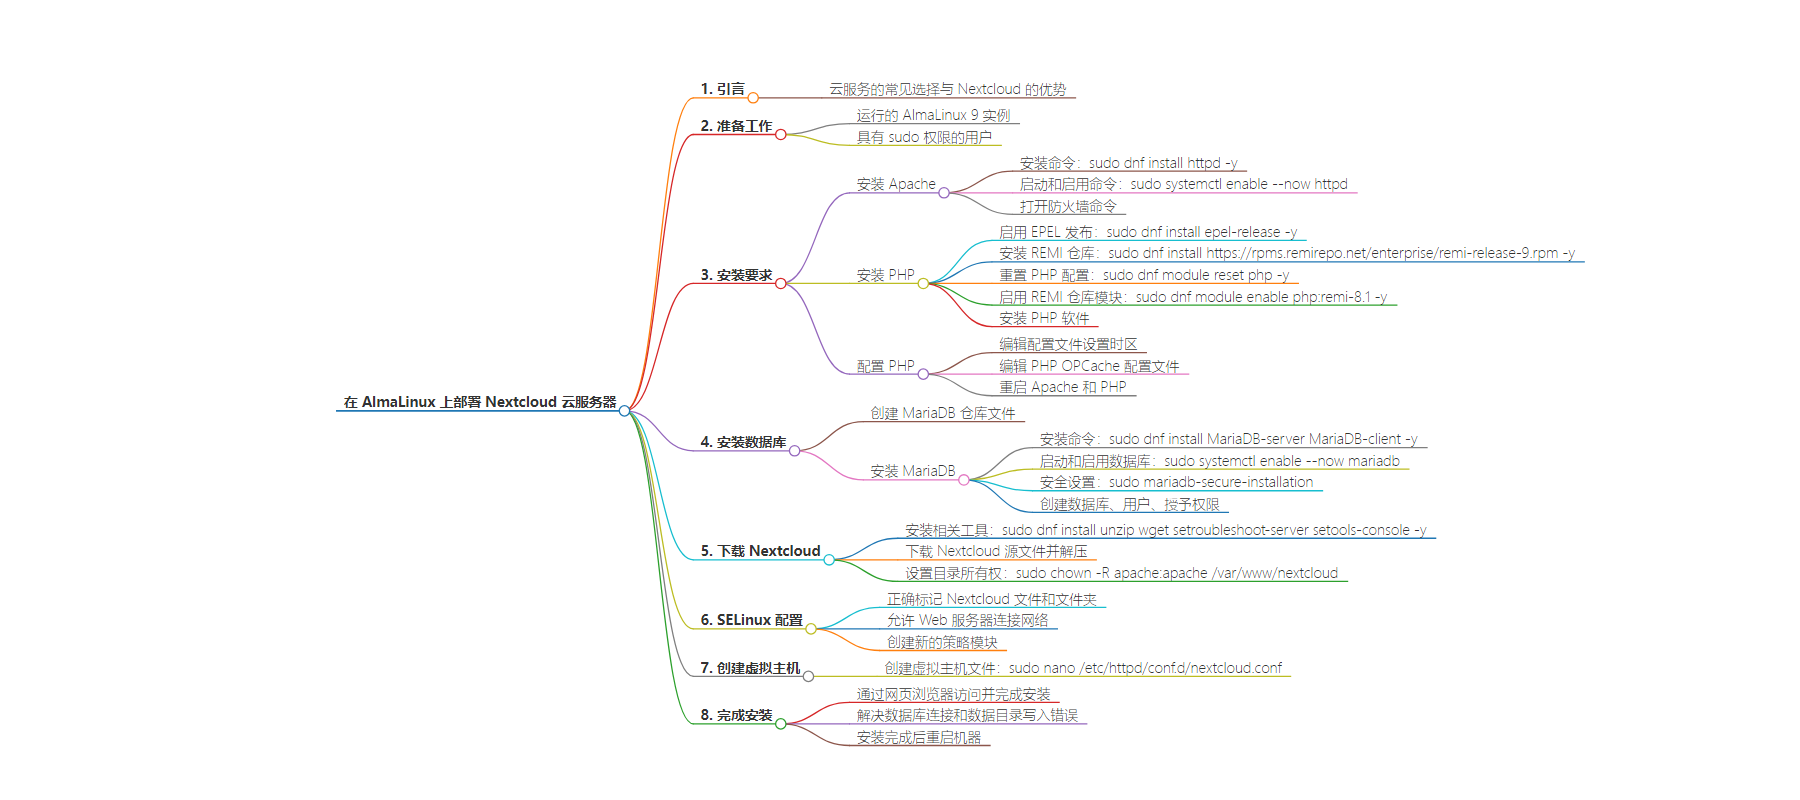
文章地址:https://thenewstack.io/how-to-deploy-the-nextcloud-cloud-server-on-almalinux/
文章来源:thenewstack.io
作者:Jack Wallen
发布时间:2024/7/23 18:43
语言:英文
总字数:1132字
预计阅读时间:5分钟
评分:83分
标签:Nextcloud,AlmaLinux,云服务器,开源,Apache
以下为原文内容
本内容来源于用户推荐转载,旨在分享知识与观点,如有侵权请联系删除 联系邮箱 media@ilingban.com
Cloud services are all over the place. For most people, the usual options (such as Google, iCloud, etc.) are fine. For others who demand more security and control, there are additional options, such as Nextcloud.
Nextcloud is an open source platform that includes all the features you’ve grown accustomed to (such as files, editors, chat, version control and much more) and can be deployed to hardware on your network. Because of that, you don’t have to worry about third parties having access to your data. That’s a win for any security/privacy-minded individuals or companies.
I want to show you how to deploy Nextcloud to the open source AlmaLinux operating system. Unlike deploying to Ubuntu Server, there are a few more steps required, which can often trip people up.
Let me help you avoid those pitfalls.
Ready?
What You’ll Need
The only things you’ll need for this basic installment are a running instance of AlmaLinux 9 and a user with sudo privileges. Of course, if you want to point a domain name to the instance, you’ll need an FQDN and secure it with SSL. Since I’m only deploying this to an internal network, I’m not going to worry about those things at the moment.
With those things at the ready, let’s install them.
Installing the Requirements
There are a few dependencies we have to take care of.
Apache
The first thing we’ll do is install the Apache web server. Log into AlmaLinux and issue the command:
|
sudo dnf install httpd –y |
When the installation is completed, start and enable Apache with:
|
sudo systemctl enable —now httpd |
After you take care of this, you’ll need to open the firewall with the following two commands:
PHP
Next, we’ll install the necessary PHP release. First, enable the EPEL release with:
|
sudo dnf install epel–release –y |
Install the REMI repository (which will get us access to PHP 8.1) with:
|
sudo dnf install https://rpms.remirepo.net/enterprise/remi–release–9.rpm –y |
Reset the current PHP config with:
|
sudo dnf module reset php –y |
Enable REMI repository module with:
|
sudo dnf module enable php:remi–8.1 –y |
Install all of the necessary PHP software with the following command:
Configure PHP
We now need to configure PHP. Open the configuration file with:
You’ll need to locate and make sure to set the following:
Where YOUR_TIMEZONE is the timezone in which your server is located.
You can make a short-shrift of locating the above entries by using the nano search tool (which is called up with the Ctrl+w keyboard shortcut).
Save and close the file.
Next, open the PHP OPCache configuration file with:
|
sudo nano /etc/php.d/10–opcache.ini |
In this file, you want to make sure to uncomment and change (if necessary) the following lines:
Save and close the file.
Restart Apache and PHP with the following:
Install the Database
The next step is the installation of the MariaDB database. To do that, we must create a repository file with the command:
|
sudo nano /etc/yum.repos.d/MariaDB.repo |
In that file, paste the following:
Save and close the file.
Install MariaDB with:
|
sudo dnf install MariaDB–server MariaDB–client –y |
Start and enable the database with:
|
sudo systemctl enable —now mariadb |
Secure the database installation with the command:
|
sudo mariadb–secure–installation |
Hit Enter when prompted for the admin password, type n for unix_socket, type and verify a new admin password, and answer y to the remaining questions.
With the MariaDB installed, it’s time to create our database. Access the MariaDB console with:
Create the database with:
|
CREATE DATABASE netxcloud_db; |
Create a new database user with:
|
CREATE USER nextuser@localhost IDENTIFIED BY ‘PASSWORD’; |
Where PASSWORD is a strong and unique password.
Grant the required permissions with:
|
GRANT ALL PRIVILEGES ON netxcloud_db.* TO nextuser@localhost; |
Flush the privileges and exit the console with:
Download Nextcloud
Before you download Nextcloud, you’ll need to install a few more bits with:
|
sudo dnf install unzip wget setroubleshoot–server setools–console –y |
Change into the Apache document root with:
Download the Nextcloud source with:
|
sudo wget https://download.nextcloud.com/server/releases/latest.zip |
Unzip the file with:
Give the newly-created Nextcloud directory the required ownership with:
|
sudo chown –R apache:apache /var/www/nextcloud |
SELinux
Unless we configure SELinux properly, Nextcloud will not function. The first thing to do is to properly label all of the Nextcloud files and folders with the following commands:
Next, you must allow the webserver to connect to the network with the following commands:
We have to create a new policy module to ensure PHP-FPM can connect to the MariaDB socket. First, create a new file with the command:
Paste the following into that file:
Save and close the file.
Convert the file to an SELinux policy module with the command:
|
sudo checkmodule –M –m –o my–phpfpm.mod my–phpfpm.te |
Compile the policy with:
|
sudo semodule_package –o my–phpfpm.pp –m my–phpfpm.mod |
Apply the new policy module with:
|
sudo semodule –i my–phpfpm.pp |
Virtual Host
We now have to create a virtual host file with the command:
|
sudo nano /etc/httpd/conf.d/nextcloud.conf |
In that file, paste the following, making sure to edit as needed for your situation:
Save and close the file.
Restart Apache with:
|
sudo systemctl restart httpd |
Finishing Up the Installation
You should now be able to point a web browser to http://SERVER (where SERVER is the IP address of the hosting server) and be greeted by the Nextcloud web-based installer, where you can create an admin user and finish up the process with a few clicks.
If you find there’s an error connecting to the database and writing to the data directory, temporarily disable SELinux (until the next reboot) with:
After the installation completes, reboot the machine and SELinux is back to keeping tabs on the system and Nextcloud is up and running.
And that, my friends, is how you deploy Nextcloud to AlmaLinux.
YOUTUBE.COM/THENEWSTACK
Tech moves fast, don’t miss an episode. Subscribe to our YouTubechannel to stream all our podcasts, interviews, demos, and more.