
包阅导读总结
1.
– `Private Key JWT`、`.NET 应用`、`认证`、`安全机制`、`Auth0`
2.
本文介绍了在.NET 应用中使用 Private Key JWT 进行认证的相关内容,包括其适用场景、工作原理、实现方法、在企业计划中的可用性,以及示例项目中的配置和关键步骤。
3.
– 背景与需求
– 敏感操作需增强应用认证安全,如使用 Private Key JWT 认证。
– 基于客户端密钥的认证在某些场景下不够安全。
– Private Key JWT 认证
– 基于不对称加密,生成公私钥对,私钥保密,与 Auth0 共享公钥。
– 应用生成并发送用私钥签名的断言以获取访问令牌。
– 高度监管的身份与 Private Key JWT 认证
– 在金融、医疗等高安全需求场景中,Okta 推出相关功能。
– 企业计划中可用,特定算法需额外插件。
– 示例项目
– 包含获取用户健康数据的两个.NET 项目。
– 需创建和注册公钥,调整代码获取访问令牌,支持凭据轮转。
思维导图:
文章地址:https://auth0.com/blog/use-private-key-jwt-to-authenticate-dotnet-app/
文章来源:auth0.com
作者:Andrea Chiarelli
发布时间:2024/7/17 16:55
语言:英文
总字数:1701字
预计阅读时间:7分钟
评分:84分
标签:身份验证,安全,.NET,私钥 JWT,Auth0
以下为原文内容
本内容来源于用户推荐转载,旨在分享知识与观点,如有侵权请联系删除 联系邮箱 media@ilingban.com
Sensitive operations require increased security mechanisms, but at the same time, threat actors are on the rise, so it’s crucial to raise the bar on application authentication security, such as using Private Key JWT authentication. Private Key JWT is a secure authentication method for applications to get security tokens from an authorization server. In this article, you will learn when you may need it, how it works, and how to implement it in a .NET application using Auth0.
When a Client Secret Is Not Enough
In the OAuth 2.0 context, your application needs to authenticate in order to get an ID, access, and refresh token. This means that your application must provide its credentials, typically a client ID and a secret, to the authorization server, such as Auth0.
Sensitive applications typically run in a server environment and are confidential clients, i.e., applications capable of securely storing their credentials. Typically, these are server-rendered web applications or back-end services and applications that run in a protected environment. Public clients, such as Single-Page Applications or mobile apps, can’t securely store a secret. They must use specific flows that don’t include client authentication, and their level of security is generally less reliable than that of a confidential client.
Although client authentication based on client secret provides a higher level of security for obtaining the access token than a public client flow, there are contexts in which it is considered insufficient. Think of banking or financial contexts, where the highest levels of transaction security must be ensured. Or in the healthcare context, where data confidentiality must be protected.
In these contexts, various regulations (e.g., Open Banking) require the use of more secure mechanisms to protect transactions. Among these mechanisms, they require a more secure alternative to client authentication based on client ID and secret.
Private Key JWT Authentication
Private Key JWT authentication is a secure alternative to client authentication based on a secret. It’s a standard mechanism that relies on asymmetric cryptography to authenticate your application.
Basically, you generate a private and public key pair. Keep your private key securely stored and accessible to only your application. Don’t even share it with Auth0. Share the corresponding public key with Auth0 instead. By nature, the public key is not sensitive data, so even if an attacker manages to catch it, they can’t impersonate your application.
When your application needs an access token, it generates a specific JWT, called assertion, and signs it with its private key. Then, it sends this assertion to Auth0 in order to authenticate. The following is an example of an HTTP request to authenticate via an assertion:
curl --request POST \ --url 'https://<YOUR-AUTH=-DOMAIN>/oauth/token' \ --header 'content-type: application/x-www-form-urlencoded' \ --data grant_type=client_credentials \ --data client_id=<YOUR_CLIENT_ID> \ --data client_assertion=eyJhbGciOiJIUzI1NiIsInR5cCI6IkpXVCJ9.eyJzdWIiOi... \ --data client_assertion_type=urn:ietf:params:oauth:client-assertion-type:jwt-bearer \ --data audience=<YOUR_API_IDENTIFIER>Auth0 validates the assertion using your application’s public key and, if everything is ok, issues your access token.
If you want to learn more details about how to authenticate with Private Key JWT, read the documentation. If you use one of the Auth0’s SDKs, you don’t need to build an assertion yourself, as you will see later in this article.
Private Key JWT authentication is only available with the Enterprise plan.
Highly Regulated Identity and Private Key JWT Authentication
As mentioned, Private Key JWT authentication is a secure client authentication method required in business contexts where higher levels of security must be guaranteed, such as in finance, insurance, and healthcare.
To meet customers’ needs in this area, Okta has released Highly Regulated Identity (HRI), a set of Auth0 features that enable high levels of security standards, such as Financial Data Exchange and Open Banking, and compliance with widely adopted regulations, such as the Payment Services Directive (PSD2).
Highly Regulated Identity is an add-on for the Enterprise plan. For an overview of Highly Regulated Identity, check out this article.
Private Key JWT authentication is available in the Enterprise plan, so you don’t need HRI to use it in your applications. However, if you need to use PS256 as the signing algorithm for your assertions, you need HRI on top of your Enterprise plan. HRI also supports mutual TLS as another secure mechanism for client authentication using a public-private key pair.
The Sample Project
To see how to use Private Key JWT authentication in practice, you will use an ASP.NET Core web application that gets users’ health data from a protected API. You can download the sample project by running the following command in a window terminal:
git clone -b starting-point --single-branch https://github.com/auth0-blog/dotnet-private-key-jwt-authenticationYou will get two .NET projects:
- HealthCkeckApi, an ASP.NET Core Web API project that provides the user’s health data through a protected endpoint.
- HealthCheckWebApp, an ASP.NET Core MVC application that implements the frontend used by the user to get their own health data.
You need an Auth0 account to configure and run the application. If you don’t have one, you can sign up for free now. Follow the README document to configure and run the application.
Once your application is up and running and you have logged in, you will see a page like the following:
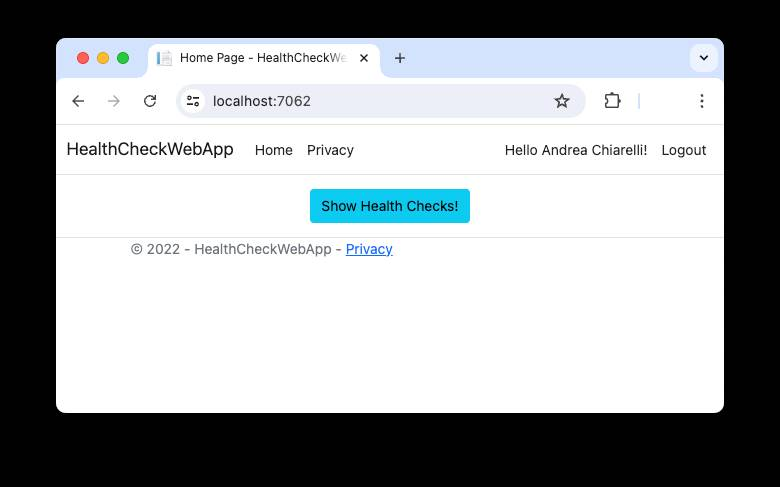
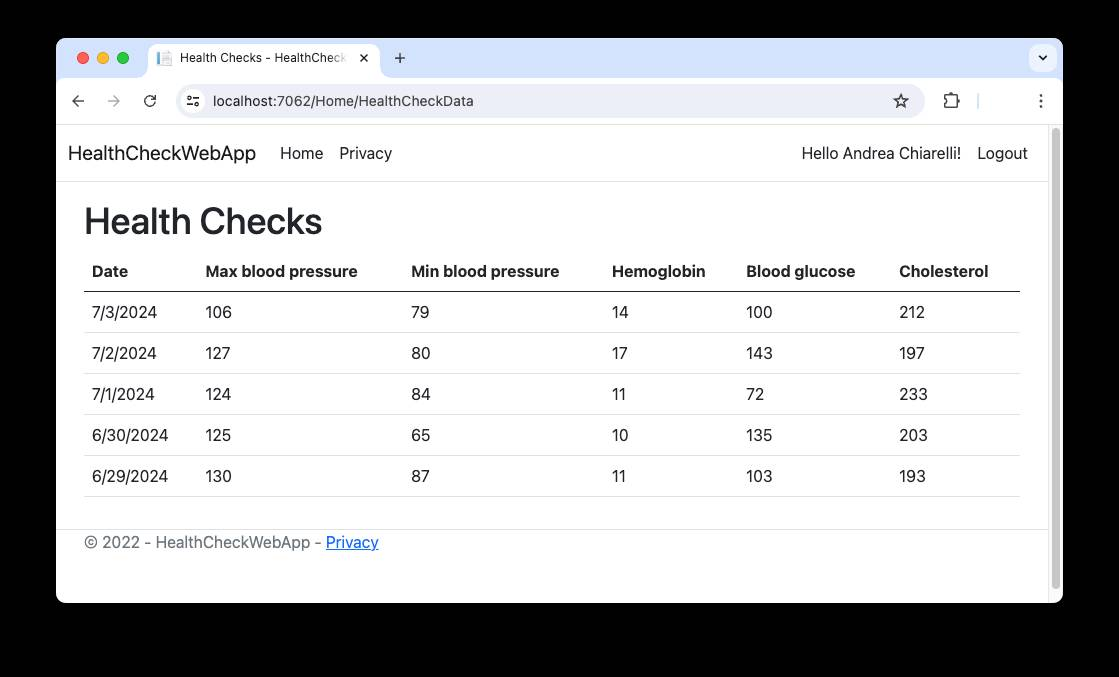
By clicking the Show Health Checks button, you will see a list of data like the following:
You will work on the HealthCheckWebApp application, which represents the OAuth confidential client that needs an access token to call the protected API. The current application implementation uses the Auth0 ASP.NET Core Authentication SDK to authenticate the user and get the access token from Auth0 by using its client ID and secret.
You will modify this application to use Private Key JWT authentication instead of client ID and secret.
Create and Register Your Public Key
Let’s start by creating a private and public key pair. Go to the HealthCheckWebApp folder and generate your private and public key pair. For example, using OpenSSL you can create the key pair with the following command:
openssl genrsa -out app_keys.pem 2048This command generates an app_keys.pem file containing the private and public key pair you will use as a credential for your application.
Extract the public key from that file with the following command:
openssl rsa -in app_keys.pem -outform PEM -pubout -out pub_key.pemYou will get a pub_key.pem file containing only the public key. You will be sharing the public key with Auth0, while your private key must be kept safe and never shared with anyone.
Go to your Auth0 dashboard and open the Credentials tab of your application configuration page, as shown in the following image:

Select Private Key JWT, and a window like the following will show:
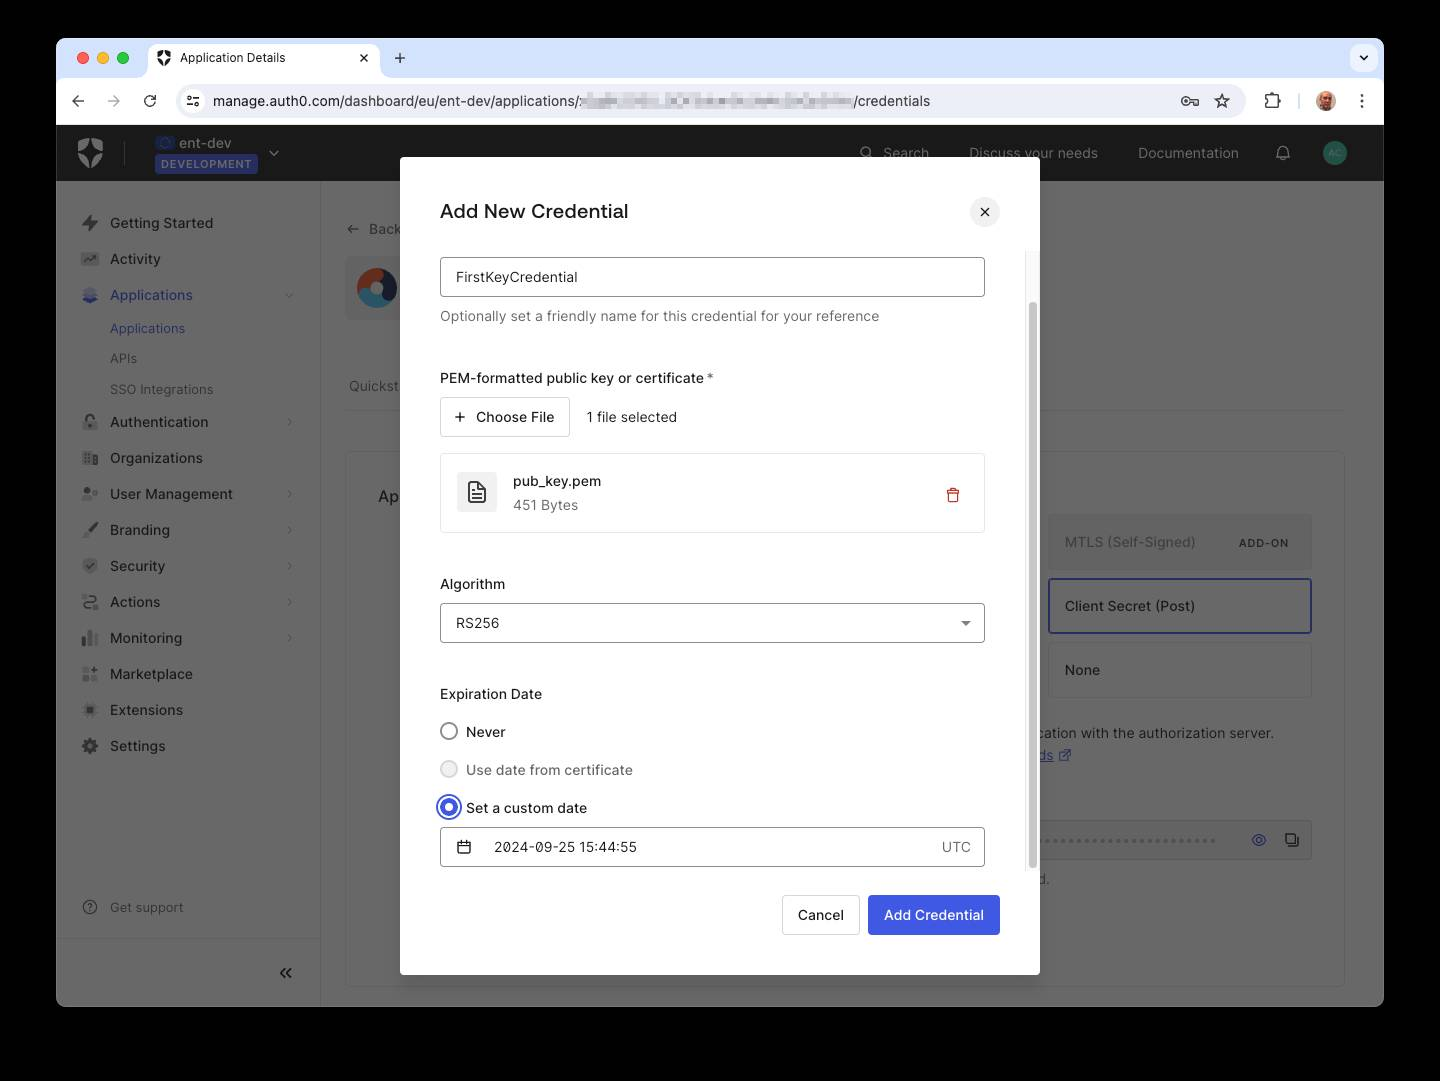
This window allows you to define a Private Key JWT credential for your application. Assign a name for the credential and upload the pub_key.pem file containing the public key. Optionally, select the signing algorithm and set an expiration date. Finally, click the Add Credential button to save your changes.
You will see your credential appearing below the Application Authentication section:
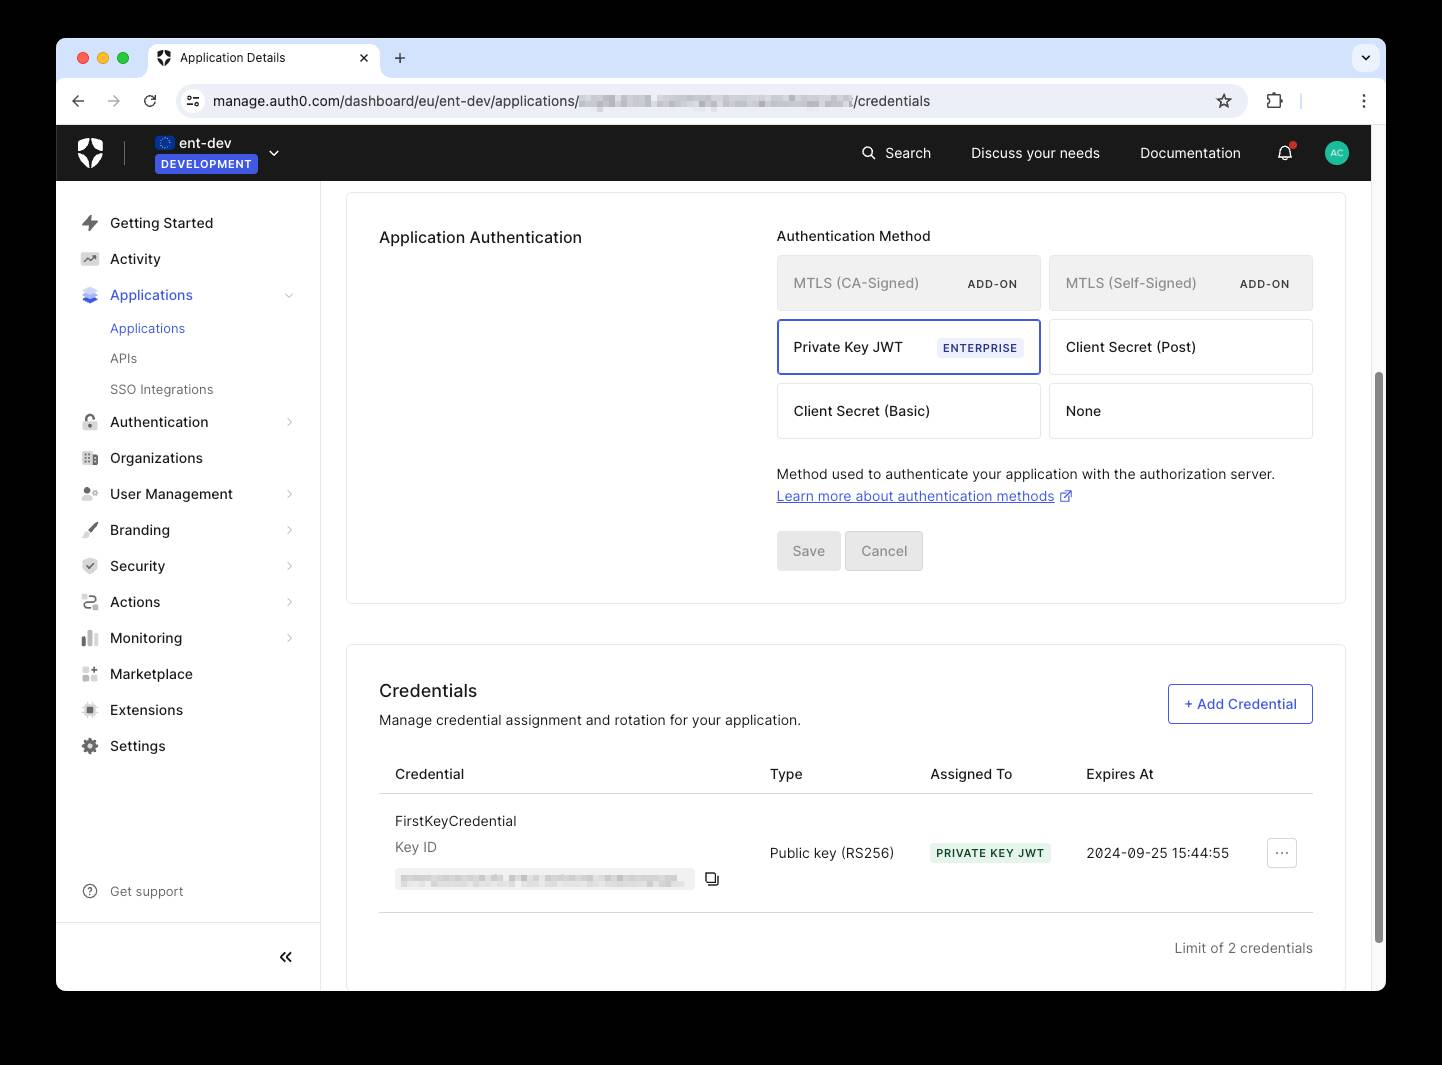
You can add multiple credentials for your application, as you will learn in a moment.
Get Your Access Token
Your application is now configured to use Private Key JWT authentication on the Auth0 side. Let’s adjust the application code to use this authentication method instead of the client ID and secret.
Open the appsettings.json file in the HealthCheckWebApp folder and remove the ClientSecret key. You don’t need it anymore. The file’s content will be as follows:
{ "Logging": { "LogLevel": { "Default": "Information", "Microsoft.AspNetCore": "Warning" } }, "AllowedHosts": "*", "Auth0": { "Domain": "<YOUR-AUTH=-DOMAIN>", "ClientId": "<YOUR-CLIENT-ID>", "Audience": "https://myapi.com" }, "HealthCheckApiBaseUrl": "https://localhost:7102"}Now, edit the Program.cs file in the HealthCheckWebApp folder by applying the changes highlighted in the following code snippet:
var cryptoProvider = new RSACryptoServiceProvider();cryptoProvider.ImportFromPem(File.ReadAllText("app_keys.pem"));var securityKey = new RsaSecurityKey(cryptoProvider);builder.Services .AddAuth0WebAppAuthentication(options => { options.Domain = builder.Configuration["Auth0:Domain"]; options.ClientId = builder.Configuration["Auth0:ClientId"]; options.ClientAssertionSecurityKey = securityKey; options.Scope = "openid profile email"; }) .WithAccessToken(options => { options.Audience = builder.Configuration["Auth0:Audience"]; });You load the key pair from the app_keys.pem file, generate an instance of the RsaSecurityKey class from the content of that file, and assign it to the securityKey variable. Then, you replace the assignment of the ClientSecret option with the ClientAssertionSecurityKey option and assign the value of the securityKey variable.
You are done! The Auth0 ASP.NET Core Authentication SDK will take care of creating the assertion and authenticate your application with Auth0 to get the access token. You will notice no difference in the behavior of the application, but under the hood your application uses a more secure authentication method to get the access token to call the protected API.
Credential Rotation
When you configured your application to use Private Key JWT authentication, you should have noticed two things:
- You can set an expiration date.
- You can create multiple credentials for the application.
These two optional features allow you to further strengthen the security of Private Key JWT authentication.In fact, setting an expiration date for a credential is always a good practice, even with secure mechanisms such as Private Key JWT.
However, setting an expiration date can cause some downtime when the old credential expires and the new one has not yet been activated. To avoid this downtime, you can add a new credential before the old one expires. This way, on the application side, you can replace the old credential with the new one before it expires, preventing the application from becoming inoperable.
For more information about credential rotation, see the documentation.
Summary
Throughout this article, you learned about Private Key JWT authentication and how it increases your application’s level of security in obtaining tokens.
Together with other advanced features of Highly Regulated Identity, Private Key JWT helps achieve a high level of security and compliance required in areas such as finance, insurance, and health care.
You also saw how to implement Private Key JWT in a .NET application using the Auth0 SDK, which relieves you of the task of dealing with low-level details.
The final version of the example application code implementing Private Key JWT is available on GitHub.