
包阅导读总结
1. 关键词:量子 AI、神经网络、Iris 花数据、Python、混合计算
2. 总结:本文介绍了利用 Python 构建用于预测鸢尾花数据的量子 AI 模型。解释了深度学习与神经网络的概念,阐述了混合神经网络的优势,包括处理速度快和能耗低等,并逐步展示了构建模型的代码过程及各部分功能。
3. 主要内容:
– 引言
– 介绍机器学习和深度学习,提及创建如 ChatGPT 等模型使用的神经网络。
– 深度学习与神经网络
– 解释深度学习利用神经网络预测复杂模式。
– 阐述简单神经网络的结构和训练方式。
– 混合神经网络
– 说明输入和输出层在经典计算机运行,隐藏层在量子计算机处理。
– 指出混合神经网络处理数据更快、能耗更低,能创建更高效的 AI 模型。
– 量子 AI 预测鸢尾花数据
– 介绍使用 Python 构建量子 AI 模型预测鸢尾花数据。
– 详细解释代码各部分功能,包括导入库、加载和预处理数据、定义量子设备和电路、定义混合模型和初始化权重、定义成本函数和优化权重。
思维导图:
文章地址:https://www.freecodecamp.org/news/how-to-build-an-ai-model-for-predicting-data-with-python/
文章来源:freecodecamp.org
作者:Tiago Monteiro
发布时间:2024/8/8 13:18
语言:英文
总字数:1636字
预计阅读时间:7分钟
评分:86分
标签:量子 AI,神经网络,Python,混合计算,机器学习
以下为原文内容
本内容来源于用户推荐转载,旨在分享知识与观点,如有侵权请联系删除 联系邮箱 media@ilingban.com
Machine learning is an area of AI where the likes of ChatGPT and other famous models were created. These systems were all created with neural networks.
The field of machine learning that deals with the creation of these neural networks is called deep learning.
In this blog post, we’ll create a neural network with some neurons that run on a classical computer and others in quantum computers.
This way, creating and training a neural network with both types of neurons will create an AI model based on quantum computing, as most of the processing will occur in the quantum neurons.
We’ll talk about these:
Note: We’ll create a simple neural network, avoiding complex architectures like transformers, deep dives into quantum physics, or advanced AI model optimization techniques.
The full code is available here.
Introduction to AI, Hybrid Neural Networks and Its Benefits
 Photo by Pavel Danilyuk: https://www.pexels.com/photo/elderly-man-thinking-while-looking-at-a-chessboard-8438918/
What is Deep Learning in Artificial Intelligence?
Deep learning is a subfield of AI that uses neural networks to predict complex patterns like weather, classifying images, responding to text, and so on.
The bigger the neural network, the more complex things it can do. Like ChatGPT, which can process natural language to interact with users.
Neural Networks
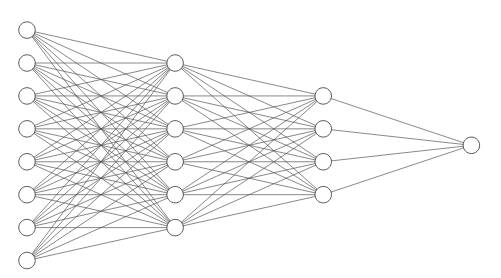 Simple Neural Network
Deep learning is the training of neural networks to predict future data. Training a neural network involves feeding it data, allowing it to learn, and then making predictions.
Neural networks are composed of many neurons organized in layers. All layers get different patterns of the data.
This layer type structure allows AI models to interpret complex data and patterns. For example, the neural network in the image above can, for example, with 8 characteristics of data from the weather, be trained to predict whether if it will rain or not.
The layer that takes data is called the input layer and the final one is called the output layer. Between these are the hidden layers that capture complex patterns.
Of course, this is a very simple neural network, but the idea of training a neural network is the same for any complex architecture.
Hybrid Neural Networks – Combining Quantum and Classical Computing
We’ll now create a hybrid neural network. Essentially, the input and outputs layers will operate on classical computers while the hidden layer will process data on a quantum computer.
This approach uses the best of classical and quantum computing to train a neural network.
Why Choose Hybrid Neural Networks Over Traditional Neural Networks?
 Photo by Burak The Weekender: https://www.pexels.com/photo/lighted-light-bulb-in-selective-focus-photography-45072/
The main idea of using a hybrid neural network is to make the processing of data occur in a quantum computer, which is a lot faster than a classical computer.
In addition, quantum computers perform certain tasks with far less energy consumption. This efficiency in processing and energy usage allows the creation of smaller and more reliable AI models.
This is the main idea of a hybrid neural network: to create smaller and more efficient AI models.
Quantum AI in Action: Predicting Iris Flower Data with Python
 Photo by Google DeepMind: https://www.pexels.com/photo/quantum-computing-and-ai-25626507/
In this code, we’ll create a quantum based AI model to predict the species of iris flowers from the famous Iris dataset.
The code uses a quantum simulator called default.qubit, which mimics a quantum computer behavior on a classical computer.
This is possible because of the use of mathematical models to simulate quantum operations.
However, with some code alterations, you can run this code on the IBM, Amazon or Microsoft platforms to make it actually run on a quantum computer
import pennylane as qmlimport numpy as npfrom sklearn.datasets import load_irisfrom sklearn.preprocessing import StandardScaler, OneHotEncoderfrom sklearn.model_selection import train_test_splitfrom sklearn.metrics import accuracy_score# Load and preprocess the Iris datasetdata = load_iris()X = data.datay = data.target# Standardize the featuresscaler = StandardScaler()X_scaled = scaler.fit_transform(X)# One-hot encode the labelsencoder = OneHotEncoder(sparse=False)y_onehot = encoder.fit_transform(y.reshape(-1, 1))# Split the datasetX_train, X_test, y_train, y_test = train_test_split(X_scaled, y_onehot, test_size=0.2, random_state=42)# Define a quantum devicen_qubits = 4dev = qml.device('default.qubit', wires=n_qubits)# Define a quantum node@qml.qnode(dev)def quantum_circuit(inputs, weights): for i in range(len(inputs)): qml.RY(inputs[i], wires=i) for i in range(n_qubits): qml.RX(weights[i], wires=i) qml.RY(weights[n_qubits + i], wires=i) return [qml.expval(qml.PauliZ(i)) for i in range(n_qubits)]# Define a hybrid quantum-classical modeldef hybrid_model(inputs, weights): return quantum_circuit(inputs, weights)# Initialize weightsnp.random.seed(0)weights = np.random.normal(0, np.pi, (2 * n_qubits,))# Define a cost functiondef cost(weights): predictions = np.array([hybrid_model(x, weights) for x in X_train]) loss = np.mean((predictions - y_train) ** 2) return loss# Optimize the weights using gradient descentopt = qml.GradientDescentOptimizer(stepsize=0.1)steps = 100for i in range(steps): weights = opt.step(cost, weights) if i % 10 == 0: print(f"Step {i}, Cost: {cost(weights)}")# Test the modelpredictions = np.array([hybrid_model(x, weights) for x in X_test])predicted_labels = np.argmax(predictions, axis=1)true_labels = np.argmax(y_test, axis=1)# Calculate the accuracyaccuracy = accuracy_score(true_labels, predicted_labels)print(f"Test Accuracy: {accuracy * 100:.2f}%")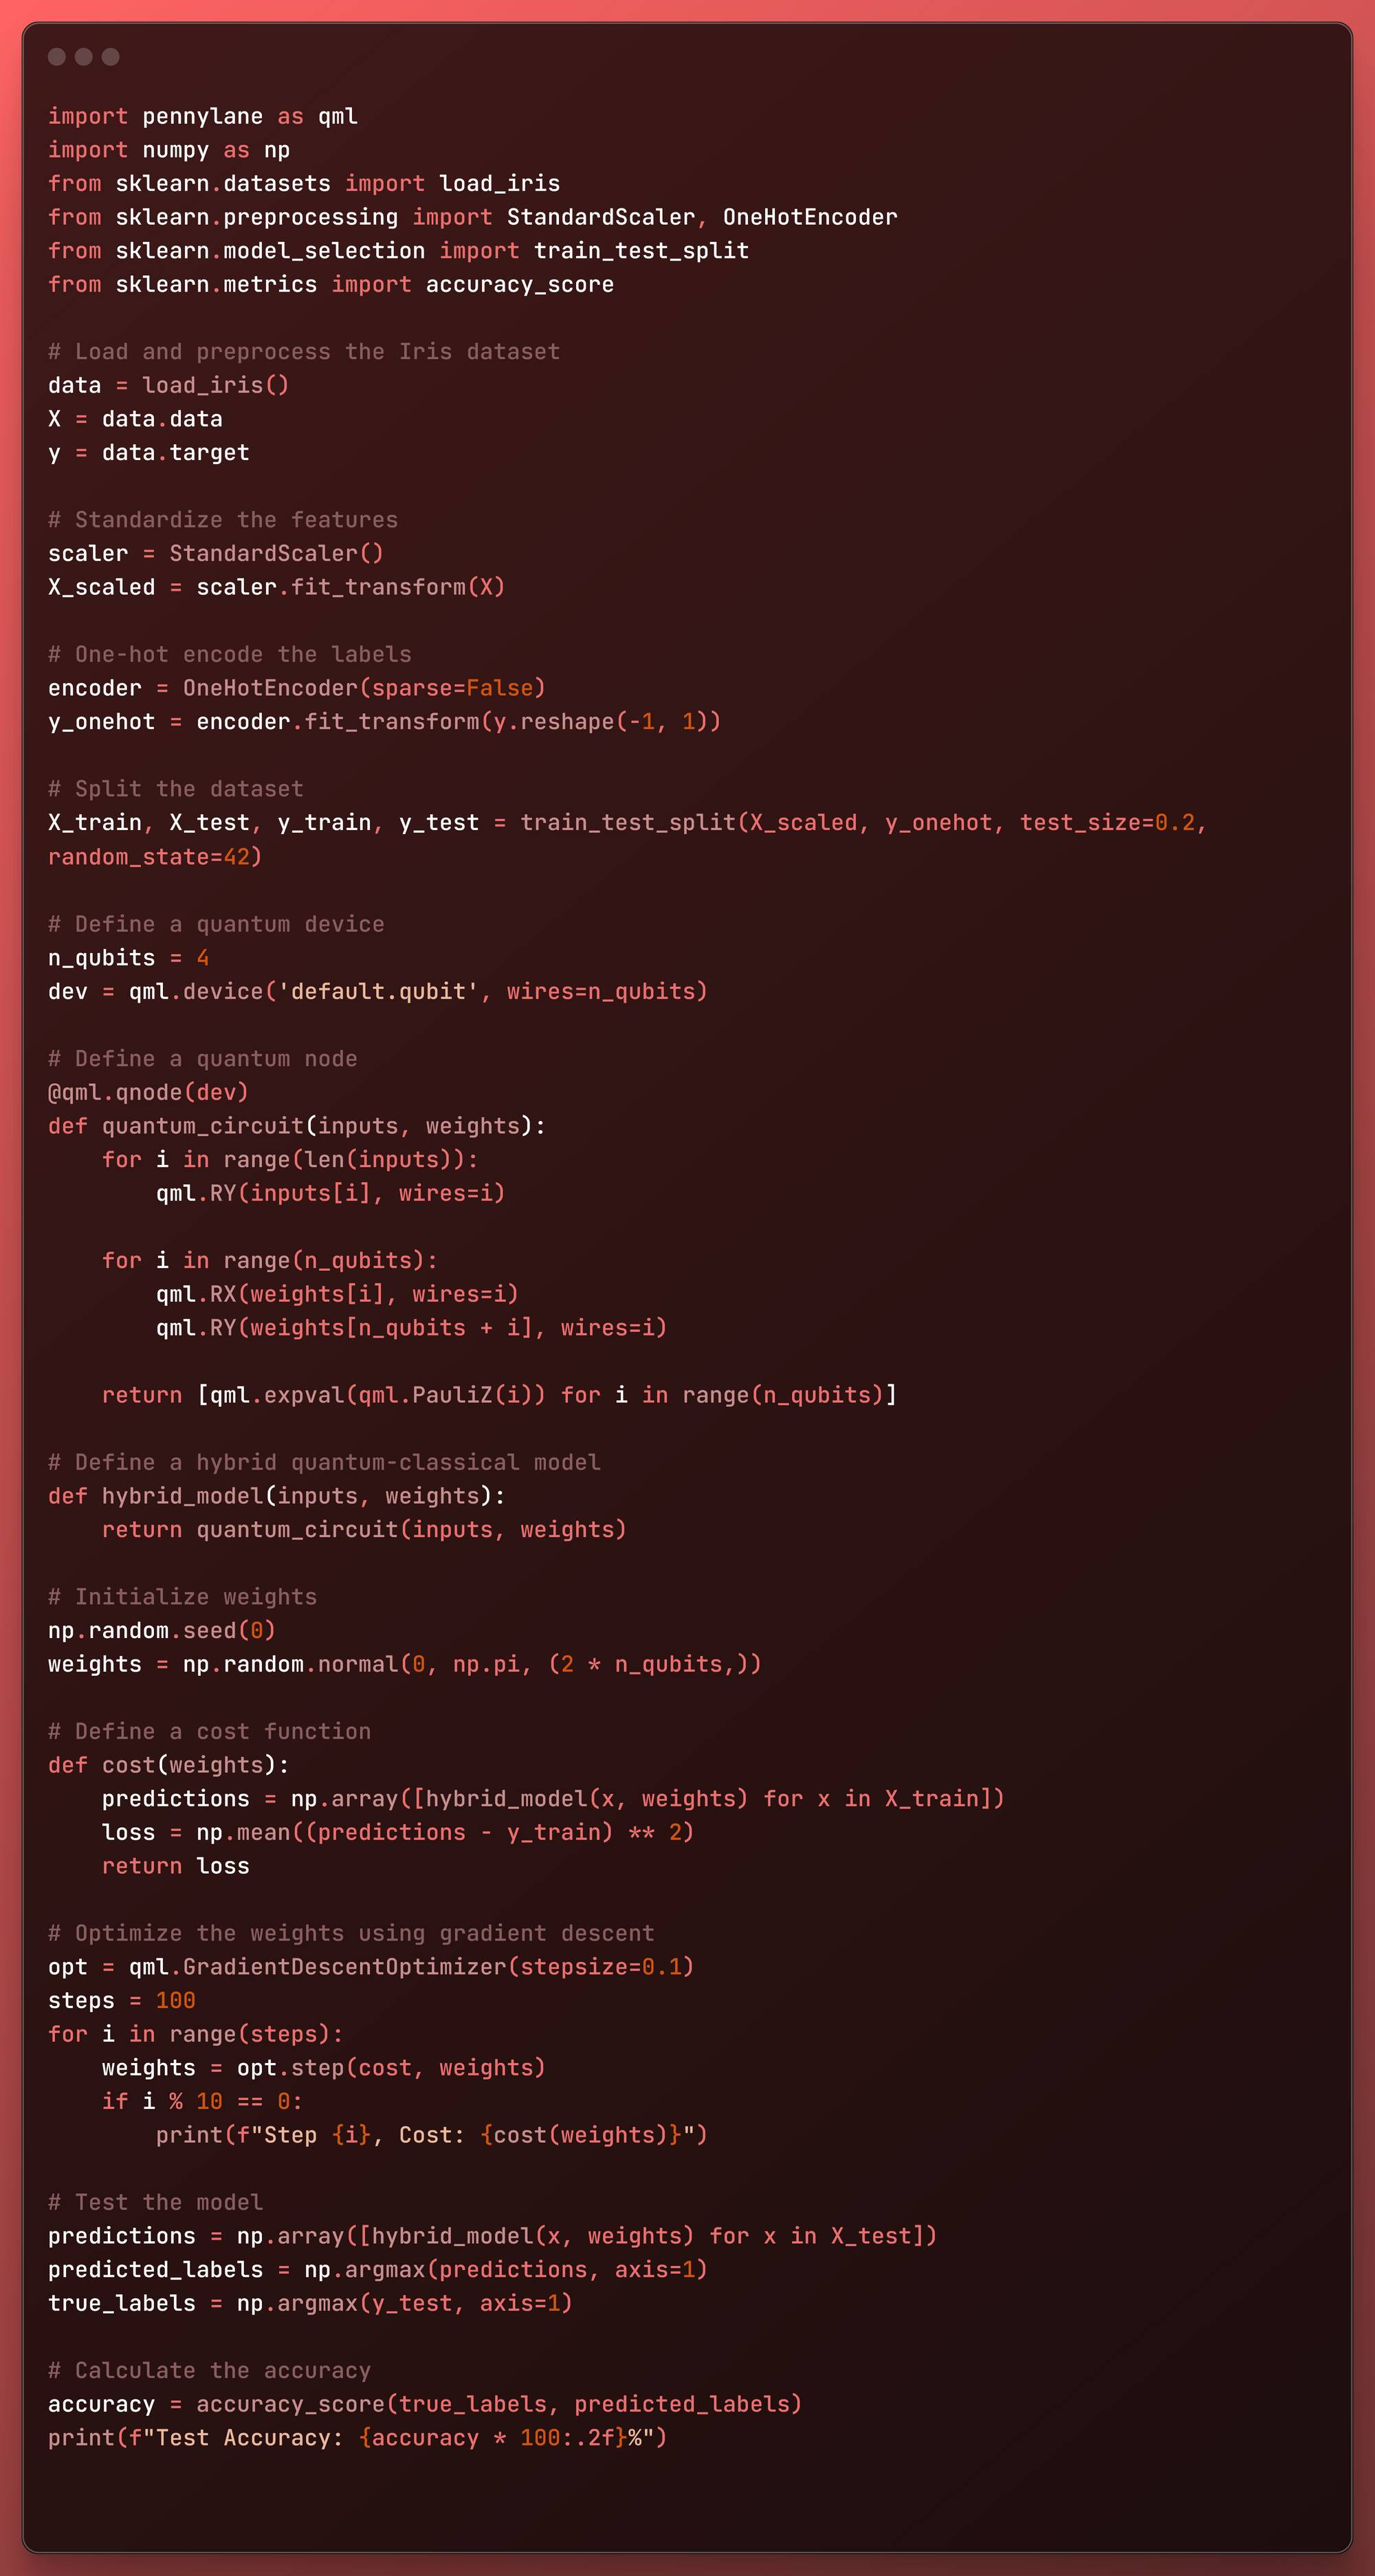
Let’s see the code block by block!
Import Libraries
import pennylane as qmlimport numpy as npfrom sklearn.datasets import load_irisfrom sklearn.preprocessing import StandardScaler, OneHotEncoderfrom sklearn.model_selection import train_test_splitfrom sklearn.metrics import accuracy_score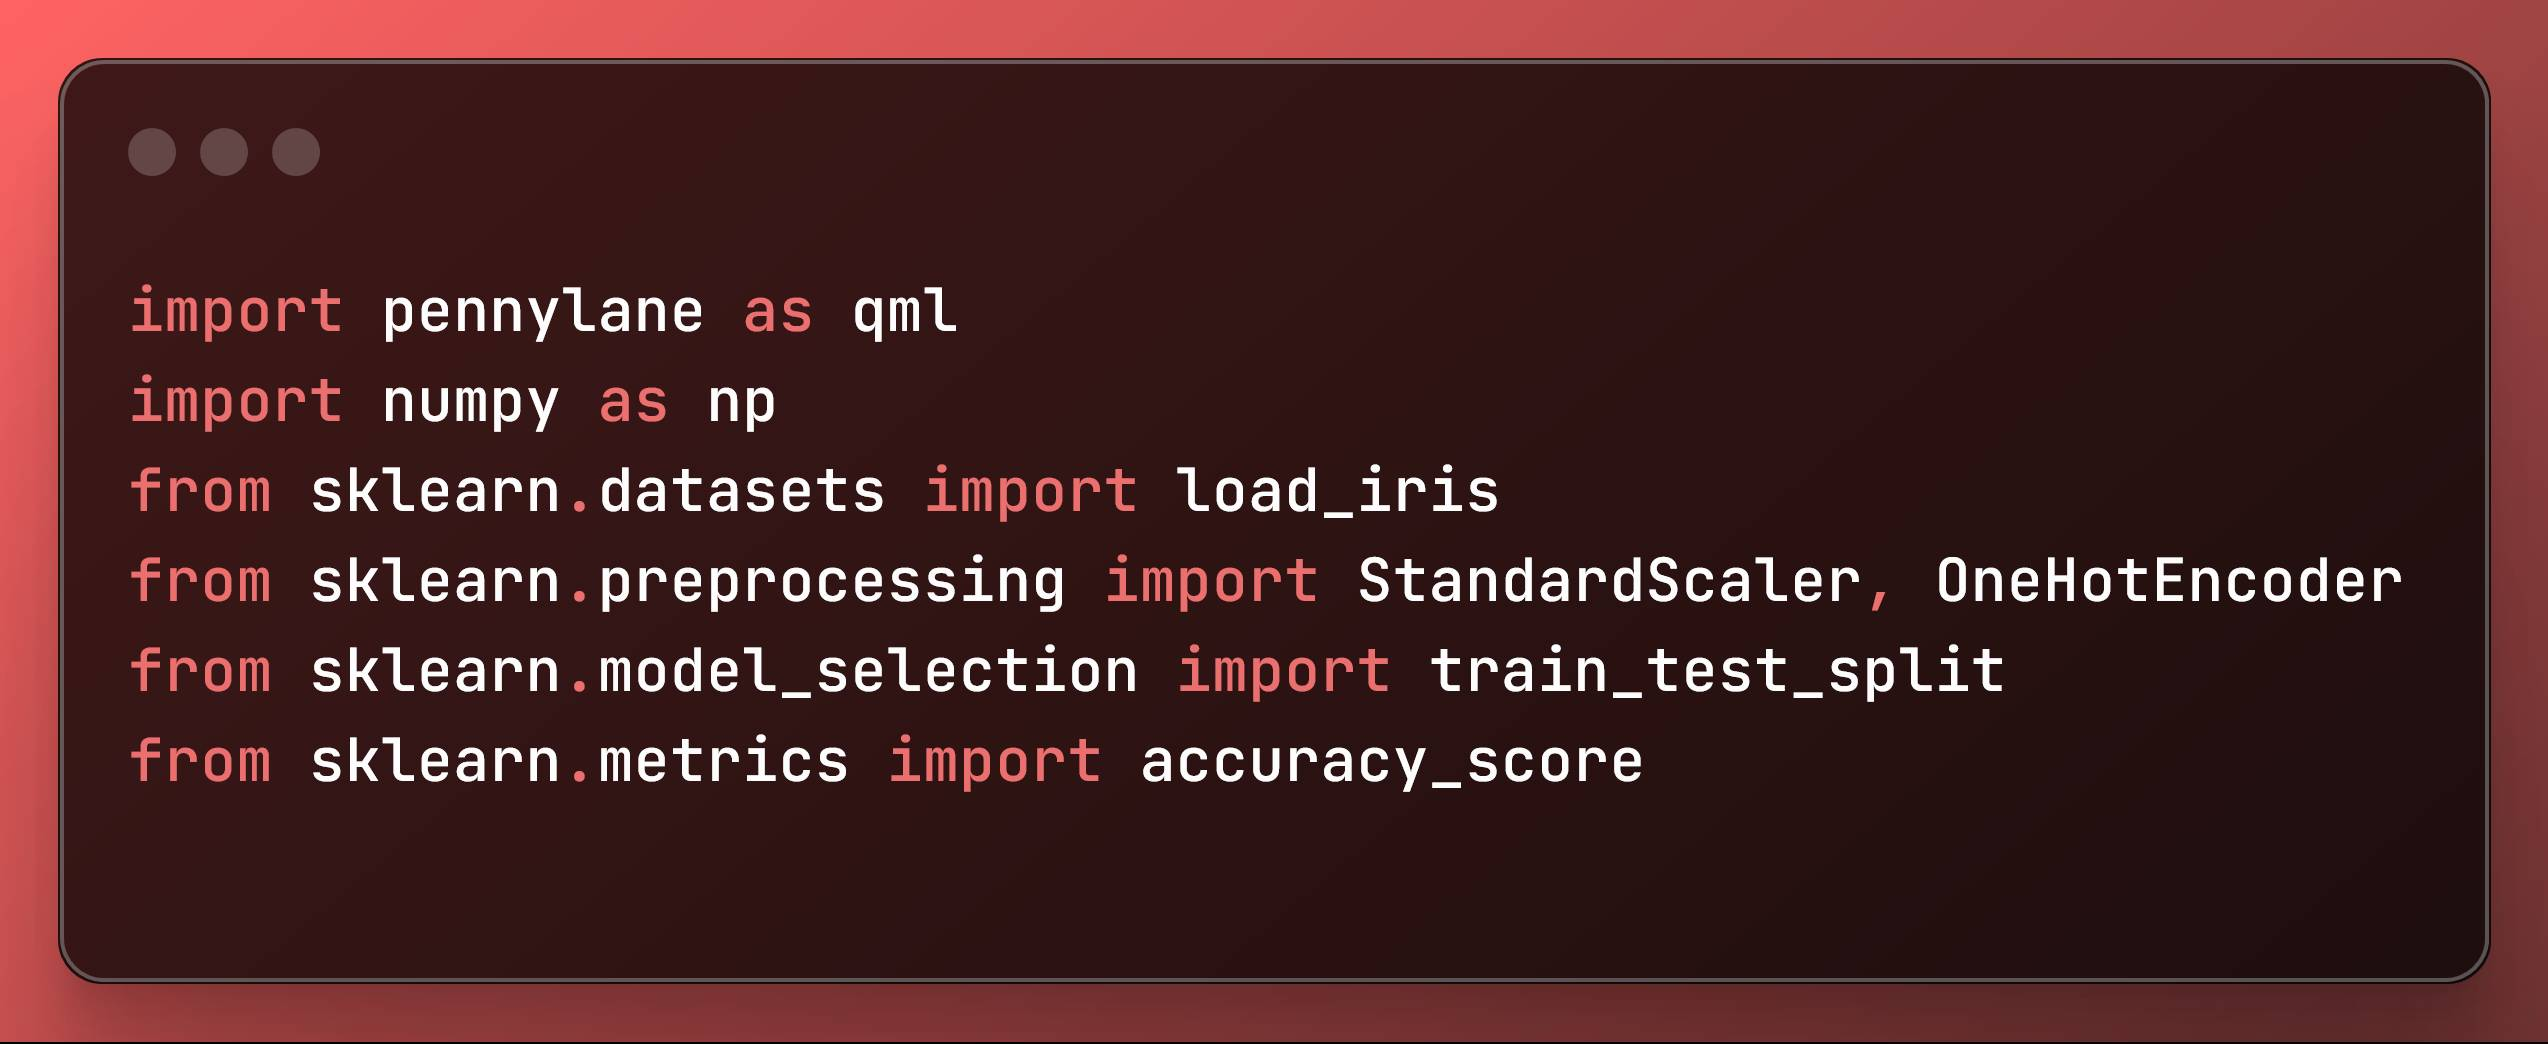 Import Libraries
In this part of the code we imported the necessary libraries:
pennylaneandpennylane.numpy: For creating and manipulating quantum circuits.sklearn.datasets: To load the Iris dataset.sklearn.preprocessing: For data preprocessing like scaling and encoding.sklearn.model_selection: For splitting the data into training and testing sets.sklearn.metrics: To evaluate the model’s accuracy.
Load and Preprocess the Iris Dataset
# Load and preprocess the Iris datasetdata = load_iris()X = data.datay = data.target# Standardize the featuresscaler = StandardScaler()X_scaled = scaler.fit_transform(X)# One-hot encode the labelsencoder = OneHotEncoder(sparse=False)y_onehot = encoder.fit_transform(y.reshape(-1, 1))# Split the datasetX_train, X_test, y_train, y_test = train_test_split(X_scaled, y_onehot, test_size=0.2, random_state=42) Load and Preprocess the Iris Dataset
Here, we prepared the data for training the neural network:
- Loads the Iris dataset and extracts features (
X) and labels (y). - Standardizes the features to have zero mean and unit variance using
StandardScaler. - One-hot encodes the labels for multi-class classification using
OneHotEncoder. - Splits the dataset into training and test sets with a ratio of 80/20.
Define the Quantum Device and Circuit
# Define a quantum devicen_qubits = 4dev = qml.device('default.qubit', wires=n_qubits)# Define a quantum node@qml.qnode(dev)def quantum_circuit(inputs, weights): for i in range(len(inputs)): qml.RY(inputs[i], wires=i) for i in range(n_qubits): qml.RX(weights[i], wires=i) qml.RY(weights[n_qubits + i], wires=i) return [qml.expval(qml.PauliZ(i)) for i in range(n_qubits)]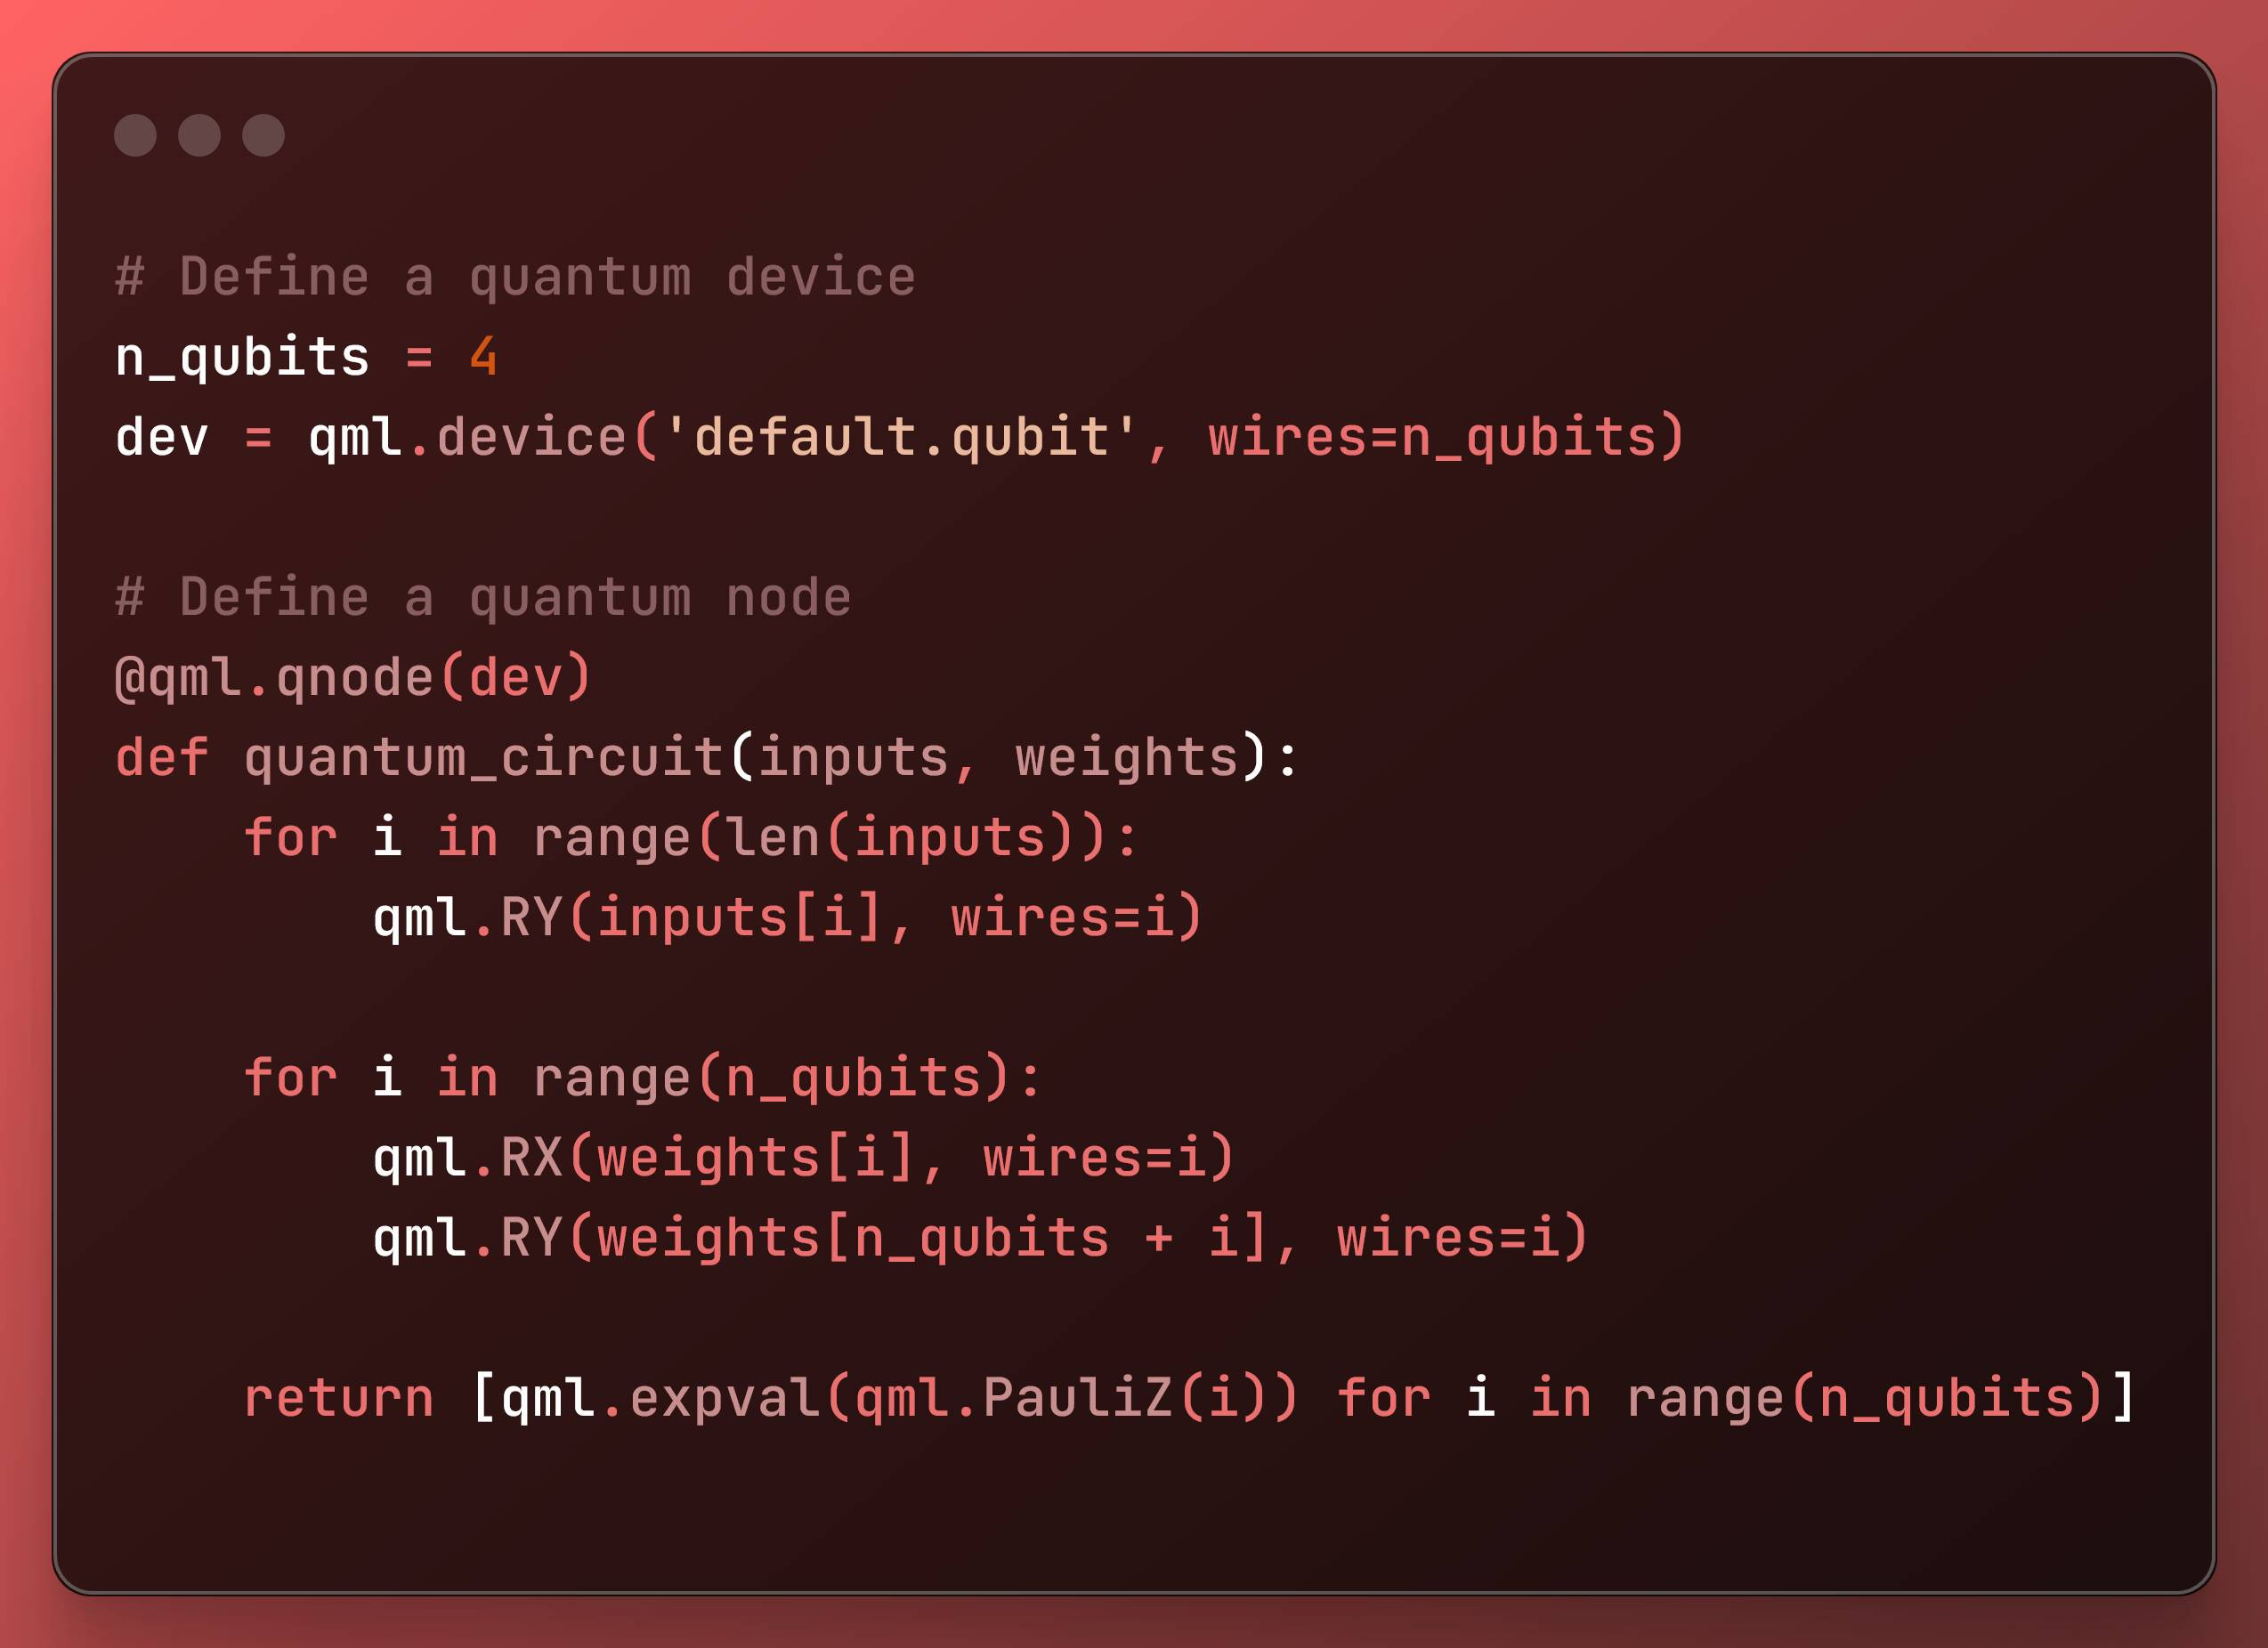 Define the Quantum Device and Circuit
This segment defines the quantum device and circuit:
- Sets up a quantum device with 4 qubits using PennyLane’s default simulator.
- Defines a quantum circuit (
quantum_circuit) that takes inputs and weights. The circuit applies rotation gates (RY,RX) to encode inputs and parameters, and measures the expectation values ofPauliZoperators on each qubit.
Define the Hybrid Model and Initialize Weights
# Define a hybrid quantum-classical modeldef hybrid_model(inputs, weights): return quantum_circuit(inputs, weights)# Initialize weightsnp.random.seed(0)weights = np.random.normal(0, np.pi, (2 * n_qubits,))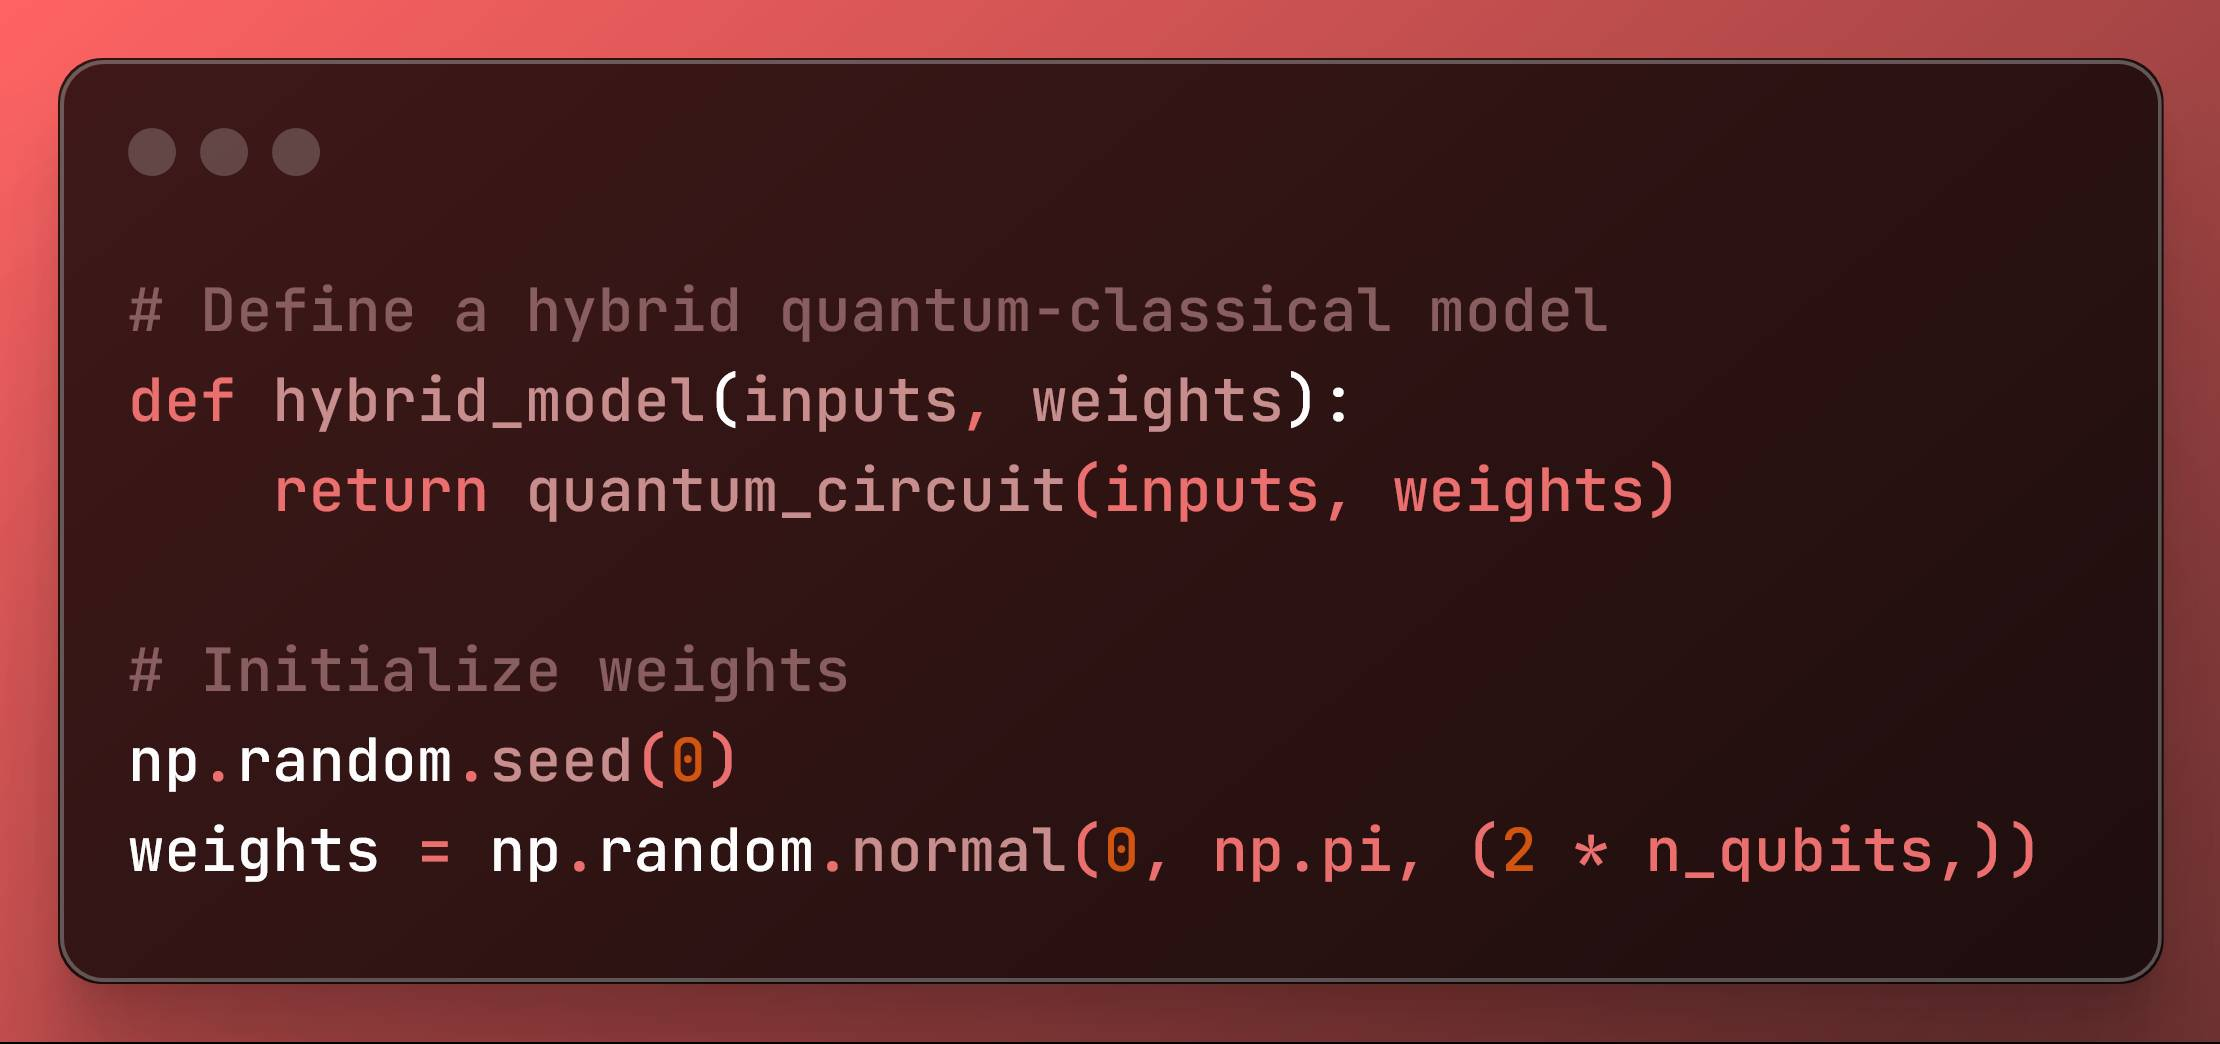 Define the Hybrid Model and Initialize Weights
Here, we actually created the model and started its weights.
- Defines a hybrid model function that utilizes the quantum circuit.
- Initializes the weights for the model using a normal distribution with a specified seed for reproducibility.
Define the Cost Function and Optimize Weights
# Define a cost functiondef cost(weights): predictions = np.array([hybrid_model(x, weights) for x in X_train]) loss = np.mean((predictions - y_train) ** 2) return loss# Optimize the weights using gradient descentopt = qml.GradientDescentOptimizer(stepsize=0.1)steps = 100for i in range(steps): weights = opt.step(cost, weights) if i % 10 == 0: print(f"Step {i}, Cost: {cost(weights)}")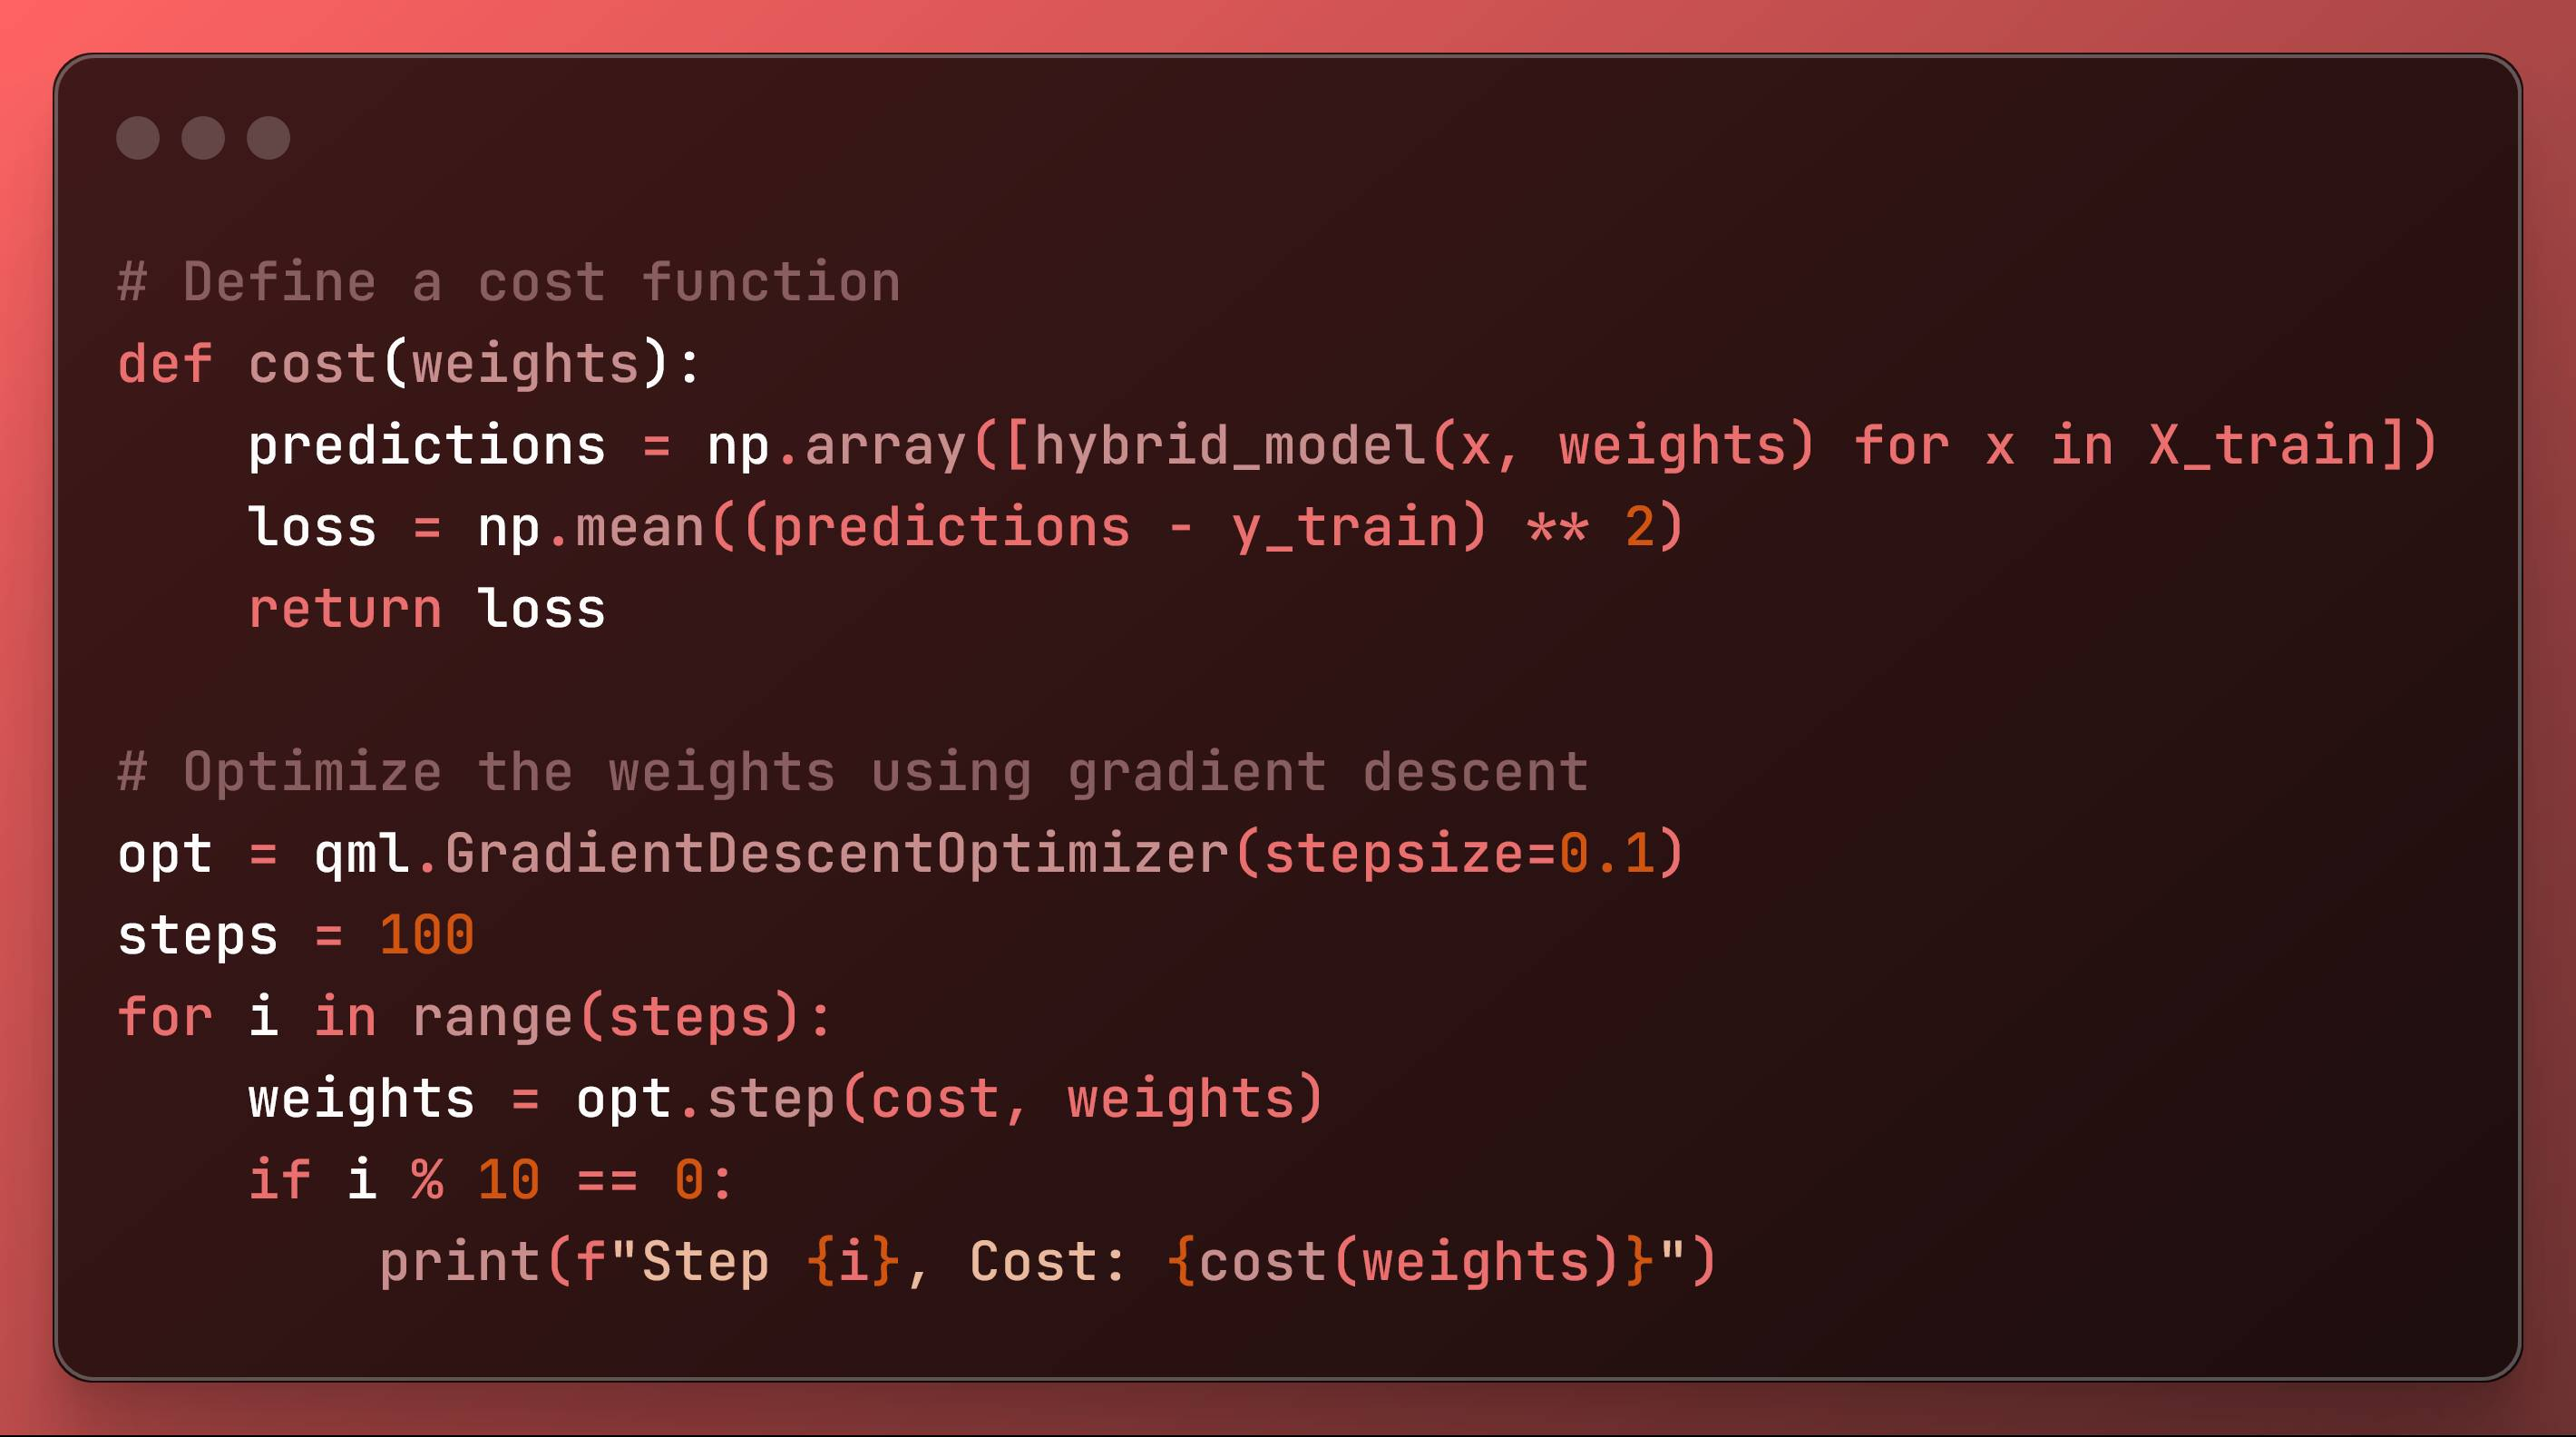 Define the Cost Function and Optimize Weights
Finally, we started training the quantum based neural network.
- Defines a cost function that calculates the mean squared error between predictions and true labels.
- Uses PennyLane’s
GradientDescentOptimizerto minimize the cost function by updating weights iteratively. It prints the cost every 10 steps to track progress.
It prints out:
Step 0, Cost: 0.35359229278282217Step 10, Cost: 0.3145818194833503Step 20, Cost: 0.28937668289628116Step 30, Cost: 0.2733108557682183Step 40, Cost: 0.26273285477208475Step 50, Cost: 0.25532913470009133Step 60, Cost: 0.24973939376050813Step 70, Cost: 0.24517135825709957Step 80, Cost: 0.2411459409849017Step 90, Cost: 0.23735091263019087Test the Model and Evaluate Accuracy
# Test the modelpredictions = np.array([hybrid_model(x, weights) for x in X_test])predicted_labels = np.argmax(predictions, axis=1)true_labels = np.argmax(y_test, axis=1)# Calculate the accuracyaccuracy = accuracy_score(true_labels, predicted_labels)print(f"Test Accuracy: {accuracy * 100:.2f}%")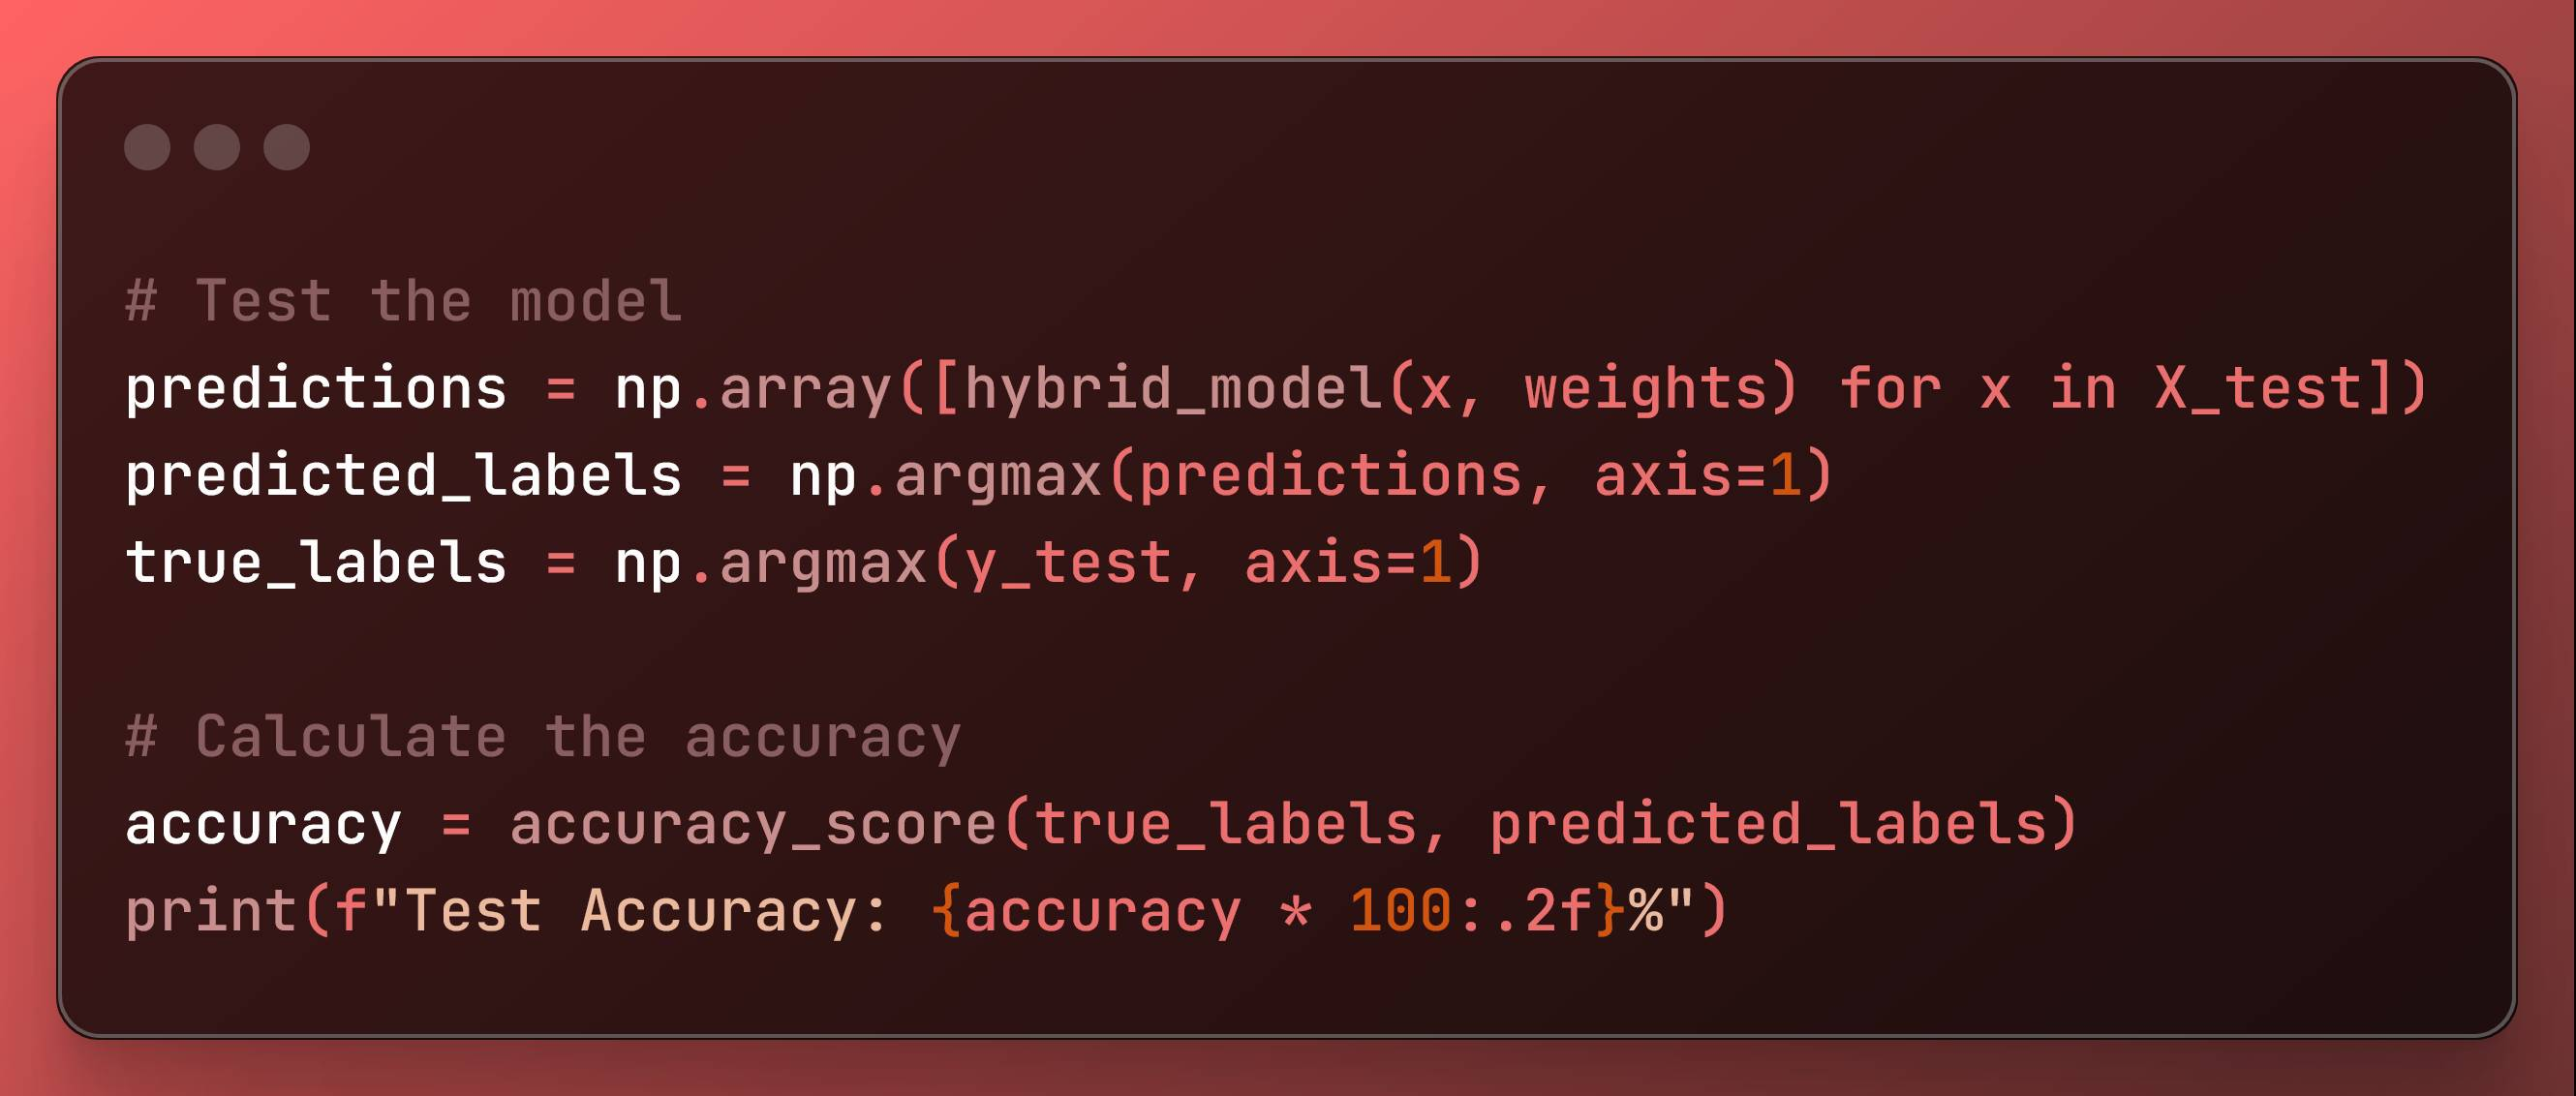 Test the Model and Evaluate Accuracy
Next, we evaluate the trained model:
- Makes predictions on the test set using the optimized weights.
- Converts one-hot encoded predictions and true labels back to class labels.
- Calculates and prints the accuracy of the model using
accuracy_score.
And the final results gave:
Test Accuracy: 66.67%An accuracy of 67% is not a good AI model result. This is because we did not optimize this neural network for this data.
We would need to change the neural network structure to get better results.
However, for this dataset, with just normal neural networks and a library like optuna for hyperparameter optimization, a far bigger accuracy surpassing 98% is possible and can be easily achieved.
Nevertheless, we created a simple quantum AI model.
Conclusion: The Future of Efficient AI Models
 Photo by Pixabay: https://www.pexels.com/photo/low-angle-photography-of-grey-and-black-tunnel-overlooking-white-cloudy-and-blue-sky-210158/
Integrating quantum computing in AI allows the creation of smaller and more efficient AI models. With further advances in quantum technology, it will be more and more applied in AI.
In my point of view, the future of AI will eventually be integrated with quantum computers.
Here is the full code: