包阅导读总结
1. 关键词:Linux 服务器、ClamAV、病毒扫描、恶意威胁、自动化
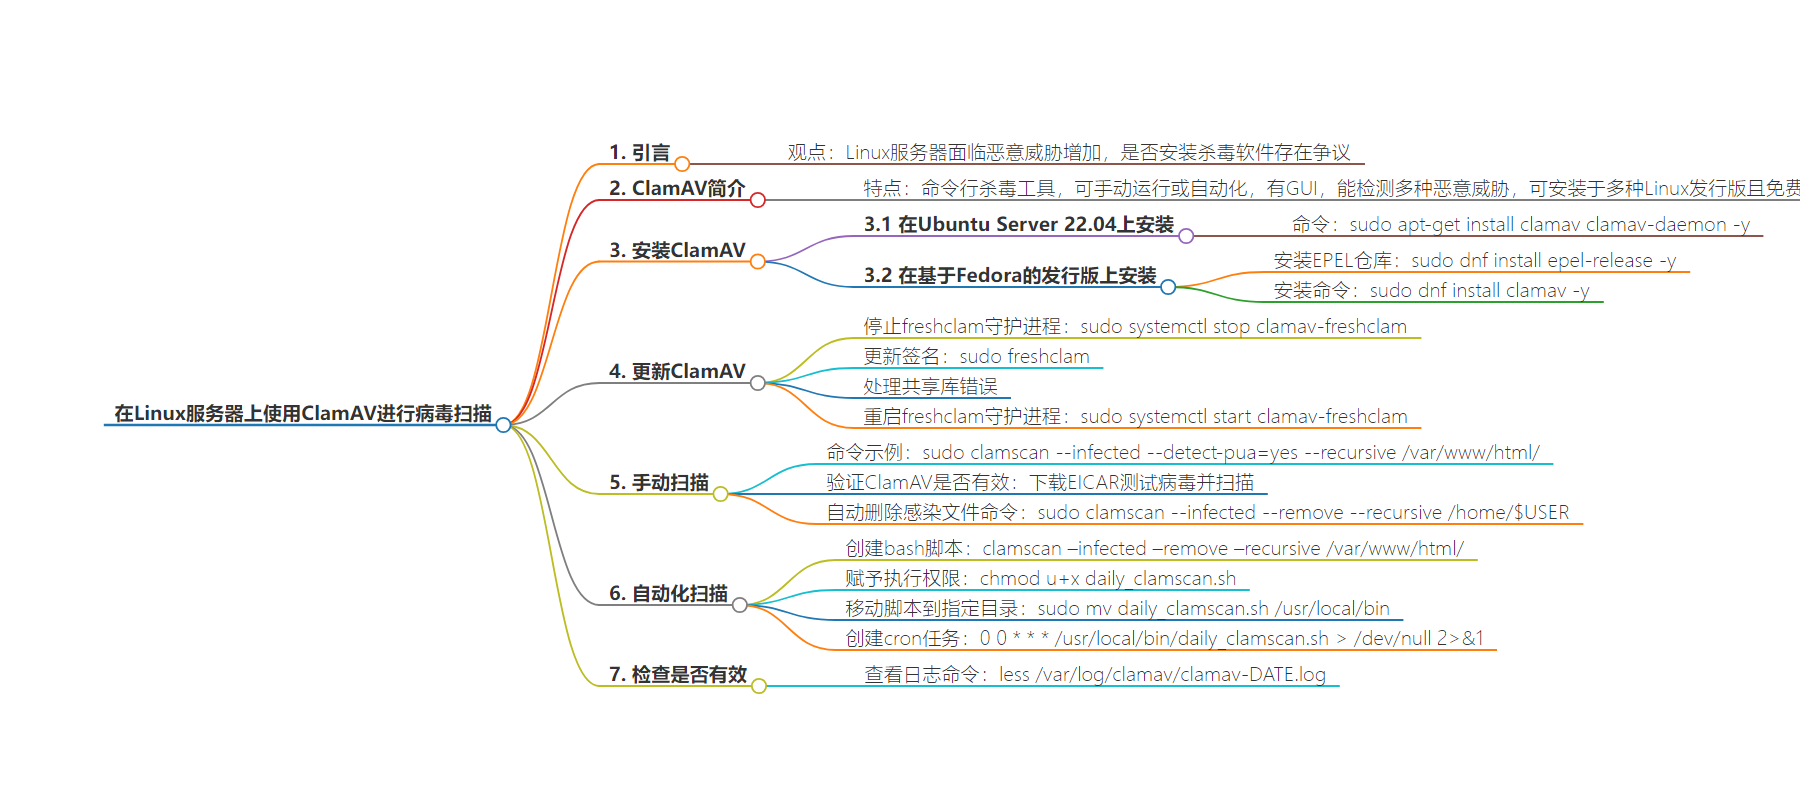
2. 总结:本文介绍了在 Linux 服务器上使用 ClamAV 进行病毒扫描的相关内容,包括安装方法、更新签名、手动扫描、自动扫描设置以及如何确认其是否有效。
3. 主要内容:
– 背景:恶意威胁增多,有时在 Linux 服务器上使用杀毒软件是个好主意。
– ClamAV 简介:命令行杀毒工具,可手动运行或自动化,能检测多种恶意威胁,可安装于多数 Linux 发行版且免费。
– 安装:
– Ubuntu Server 22.04:`sudo apt-get install clamav clamav-daemon -y`
– Fedora 系列:先安装 EPEL 库,再`sudo dnf install clamav -y`
– 更新:先停止 freshclam 守护进程,更新签名,再重启。
– 手动扫描:指定目录进行扫描,可下载测试病毒验证是否有效。
– 自动扫描:创建并配置 bash 脚本和 cron 任务。
– 确认是否有效:查看特定日期的日志文件。
思维导图:
文章地址:https://thenewstack.io/scan-your-linux-server-for-viruses-with-clamav/
文章来源:thenewstack.io
作者:Jack Wallen
发布时间:2024/8/6 16:31
语言:英文
总字数:954字
预计阅读时间:4分钟
评分:89分
标签:Linux 安全,ClamAV,防病毒,服务器管理,Ubuntu
以下为原文内容
本内容来源于用户推荐转载,旨在分享知识与观点,如有侵权请联系删除 联系邮箱 media@ilingban.com
This is often a rather divisive topic, but given how malicious threats are on the rise (even for the Linux operating system), there are many who’ve decided maybe it’s time to take notice of the issue.
That’s not to say you need to immediately jump on the “I have to install every known antivirus and anti-malware software known to humankind on my Linux servers!” bandwagon. You don’t. And, in many cases, you probably don’t need to install such things in the first place.
However, there are instances when antivirus might be a good idea. For example, you could have a Linux mail server in your company. As you know, with email comes attachments that could contain malicious payloads. Say your employees use Linux as their desktop operating system. Although they might not have to concern themselves with antivirus, the people they might forward those attachments to are probably using Microsoft Windows, which is far more vulnerable to malicious code.
You don’t want that prospect hanging over your shoulders. So you could install ClamAV and set it up to automatically scan your server nightly.
I’m going to show you how to do just that.
What Is ClamAV?
ClamAV is a command-line anti-virus tool (although there is a GUI available) that you can install and run manually or use another Linux tool to create an automated job. ClamAV has been around for a very long time and is capable of detecting viruses, trojans, malware and other malicious threats.
ClamAV can be installed on just about any Linux distribution, and it’s free to use.
That said, let’s get to the installation.
Installing ClamAV
First, I’ll demonstrate installing ClamAV on Ubuntu Server 22.04. To do this, log into your Ubuntu Server instance and issue the command:
|
sudo apt–get install clamav clamav–daemon –y |
If you’re using a Fedora-based distribution (such as RHEL or AlmaLinux), you must first install the EPEL repository with:
|
sudo dnf install epel–release –y |
Once that installation finishes, run an update with:
Finally, install ClamAV with the command:
|
sudo dnf install clamav –y |
Installation is complete.
Updating ClamAV
Once you have ClamAV installed, it’s time to update its virus signatures. Before you do this, you have to first stop the freshclam daemon with the command:
|
sudo systemctl stop clamav–freshclam |
Once that’s taken care of, update the ClamAV signatures with:
If you receive a shared library error, resolve it with:
Restart the freshclam daemon with:
|
sudo systemctl start clamav–freshclam |
Run a Manual Scan
We can now run a manual scan on our server. Let’s say you want to run a scan on the /var/www/html directory. For that, issue the command:
|
sudo clamscan —infected —detect–pua=yes —recursive /var/www/html/ |
The above command will recursively scan the configured directory for infected files and check for possibly unwanted applications (using –-detect-pua=yes). Hopefully, the scan will come back negative. You can run that command on any directory you like. Just know that if you run the command on the root directory (/), it will take considerable time.
If you want to verify if ClamAV works, you can download the EICAR test virus with the command:
|
wget –P ~/ https://secure.eicar.org/eicar.com.txt |
This will add the file eicar.com to your home directory. Run the scan on that directory with:
|
sudo clamscan —infected —detect–pua=yes —recursive /home/$USER |
ClamAV will detect that file report back. You can run the command and have ClamAV automatically remove any infected file with the command:
|
sudo clamscan —infected —remove —recursive /home/$USER |
That should take care of the EICAR test file.
Automate the Scan
To do this, we’re going to create a bash script that will scan the /var/www/html directory. Create the script with:
In that file, add the following:
#!/bin/bash
clamscan –infected –remove –recursive /var/www/html/
Save and close the file.
Give the file executable permissions with:
|
chmod u+x daily_clamscan.sh |
Move the file into the /usr/local/bin directory with
|
sudo mv daily_clamscan.sh /usr/local/bin |
Create the new cron job (using sudo permissions) with:
We’ll have the scan run at midnight every day. At the bottom of the file, add the following:
We have to use > /dev/null 2>&1 to silence the output of our script, otherwise, the cronjob will fail.
Save the cronjob and you’re done. The script will run every midnight and scan the /var/www/html directory for infected files.
How to Know If It’s Working
Because our bash script is very simple, you might want to know if ClamAV actually finds something. For that, you can view the necessary log file with the command:
|
less /var/log/clamav/clamav–DATE.log |
Where DATE is the date of the log you want to view (in the form YEAR-MONTH-DAY). That log will include the output from the command, such as:
Known viruses: 8710515
Engine version: 0.103.11
Scanned directories: 17
Scanned files: 12
Infected files: 1
Data scanned: 0.49 MB
Data read: 0.26 MB (ratio 1.88:1)
And there ya go. You now have an automated virus scanner on your Linux server, and it didn’t cost you a penny (or much time). Hopefully, this will ease your concerns about malicious files on those Linux-powered servers.
YOUTUBE.COM/THENEWSTACK
Tech moves fast, don’t miss an episode. Subscribe to our YouTubechannel to stream all our podcasts, interviews, demos, and more.
