
包阅导读总结
1. 富文本编辑器、Prosemirror、Tiptap、文档结构、更新流程
2. 本文介绍了富文本编辑器从 Prosemirror 到 Tiptap 的相关内容,包括 Prosemirror 的架构模块、文档结构、初始化和更新流程,还阐述了 Tiptap 的优势、核心概念、构造实例等。
3.
– 富文本编辑器基础
– Prosemirror
– 架构核心模块:包括 model、state、view、transform
– 文档结构:基于 inline + mark,相比树状结构有优势
– 初始化流程:创建规范标准、state、view
– 更新流程:保证 state 和 view 一致性
– Tiptap
– 优势:基于 Prosemirror、可扩展、易定制等
– 核心概念
– Command:包括常用命令和链式调用
– Extension:分为 Node、Mark、Extension 三种类型,有多种核心选项
– 继承:可对已有 extension 进行特性修改和逻辑添加
– 构造 editor 实例:基于@tiptap/react 的 useEditor 创建
思维导图:
文章地址:https://juejin.cn/post/7398045595485634569
文章来源:juejin.cn
作者:Lsx_
发布时间:2024/8/1 9:26
语言:中文
总字数:4752字
预计阅读时间:20分钟
评分:85分
标签:前端开发,富文本编辑器,ProseMirror,Tiptap,编辑器架构
以下为原文内容
本内容来源于用户推荐转载,旨在分享知识与观点,如有侵权请联系删除 联系邮箱 media@ilingban.com
简介
虽然大家都知道富文本是基于html和css来渲染的,但是如何可视化的修改这些html以及css却是富文本编辑器需要解决的问题。
浏览器提供了contenteditable使得元素可以编辑,以及document.execCommand让js具备能力去改变元素。但直接用这两个能力去做富文本编辑器是很坑的。
所以一般富文本编辑器都采用如下的架构:
Prosemirror
prosemirror核心有四个模块。
prosemirror-model:定义编辑器的文档模型,用来描述编辑器内容的数据结构。
prosemirror-state:描述编辑器整体状态,包括文档数据、选择等。
prosemirror-view:UI组件,用于将编辑器状态展现为可编辑的元素,处理用户交互。
prosemirror-transform:修改文档的事务方法。
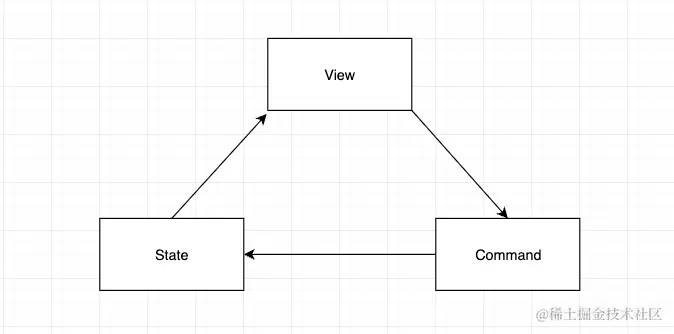
可以发现,prosemirror的核心模块和上述架构是完全对应得上的。因此本文就从state、view,transform三个方面来探索prosemirror的实现原理。
文档结构
HTML的文档结构是树状的,而prosemirror采用的是基于inline + mark的数据结构。每个文档就是一个node,node包含一个fragment,fragment包含一个或者多个子node。其中核心是node的数据结构。
对比如下(来自官网)。
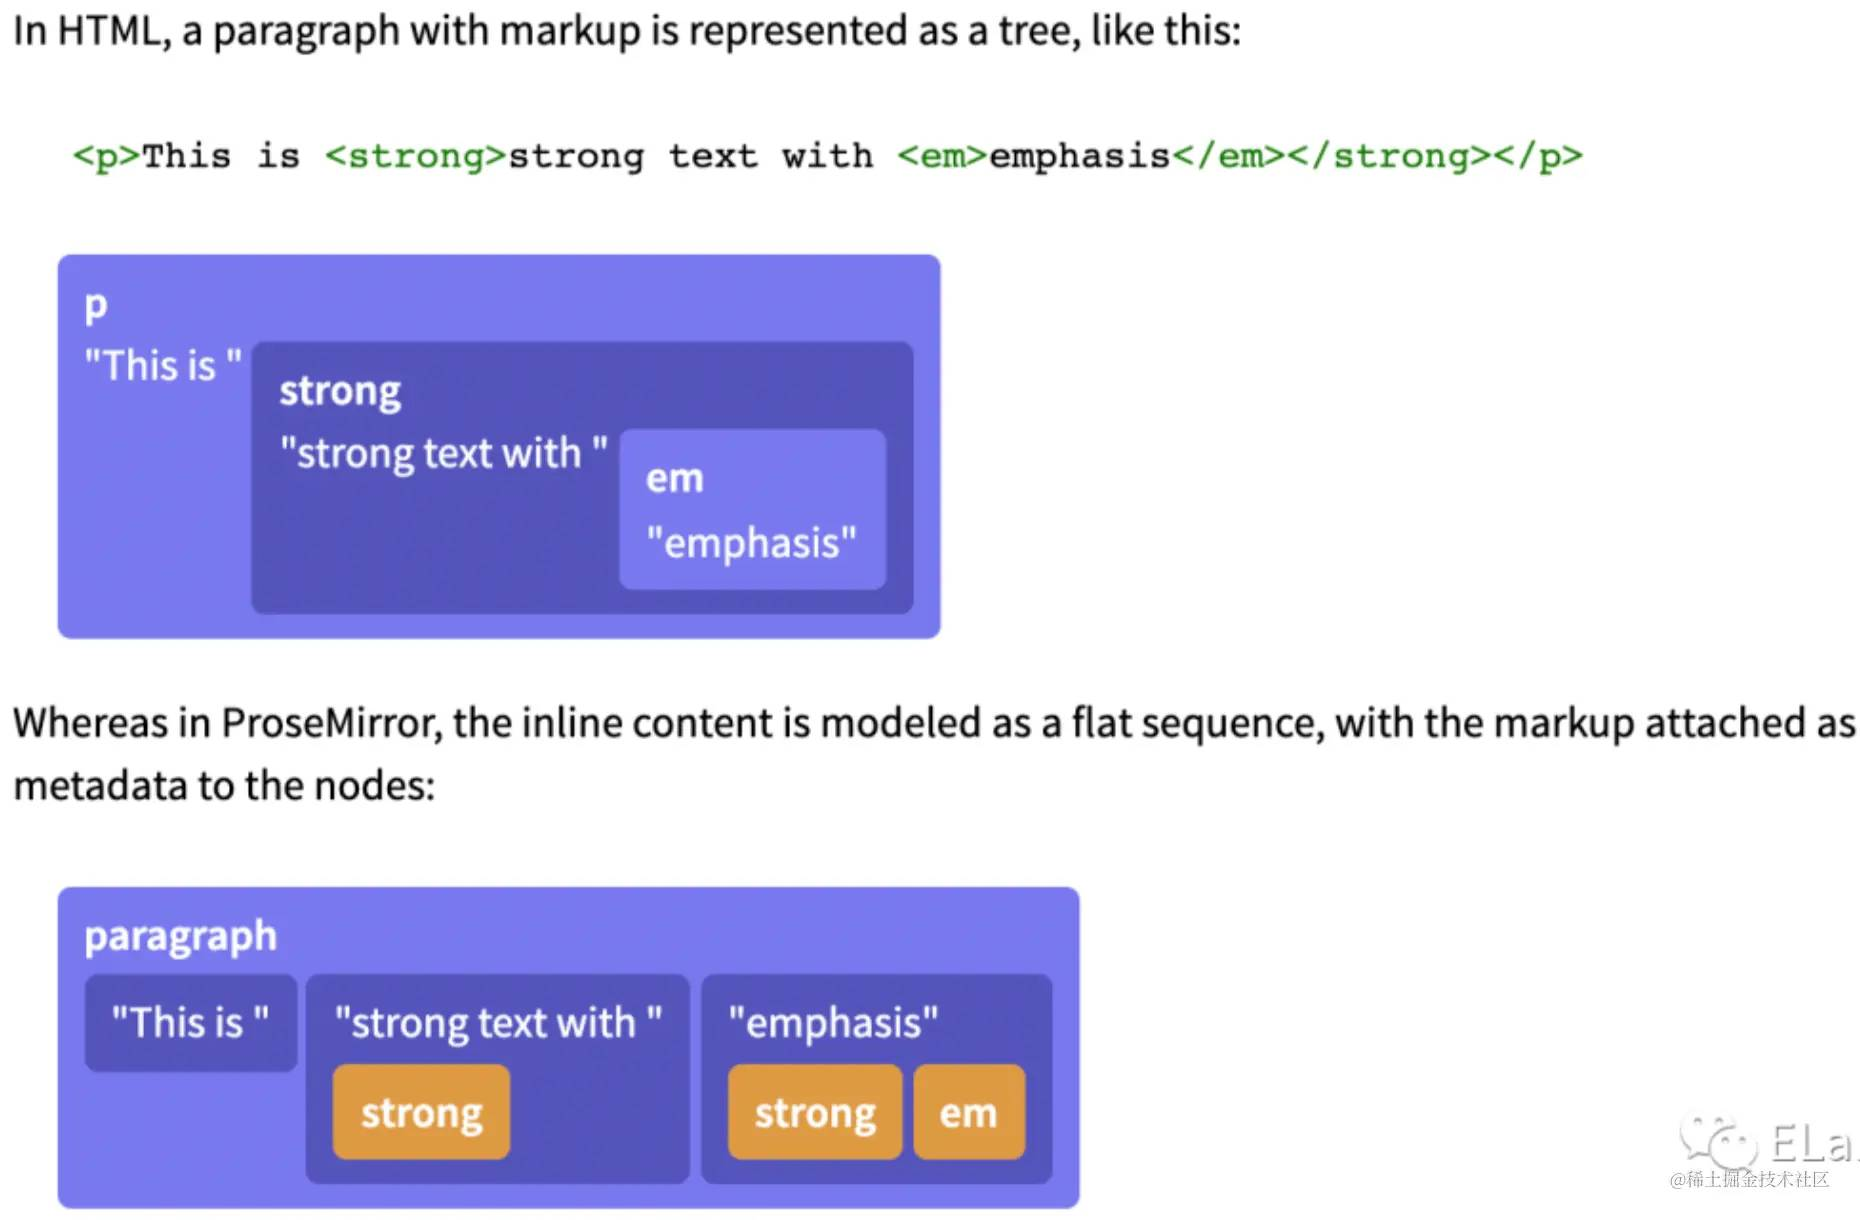
在prosemirror中,p是一个节点,其有三个子节点this is,string text with以及emphasis。而类似strong,em这些非内容本身,仅仅是用来装饰内容的东西,就作为文本的mark存储在文本节点里面了。这样就从树状结构变成了inline的结构。
这里面有一个核心的好处是,如果是树状结构,我们对于一个既strong又em的文字,有如下两种描述方式。
<strong><em>helloworld</em></strong>和
<em><strong>helloworld</strong></em>显然,这样的话,文档数据就会不稳定,同样的展示将会对应不用的数据,问题很大。如果采用prosemirror的存储结构,类似上图的emphasis,只要保证各mark的排序是稳定的,其数据结构就是唯一的。
除了上述这个优点以外,针对富文本编辑这个场景,这种数据结构还有其他的优势。
- 更符合用户对文本操作的直观感受,可以通过偏移量来描述位置,更加轻易的做分割。
state层
prosemirror的state并不是固定的,而是可以扩展的,但其有基本的四个属性:doc、selection、storedMarks、scrollToSelection。不过其中最核心的应该是doc,也就是文档结构,里面存放的是文档数据。
view层
view调用updateState(也就是根据state来更新视图)时,会调用节点的toDOM方法来创建DOM元素,从而渲染到浏览器上。
相应的还有parseDOM方法,可以根据DOM元素,序列化成文档数据。
每次初始化,或者有state有更新的时候,都会触发updateState方法,从而完成界面的更新。
transform层
在更新流程中,当view发生变化时,会构建transaction(其父类就是transform),来更新state。
Prosemirror 初始化流程
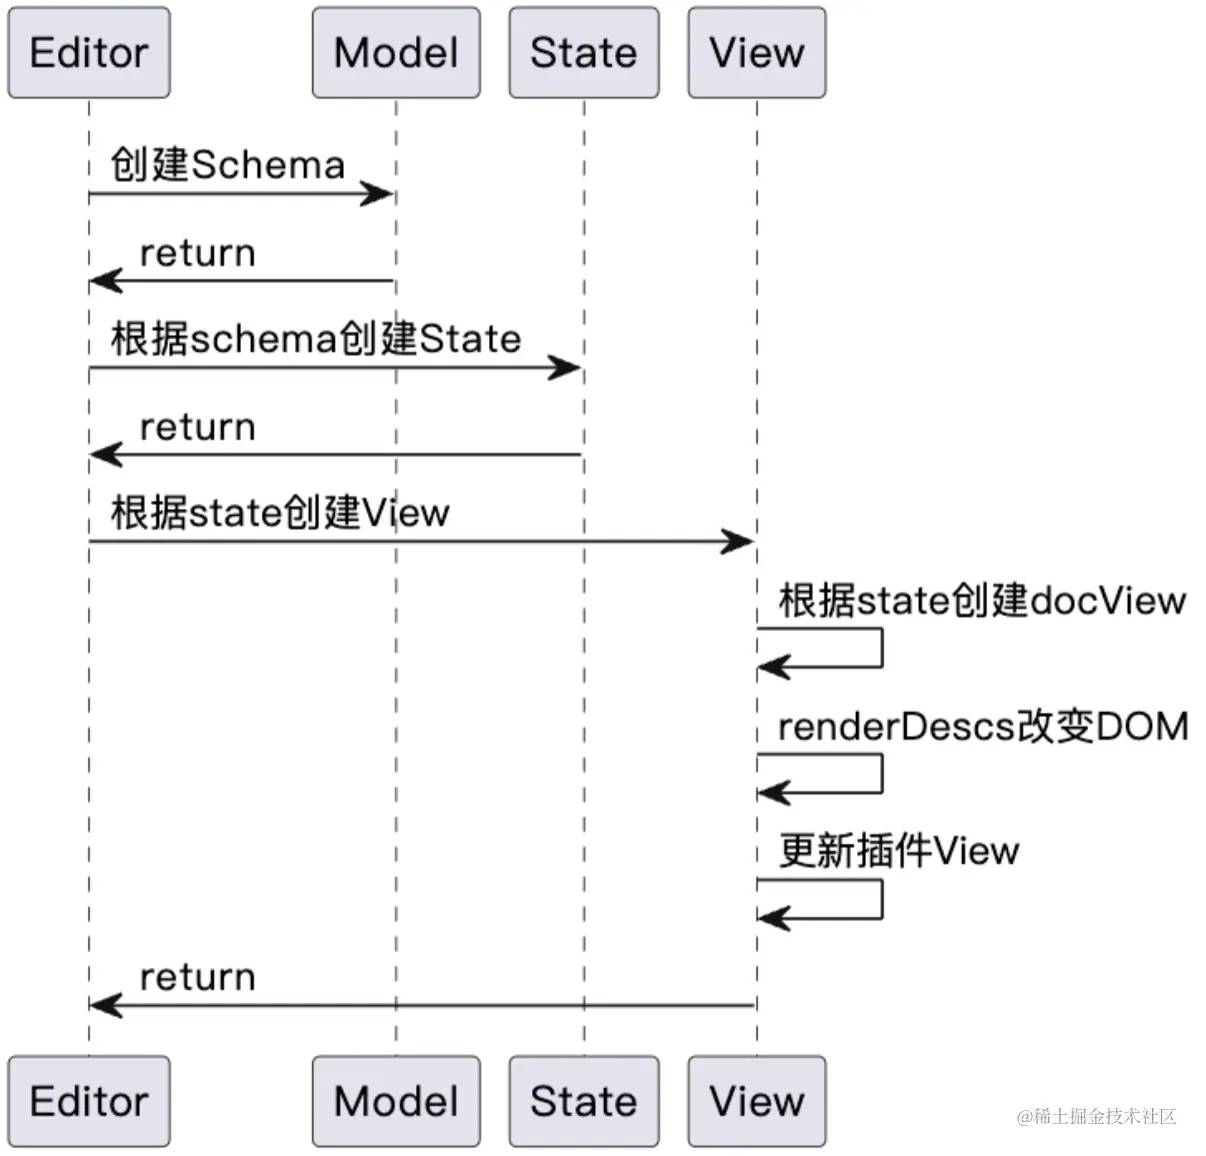
首先看一下prosemirror的初始化代码。
constdemoSchema=newSchema({nodes:addListNodes(schema.spec.nodes,"paragraphblock*","block"),marks:schema.spec.marks}) letstate=EditorState.create({doc:DOMParser.fromSchema(demoSchema).parse(document.querySelector("#content")),plugins:exampleSetup({schema:demoSchema})}) letview=EditorView(document.querySelector('.full'),{state})初始化先是创建文档数据的规范标准,类似约定了数据模型。其次创建了state,state是需要满足schema规范的。最后根据state创建了view,view就是最终展现在用户面前的富文本编辑器UI。因为初始化的时候还没有用户操作的介入,所以并不涉及command也就是transform的引入。
编辑器初始化的详细流程图如下:
因为此类架构的富文本编辑器本质是F(state) = view,界面是由数据驱动的,而contenteditable的元素又是非受控的,所以保证状态和界面的一致性是非常重要的。
在上述创建状态的代码中,DOMParser解析了id为content的元素的内容,并将其传给了状态的工厂函数。DOMParser,顾名思义就是解析DOM元素的,其核心作用就是将元素内容同步到状态中,准确的说是state中的doc属性。
letstate=EditorState.create({doc:DOMParser.fromSchema(demoSchema).parse(document.querySelector("#content")),plugins:exampleSetup({schema:demoSchema})})Prosemirror 更新流程
当用户在编辑器里面输入一个字符的时候,会触发更新流程。详细的更新流程如下:
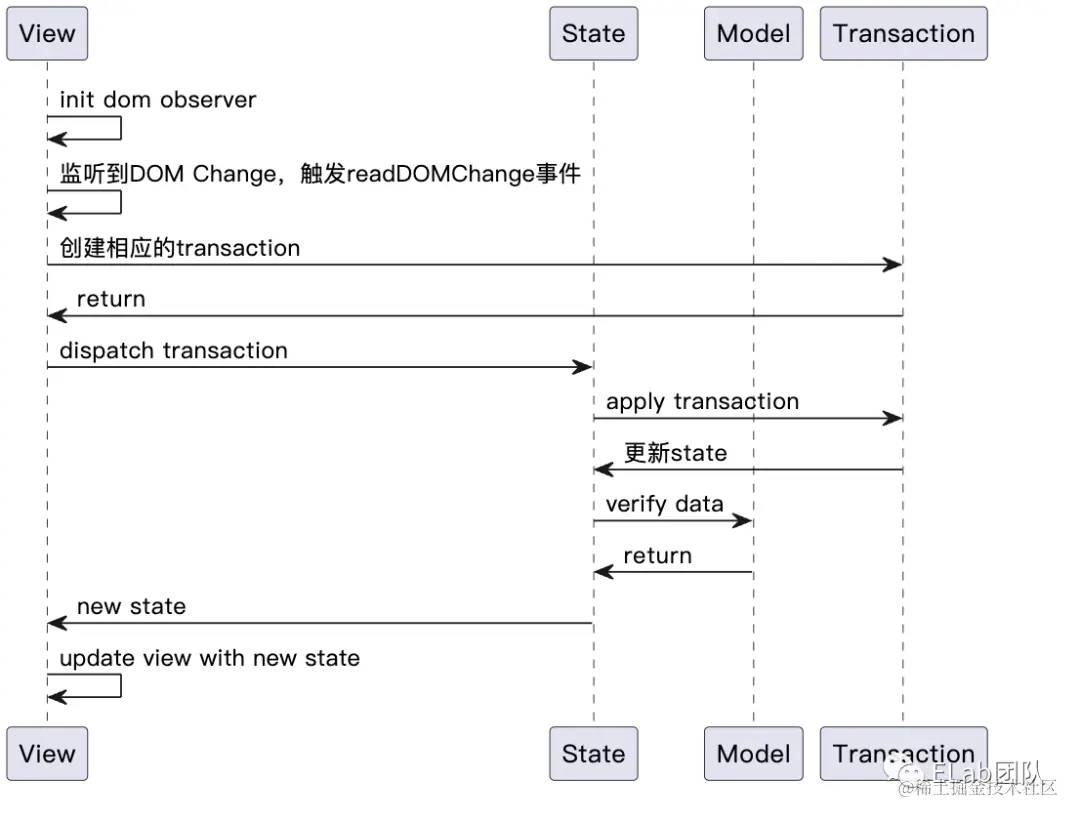
输入字符会触发view变化,继而更新state,保证state和view的一致性。如果我们输入的是自定义的元素,就会在触发state更新之后,再通过updateState方法更新view,展示自定义的元素。
Tiptap
Tiptap 是一个基于 ProseMirror 构建的富文本编辑器,因其灵活性和可扩展性而备受关注。以下是 Tiptap 编辑器相对于其他富文本编辑器的一些优势:
-
基于 ProseMirror:
- ProseMirror 是一个强大的编辑框架,提供了可靠的文档模型和编辑功能。
- Tiptap 继承了 ProseMirror 的强大功能,同时简化了其使用和配置。
-
可扩展性:
- Tiptap 提供了丰富的插件系统,可以根据需要添加或移除功能。
- 用户可以轻松地创建自定义扩展和插件,以满足特定需求。
-
易于定制:
- Tiptap 的配置和定制非常灵活,可以根据需求调整编辑器的外观和功能。
- 提供了丰富的 API 接口,方便开发者进行二次开发。
-
社区支持:
- 其代码库维护良好,文档详尽,易于上手。
- Tiptap 拥有活跃的社区和开发团队,提供了及时的支持和更新。
- 有丰富的示例和教程,帮助用户快速上手和解决问题。
-
丰富的功能:
- 支持多种文本格式和样式,如粗体、斜体、下划线、列表、表格、图片、链接等。
- 提供了 Markdown 支持,可以在编辑器中直接使用 Markdown 语法。
-
支持 Vue 和 React:
- Tiptap 提供了对 Vue 和 React 框架的良好支持,方便在这些框架中集成和使用。
- 提供了 Vue 和 React 的封装组件,减少了集成的复杂性。
-
实时协作:
- Tiptap 提供了对实时协作编辑的支持,可以方便地集成协作功能。
- 通过 WebSocket 或其他实时通信技术,可以实现多人协作编辑。
构造 editor 实例
import { useEditor, EditorContent } from '@tiptap/react';function TiptapEditor({ content }: { content?: string }) { const editor = useEditor({ extensions: [ StarterKit, ], content, onUpdate(props) { }, }); return ( <div style={{ position: 'relative', height: '100%', overflow: 'auto' }}> <EditorContent editor={editor} /> </div> );}基于@tiptap/react 的 useEditor创建编辑器实例。EditorContent组件 用于渲染编辑器,extensions 选项指定编辑器的扩展。
StarterKit 是 tiptap 提供的入门套件 extension,它包含了所有常用的编辑器功能
核心概念
Command
以用于加粗的 @tiptap/extension-bold extension 为例,由于已包含在入门套件,直接使用命令即可
const handleBold = () => { editor.commands.toggleBold(); };editor 命令
其中 insertContent,updateAttributes 是常用基础命令
以插入图片为例:
editor.commands.setImage({ src: "https://www.baidu.com/logo.png" });setImage 命令源代码实现:
addCommands() { return { setImage: options => ({ commands }) => { return commands.insertContent({ type: this.name, attrs: options, }) }, }},可以看到setImage内部依旧调用 insertContent 基础命令。因此,下面两行代码互相等价
editor.commands.setImage({ src: "https://www.baidu.com/logo.png" });editor.commands.insertContent({ type: "image", attrs: { src: "https://www.baidu.com/logo.png" },});链式调用
editor.chain() 命令提供命令链调用
editor .chain() .focus() .toggleBold() ... .run() extension
extension 分为这 3 种类型拓展:Node、Mark、Extension
Node
创建一个新节点类型
import { Node } from "@tiptap/core";const Video = Node.create({ type: "video", renderHTML(){ ... }, parseHTML(){ ... }})Mark
可以对节点应用一个或多个标记,例如为文本添加内联样式
import { Mark } from "@tiptap/core";const FontSize = Mark.create({ name: "fontSize", ...})Extension
以上 2 种类型都基于 Extension 基础类,通过定义基础的 extension 添加全局特性
import { Extension } from "@tiptap/core";const Float = Extension.create({ name: "uniqueId", addGlobalAttributes() { ... } ...})extension 核心选项
name
扩展名称,代表内容类型/特性唯一名称
editor.commands.insertContent({ type: "image", attrs: { src: "https://www.baidu.com/logo.png" },});editor.commands.setMark("bold"); group
定义节点所属的内容组,值可以是 block/inline/有效type值,供 content 选项引用
content
定义节点可以包含的内容类型。不符合的内容会被丢弃
content: 'block+',content: 'block*',content: 'inline*',content: 'text*',content: '(paragraph|list?)+',content: 'heading block+'inline
节点是否内联显示。为 true 时,节点会与文本一起并列行呈现。
addOptions
声明 extension 使用时配置项,供拓展使用者控制 extension 行为
如 @tiptap/extension-image 的 addOptions 选项:
addOptions() { return { inline: false, allowBase64: false, HTMLAttributes: {}, } }, group() { return this.options.inline ? 'inline' : 'block' }, parseHTML() { return [ { tag: this.options.allowBase64 ? 'img[src]' : 'img[src]:not([src^="data:"])', }, ] },import Image from "@tiptap/extension-image";const editor = new Editor({ element: document.querySelector(".editor"), extensions: [Image.configure({ inline: true, allowBase64: true })],});addAttributes
设置节点/标记状态,注意到它返回一个函数,即为每个节点/标记实例添加独立状态
addAttributes() { return { src: { default: null, }, alt: { default: null, }, title: { default: null, }, }},默认未添加额外声明时,tiptap 节点属性(attributes)会作为 DOM HTMLAttributes,渲染到 DOM 节点上。
同时,也可以通过 renderHTML 如何消费你声明的属性,自定义渲染输出;也可以通过 parseHTML 定义外部输入时(向 editor 插入 HTML 或粘贴)如何解析出属性值。
addAttributes() { return { color: { default: null, parseHTML: element => element.getAttribute('data-color') || element.style.backgroundColor, renderHTML: attributes => { if (!attributes.color) { return {} } return { 'data-color': attributes.color, style: `background-color: ${attributes.color}; color: inherit`, } }, }, }},如果只想新增一个单纯状态,避免默认作为 DOM HTMLAttributes,设置 rendered: false 即可
addAttributes() { return { level: { default: 1, rendered: false, }, }},editor 基础命令 updateAttributes 可以用来更新节点属性
editor.commands.updateAttributes("heading", { level: 2 });...renderHTML
通过 renderHTML 函数,您可以控制如何将扩展渲染为 HTML,同时也影响 editor.getHTML() 返回值
这与 addAttributes 内的 renderHTML 选项不同,后者用于如何消费 node 属性attribute,前者用于渲染节点/标记的容器,且此时 DOM 的 HTMLAttribute 已被计算。
renderHTML({ HTMLAttributes }) { return ['strong', HTMLAttributes, 0] },renderHTML 返回一个数组,第一个值是 HTML 标签名; 如果第二个元素是一个对象,它将被解释为一组属性; 第三个参数 0 用于表示内容应插入的位置;
通过自定义 renderHTML 逻辑,可以额外的添加 HTMLAttributes
import { mergeAttributes } from '@tiptap/core'renderHTML({ HTMLAttributes }) { return ['a', mergeAttributes(HTMLAttributes, { rel: this.options.rel }), 0]},parseHTML
parseHTML 选项用于定义外部 HTML 字符串解析为 Node 的方法,HTML 字符串的未匹配并解析内容将无法插入编辑器
parseHTML() { return [ { tag: 'strong', }, { tag: 'b', getAttrs: node => (node as HTMLElement).style.fontWeight !== 'normal' && null, }, ]},addNodeView
通过添加节点视图,为编辑器添加了交互的或内嵌内容类型
addNodeView 作为一个extension配置,它和 renderHTML 有共同点,都能控制节点最终在编辑区渲染结果;
renderHTML 最核心作用是 editor.getHTML 如何将节点转换为html文本用于存储,编辑器默认将renderHTML作为编辑区渲染依据
但节点视图支持开发者自定义一个类型Node在编辑区上的dom中。
extension 继承
如果针对某一个extension进行添加特性修改部分逻辑,tiptap提供 Node.extend 以 extension 继承实现
如下为 @tiptap/extension-bullet-list 新增 listStyleType 特性,打造一个支持修改无序列表 list-style 的新 bullet list extension
import BulletList from "@tiptap/extension-bullet-list";export default BulletList.extend({ addAttributes() { return { ...this.parent?.(), listStyleType: { default: "disc", parseHTML: (element) => { const listStyleType = element.style["list-style-type"]; return { listStyleType: listStyleType || "disc" }; }, renderHTML: (attributes) => { return { style: `list-style-type: ${attributes.listStyleType}` }; }, }, }; },});自定义 Node
如下代码定义了一个AIImage的节点,并渲染节点为AiImageView
import { mergeAttributes, Node } from '@tiptap/core';import { ReactNodeViewRenderer } from '@tiptap/react';import Image from '@tiptap/extension-image';import UImageComponent from './u-image-component';import AiImageView from './AiImageView';declare module '@tiptap/core' { interface Commands<ReturnType> { uImage: { setImage: (options: { src: string; alt?: string; title?: string; width?: string | number; height?: string | number; file?: File; }) => ReturnType; }; aiImage: { setAiImage: (options: { pos: number; value?: string }) => ReturnType; }; }}export const AIImage = Node.create({ name: 'aiImage', group: 'block', atom: true, addAttributes() { return { value: { default: '', renderHTML(attributes) { return { value: attributes.value, }; }, parseHTML(element) { return element.getAttribute('value'); }, }, }; }, renderHTML({ HTMLAttributes }) { return [ 'div', mergeAttributes(this.options.HTMLAttributes, HTMLAttributes, { 'data-type': this.name, }), ]; }, parseHTML() { return [ { tag: `div[data-type="${this.name}"]`, }, ]; }, addNodeView() { return ReactNodeViewRenderer(AiImageView); }, addCommands() { return { setAiImage: (options) => ({ commands }) => commands.insertContentAt(options.pos, { type: this.name, attrs: options, }), }; },});NodeViewContent
NodeViewContent其实就是个占位符,它会被替换成节点的实际内容。它确保这些内容能够正确地被渲染,并且可以在编辑器中进行编辑。
首先自定义节点:
import { mergeAttributes, Node } from '@tiptap/core';import { ReactNodeViewRenderer } from '@tiptap/react';import Component from './card-component';export const Card = Node.create({ name: 'card', group: 'block', content: 'optionList', addAttributes() { return { title: { default: '', renderHTML(attributes) { return { title: attributes.title, }; }, parseHTML(element) { return element.getAttribute('title'); }, }, }; }, parseHTML() { return [ { tag: `div[data-type="${this.name}"]`, }, ]; }, renderHTML({ HTMLAttributes }) { const attrs = mergeAttributes(HTMLAttributes, { 'data-type': this.name, }); return ['div', attrs, 0]; }, addNodeView() { return ReactNodeViewRenderer(Component); },});比如编辑器的内容如下:
const editor = useEditor({ extensions: [ StarterKit, Card, ], content: ` <p>这是一个段落。</p> <div data-type="card" title="Card Title"> <p>这是卡片的内容。</p> </div> `, })那么就会在CardComponent的 NodeViewContent插槽处显示 <p>这是卡片的内容。</p> 并且可以控制是否可编辑。
总结
笔者在日常的需求迭代中,已经在编辑器集成了AI写作、AI绘画等AIGC相关功能以及一些通用编辑功能。并且对该编辑器的灵活性、可扩展性、文档规范性等方面给予了很高的认可。
通过使用Tiptap编辑器的扩展继承、自定义扩展等功能,可以让我们构建出更为更为丰富的富文本编辑器。
Tiptap富文本编辑器的功能远不止这些,还有很多编辑器的方法没有介绍。不过笔者希望通过此篇文章可以帮助你更好的认识Prosemirror 和 Tiptap富文本编辑器。