
包阅导读总结
1. `Azure AKS`、`Terraform`、`Kubernetes`、`Spring Boot`、`Microservices`
2. 本文介绍了在 Azure AKS 上使用 Terraform 和 Kubernetes 部署安全的 Spring Boot 微服务。包括使用 JHipster 创建微服务架构,通过 Terraform 配置创建 AKS 集群、Hub 网络及防火墙等,还提到了相关工具和服务。
3.
– 背景
– 公共云流行,Azure 是领先云厂商之一,Kubernetes 是微服务编排标准,Azure 的管理 Kubernetes 服务是 AKS,部署和管理有挑战,Terraform 等 IaC 工具很有价值。
– 微服务架构创建
– 可用 JHipster 生成 Java 微服务架构,包括 Spring Boot 和 Consul,可通过 JDL 或克隆 GitHub 仓库生成,需更新部署文件中的 Docker 仓库 URI/名称。
– AKS 集群创建
– 遵循 Azure 微服务部署建议,使用 hub-spoke 网络拓扑,包含多个组件。
– 首先创建 Terraform 配置文件夹,配置相关提供程序。
– 配置 Hub 网络和 Azure 防火墙,包括创建资源组、虚拟网络、子网、公共 IP 等,并设置相关变量和输出。
– 为防火墙设置网络和应用规则。
思维导图: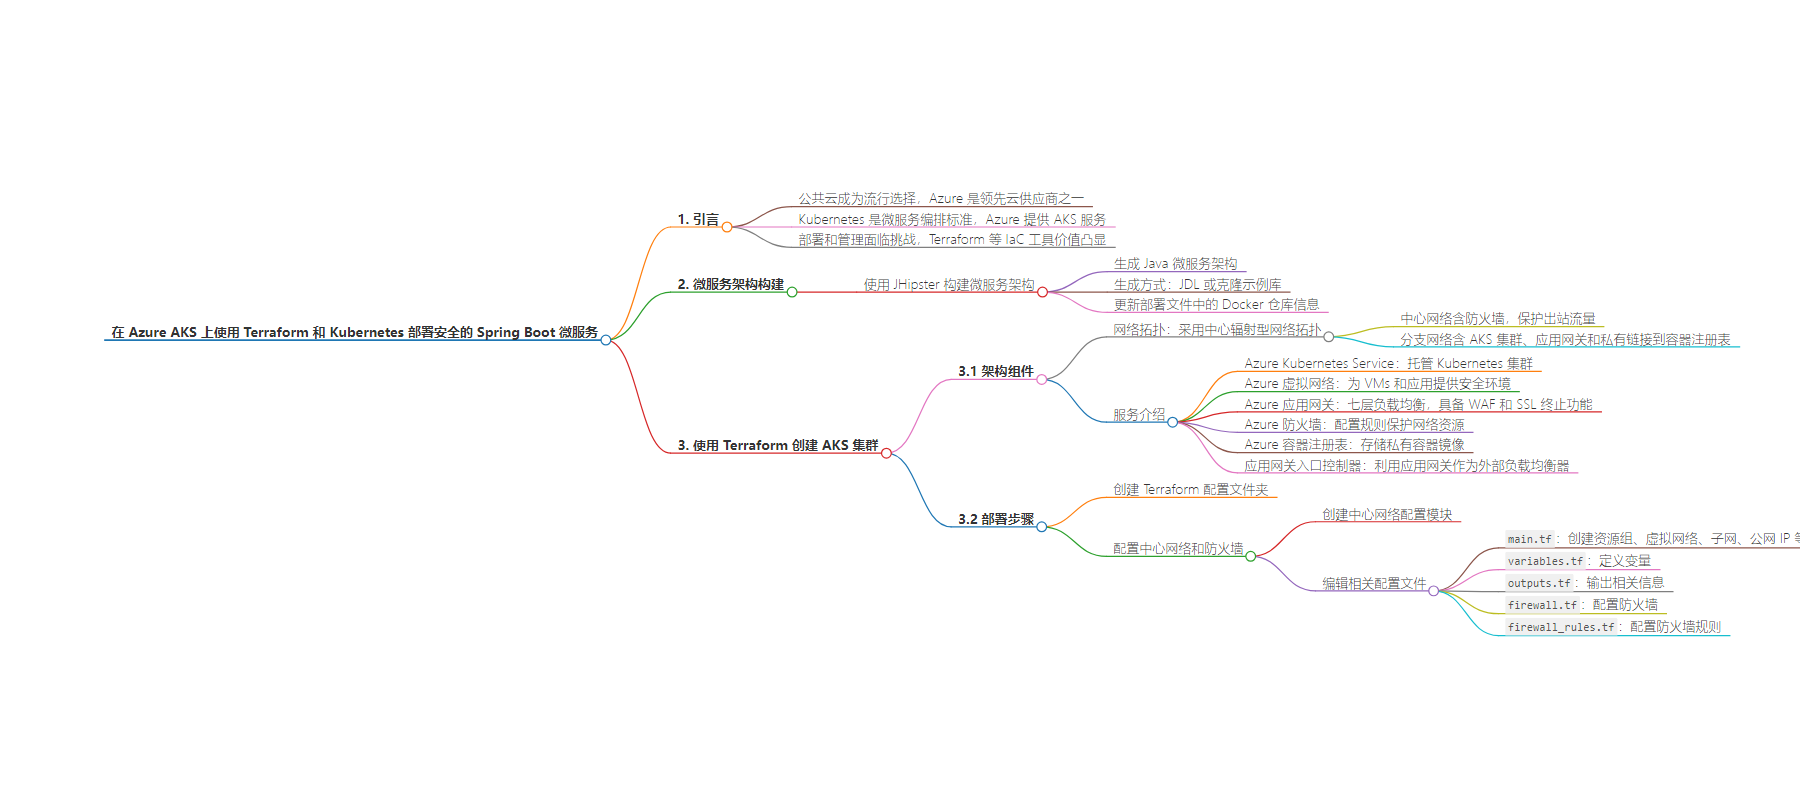
文章地址:https://auth0.com/blog/terraform-aks-java-microservices/
文章来源:auth0.com
作者:Jimena Garbarino
发布时间:2024/8/30 15:19
语言:英文
总字数:4704字
预计阅读时间:19分钟
评分:88分
标签:Azure,Kubernetes,Terraform,微服务,Spring Boot
以下为原文内容
本内容来源于用户推荐转载,旨在分享知识与观点,如有侵权请联系删除 联系邮箱 media@ilingban.com
In today’s infrastructure landscape, public clouds have emerged as the most popular choice, with Microsoft Azure being one of the leading cloud vendors. Kubernetes is the standard choice for microservices orchestration, and most public cloud providers offer managed Kubernetes services. For Azure, the managed Kubernetes service is Azure Kubernetes Service (AKS).
Deploying and managing microservices on the public cloud comes with its own set of challenges. Each cloud service has unique complexities, and Azure AKS comes with its own recommended architecture best practices, which require significant time and effort for the setup and management. This is where infrastructure as code (IaC) tools like Terraform become valuable.
In this post, you will learn the basics of automating the provisioning of a managed Kubernetes cluster on Azure using a hub-network topology to deploy a Spring Boot microservices architecture generated with the JHipster framework.
This tutorial was created with the following tools and services:
Build a Microservices Architecture with JHipster
Create a Java microservices architecture using JHipster, Spring Boot, and Consul. JHipster is an excellent tool for generating a microservice stack with Spring Boot, Angular/React/Vue.js, and other modern frameworks. To deploy the application for this demo, you can either generate it using JHipster JDL or clone the sample repository from GitHub. Here is how you can build your microservices stack using JHipster:
Option 1: Generate the architecture with JHipster Domain Language (JDL)
mkdir jhipster-microservice-stackcd jhipster-microservice-stackjhipster download https://raw.githubusercontent.com/oktadev/jhipster-terraform-azure/main/apps.jdljhipster jdl apps.jdlOption 2: Clone the sample repository
git clone https://github.com/oktadev/jhipster-terraform-azureUpdate kubernetes/invoice-k8s/invoice-deployment.yml, kubernetes/product-k8s/product-deployment.yml, and kubernetes/store-k8s/store-deployment.yml with your Docker Repository URI/Name instead of your-docker-repo.
Create an AKS Cluster Using Terraform
Following Azure recommendations for microservices deployment, in the next sections, you will find a simplified version of the advanced microservices architecture, with the components included in the diagram below:

Network Topology: The architecture uses a hub-spoke network topology, where the hub and spoke are deployed in separate virtual networks connected through peering, minimizing exposure of resources to the public internet. The hub virtual network contains an Azure Firewall in a dedicated subnet, securing outbound network traffic. The spoke network contains the AKS cluster, the Application Gateway, and a private link to the Azure Container Registry.
Azure Kubernetes Service: The managed Kubernetes cluster.
Azure Virtual Network: an isolated and secure environment for VMs and applications.
Azure Application Gateway: Load balances traffic to the web application, operating at Layer 7, using the Azure Application Gateway Ingress Controller (AGIC) as the Kubernetes ingress controller. It has the Web Application Firewall (WAF) enabled, securing incoming traffic from common web attacks and it can perform SSL termination.
Azure Firewall: the network security service is protecting all network resources, only allowing approved outbound traffic, by configuring firewall rules.
Azure Container Registry: stores private container images that can be run in the AKS cluster.
Application Gateway Ingress Controller (AGIC): a Kubernetes resource for leveraging the Azure Application Gateway as an external load balancer for exposing an application to the internet.
IMPORTANT NOTE: To limit the scope of this tutorial, TLS is not configured at the Application Gateway, but keep in mind securing traffic to your application is required for production.
On to the deployment, start by creating a folder for the Terraform configuration, inspired by the reference implementation from Azure:
mkdir terraformcd terraformmkdir modulestouch main.tftouch outputs.tftouch variables.tftouch providers.tfEdit the file providers.tf and add the following content:
terraform { required_version = ">=1.8" required_providers { azurerm = { source = "hashicorp/azurerm" version = "~>3.107" } random = { source = "hashicorp/random" version = "~>3.0" } azapi = { source = "azure/azapi" version = "~>1.5" } }}provider "azurerm" { features {}}Configure a Hub Network and Azure Firewall
Create a module for the hub network configuration:
cd modulesmkdir hub_networkcd hub_networktouch main.tftouch outputs.tftouch variables.tftouch firewall.tftouch firewall_rules.tfEdit main.tf and add the following content:
locals { pip_name = "pip-fw-${var.resource_group_location}-default" hub_fw_name = "fw-${var.resource_group_location}-hub" hub_vnet_name = "vnet-${var.resource_group_location}-hub" hub_rg_name = "rg-hubs-${var.resource_group_location}"}resource "azurerm_resource_group" "rg_hub_networks" { name = local.hub_rg_name location = var.resource_group_location tags = { displayName = "Resource Group for Hub networks" }}resource "azurerm_virtual_network" "hub_vnet" { name = local.hub_vnet_name location = azurerm_resource_group.rg_hub_networks.location resource_group_name = azurerm_resource_group.rg_hub_networks.name address_space = [var.hub_vnet_address_space]}resource "azurerm_subnet" "azure_firewall_subnet" { name = "AzureFirewallSubnet" resource_group_name = azurerm_resource_group.rg_hub_networks.name virtual_network_name = azurerm_virtual_network.hub_vnet.name address_prefixes = [var.azure_firewall_address_space] service_endpoints = ["Microsoft.KeyVault"]}resource "azurerm_public_ip" "hub_pip" { name = local.pip_name location = azurerm_resource_group.rg_hub_networks.location resource_group_name = azurerm_resource_group.rg_hub_networks.name allocation_method = "Static" sku = "Standard" zones = ["1", "2", "3"] idle_timeout_in_minutes = 4}The configuration above will create a Hub Network with a subnet for the Azure Firewall through which outbound traffic will be routed.
Edit variables.tf and add the following content:
variable "resource_group_location" { description = "The location of the resource group"}variable "hub_vnet_address_space" { description = "The address space for the hub virtual network." default = "10.200.0.0/24"}variable "azure_firewall_address_space" { description = "The address space for the Azure Firewall subnet." default = "10.200.0.0/26"}variable "cluster_nodes_address_space" { description = "The address space for the cluster nodes."}Edit outputs.tf and add the following content:
output "hub_vnet_id" { value = azurerm_virtual_network.hub_vnet.id}output "hub_vnet_name" { value = azurerm_virtual_network.hub_vnet.name}output "hub_fw_private_ip" { value = azurerm_firewall.azure_firewall.ip_configuration.0.private_ip_address}output "hub_rg_name" { value = azurerm_resource_group.rg_hub_networks.name}output "hub_pip" { value = azurerm_public_ip.hub_pip.ip_address}Edit firewall.tf and add the following content:
resource "azurerm_firewall" "azure_firewall" { name = local.hub_fw_name location = azurerm_resource_group.rg_hub_networks.location resource_group_name = azurerm_resource_group.rg_hub_networks.name sku_name = "AZFW_VNet" sku_tier = "Standard" zones = ["1", "2", "3"] dns_proxy_enabled = true ip_configuration { name = local.pip_name subnet_id = azurerm_subnet.azure_firewall_subnet.id public_ip_address_id = azurerm_public_ip.hub_pip.id }}The firewall requires a set of network and application rules for allowing outgoing traffic from the cluster. Edit firewall_rules.tf and add the following content:
resource "azurerm_ip_group" "aks_ip_group" { name = "aks_ip_group" location = azurerm_resource_group.rg_hub_networks.location resource_group_name = azurerm_resource_group.rg_hub_networks.name cidrs = [var.cluster_nodes_address_space]}resource "azurerm_firewall_network_rule_collection" "org_wide_allow" { name = "org-wide-allowed" azure_firewall_name = azurerm_firewall.azure_firewall.name resource_group_name = azurerm_resource_group.rg_hub_networks.name priority = 100 action = "Allow" rule { name = "dns" source_addresses = ["*"] protocols = ["UDP"] destination_ports = ["53"] destination_addresses = ["*"] } rule { name = "ntp" description = "Network Time Protocol (NTP) time synchronization" source_addresses = ["*"] protocols = ["UDP"] destination_ports = ["123"] destination_addresses = ["*"] }}resource "azurerm_firewall_network_rule_collection" "aks_global_allow" { name = "aks-global-requirements" azure_firewall_name = azurerm_firewall.azure_firewall.name resource_group_name = azurerm_resource_group.rg_hub_networks.name priority = 200 action = "Allow" rule { name = "tunnel-front-pod-tcp" source_ip_groups = [azurerm_ip_group.aks_ip_group.id] protocols = ["TCP"] destination_ports = ["22", "9000"] destination_addresses = ["AzureCloud"] } rule { name = "tunnel-front-pod-udp" source_ip_groups = [azurerm_ip_group.aks_ip_group.id] protocols = ["UDP"] destination_ports = ["1194", "123"] destination_addresses = ["AzureCloud"] } rule { name = "managed-k8s-api-tcp-443" source_ip_groups = [azurerm_ip_group.aks_ip_group.id] protocols = ["TCP"] destination_ports = ["443"] destination_addresses = ["AzureCloud"] } rule { name = "docker" source_ip_groups = [azurerm_ip_group.aks_ip_group.id] protocols = ["TCP"] destination_ports = ["443"] destination_fqdns = ["docker.io", "registry-1.docker.io", "production.cloudflare.docker.com"] } depends_on = [azurerm_firewall_network_rule_collection.org_wide_allow]}resource "azurerm_firewall_application_rule_collection" "aks_global_allow" { name = "aks-global-requirements" azure_firewall_name = azurerm_firewall.azure_firewall.name resource_group_name = azurerm_resource_group.rg_hub_networks.name priority = 200 action = "Allow" rule { name = "nodes-to-api-server" source_ip_groups = [azurerm_ip_group.aks_ip_group.id] target_fqdns = ["*.hcp.${azurerm_resource_group.rg_hub_networks.location}.azmk8s.io", "*.tun.${azurerm_resource_group.rg_hub_networks.location}.azmk8s.io"] protocol { port = "443" type = "Https" } } rule { name = "microsoft-container-registry" source_ip_groups = [azurerm_ip_group.aks_ip_group.id] target_fqdns = ["*.cdn.mscr.io", "mcr.microsoft.com", "*.data.mcr.microsoft.com"] protocol { port = "443" type = "Https" } } rule { name = "management-plane" source_ip_groups = [azurerm_ip_group.aks_ip_group.id] target_fqdns = ["management.azure.com"] protocol { port = "443" type = "Https" } } rule { name = "aad-auth" source_ip_groups = [azurerm_ip_group.aks_ip_group.id] target_fqdns = ["login.microsoftonline.com"] protocol { port = "443" type = "Https" } } rule { name = "apt-get" source_ip_groups = [azurerm_ip_group.aks_ip_group.id] target_fqdns = ["packages.microsoft.com"] protocol { port = "443" type = "Https" } } rule { name = "cluster-binaries" source_ip_groups = [azurerm_ip_group.aks_ip_group.id] target_fqdns = ["acs-mirror.azureedge.net"] protocol { port = "443" type = "Https" } } rule { name = "ubuntu-security-patches" source_ip_groups = [azurerm_ip_group.aks_ip_group.id] target_fqdns = ["security.ubuntu.com", "azure.archive.ubuntu.com", "changelogs.ubuntu.com"] protocol { port = "80" type = "Http" } } rule { name = "azure-monitor" source_ip_groups = [azurerm_ip_group.aks_ip_group.id] target_fqdns = [ "dc.services.visualstudio.com", "*.ods.opinsights.azure.com", "*.oms.opinsights.azure.com", "*.microsoftonline.com", "*.monitoring.azure.com" ] protocol { port = "443" type = "Https" } } rule { name = "azure-policy" source_ip_groups = [azurerm_ip_group.aks_ip_group.id] target_fqdns = [ "gov-prod-policy-data.trafficmanager.net", "raw.githubusercontent.com", "dc.services.visualstudio.com", "data.policy.core.windows.net", "store.policy.core.windows.net" ] protocol { port = "443" type = "Https" } } rule { name = "azure-kubernetes-service" source_ip_groups = [azurerm_ip_group.aks_ip_group.id] fqdn_tags = ["AzureKubernetesService"] } rule { name = "auth0" source_ip_groups = [azurerm_ip_group.aks_ip_group.id] target_fqdns = ["*.auth0.com"] protocol { port = "443" type = "Https" } } depends_on = [azurerm_firewall_network_rule_collection.aks_global_allow]}NOTE: According to the Azure Firewall documentation, network-level FQDN filtering is not supported in the basic firewall version and is required to allow cluster outgoing connections to Docker. The firewall version standard was selected for the example, using the
sku_tierargument of theazurerm_firewallresource.
Configure a Spoke Network and Azure Application Gateway
Create a module for the spoke network configuration:
cd modulesmkdir spoke_networkcd spoke_networktouch main.tftouch outputs.tftouch variables.tftouch gateway.tftouch peering.tfEdit main.tf and add the following content:
locals { spoke_vnet_name = "vnet-${var.resource_group_location}-spoke" spoke_rg_name = "rg-spokes-${var.resource_group_location}" pip_name = "pip-${var.application_id}-00"}resource "azurerm_resource_group" "rg_spoke_networks" { name = local.spoke_rg_name location = var.resource_group_location tags = { displayName = "Resource Group for Spoke networks" }}resource "azurerm_virtual_network" "spoke_vnet" { name = local.spoke_vnet_name location = azurerm_resource_group.rg_spoke_networks.location resource_group_name = azurerm_resource_group.rg_spoke_networks.name address_space = [var.spoke_vnet_address_space]}resource "azurerm_subnet" "cluster_nodes_subnet" { name = "snet-clusternodes" resource_group_name = azurerm_resource_group.rg_spoke_networks.name virtual_network_name = azurerm_virtual_network.spoke_vnet.name address_prefixes = [var.cluster_nodes_address_space]}resource "azurerm_route_table" "spoke_route_table" { name = "route-spoke-to-hub" location = azurerm_resource_group.rg_spoke_networks.location resource_group_name = azurerm_resource_group.rg_spoke_networks.name route { name = "r-nexthop-to-fw" address_prefix = "0.0.0.0/0" next_hop_type = "VirtualAppliance" next_hop_in_ip_address = var.hub_fw_private_ip } route { name = "r-internet" address_prefix = "${var.hub_fw_public_ip}/32" next_hop_type = "Internet" }}resource "azurerm_subnet_route_table_association" "cluster_nodes_route_table" { subnet_id = azurerm_subnet.cluster_nodes_subnet.id route_table_id = azurerm_route_table.spoke_route_table.id}resource "azurerm_subnet" "application_gateways_subnet" { name = "snet-application-gateways" resource_group_name = azurerm_resource_group.rg_spoke_networks.name virtual_network_name = azurerm_virtual_network.spoke_vnet.name address_prefixes = [var.application_gateways_address_space]}resource "azurerm_public_ip" "spoke_pip" { name = local.pip_name location = azurerm_resource_group.rg_spoke_networks.location resource_group_name = azurerm_resource_group.rg_spoke_networks.name allocation_method = "Static" sku = "Standard" zones = ["1", "2", "3"] idle_timeout_in_minutes = 4}The configuration above will create a Spoke Network. The network peerings between the hub and spoke networks, as well as the Azure application gateway, will be created in separate .tf files.
Edit outputs.tf and add the following content:
output "cluster_nodes_subnet_id" { value = azurerm_subnet.cluster_nodes_subnet.id}output "spoke_pip" { value = azurerm_public_ip.spoke_pip.ip_address}output "spoke_pip_id" { value = azurerm_public_ip.spoke_pip.id}output "spoke_rg_name" { value = azurerm_resource_group.rg_spoke_networks.name}output "spoke_rg_location" { value = azurerm_resource_group.rg_spoke_networks.location}output "spoke_rg_id" { value = azurerm_resource_group.rg_spoke_networks.id}output "application_gateway_id" { value = azurerm_application_gateway.gateway.id}Edit variables.tf and add the following content:
variable "resource_group_location" { description = "The location of the spoke resource group."}variable "hub_fw_private_ip" { description = "The private IP address of the hub firewall."}variable "hub_fw_public_ip" { description = "The public IP address of the hub firewall."}variable "application_id" { description = "The identifier for the application."}variable "spoke_vnet_address_space" { description = "The address space for the spoke virtual network." default = "10.240.0.0/16"}variable "cluster_nodes_address_space" { description = "The address space for the cluster nodes." default = "10.240.0.0/22"}variable "application_gateways_address_space" { description = "The address space for the application gateways." default = "10.240.4.16/28"}variable "hub_vnet_id" { description = "The ID of the hub virtual network."}variable "hub_vnet_name" { description = "The name of the hub virtual network."}variable "hub_rg_name" { description = "The name of the hub resource group."}variable "host_name" { description = "The host name"}Edit peering.tf and add the following content:
resource "azurerm_virtual_network_peering" "spoke_to_hub_peer" { name = "spoke-to-hub" resource_group_name = azurerm_resource_group.rg_spoke_networks.name virtual_network_name = azurerm_virtual_network.spoke_vnet.name remote_virtual_network_id = var.hub_vnet_id allow_forwarded_traffic = true depends_on = [ var.hub_vnet_id, azurerm_virtual_network.spoke_vnet ]}resource "azurerm_virtual_network_peering" "hub_to_spoke_peer" { name = "hub-to-spoke" resource_group_name = var.hub_rg_name virtual_network_name = var.hub_vnet_name remote_virtual_network_id = azurerm_virtual_network.spoke_vnet.id depends_on = [ var.hub_vnet_id, azurerm_virtual_network.spoke_vnet ]}resource "azurerm_private_dns_zone" "dns_zone_acr" { name = "privatelink.azurecr.io" resource_group_name = azurerm_resource_group.rg_spoke_networks.name}resource "azurerm_private_dns_zone_virtual_network_link" "acr_network_link" { name = "dns-link-acr" resource_group_name = azurerm_resource_group.rg_spoke_networks.name private_dns_zone_name = azurerm_private_dns_zone.dns_zone_acr.name virtual_network_id = azurerm_virtual_network.spoke_vnet.id}Edit gateway.tf and add the following content:
locals { backend_address_pool_name = "app-gateway-beap" frontend_port_name = "app-gateway-feport" frontend_ip_configuration_name = "app-gateway-feip" http_setting_name = "app-gateway-be-htst" listener_name = "app-gateway-httplstn" request_routing_rule_name = "app-gateway-rqrt" redirect_configuration_name = "app-gateway-rdrcfg"}resource "azurerm_application_gateway" "gateway" { name = "app-gateway" location = azurerm_resource_group.rg_spoke_networks.location resource_group_name = azurerm_resource_group.rg_spoke_networks.name zones = ["1", "2", "3"] sku { name = "WAF_v2" tier = "WAF_v2" capacity = 2 } gateway_ip_configuration { name = "gateway-ip-configuration" subnet_id = azurerm_subnet.application_gateways_subnet.id } frontend_port { name = local.frontend_port_name port = 80 } frontend_ip_configuration { name = local.frontend_ip_configuration_name public_ip_address_id = azurerm_public_ip.spoke_pip.id } waf_configuration { enabled = true firewall_mode = "Prevention" rule_set_type = "OWASP" rule_set_version = "3.0" } backend_address_pool { name = local.backend_address_pool_name } backend_http_settings { name = local.http_setting_name cookie_based_affinity = "Disabled" port = 80 protocol = "Http" pick_host_name_from_backend_address = true request_timeout = 60 } http_listener { name = local.listener_name frontend_ip_configuration_name = local.frontend_ip_configuration_name frontend_port_name = local.frontend_port_name protocol = "Http" host_name = var.host_name } request_routing_rule { name = local.request_routing_rule_name priority = 1 rule_type = "Basic" http_listener_name = local.listener_name backend_address_pool_name = local.backend_address_pool_name backend_http_settings_name = local.http_setting_name }}Configure an Azure Kubernetes Cluster
Create a module for the Azure Kubernetes Service (AKS) configuration:
cd modulesmkdir clustercd clustertouch providers.tftouch main.tftouch outputs.tftouch variables.tftouch role_assignment.tfEdit providers.tf and add the following content:
terraform { required_version = ">=1.8" required_providers { azapi = { source = "azure/azapi" version = "~>1.5" } }}Edit main.tf and add the following content:
resource "random_pet" "azurerm_kubernetes_cluster_name" { prefix = "cluster"}resource "azurerm_user_assigned_identity" "cluster_control_plane_identity" { location = var.resource_group_location name = "${random_pet.azurerm_kubernetes_cluster_name.id}-controlplane" resource_group_name = var.resource_group_name}resource "azurerm_kubernetes_cluster" "k8s" { location = var.resource_group_location name = random_pet.azurerm_kubernetes_cluster_name.id resource_group_name = var.resource_group_name dns_prefix = random_pet.azurerm_kubernetes_cluster_name.id oidc_issuer_enabled = true workload_identity_enabled = true tags = { displayName = "Kubernetes Cluster" } identity { type = "UserAssigned" identity_ids = [ azurerm_user_assigned_identity.cluster_control_plane_identity.id ] } default_node_pool { name = "agentpool" vm_size = var.vm_size node_count = var.node_count zones = ["1", "2", "3"] vnet_subnet_id = var.vnet_subnet_id } network_profile { network_plugin = "azure" network_policy = "azure" outbound_type = "userDefinedRouting" } ingress_application_gateway { gateway_id = var.application_gateway_id }}Edit outputs.tf and add the following content:
output "kubernetes_cluster_name" { value = azurerm_kubernetes_cluster.k8s.name}output "kube_config" { value = azurerm_kubernetes_cluster.k8s.kube_config_raw sensitive = true}Edit variables.tf and add the following content:
variable "resource_group_location" { description = "The location of the resource group"}variable "resource_group_name" { description = "The name of the resource group"}variable "resource_group_id" { description = "The id of the resource group"}variable "username" { type = string description = "The admin username for the new cluster." default = "azureadmin"}variable "node_count" { type = number description = "The initial quantity of nodes for the node pool." default = 4}variable "vnet_subnet_id" { description = "The id of the subnet"}variable "application_gateway_id" { description = "The id of the application gateway"}variable "vm_size" { type = string description = "The size of the Virtual Machine." default = "Standard_B2s_v2"}variable "spoke_pip_id" { description = "The id of the spoke public IP"}Edit role_assignment.tf and add the following content:
resource "azurerm_role_assignment" "cluster_nodepool_role_assignment" { scope = azurerm_kubernetes_cluster.k8s.node_resource_group_id role_definition_name = "Virtual Machine Contributor" principal_id = azurerm_kubernetes_cluster.k8s.kubelet_identity[0].object_id}resource "azurerm_role_assignment" "cluster_vnet_role_assignment" { scope = var.vnet_subnet_id role_definition_name = "Network Contributor" principal_id = azurerm_kubernetes_cluster.k8s.kubelet_identity[0].object_id}resource "azurerm_role_assignment" "control_plane_vnet_role_assignment" { scope = var.vnet_subnet_id role_definition_name = "Network Contributor" principal_id = azurerm_user_assigned_identity.cluster_control_plane_identity.principal_id}resource "azurerm_role_assignment" "control_plane_pip_role_assignment" { scope = var.spoke_pip_id role_definition_name = "Network Contributor" principal_id = azurerm_user_assigned_identity.cluster_control_plane_identity.principal_id}resource "azurerm_role_assignment" "ingress_vnet_role_assignment" { scope = var.vnet_subnet_id role_definition_name = "Network Contributor" principal_id = azurerm_kubernetes_cluster.k8s.ingress_application_gateway[0].ingress_application_gateway_identity[0].object_id}resource "azurerm_role_assignment" "ingress_pip_role_assignment" { scope = var.spoke_pip_id role_definition_name = "Network Contributor" principal_id = azurerm_kubernetes_cluster.k8s.ingress_application_gateway[0].ingress_application_gateway_identity[0].object_id}resource "azurerm_role_assignment" "ingress_app_gateway_role_assignment" { scope = var.application_gateway_id role_definition_name = "Contributor" principal_id = azurerm_kubernetes_cluster.k8s.ingress_application_gateway[0].ingress_application_gateway_identity[0].object_id}resource "azurerm_role_assignment" "ingress_rg_role_assignment" { scope = var.resource_group_id role_definition_name = "Contributor" principal_id = azurerm_kubernetes_cluster.k8s.ingress_application_gateway[0].ingress_application_gateway_identity[0].object_id}Add the Terraform Module Configurations
Add references to the modules in the main configuration file terraform/main.tf, setting the following content:
resource "azurerm_resource_group" "rg_ecommerce" { name = "rg-ecommerce-${var.resource_group_location}" location = var.resource_group_location tags = { displayName = "Resource Group for general purpose" }}module "hub_network" { source = "./modules/hub_network" resource_group_location = azurerm_resource_group.rg_ecommerce.location cluster_nodes_address_space = var.cluster_nodes_address_space}module "spoke_network" { source = "./modules/spoke_network" resource_group_location = azurerm_resource_group.rg_ecommerce.location application_id = var.application_id host_name = var.host_name cluster_nodes_address_space = var.cluster_nodes_address_space hub_fw_private_ip = module.hub_network.hub_fw_private_ip hub_fw_public_ip = module.hub_network.hub_pip hub_vnet_id = module.hub_network.hub_vnet_id hub_vnet_name = module.hub_network.hub_vnet_name hub_rg_name = module.hub_network.hub_rg_name depends_on = [ module.hub_network ]}module "cluster" { source = "./modules/cluster" resource_group_location = module.spoke_network.spoke_rg_location resource_group_name = module.spoke_network.spoke_rg_name resource_group_id = module.spoke_network.spoke_rg_id vnet_subnet_id = module.spoke_network.cluster_nodes_subnet_id application_gateway_id = module.spoke_network.application_gateway_id spoke_pip_id = module.spoke_network.spoke_pip_id depends_on = [ module.spoke_network, module.hub_network ]}Edit terraform/outputs.tf and add the following contents:
output "resource_group_name" { value = azurerm_resource_group.rg_ecommerce.name}output "kube_config" { value = module.cluster.kube_config sensitive = true}output "kubernetes_cluster_name" { value = module.cluster.kubernetes_cluster_name}output "spoke_pip" { value = module.spoke_network.spoke_pip}Edit terraform/variables.tf and add the following variables:
variable "resource_group_location" { description = "The location of the resource group" default = "eastus2"}variable "application_id" { description = "The application id" default = "jhipster-microservices"}variable "cluster_nodes_address_space" { description = "The address space for the cluster nodes." default = "10.240.0.0/22"}variable "host_name" { description = "The host name" default = "store.example.com"}Provision the cluster
In this example, multiple resources have availability zones requirements. The default region in resource_group_location is eastus2. You can choose a different region, but make sure it has availability zones support.
With the Terraform configuration ready, ensure the Azure CLI has an active subscription with the following line:
az account listIMPORTANT NOTE: For this demo, the selected VM size is
Standard_B2s_v2, and the deployed architecture requires a minimum node count of 4. The architecture will not run under the Azure free account; you need to upgrade to at least a basic plan of the pay-as-you-go subscription, so please don’t forget to delete the architecture after the test to avoid unwanted costs.
Register required resource providers. It may take a few minutes to complete. You can refer the Azure CLI docs for more details.
az provider register --namespace Microsoft.QuotaVerify you have the available cores quota for the minimum node count of 4 (8 cores):
Note:
<account-id>is theidfield from theaz account listcommand output.
az quota show --resource-name standardBsv2Family --scope /subscriptions/<account-id>/providers/Microsoft.Compute/locations/eastus2QUOTA REQUESTS: If the
properties.limit.valuein the output is not 8, you have to request an increase in quota. Go to the Azure portal and filter by the region and then findStandard Bsv2 Family vCPUsusing the search field. Open the entry and click theNew Quota Requestbutton. Enter8as the new limit and submit. While writing this post, I noticed that quota requests were denied in some regions without reason. An alternate region was suggested by the support team, and the quota request was successful.
Terraform team recommends authenticating the Azure Provider using the Azure CLI when running Terraform locally. You should be logged in using the previous steps. Next, initialize the Terraform workspace and plan the changes:
cd terraformterraform initterraform plan -out main.tfplanReview the plan and make sure everything is correct. Then apply changes:
terraform apply main.tfplanOnce the AKS cluster is ready, you will see the output variables printed to the console:
Apply complete! Resources: 35 added, 0 changed, 0 destroyed.Outputs:kube_config = <sensitive>kubernetes_cluster_name = "cluster-helping-terrier"resource_group_name = "rg-ecommerce-eastus2"spoke_pip = "4.153.103.124"IMPORTANT NOTE: If you encounter an error
Error: creating Kubernetes Clusterthat has the error codeSkuNotAvailable, it means that the selected VM size is not available in the selected region.Runaz vm list-skus --size Standard_B2s_v2 --all --output tableto see all regions’ availability and choose a region that hasRestrictions: None.Repeat the quota request process for that region.Runterraform destroyto delete the current state, and once it’s complete, update theresource_group_locationvariable interraform/variables.tfand re-run theterraform applycommand.
For kubectl commands, run the following Azure CLI option for retrieving the cluster credentials:
az aks get-credentials --resource-group rg-spokes-<resource_group_location> --name <kubernetes_cluster_name> --adminThen check the cluster details with kdash or kubectl get nodes.
AME STATUS ROLES AGE VERSIONaks-agentpool-71839675-vmss000000 Ready <none> 4m58s v1.29.7aks-agentpool-71839675-vmss000002 Ready <none> 4m27s v1.29.7aks-agentpool-71839675-vmss000003 Ready <none> 4m31s v1.29.7aks-agentpool-71839675-vmss000004 Ready <none> 3m43s v1.29.7Set up OIDC Authentication Using Auth0
Since you are using Terraform, you can set up the Auth0 application using the Auth0 Terraform provider. This will allow you to automate the setup of the Auth0 application and manage the addition of users, customizations, and such.
Find your Auth0 domain with the following Auth0 CLI command:
auth0 tenants listCreate a machine-to-machine Auth0 client for Terraform to identify at Auth0:
auth0 apps create \ --name "Auth0 Terraform Provider" \ --description "Auth0 Terraform Provider M2M" \ --type m2m \ --reveal-secretsSet the clientId and clientSecret as environment variables, as required by Terraform Auth0 provider:
export AUTH0_CLIENT_ID=<client-id>export AUTH0_CLIENT_SECRET=<client-secret>Find out the Auth0 Management API id and identifier:
auth0 apis listSet the id and identifier as environment variables:
export AUTH0_MANAGEMENT_API_ID=<auth0-management-api-id>export AUTH0_MANAGEMENT_API_IDENTIFIER=<auth0-management-api-identifier>Then, retrieve all the scopes of the Auth0 Management API:
export AUTH0_MANAGEMENT_API_SCOPES=$(auth0 apis scopes list $AUTH0_MANAGEMENT_API_ID --json | jq -r '.[].value' | jq -ncR '[inputs]')Finally, grant all the scopes to the newly created clientId:
auth0 api post "client-grants" --data='{"client_id": "'$AUTH0_CLIENT_ID'", "audience": "'$AUTH0_MANAGEMENT_API_IDENTIFIER'", "scope":'$AUTH0_MANAGEMENT_API_SCOPES'}'Edit terraform/providers.tf and add the Auth0 provider:
terraform { required_version = ">=1.8" required_providers { ... auth0 = { source = "auth0/auth0" version = "~> 0.49.0" } ... }}Create a configuration file for the Auth0 resources:
cd terraformtouch auth0.tfEdit auth0.tf and add the following content:
provider "auth0" { domain = "https://<your-auth0-domain>" debug = false}resource "auth0_client" "java_ms_client" { name = "JavaMicroservices" description = "Java Microservices Client Created Through Terraform" app_type = "regular_web" callbacks = ["http://store.example.com/login/oauth2/code/oidc"] allowed_logout_urls = ["http://store.example.com"] oidc_conformant = true jwt_configuration { alg = "RS256" }}resource "auth0_client_credentials" "java_ms_client_creds" { client_id = auth0_client.java_ms_client.id authentication_method = "client_secret_post"}resource "auth0_role" "admin" { name = "ROLE_ADMIN" description = "Administrator"}resource "auth0_role" "user" { name = "ROLE_USER" description = "User"}resource "auth0_action" "jhipster_action" { name = "jhipster_roles_claim" runtime = "node18" deploy = true code = <<-EOT /** * Handler that will be called during the execution of a PostLogin flow. * * @param {Event} event - Details about the user and the context in which they are logging in. * @param {PostLoginAPI} api - Interface whose methods can be used to change the behavior of the login. */ exports.onExecutePostLogin = async (event, api) => { const namespace = 'https://www.jhipster.tech'; if (event.authorization) { api.idToken.setCustomClaim('preferred_username', event.user.email); api.idToken.setCustomClaim(namespace + '/roles', event.authorization.roles); api.accessToken.setCustomClaim(namespace + '/roles', event.authorization.roles); } }; EOT supported_triggers { id = "post-login" version = "v3" }}resource "auth0_trigger_actions" "login_flow" { trigger = "post-login" actions { id = auth0_action.jhipster_action.id display_name = auth0_action.jhipster_action.name }}resource "auth0_user" "test_user" { connection_name = "Username-Password-Authentication" name = "Jane Doe" email = "jhipster@test.com" email_verified = true password = "passpass$12$12" lifecycle { ignore_changes = [roles] }}resource "auth0_user_roles" "test_user_roles" { user_id = auth0_user.test_user.id roles = [auth0_role.admin.id, auth0_role.user.id]}output "auth0_webapp_client_id" { description = "Auth0 JavaMicroservices Client ID" value = auth0_client.java_ms_client.client_id}output "auth0_webapp_client_secret" { description = "Auth0 JavaMicroservices Client Secret" value = auth0_client_credentials.java_ms_client_creds.client_secret sensitive = true}Replace <your-auth0-domain> in the provider configuration. Now, you can run the Terraform script to create the Auth0 application. Run the following commands to initialize the script and apply it.
terraform initterraform applyGet the client-id and client-secret with:
terraform output auth0_webapp_client_secretterraform output auth0_webapp_client_idUpdate kubernetes/registry-k8s/application-configmap.yml to replace <your-auth0-domain>, <client-id>, and <client-secret> with these values. This configuration is loaded into Consul, and it shares the values with the gateway and microservices.
apiVersion: v1kind: ConfigMapmetadata: name: application-config namespace: jhipsterdata: application.yml: |- configserver: name: Consul status: Connected to Consul running in Kubernetes logging: level: ROOT: INFO jhipster: security: authentication: jwt: base64-secret: NTY5NTUyYzUzZDFlNjBkNjMzNDNkZWQzNDk0ZjAwOTQzZTU2ZTMyOTgxYTI3ZTZjYWViNjEzMmM3MGQ5MDNlY2YwYjY2MDc0ZDNlZWM1ZTY3ZDllNDE4NDlhY2M2YmViY2E3Mg== oauth2: audience: - https://<your-auth0-domain>/api/v2/ spring: security: oauth2: client: provider: oidc: issuer-uri: https://<your-auth0-domain>/ registration: oidc: client-id: <client-id> client-secret: <client-secret>Deploy the Microservices Stack
Before the actual deployment, some more configuration changes are required to make the inbound traffic to the store service go through the Azure Application Gateway Ingress Controller (AGIC) enabled in the cluster. Also, you need to build and push the Docker images to the Docker container registry.
Configure Azure AGIC
In the kubernetes/store-k8s folder, edit the file store-service.yml and set the following content:
apiVersion: v1kind: Servicemetadata: name: store namespace: jhipster labels: app: storespec: selector: app: store ports: - name: http port: 8080Also, create a file kubernetes/store-k8s/store-ingress.yml and set the following content:
apiVersion: networking.k8s.io/v1kind: Ingressmetadata: name: store-ingress namespace: jhipsterspec: ingressClassName: azure-application-gateway rules: - http: paths: - path: / backend: service: name: store port: number: 8080 pathType: ExactIMPORTANT NOTE: This tutorial does not cover securing secrets, and the Azure recommended microservices architecture uses the Azure Key Vault for secrets storage and management.
Build the Docker images
You need to build Docker images for each app. This is specific to the JHipster application used in this tutorial, which uses Jib to build the images. Make sure you are logged into Docker using docker login. Navigate to each app folder (store, invoice, product) and run the following command:
./gradlew bootJar -Pprod jib -Djib.to.image=<docker-repo-uri-or-name>/<image-name>Note:
<image-name>would bestore,invoice, andproduct.
Deploy the microservices to AKS
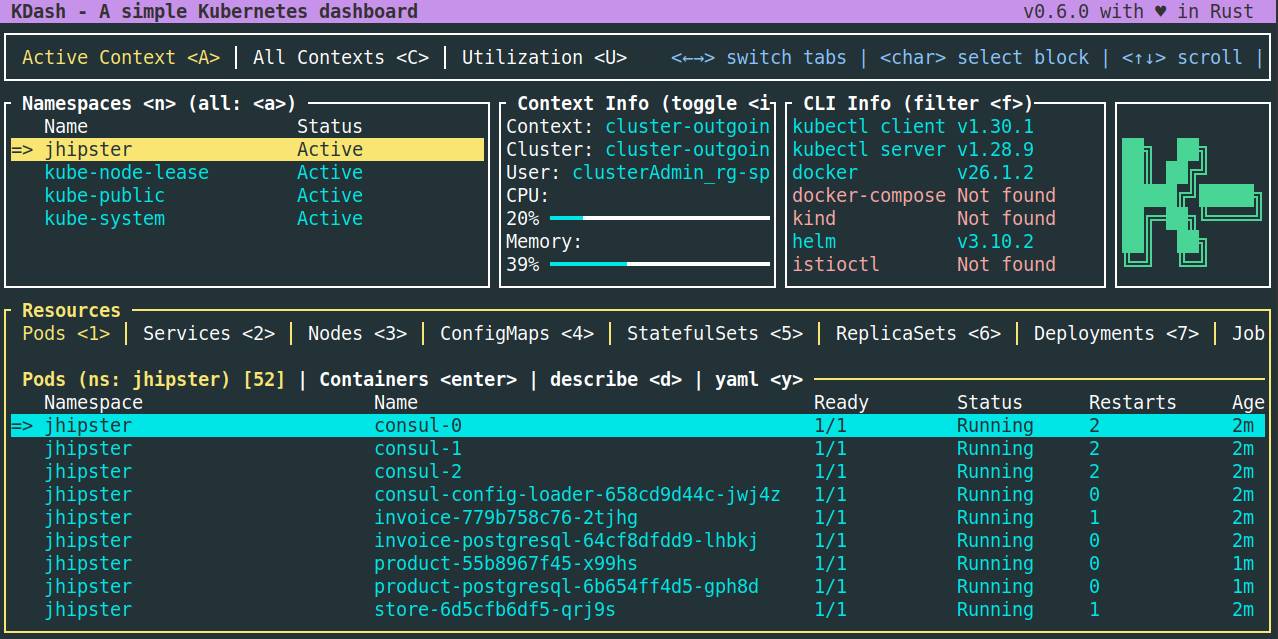
Once the images are pushed to the Docker registry, we can deploy the stack using the handy script provided by JHipster. Navigate to the kubernetes folder created by JHipster and run the following command.
cd kubernetes./kubectl-apply.sh -fWith kdash, check the pods status in the jhipster namespace:
As the Azure Application Gateway requires the inbound traffic to be for the host store.example.com, you can test the store service by adding an entry in your /etc/hosts file that maps to the gateway public IP. Get the public IP of the Azure Application Gateway with:
cd terraformterraform output spoke_pipEdit the /etc/hosts file and add the following line:
<spoke_pip> store.example.comThen navigate to http://store.example.com and sign in at Auth0 with the test user/password jhipster@test.com/passpass$12$12. The authentication flow will redirect back to the application home:

Tear down the Cluster with Terraform
Once you finish verifying the deployment, don’t forget to remove all resources to avoid unwanted costs. You can first delete the deployment with the following:
kubectl delete namespace jhipsterAnd then, delete the architecture with:
terraform destroy -auto-approveLearn More about Java Microservices, Kubernetes and Jhipster
In this post, you learned about JHipster microservices deployment to Azure Kubernetes Service using Terraform for provisioning a hub-spoke network architecture and an Auth0 client application for authentication and authorization. You can find the code shown in this tutorial on GitHub. If you’d rather skip the step-by-step Terraform configuration and prefer jumping straight into the deployment, follow the README instructions in the same repository. Be aware that some important and interesting features were not included in this example, like cluster auto-scaling, monitoring, cluster access security, and workload-managed identities.
Also, if you liked this post, you might enjoy these related posts:
For more tutorials like this one, follow @oktadev on Twitter. We also have a YouTube channel you might like. If you have any questions, please leave a comment below!
Our Zero Index Developer Newsletter will keep you informed about the latest happenings in the Java security space. Subscribe today!