
包阅导读总结
1.
关键词:
消息队列、后端应用、RabbitMQ、分布式系统、可扩展性
2.
总结:
本文介绍了在后端应用中实现消息队列的相关内容,包括消息队列的重要性、相关用例、流行工具,以RabbitMQ为例构建了简单的消息代理系统,并给出了相关代码和额外的最佳实践建议。
3.
主要内容:
– 目的与问题
– 目标是创建吸引大量用户的产品,面临可扩展性问题。
– 消息队列的概念与作用
– 有序存储消息,异步操作,确保系统停机时消息仍能处理和存储。
– 相关用例
– 现代金融科技应用中确保金融交易有序执行。
– 日常通知应用中保证及时接收通知。
– 金融市场及其他领域也有应用。
– 流行的消息队列服务
– 如RabbitMQ、Apache Kafka、Redis等。
– 示例项目
– 利用RabbitMQ构建简单的消息代理系统,包括消息发布者和消费者。
– 给出相关代码及创建步骤。
– 额外信息
– 给出进一步提升技能的最佳实践建议。
思维导图: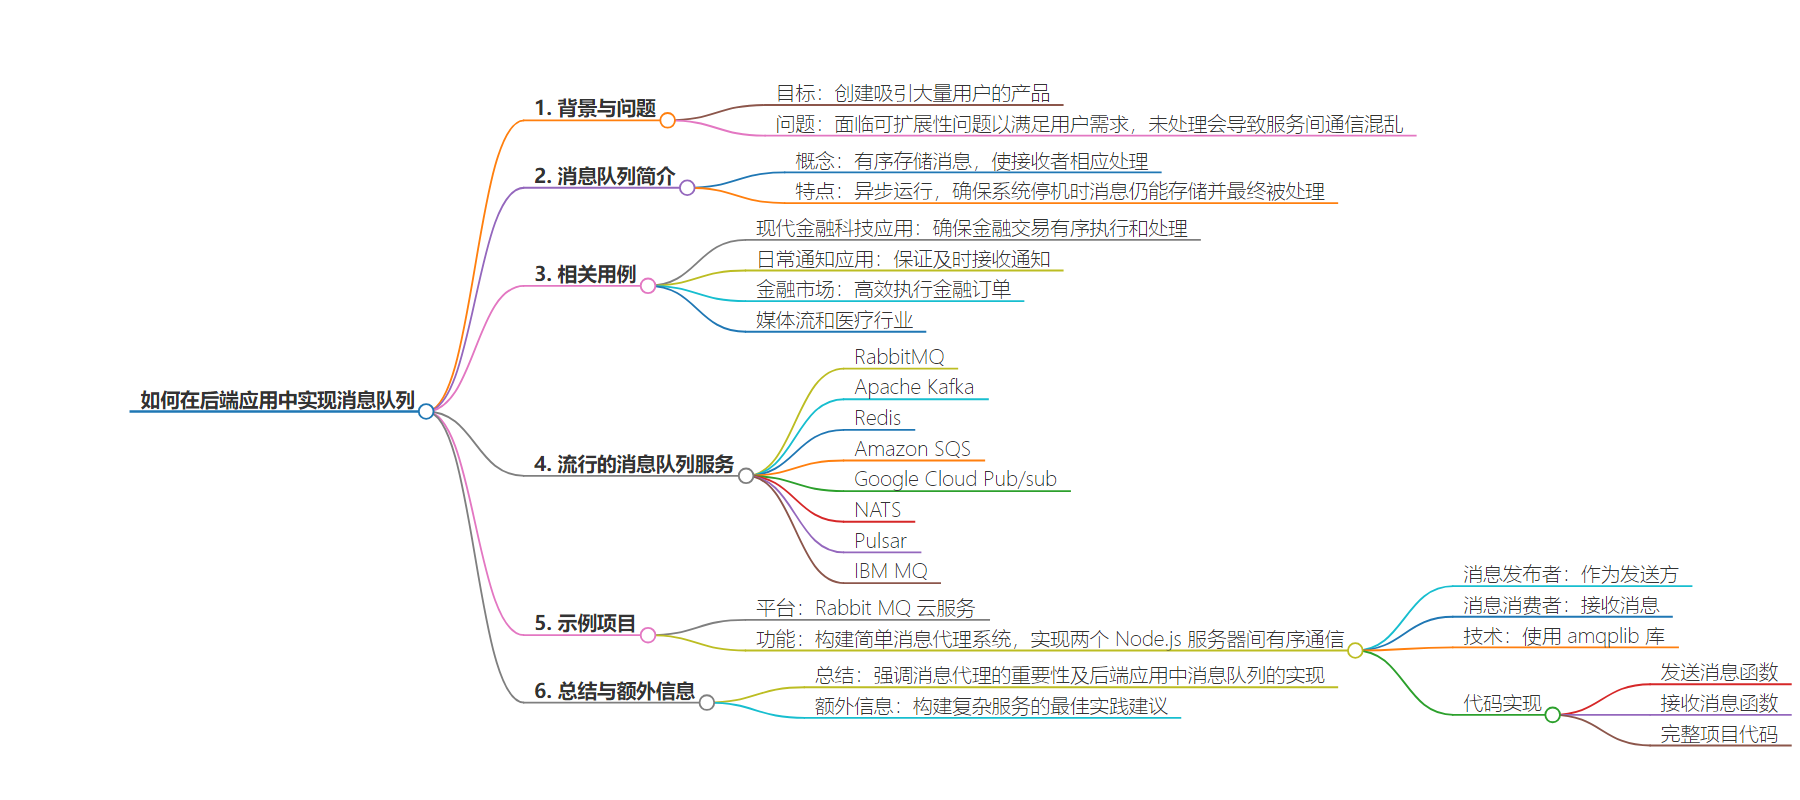
文章地址:https://www.freecodecamp.org/news/how-to-implement-message-queues-in-your-backend-applications/
文章来源:freecodecamp.org
作者:Oluwatobi
发布时间:2024/8/14 9:56
语言:英文
总字数:1164字
预计阅读时间:5分钟
评分:85分
标签:消息队列,后端开发,Node.js,RabbitMQ,微服务
以下为原文内容
本内容来源于用户推荐转载,旨在分享知识与观点,如有侵权请联系删除 联系邮箱 media@ilingban.com
The goal of every web developer is to create a product that appeals to a wide range of users. However, this comes with its problems, chief among them being scalability issues to meet overwhelming user demands.
If not addressed, this can result in a disarray of communication among services, defeating the measures placed to ensure orderly database transactions. But thank goodness, we have message brokers to the rescue.
In this article, we’ll highlight the importance of message queuing as a best practice for backend development, relevant use cases and popular message queuing tools, and how to implement message queuing in backend applications.
Here are some of the prerequisites to be able to follow along in this article:
What is Message Queuing?
In distributed systems, several requests and queues are sent at a time. The concept of a message queue enables the storage of messages in an orderly manner, allowing for the recipients of these messages and requests to process them accordingly.
It operates asynchronously, allowing the independent functioning of different components of a distributed system. Having these in place ensures that the messages sent to the recipient eventually get attended to irrespective of a system downtime. The messages are securely stored until they get acknowledged.
Relevant Use Cases of Message Brokers
Here are some of the real-life use cases of message brokers.
-
They are actively used in modern fintech applications to ensure seamless and orderly execution and processing of financial transactions made on the application. This helps to prevent server overload and transaction errors.
-
Message queueing is also used in our day-to-day notification applications, ensuring early reception of sent notifications from other services. This allows the recipient to get access to those notifications notwithstanding the time they were sent or when the recipient gets access to the notification application.
-
It is also used in the financial markets for seamless and efficient execution of financial orders being made. Other uses of this feature are seen in media streaming and the healthcare industry.
In the next paragraph, we’ll discuss more about the tools that offer message queueing features.
Examples of Popular Message Queue Services
A wide range of applications and services offer message queueing features. Some of these services are embedded in commercial cloud infrastructure providers. Here is a list of some commonly used message queueing services:
-
RabbitMQ
-
Apache Kafka
-
Redis
-
Amazon SQS
-
Google Cloud Pub/sub
-
NATS
-
Pulsar
-
IBM MQ
We’ll be utilizing a Rabbit MQ Cloud-as-a-service application to power our messages due to its popularity and ease of use. Here is a link to the documentation. You can also check out other message queuing applications provided above.
Next, we’ll develop a demo project that utilizes message queuing features.
Demo Project
In this project, we’ll use Rabbit MQ as a service cloud platform to build a simple message broker system that allows for seamless, ordered communication between two Node.js servers.
In this tutorial, we’ll create a message publisher that will serve as the sender, and a message consumer that receives the messages.
To begin with, we’ll have to create both Node.js servers that will be communicating with each other.
You can create two different files and initialize a Node project using npm init.
Thereafter, you can install relevant packages that will aid in the implementation of the features. We’ll use the amqplib library, a Node library implementation for Rabbit MQ.
This package allows us to swiftly communicate with RabbitMQ via the Node.js application. It seamlessly achieves this due to its built-in functions for creating queues, publishing messages, and consuming messages. More details regarding its usage will be discussed later.
To install this in our project, kindly execute:
npm i amqplibThe publish function will now be drafted. After that, we’ll have to initialize amqplib in our project.
const amp = require(“amqplib”)Also, we need to set up our RabbitMQ broker which will manage our messages.
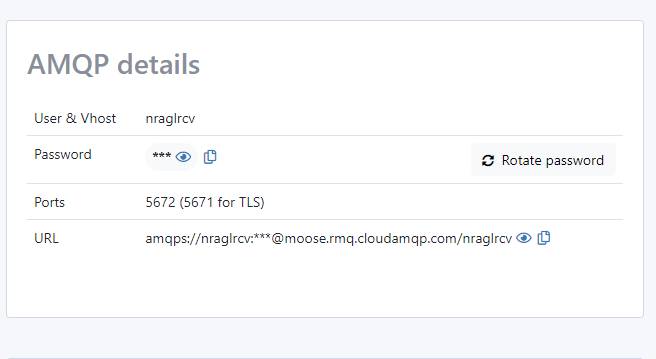
There are several ways of creating RabbitMQ servers, the most popular being installing them on a home computer and then setting them up to interact with the backend servers. You can download the software here. However, for ease of usage, we will be utilizing a cloud-based RabbitMQ broker as a service application to generate our server.
To get this done, kindly navigate to https://www.cloudamqp.com/ and create an account. For this tutorial, an instance was created and configured to the closest region to me. On successful creation of the instance, the details of the Rabbit MQ will be made available.


Moving on, we will be creating a message queue in which both parties can use as a connection pipeline. We will begin by creating a function to send messages.
async function sendMessage(msg) { try { const connection = await amqp.connect(url); const channel = await connection.createChannel(); await channel.assertQueue(queue); await channel.sendToQueue(queue, Buffer.from(msg));In the code above, a connection was ensured and maintained. Thereafter, a communication channel was also created. The assert queue function is then declared when executed, ensuring that the existing queue is maintained, and creates the queue if it doesn’t exist.
The message attached to the function gets buffered and then sent to the queue created.
async function receiveMessage() { try { const connection = await amqp.connect(url); const channel = await connection.createChannel(); await channel.assertQueue(queue); await channel.consume(queue, (msg) => { console.log(`Received message: ${msg.content.toString()}`); channel.ack(msg); });The receiver function also gets executed to receive any message that gets into the queue by executing the consume method at the exact queue. In our case, the message is outputted as a log message.
The ack function is now executed to acknowledge the message received from the queue.
Here is the full project code:
const amqp = require("amqplib");const url = "amqp://localhost"; const queue = "queue";async function receiveMessage() { try { const connection = await amqp.connect(url); const channel = await connection.createChannel(); await channel.assertQueue(queue); await channel.consume(queue, (msg) => { if (msg !== null) { console.log(`Received message: ${msg.content.toString()}`); channel.ack(msg); } }); } catch (err) { console.error("Failed to receive message:", err); }}receiveMessage();Here’s the message publisher application code:
const amqp = require("amqplib");const url = "amqp://localhost"; const queue = "queue";async function sendMessage(msg) { try { const connection = await amqp.connect(url); const channel = await connection.createChannel(); await channel.assertQueue(queue); await channel.sendToQueue(queue, Buffer.from(msg)); console.log(`Message sent to ${queue}: ${msg}`); await channel.close(); await connection.close(); } catch (err) { console.error("Failed to send message:", err); }}sendMessage("Hello, world!");Here is the output of the code:

Additional info
So far, we have completed this tutorial on message queueing and its role in facilitating seamless communication across various systems. To further improve your skillset, here are some additional best practices that should be implemented when building complex services:
Summary
We’ve highlighted the importance of message brokers and how to implement message queueing in a backend application.
Feel free to check out my other articles here. Till next time, keep on coding!