
包阅导读总结
1. 关键词:Linux、IP 地址、网络配置、主机名、MAC 地址
2. 总结:本文介绍了 Linux 系统的网络身份(主机名、IP 地址、MAC 地址),包括显示和管理系统主机名与 IP 地址的方法,强调管理员负责 IP 配置,还提及不同发行版设置静态 IP 地址的方式。
3. 主要内容:
– Linux 网络身份
– 介绍三种网络身份:主机名、IP 地址、MAC 地址,说明其用途。
– 显示系统身份
– 使用`hostname`命令显示系统的主机名。
– 使用`ip addr`命令显示网络接口的 IP 和 MAC 地址,旧系统用`ifconfig`命令。
– 管理系统主机名
– 通过`hostname`命令显示当前主机名。
– 临时修改主机名,但重启后失效。
– 使用`hostnamectl`命令永久修改主机名,该命令修改`/etc/hostname`文件。
– 管理系统 IP 地址
– 管理员负责分配 IP 地址,可手动或通过服务器动态分配。
– 静态 IP 地址适用于特定网络节点,可临时或永久设置。
– 介绍使用`ip`命令临时设置静态 IP 地址及删除的方法。
– 对于 Red Hat 相关发行版,可使用`nmcli`命令和修改相关文件设置静态 IP 地址。
– Debian 及其相关发行版使用 Netplan 配置,通过编辑 YAML 文件设置。
思维导图: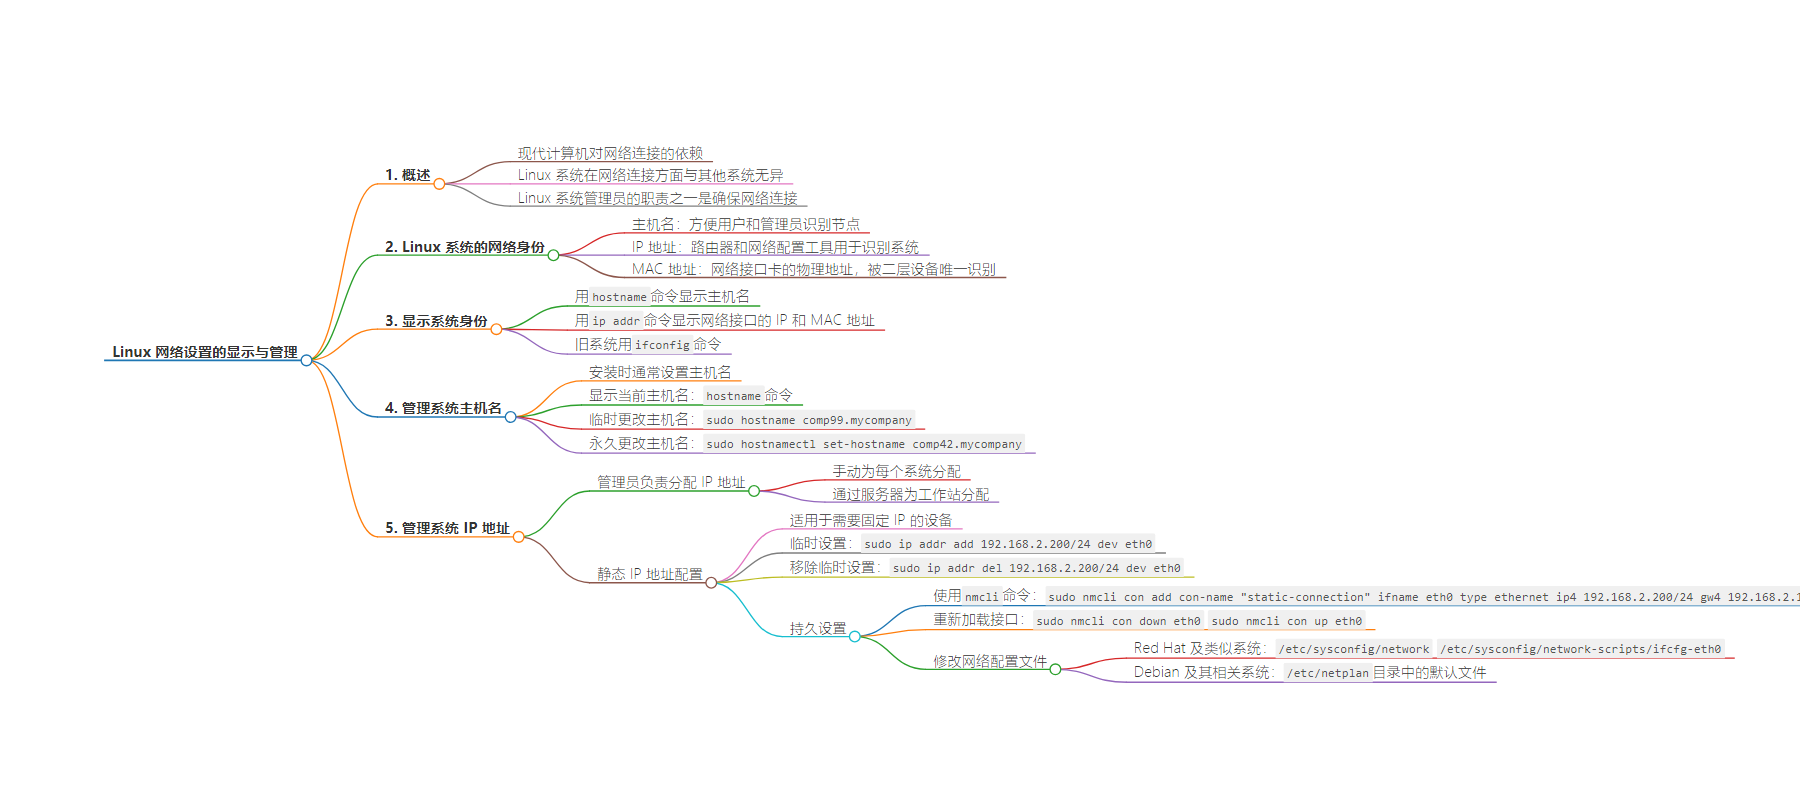
文章地址:https://thenewstack.io/linux-display-and-manage-ip-address-settings/
文章来源:thenewstack.io
作者:Damon M. Garn
发布时间:2024/8/14 14:10
语言:英文
总字数:3633字
预计阅读时间:15分钟
评分:87分
标签:Linux,系统管理员,网络,IP 地址管理,DHCP
以下为原文内容
本内容来源于用户推荐转载,旨在分享知识与观点,如有侵权请联系删除 联系邮箱 media@ilingban.com
Modern computers and their users rely on network connectivity for nearly everything, including cloud-based applications, software access, data access and communication. It seems that every aspect of computing relies on networking. Linux workstations and servers are no different in this necessity than Windows or macOS systems.
One of a Linux sysadmin’s primary responsibilities is ensuring network connectivity. This requires understanding the system’s identity on the network and configuring it to participate in network data exchanges.
Linux systems have three identities on a network. Various network devices use each identity differently.
Here are the three identities with a summary of their use:
- Hostname: A human-friendly name providing users and administrators with an easy way to identify a node.
- IP address: A logical address routers and network configuration tools use to identify the system.
- MAC address: A physical address on the network interface card (NIC) that uniquely identifies it to switches and other Layer 2 devices.
For example, a computer’s three identities might look like this:
- Hostname: computer27
- IP address: 192.168.2.200
- MAC address: 00:1c:42:73:8d:f2
The use and function of these three network identities are assumed knowledge for this article. Be sure to review basic network information if you need a refresher. You may want to construct a lab environment to practice the commands covered in this article. Refer to this article if you need to review basic Linux command syntax.
Avoid logging on to a Linux system as the root (administrator) user. Most systems force you to log on as a regular user and then use thesudo (super user do) command and your password to elevate your privileges. Some commands in this tutorial may require thesudo command on your Linux distribution. You must also usesudo to open text editors with elevated privileges to manage the network configuration files.
$ sudo vim /etc/resolv.conf
This article examines the use and configuration of the three network identities by giving command examples and offering ways to maintain network settings easily.
Display System Identities
Use the hostname command to display the system’s human-friendly name. This is almost certainly the only way end users will recognize their computer. The hostname may be part of a larger naming structure called a fully qualified domain name (FQDN), indicating the system’s position in a hierarchical naming structure.

Figure 1: The hostname command displays the system name.
A single command also displays IP and MAC addresses, though the output is much less straightforward. Use theip addr command to display information about each network interface in the system. Remember that each will have its own unique IP and MAC address. Servers often contain two or more NICs for redundancy or connectivity to multiple segments.
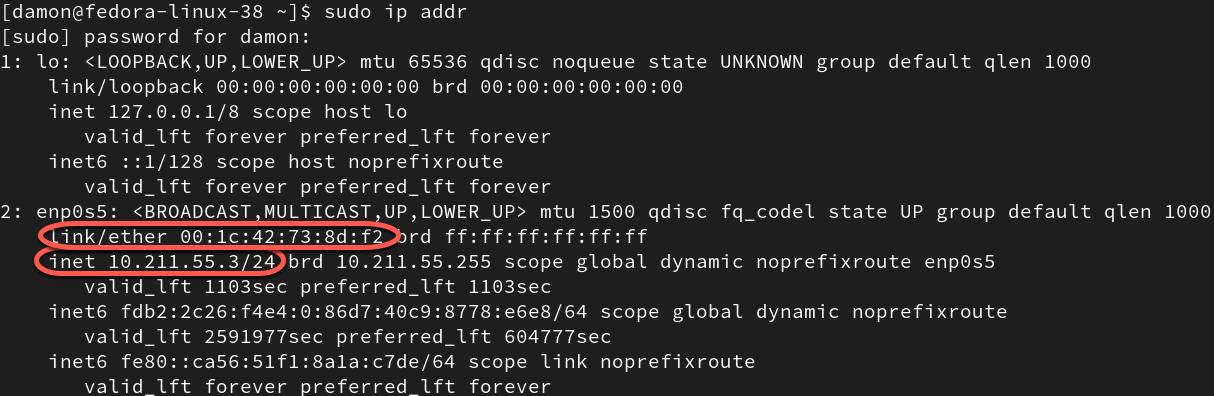
Figure 2: Use the ip addr command to display interface information, including the MAC address and IP address.
Older Linux systems used theifconfig command for this purpose.
How were these values selected and assigned? Administrators configure hostnames when installing the operating system. IP addresses may be manually configured by administrators or dynamically assigned by Dynamic Host Configuration Protocol (DHCP) servers. MAC addresses are hard-coded by their manufacturer. Of these, you’re only likely to change a system’s hostname and IP address, which will probably happen rarely.
Even simple networks get unwieldy quickly, so many IT departments document these configurations for easy reference during troubleshooting.
Manage the System Hostname
The system hostname is typically set when installing Linux. Larger organizations often use a specific naming convention that indicates the system’s role or use in the network. Smaller companies may use simple names. Regardless, the system name must be unique in the environment.
Display the current hostname by typing thehostname command.
Temporarily change the system’s hostname tocomp99 by typing this command:
|
$ sudo hostname comp99.mycompany |
However, this name assignment will be lost when the system reboots next.
If you need to permanently change the hostname after installing the OS, use thehostnamectl command. Suppose you need to set the new hostname ascomp42 in themycompany domain. Use the following command:
|
$ sudo hostnamectl set–hostname comp42.mycompany |

Figure 3: Update the system hostname with the hostnamectl command.
This method makes the change persist through reboots. Thehostnamectl command modifies the/etc/hostname file, so you don’t need to find and edit it directly.
Changing a system’s hostname means that any script, network mapping, or user that references by name will no longer be able to do so. Because of this, it’s generally not recommended to reference systems by their hostnames. IP addresses are often a better way to refer to network servers, printers and other devices.
Manage the System IP Address
Administrators are responsible for assigning IP addresses. They may accomplish this by manually entering a unique IP address on each system in the network (very tedious) or by configuring a server with a pool of addresses from which workstations can lease an IP configuration. Most administrators use a combination of these two approaches by assigning servers and other essential network devices static IP addresses and having workstations and end-user devices lease configurations from a server.
Static IP Address Configuration
Static IP addresses are useful for network nodes that require a consistent and unchanging IP address identifier. Linux servers are a great example of this, as are printers, routers and other infrastructure devices. Manually typing an IP address configuration is time-consuming, and the configuration cannot tolerate typographical errors or duplicate IP address assignments, making this approach very inefficient on a large scale for workstations and client devices.
Since there tend to be fewer servers and similar devices, static assignments work well for these. You can set a temporary IP address that disappears after a reboot or a persistent setting the system retains unless you change it.
Assign a temporary IP address to the eth0 network interface by using the following command:
|
$ sudo ip addr add 192.168.2.200/24 dev eth0 |

Figure 4: Use the ip command to set a temporary static IP address.
Remove the static IP address by using thedel subcommand, as seen below:
|
$ sudo ip addr del 192.168.2.200/24 dev eth0 |
Note that the commands above do not permanently set the IP address. They only apply to the current runtime and do not persist across reboots.
You’ll probably find that the NetworkManager component of Linux networking is easier for handling network configuration. The tool uses thenmclicommand to manage network settings rather than directly editing network configuration files and restarting network services.
Type thenmcli command with no flags to see whether NetworkManager is installed:
Figure 5: The nmcli command displays interface information.
Not all distributions usenmcli, but most distros related to Red Hat do. If necessary, use the distribution’s package manager (probably APT or DNF) to install NetworkManager. For Debian-type systems, entersudo apt install network–manager . On Red Hat-related systems, entersudo dnf install NetworkManager.
View the network devices to identify the device name you want to work with:
|
$ sudo nmcli device status |

Figure 6: Check the interface status with the nmcli command.
Suppose the output shows a network interface device namedenp0s5 . Use the followingnmcli command to configure theeth0 interface with a static IP address of 192.168.2.200, a subnet mask of /24, and a default gateway of 192.168.2.1:
|
$ sudo nmcli con add con–name “static-connection” ifname eth0 type ethernet ip4 192.168.2.200/24 gw4 192.168.2.1 |

Figure 7: Set a persistent static IP address configuration with the nmcli command.
Reload the interface using thesenmcli commands:
|
$ sudo nmcli con down eth0
$ sudo nmcli con up eth0 |
Modifying the network configuration files is another way to make the IP address persistent. These files vary by distribution, but here are two common examples.
On Red Hat and similar distributions, use a text editor to edit the following files:
|
/etc/sysconfig/network
/etc/sysconfig/network–scripts/ifcfg–eth0 |
Edit the/etc/sysconfig/network file with the settings for the hostname, default gateway and IPv6 configurations.
Modify the/etc/sysconfig/network–scripts/ifcfg–eth0 file with the appropriate IP address, subnet mask, gateway (default gateway) and at least one DNS server address.
You should restart the networking service using thesudo systemctl restart network command. Like other commands, this one may vary on different distributions.
Debian and its related distributions (Ubuntu, Mint, etc.) use the Netplan configuration to manage networking. You specify the same kind of information as you do with Red Hat-derived distros. Netplan is an interface to NetworkManager that configures network settings using YAML files.
Edit the default file in the/etc/netplan directory to add settings for your network interface. Note that this file is in YAML, which is very picky about syntax (especially spaces). Remember to run the text editor using sudo to elevate your privileges.
Here’s a sample of the entry for theenp0s5 interface. Just replace the IP settings with the appropriate values for your network. Thedhcp4: no parameter sets this as a static IP address. This line will read dhcp4: true if the system is currently a DHCP client.
|
ethernets:
enp0s5:
dhcp4: no
Addresses: [192.168.2.200/24]
Gateway: 192.168.2.1
Nameservers:
Addresses: [192.168.2.10, 192.168.2.11] |
Save and close the file, then run this command to update the settings:
Confirm the IP address is correct with theip addr command (or try thehostname –I command).
Be careful editing the YAML document. YAML is very particular about spacing, so be sure to match the template.
If you want to make the system a DHCP client rather than maintain a static IP address configuration, edit the file by removing the addresses and nameservers lines, then set the DHCP line todhcp4: true. The system will then be a DHCP client.
Use the Graphical Interface for Static IP Configuration
The network settings graphical user interface includes a Manual option that allows administrators to configure IP address, subnet mask, gateway and DNS server entries. Be very careful to avoid typographical errors here. You must also remember that no systems on your network can have the same IP address, so careful documentation of statically assigned IP addresses is required. This configuration tool is similar among various distributions because the same network settings are always needed.
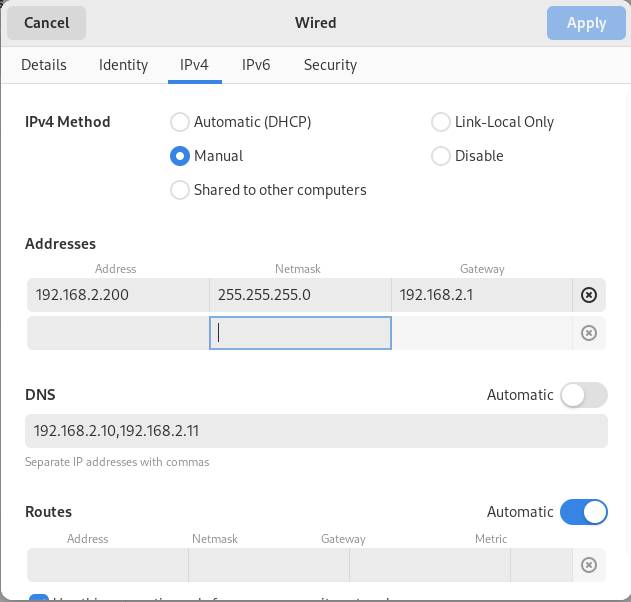
Figure 8: The GUI interface requires the same information as the command line configuration.
Dynamic IP address Configuration
End-user workstations rarely have to be discovered by other systems on the network. Since business data is typically stored and shared from Linux file servers, there should be little content on user systems that other systems must reference. Therefore, it’s not necessary to have permanent static IP addresses. Having these devices acquire IP addresses from a central server is far more efficient.
The Dynamic Host Configuration Protocol (DHCP) service enables administrators to define a server with a pool of available IP addresses and all their related settings (subnet mask, default gateway/router, etc.). During the boot process, DHCP client devices send a network broadcast requesting the use of an IP address. The DHCP leases an IP configuration to the client. This process is less difficult, more flexible and quicker than static configurations by administrators. It is also less error-prone.
The DHCP lease generation process consists of four steps initiated by the client system. These steps allow the client to request IP settings and let the DHCP server respond.
Here are the steps:
- DHCPDiscover: A broadcast by the client device asking for a DHCP server.
- DHCPOffer: A response by the DHCP server offering an IP address configuration.
- DHCPRequest: A formal request by the DHCP client to use the offered IP address configuration.
- DHCPAck: An acknowledgment of the assigned configuration by the DHCP server.
The client device periodically checks in with the DHCP server to renew the IP address lease.
Most client devices assume they will be DHCP clients, so that’s usually the default setting. From an end-user’s perspective, this means their computer is self-configuring for network connectivity. You’ll probably leave your Linux system as a DHCP client, whether in a home environment or business network. For example, a Linux laptop will be a DHCP client when connecting to the wireless network at a coffee shop and your home. You want your laptop to configure itself for whatever environment it’s in.
To configure a host as a DHCP client using NetworkManager, type the following command:
|
$ sudo nmcli con modify eth0 ipv4.method auto |
Reload the interface with the followingnmcli commands:
|
$ sudo nmcli con down eth0
$ sudo nmcli con up eth0 |
As mentioned above, to set a Debian-based distribution as a DHCP client, edit the interface file in the/etc/netplan directory with the following entry:
Use the Graphical Interface for DHCP
The graphical network configuration tool offers various options, including an Automatic (DHCP) or Manual (static) setting. The Automatic setting configures the system as a DHCP client, enabling it to go through the lease generation process described above.
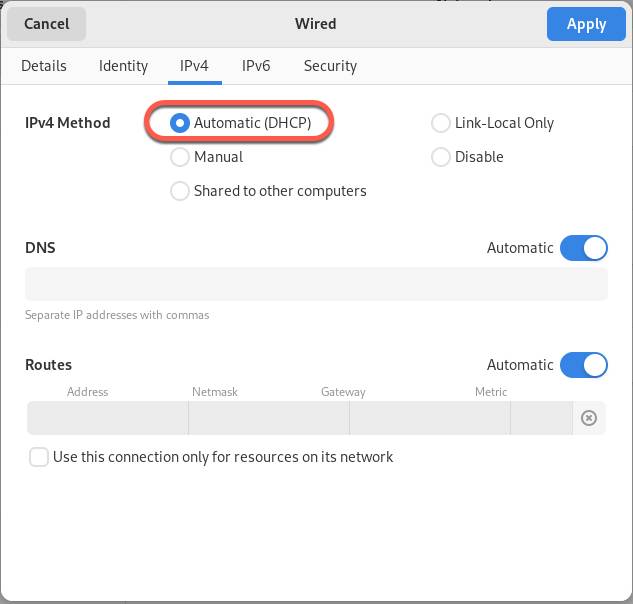
Figure 9: Use the GUI interface to set the system as a DHCP client.
Most distributions have a very similar GUI network configuration tool. These settings are always required, so any graphical tool should be easy to interpret.
Default Gateway Configuration
The primary settings provided by a DHCP server are the client’s IP address and subnet mask. However, the DHCP server will probably also include a default gateway value. This value is the IP address of the router on the subnet. Client computers don’t require a router to communicate with other nodes on the same subnet, but they do need a router for connectivity with machines on other subnets. If a system needs to send information to a node with a different network ID than its own, it forwards the message to the router. The default gateway value lets the computer know where the router is in this process.
The gateway IP address is part of the IP address setting provided by the DHCP server. If an administrator configures IP addressing manually, they must set the gateway value as part of that configuration.
Configure Name Resolution
The relationship between hostnames and IP addresses is critical. Most people refer to systems by their hostnames, but most network devices recognize the IP address to manage communication. It would be very difficult for end users to remember that 172.16.33.58 is the “color-sales-printer” or 192.168.2.10 is the “dev-dept-fileserver.” Imagine if you had to keep track of all your favorite Internet sites by their specific IP addresses!
Name resolution refers to storing and using information about which hostnames are related to which IP addresses.
The Domain Naming System (DNS) provides name resolution. This service maintains a database of hostnames and IP addresses. If a user types in a command containing a hostname, such asping server07 , their workstation queries DNS, asking for the IP address forserver07. The computers cannot communicate based on hostnames; TCP/IP communications require IP addresses. However, since IP addresses are challenging for people to remember, they need to be able to refer to systems by name. DNS relates these two values so that the network node and the user can work with the correct data.
Suppose you tell your computer toping server07. Since it doesn’t know what to do with this name, it asks the DNS server, which responds with the appropriate IP address.
The process basically looks like this:
- User typesping server07
- Their workstation doesn’t know what server07 is, and it needs an IP address
- The workstation sends a query to the DNS server, asking, “What is the IP address for server07?”
- The DNS server checks its resource records until it finds a record showing “server07 = 192.168.2.22”
- The server responds to the workstation, stating, “The IP address for server07 is 192.168.2.22”
- The workstation runsping 192.168.2.22
The workstation must know the DNS server’s IP address so it can send the query. This setting is critical for computers. The DHCP server usually provides it, along with the computer’s IP address, subnet mask, and default gateway.
The above example assumes name resolution on an internal business network. Accessing websites on the internet uses a more complicated variation of the process. The concepts are similar, but more DNS servers are involved.
DHCP servers typically provide DNS server IP addresses as part of the standard IP address settings leased to the client device.
If you’re managing a static IP address configuration on your server, you should set the DNS server IP addresses. You can statically configure DNS servers for the client to query using thenmcli command. Here’s an example:
|
$ sudo nmcli con mod “static-connection” ipv4.dns “192.168.2.10,192.168.2.11” |
To configure the client device manually to query a DNS server, edit the/etc/resolv.conf file. You’ll typically specify two DNS servers (name resolution is important enough to justify multiple servers).
Edit the twonameserver lines with the IP addresses of your DNS servers.

Figure 10: The /etc/resolv.conf file contains entries for DNS nameservers the client can query.
Be sure to usesudo to elevate your privileges when editing this file. For example, to use Vim to edit the name resolution file, type:
|
$ sudo vim /etc/resolv.conf |
Display the System’s MAC Address
You can use theip command to display the NIC’s MAC address. Doing so may be useful during troubleshooting or when documenting a system’s configuration, but it’s not a setting you’ll often change or use yourself.
Various commands exist to show the MAC address for each network interface card installed on the system. Here are a few examples:
- ip addr: Displays lots of NIC information, including IP address and MAC address.
- ip link show : Displays the MAC address, MTU size and the status of each NIC.
- ip link show eth0 : Displays the MAC address, MTU size and status of the specified NIC (eth0 in this example).

Figure 11: The IP link command is one of several that displays the MAC address.
Discovering your system’s MAC address can be helpful when working with tools like Nmap, tcpdumpand Wireshark. These troubleshooting utilities display detailed network information, including MAC addresses. You might need to determine where packets originate or what NIC is sending error packets on the network.
When sending information, computers add their own MAC address to data frames. They also add the destination computer’s MAC address. The source computer must discover the MAC address of any destination systems on the same network segment. They find this information using the Address Resolution Protocol (ARP). Each computer also caches (temporarily saves) MAC addresses it discovers for efficiency. You can view and clear this cache.
View the MAC address cache on your Linux computer by using thisip command:
Viewing the MAC address cache is a good way to learn about your segment’s network devices and troubleshoot failed connections.
Clear the ARP cache with the following command:
|
$ sudo ip neigh flush all |
Clearing the cache forces the computer to rediscover local MAC addresses, helping ensure the information in the cache is current and accurate.
Wrap Up
Recognizing the three identities networked computers use is helpful for security auditing, troubleshooting, system configuration, and more. Each identity is used by a different aspect of the network infrastructure.
- Hostnames: Typically used by people.
- IP addresses: Typically used by computers and routers.
- MAC addresses: Typically used by computers and switches.
Little configuration is available for MAC addresses, and hostnames are usually set during the operating system installation. IP address settings are where most configuration and troubleshooting will occur.
Administrators may configure IP settings manually (called a “static IP address”) or allow systems to lease IP settings from a DHCP server (called “dynamic IP addressing”). Regardless, the common settings are shown below:
- IP address: Logical address that shows what network segment the computer resides on.
- Subnet mask: Indicates which part of the IP address is the network ID and which part is the host ID.
- Default gateway: The IP address of the router.
- Name servers: The IP address of one or more DNS name servers.
Managing and troubleshooting IP addressing is a standard skill for Linux administrators. Expect to work at the command line and graphical interface when managing Linux network nodes. Begin exploring the network settings on your Linux lab computer today.
YOUTUBE.COM/THENEWSTACK
Tech moves fast, don’t miss an episode. Subscribe to our YouTubechannel to stream all our podcasts, interviews, demos, and more.