
包阅导读总结
1. 关键词:
– Zulip
– Linux
– 聊天服务器
– 内部部署
– 隐私安全
2. 总结:
本文介绍如何在 Linux 上部署内部聊天服务器 Zulip,包括准备工作、安装步骤、配置 SMTP 服务器发送邮件通知等,强调其开源、功能丰富且能保障隐私安全。
3. 主要内容:
– 部署原因
– 公司可能有敏感信息,不想依赖第三方沟通平台,如 Slack 和 Microsoft Teams。
– Zulip 特点
– 开源协作工具,功能丰富,如消息历史搜索、多种聊天方式、多语言支持等。
– 部署所需
– 运行的 Linux 实例、sudo 权限用户、完全限定域名(或使用 IP 地址)。
– 安装步骤
– 配置主机文件,映射服务器 IP 和域名。
– 更新和升级服务器。
– 下载并解压 Zulip。
– 安装 OpenSSL。
– 运行安装脚本,可选择自签名证书或 Let’s Encrypt 证书。
– 后续配置
– 创建组织和管理员账户。
– 配置 Zulip 使用 SMTP 服务器发送邮件通知。
思维导图:
文章地址:https://thenewstack.io/deploy-an-in-house-chat-server-with-linux-and-zulip/
文章来源:thenewstack.io
作者:Jack Wallen
发布时间:2024/8/13 17:54
语言:英文
总字数:1120字
预计阅读时间:5分钟
评分:87分
标签:Zulip,Linux,内部聊天服务器,隐私,安全性
以下为原文内容
本内容来源于用户推荐转载,旨在分享知识与观点,如有侵权请联系删除 联系邮箱 media@ilingban.com
For many companies, platforms like Slack are the go-to for communication and collaboration. But what if you don’t want to depend on a third party for such a service?
You might have highly sensitive information that you don’t want to be shared on a third-party server/service. If you’d prefer to keep this type of communication in-house, the likes of Slack and Microsoft Teams simply will not do.
If that kind of privacy and security is required by your company, you might want to consider a solution like Zulip.
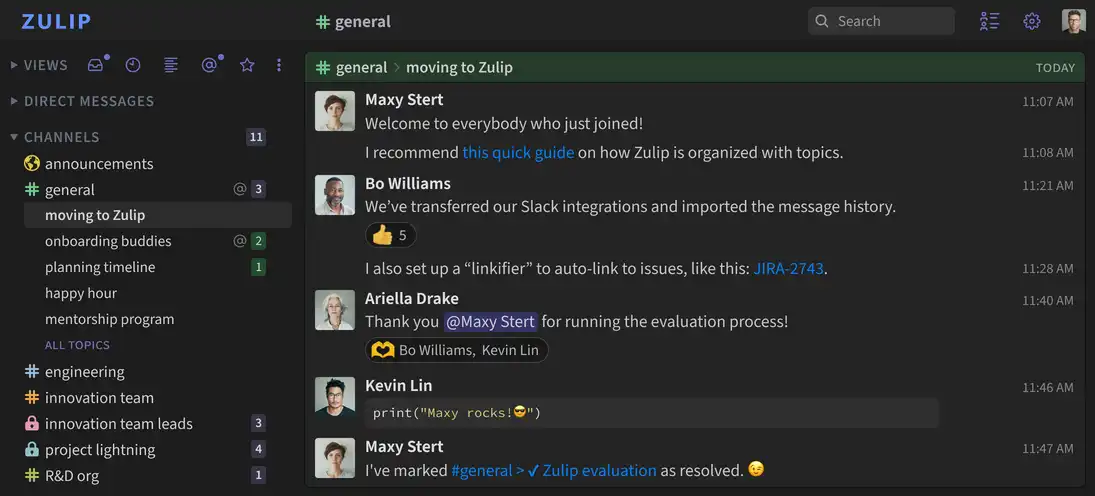
Zulip is an open-source collaboration tool with plenty of features to help make in-house communication and collaboration not only possible but easy. Zulip includes features like:
- Message history search.
- Users.
- Channels.
- Topic-based threading.
- File sharing and storage.
- Voice and video chats.
- App integration.
- Localizations with more than 20 languages.
- Web, desktop, mobile and terminal apps.
- Expressive formatting.
- Collaborative messages.
- Keyboard shortcuts.
- Permanent message links.
- Custom emoji.
- Read receipts.
- Typing notifications.
- Send later and mark unread.
- Email notifications.
- Link previews.
- Linkifiers.
- And much more.
Check out the full Zulip feature list.
The core development team for Rust programming language uses Zulip to communicate.
Best of all, Zulip can be easily deployed on a Linux server without too much hassle. I’m going to show you how to do just that.
What You’ll Need
To deploy Zulip, you’ll need the following: a running instance of Linux, a user with sudo privileges and a fully qualified domain name pointed to the hosting server. If you want to limit usage of Zulip to in-house, you can without the domain name and simply use the IP address (which is how I’ll demonstrate).
Host-File Configuration
To begin the installation, you must map your hosting server’s IP address to a domain name. Let’s say your server IP is 192.168.1.137 and your domain is zulip.example.com. Open the hosts file with the command:
At the bottom of that file, add the following:
|
192.168.1.137 zulip.example.com |
Save and close the file.
Update and Upgrade
Next, you’ll want to make sure your server is up-to-date. For example, if you’re using Ubuntu Server (which is what I’m using), you can run the following command to do both:
|
sudo apt–get update && sudo apt–get upgrade –y |
Download and Unpack Zulip
Next, we’re going to download and unpack the Zulip file. First, change into the /tmp directory with:
Now, download the latest version of the installer with:
|
wget https://www.zulip.org/dist/releases/zulip–server–latest.tar.gz |
If you find wget isn’t installed, you can install it with a command like:
|
sudo apt–get install wget –y |
When the download completes, unpack the file with:
|
tar –xvf zulip–server–latest.tar.gz |
Install OpenSSL
The next step is to install OpenSSL, which is required for the installation. Install this package with:
|
sudo apt–get install openssl –y |
When this installation is completed, you’re ready to run the installer.
Running the Installer Script
There are two ways to run the installer:
- With a self-signed certificate.
- With a Let’s Encrypt certificate.
If you’ll be using a fully qualified domain name for your Zulip server, you must install it with Let’s Encrypt. If you’ll be using this in-house only (with no outside access), you can install it with a self-signed certificate.
To install with a self-signed certificate, the command is:
|
sudo –s ./zulip–server-*/scripts/setup/install —self–signed–cert —email=EMAIL —hostname=HOST |
Where EMAIL is the email address you want associated with the admin account and HOST is the domain you configured in the host file.
If you plan on using Let’s Encrypt, the install command is:
|
sudo –s ./zulip–server-*/scripts/setup/install —certbot —email=EMAIL —hostname=FQDN |
Where EMAIL is the email address you want associated with Zulip and FQDN is your fully qualified domain name.
After launching the installation, I’d recommend you set about taking care of some other tasks because this takes some time (between 15 and 30 minutes, depending on the speed of your network and CPU).
When the installation completes, you’ll see a link in the final output. Either click that link or copy/paste it into a browser. That link will take you to the Zulip web-based installer, where you’ll first need to type an email address and click Create Organization (Figure 1).
-
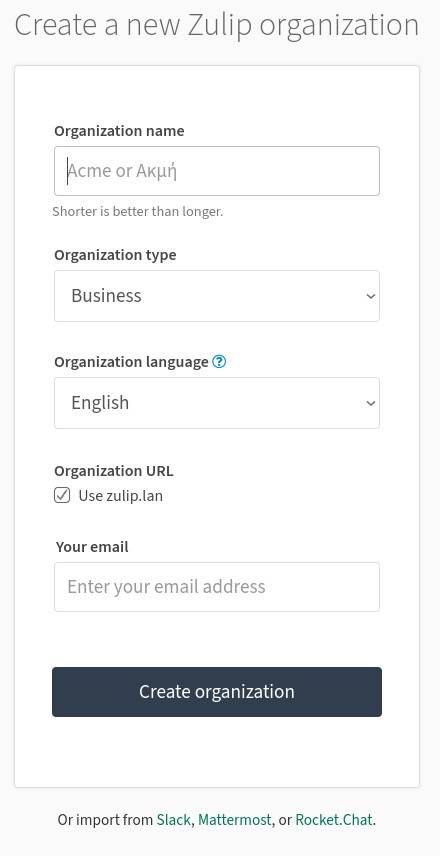
Figure 1: Create your organization in this window.
If you receive an nginx error (that it was unable to start), make sure if you’ve installed Apache that you’d stopped and disabled that web server with:
|
sudo systemctl stop apache2 sudo systemctl disable apache2 |
After creating your organization, you’ll be required to create an admin account (Figure 2). After doing that, you can log into Zulip with that account and customize the server to fit the needs of your company.
-

Figure 2: Creating the admin account for your Zulip server.
Configuring Email for Zulip
You’ll also need to configure Zulip to use an SMTP server, so the service can send email notifications. To do this, open the necessary configuration file with:
|
sudo nano /etc/zulip/settings.py |
In that file, look for the following lines:
|
#EMAIL_HOST = ‘smtp.example.com’ #EMAIL_HOST_USER = ” #EMAIL_USE_TLS = True #EMAIL_PORT = 587 |
Uncomment those lines (by removing the leading # character) and then configure as needed. For example, if you’ll be using Gmail’s SMTP servers, the lines would look like this:
|
EMAIL_HOST = ‘smtp.gmail.com’ EMAIL_HOST_USER = ‘GMAILADDRESS’ EMAIL_USE_TLS = True EMAIL_PORT = 587 |
Where GMAILADDRESS is your Gmail address.
Save and close the file.
You then must set the password for the SMTP server. Open the required configuration file with:
|
sudo nano /etc/zulip/zulip–secrets.conf |
Look for the line:
|
email_password = PASSWORD |
Change PASSWORD to the password for your email account. If you’re using Gmail, you’ll need to create an app password.
Save and close the file.
Restart the Zulip service (so the changes will take effect) with the command:
|
su zulip –c ‘/home/zulip/deployments/current/scripts/restart-server’ |
And that’s it. You now have an in-house collaborative chat server up and running. Hopefully, this platform will help you migrate away from third-party, closed-source services, so you can enjoy more privacy and security for collaboration.
YOUTUBE.COM/THENEWSTACK
Tech moves fast, don’t miss an episode. Subscribe to our YouTubechannel to stream all our podcasts, interviews, demos, and more.