包阅导读总结
1. 关键词:灰度发布、业务全链路、技术栈、版本命中、Nacos 配置
2. 总结:
本文主要介绍业务全链路灰度发布,阐述其作为信息化团队基础能力的原因,包括让用户尝鲜和收敛问题扩散。还涉及核心技术栈选型原则,灰度策略对比与选择,调用链路设计、版本命中策略、Nacos 配置等,并说明了发布流程、各端落地细节与坑点。
3. 主要内容:
– 作者背景
– 作者为数字化技术负责人、前端架构师,曾在多个知名团队任职。
– 灰度发布基础能力
– 配合产品和研发,可让用户尝鲜和控制问题扩散。
– 核心技术栈
– 基于两个原则选型:团队最大公约数、相对成熟可靠开源技术。
– 基础设施选云服务和流水线工具,后台用 Spring Boot & Nacos,前端选 Open Resty 搭配 Lua 脚本。
– 灰度策略对比
– 分为客户端先更新资源拿版本号请求后台和后台直接确认请求版本两类,因扩展性和业务特点选择方案一。
– 调用链路设计
– 包括客户端、前端资源和后台的调用流程。
– 版本命中策略
– 两种方案:后台服务设默认版本精准匹配和版本精准匹配配合上下寻找策略,因应用特点选择后者。
– Nacos 配置设计
– 是数据中枢,记录灰度和全量版本等配置。
– 版本命中场景
– 包括正常灰度、灰度回滚、正常全量、后台个别服务灰度等。
– 发布流程设计
– 涵盖编辑草稿、构建、发布等步骤。
– 各端落地细节与坑点
– 如灰度服务核心逻辑、后台服务按版本寻址、前端资源匹配等。
思维导图: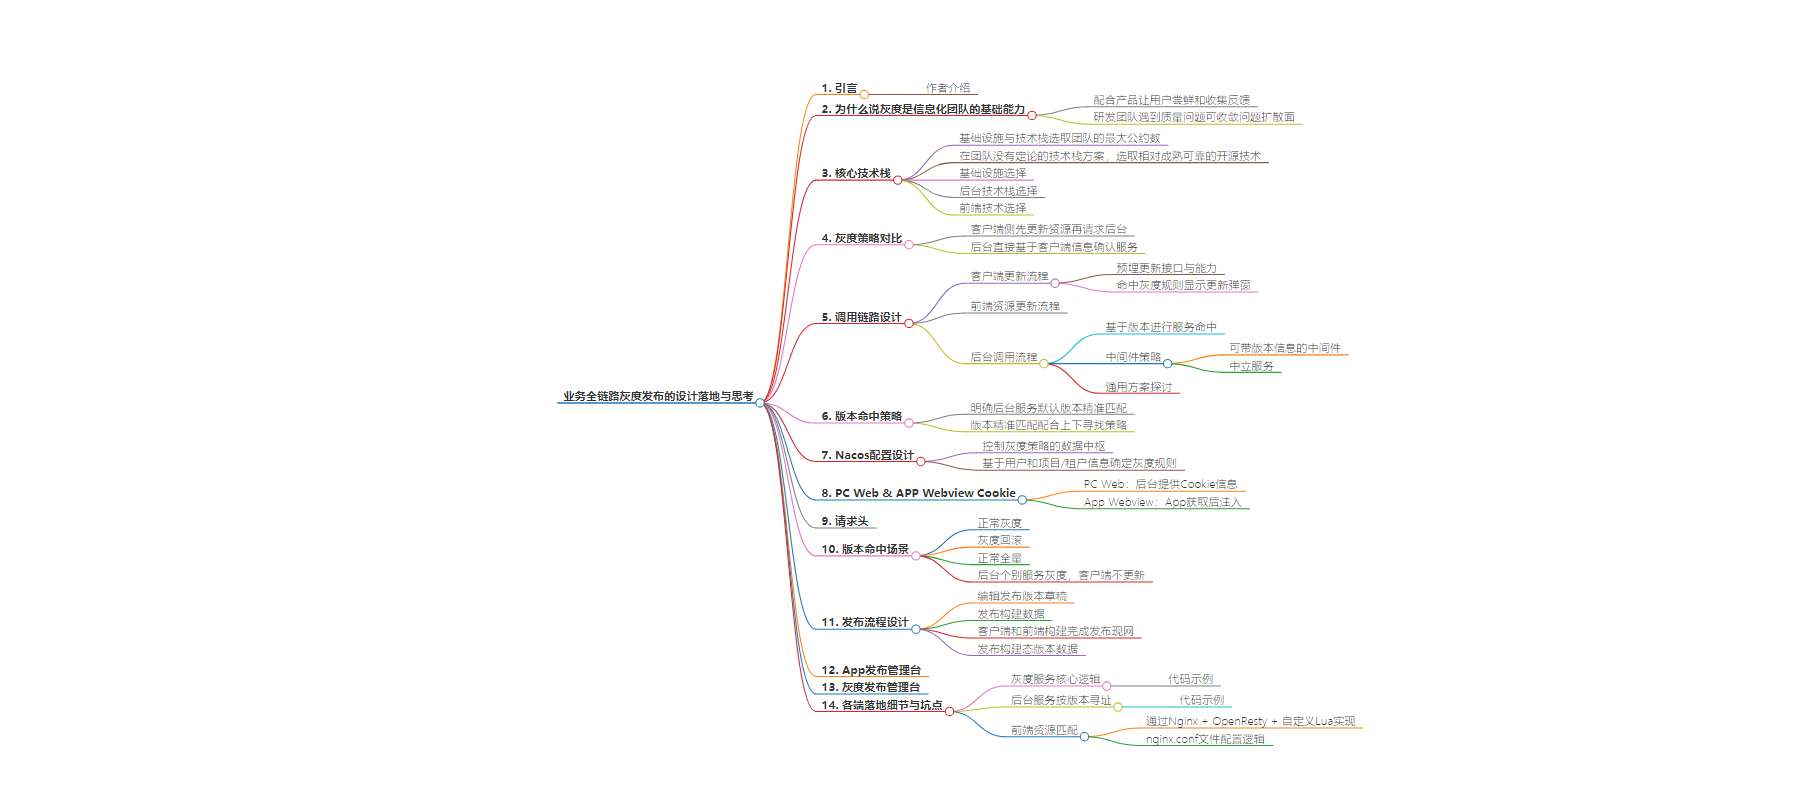
文章地址:https://mp.weixin.qq.com/s/Qucio1CaHt5X5QHzTUY-3A
文章来源:mp.weixin.qq.com
作者:印记中文团队
发布时间:2024/7/4 2:29
语言:中文
总字数:6045字
预计阅读时间:25分钟
评分:88分
标签:灰度发布,版本管理,Nacos,前端技术,后端技术
以下为原文内容
本内容来源于用户推荐转载,旨在分享知识与观点,如有侵权请联系删除 联系邮箱 media@ilingban.com
作者:李成熙,现500强央企数字化技术负责人,前端架构师。2014年加入AlloyTeam,先后负责过QQ群、花样直播等业务; 2019年加入腾讯云云开发团队;同年加入Shopee,担任金融商家业务前端负责人; 2020年-2022年回归腾讯文档,单人文字品类技术负责人
为什么说灰度是信息化团队的基础能力
基于灰度的发布,从业务层面来说,可以配合产品让用户尝鲜和收集反馈,也能让研发团队遇到质量问题也可以收敛问题的扩散面,因此灰度发布理应作为成熟产研团队的基础能力。
核心技术栈
对于不同的团队,所选择的方案可能有所不同,对所在的团队而言,本着以下两个原则选型,能够最大节约工作量以及给全部门带来更多复用的内容,无论是方案思考、架构设计、还是产出的工具:
1.基础设施与技术栈选取团队的最大公约数;
2.在团队没有定论的技术栈方案,选取相对成熟可靠的开源技术。
灰度策略对比
一般来说,多数的灰度策略都会基于业务和用户的信息执行,比如projectId(项目/租户id),uid(用户id)等。但具体到技术上又分为两种,一种是客户端侧(包括App和Web)先基于灰度规则更新资源后,拿着资源对应的版本号请求后台,后台通过版本号确认请求的对应版本的后台服务;另一种是后台直接基于客户端侧传过来的业务和用户信息直接确认请求的对应版本后台服务。两种方案的对比如下:
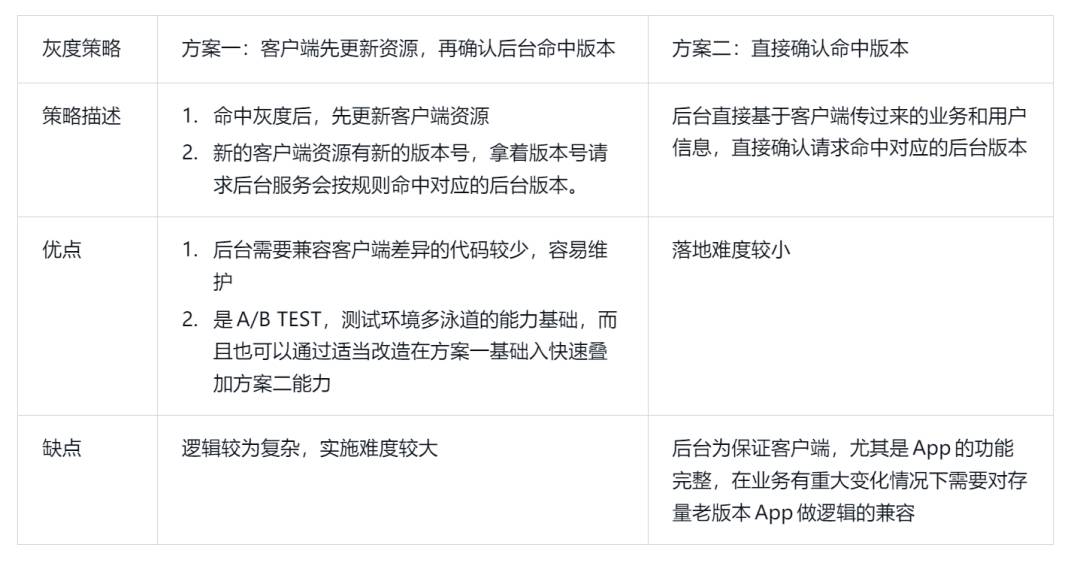
考虑到方案后续的扩展性,以及由于业务是重流程跨版本可能有较大流程变更的缘故,产研团队最终采纳了方案一。
调用链路设计
客户端更新流程
1.客户端需要预埋更新应用的接口与能力,且在灰度过程中在应用市场新版本,否则灰度能力不可控。
2.客户端只有在命中灰度规则的时候,才会显示更新的弹窗或信息。

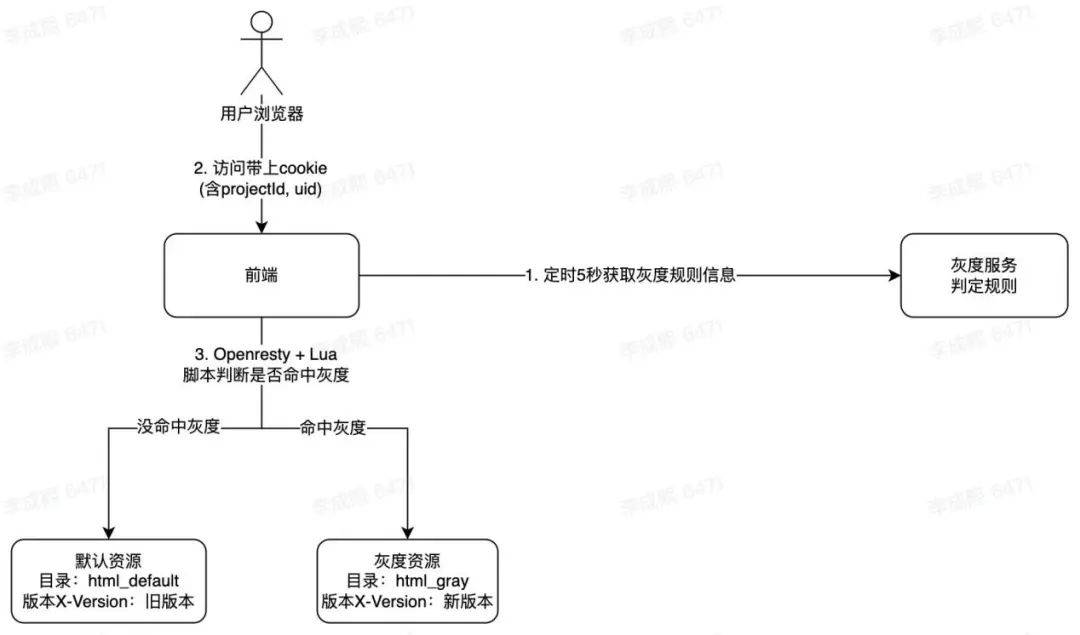
前端资源更新流程
后台调用流程
1.主要的调用流程,遵循基于版本进行服务的命中。
2.中间件的策略则各有不同,对于可以带上版本信息的中间件,如消息队列,新旧生产者和消费者只需要生产和消费匹配版本的即可。而对于一些中立的服务,比如定时任务、第三方服务等,目前并没有构思到比较通用的方案,可以采用平均流量,或者通过第三方带来的一些信息进行二次换取再进行对应规则的命中。这里如果有经验的朋友可以分享一下你们的方案。

版本命中策略
版本命中策略比较
在设计客户端/前端与后台版本的命中策略过程中,我们构思到有两种方案。第一种是明确给后台服务设定一个默认版本,精准匹配,如果版本匹配不上就走后台的默认版本。第二种是版本的精准匹配,配合往上往下寻找策略。如果版本一样就直接走同样版本的后台服务;如果客户端/前端的版本较低,就往上寻找,直到找到为止;如果客户端/前端版本较高(情况相对较少),就往下寻找,直到找到为止。
这两种方案的优缺点都比较明显,第一种方案比较简单明了,比较适合偏C侧的应用,后台默认版本需要兼容的客户端版本较多。第二种方案相对较绕,但后台兼容的版本会少一些,适用于更新较频繁的B端应用。恰好我们的应用属于偏B端的员工App,也希望后台的代码相对保持简洁,因此当时选择了第二种方案。
Nacos配置设计
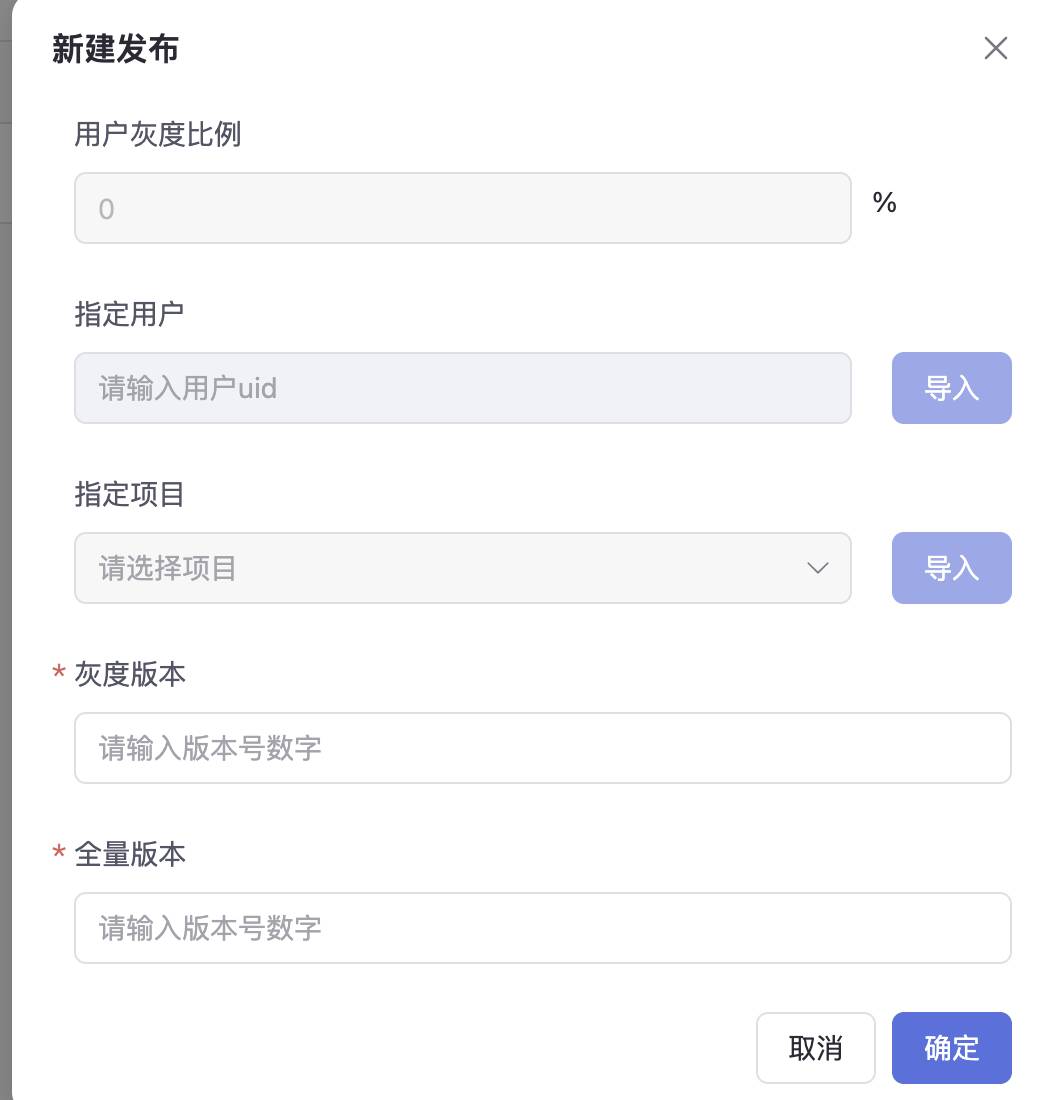
1.Nacos 是控制所有端灰度策略的数据中枢,在目前团队业务中,一般主要对用户和项目/租户进行灰度,因此提供了uid和project的配置,以及需要记录当前灰度和全量的版本,以备切换。
2.目前灰度的规则,是基于用户和项目/租户信息命中的并集确定的。如果命中灰度,则客户端(App/Web)的资源就会率先进行更新。
rule:uidPercent: 100uid: "123,124,125"project: "124"releaseGray: "202401010000"releaseDefault: "202312312300"
PC Web & APP Webview Cookie
如果是PC Web,Cookie的信息主要由后台提供,而 App Webview侧需要 App通过后台获取后,再注入到 Webview 中。

请求头

版本命中场景
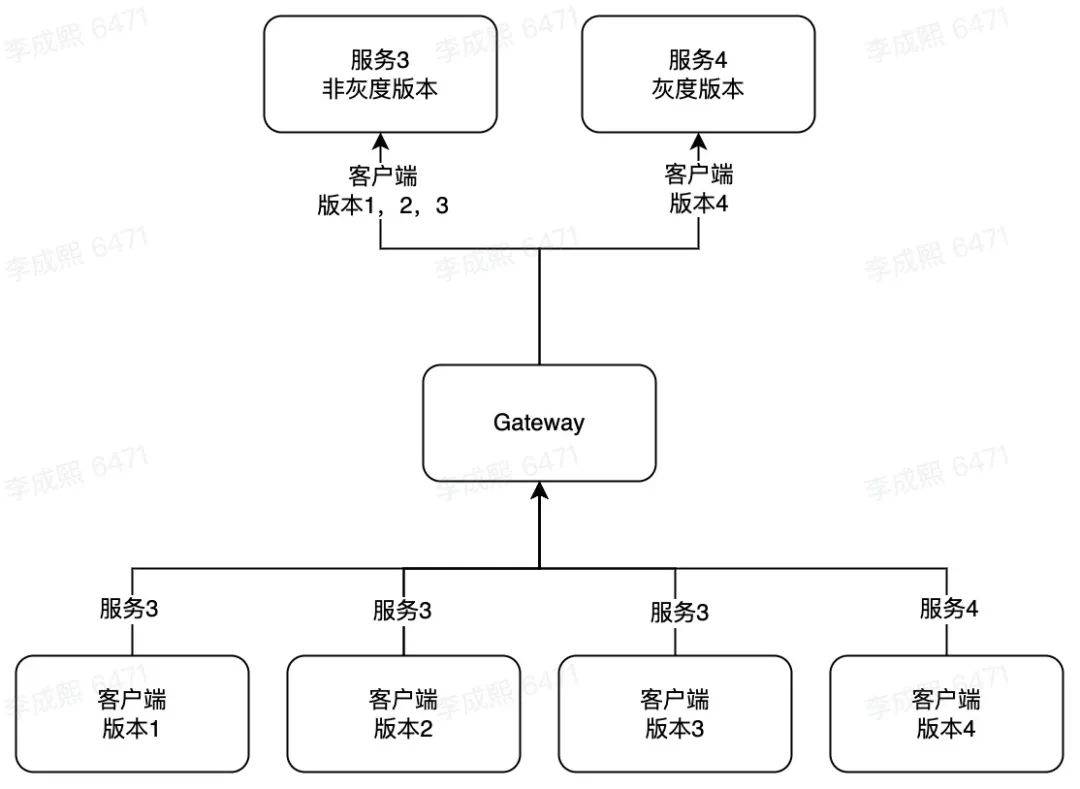
灰度场景1——正常灰度
灰度场景2——灰度回滚
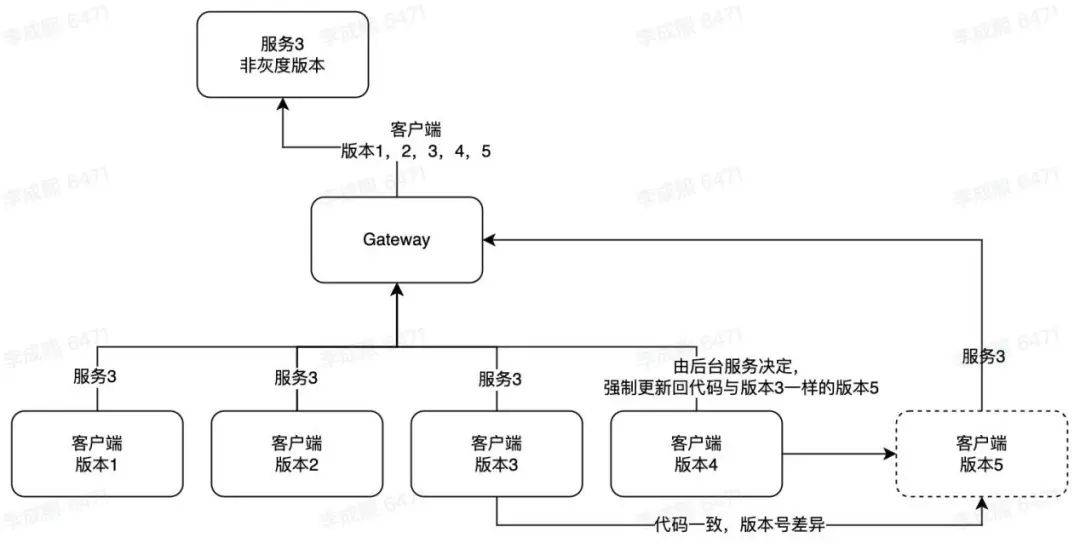
灰度场景3——正常全量
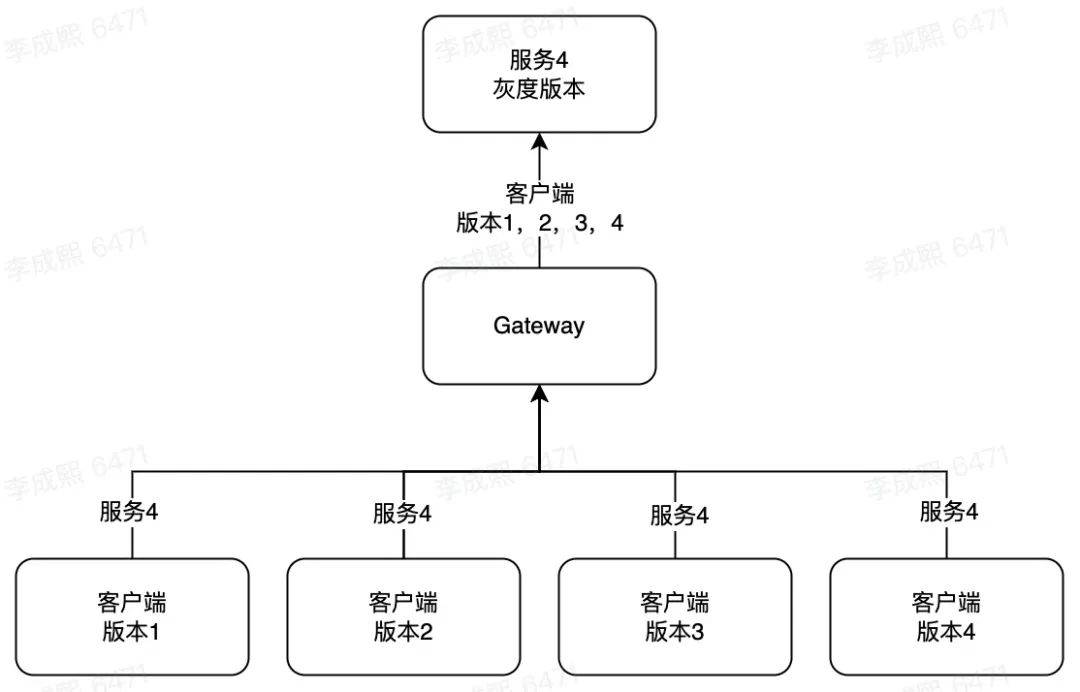
灰度场景4——后台个别服务灰度,客户端不更新
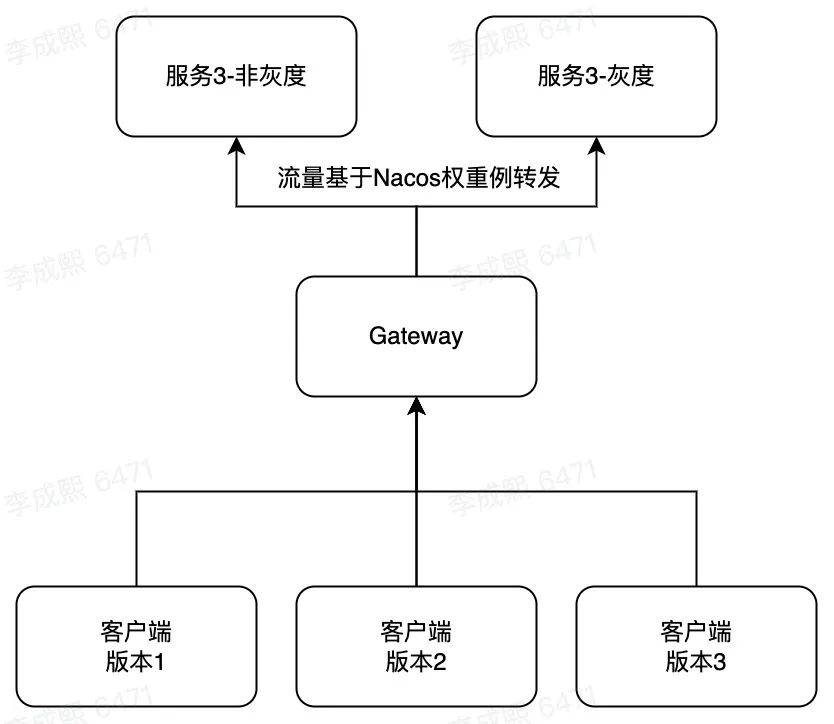
该场景主要适用于后台性能优化类、代码重构类的技术类发布,不涉及产品流程的重大变更。
发布流程设计
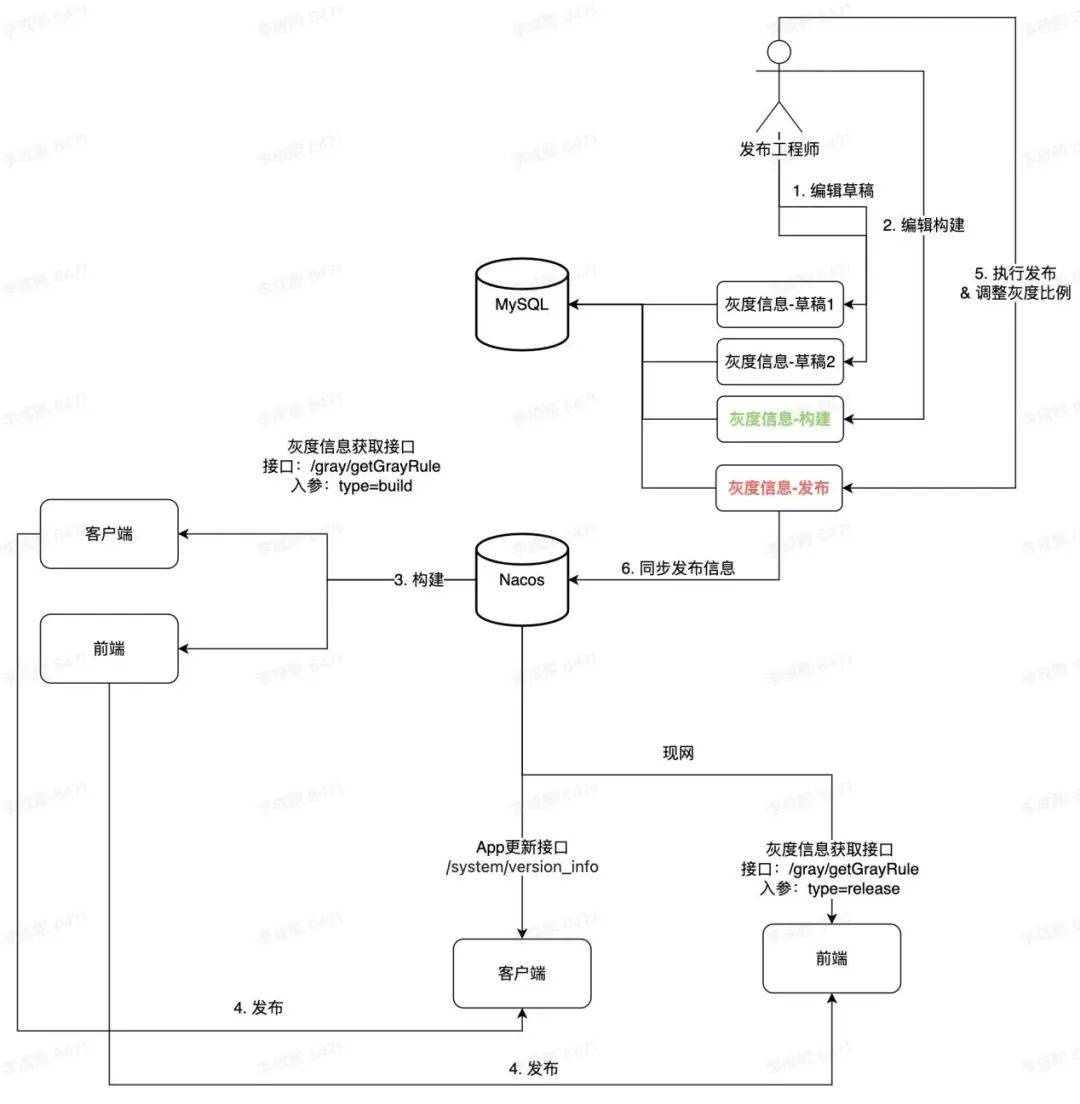
整体的发布流程如下:
1.编辑发布版本的草稿,待进入构建。
2.基于第1步编辑的草稿版本数据,发布构建数据,让客户端和前端进行代码构建,为发布做好准备。
3.当客户端和前端构建完成后,会被发布工程师发布到现网,由于此时版本数据未进入发布态,因此未有流量进入后台。
4.对构建态的版本数据进行发布,此时除了数据库版本数据会更新,也会同步更新到Nacos,方便网关、灰度服务取得灰度数据的性能更高。随着发布工程师调整灰度的比例,用户的客户端和前端资源会陆续更新,拿到新版本的客户端用户请求都会陆续进入新版本的后台,此时灰度的里程开始了。
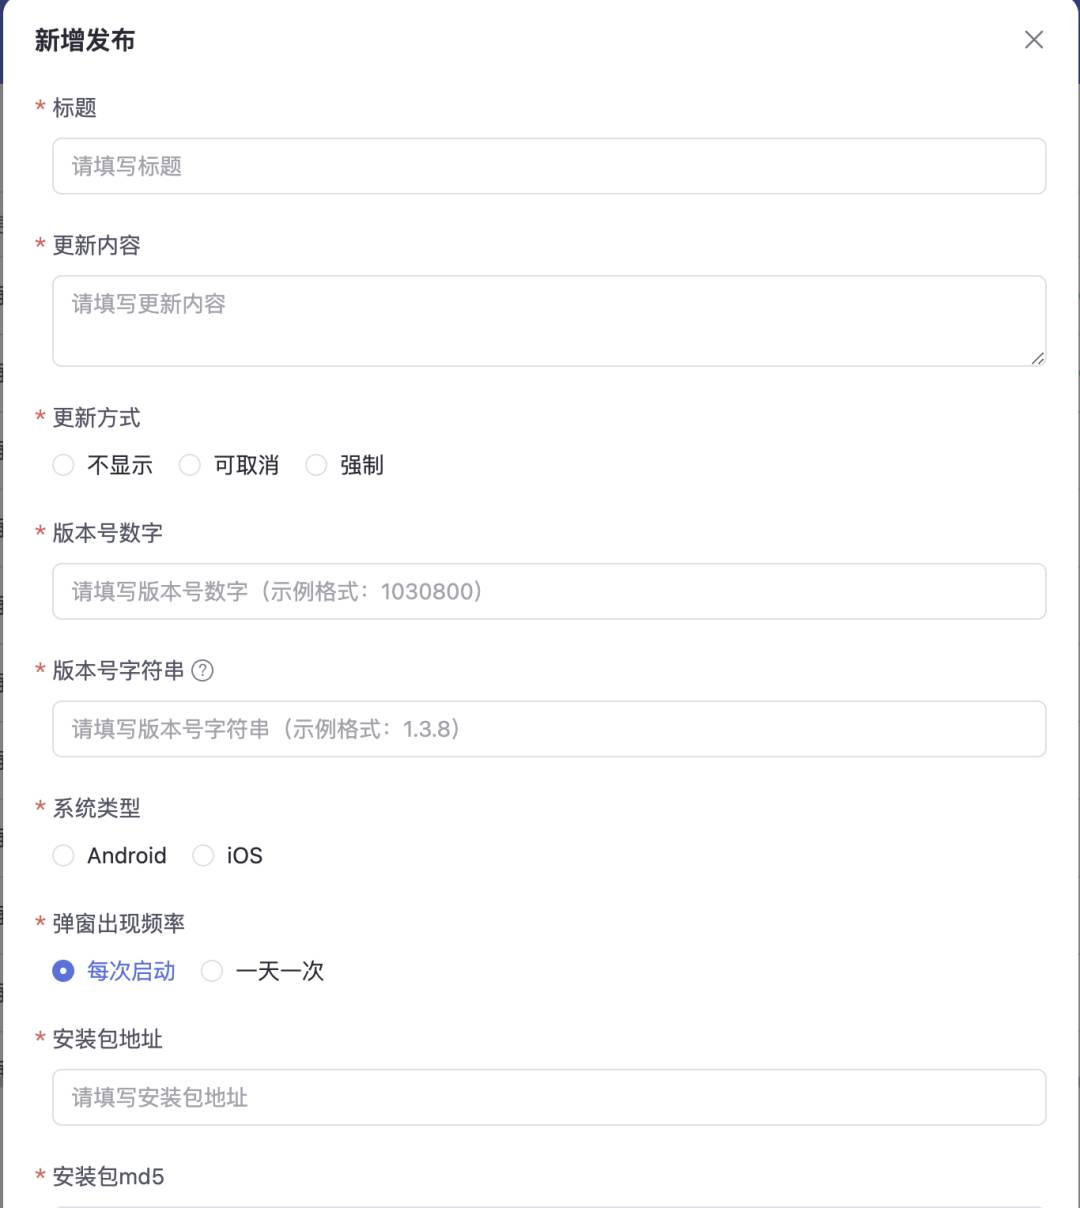
App发布管理台:


灰度发布管理台:


各端落地细节与坑点
灰度服务核心逻辑
package xxx.common.service;@Component@Slf4j@Service@RefreshScope@RequiredArgsConstructorpublic class GrayService {@Value("${rule.uidPercent}")private Integer uidPercent;@Value("${rule.uid}")private String uid;@Value("${rule.project}")private String project;@Value("${rule.releaseGray}")private String releaseGray;@Value("${rule.releaseDefault}")private String releaseDefault;public Boolean isGrayForFrontend(String userUid, String userProject) {log.debug("userId: {} userProject: {}", userUid, userProject);log.debug("uid_percent: {}", uidPercent);if (checkProject(userProject)) {return true;}if (checkUser(userUid)) {return true;}return false;}public GrayRuleDTO getGrayRule() {GrayRuleDTO grayRuleData = new GrayRuleDTO();grayRuleData.setUidPercent(uidPercent);grayRuleData.setReleaseGray(releaseGray);grayRuleData.setReleaseDefault(releaseDefault);List<String> projectArray = new ArrayList<String>(){};if (!project.isEmpty()) {projectArray = Arrays.asList(project.split(","));grayRuleData.setProject(projectArray);} else {grayRuleData.setProject(Arrays.asList());}List<String> uidArray = new ArrayList<String>(){};if (!uid.isEmpty()) {uidArray = Arrays.asList(uid.split(","));grayRuleData.setUid(uidArray);} else {grayRuleData.setUid(Arrays.asList());}return grayRuleData;}private Boolean checkProject(String userProject) {List<String> projectArray = Arrays.asList(project.split(","));log.debug("project: {} ", projectArray.toString());if (userProject.isEmpty()) {return false;}if (!userProject.isEmpty() && projectArray.contains(userProject)) {return true;}return false;}private Boolean checkUser(String userUid) {List<String> uidArray = Arrays.asList(uid.split(","));log.debug("uid: {}", uidArray.toString());if (uidPercent == 100 || Long.valueOf(releaseDefault) >= Long.valueOf(releaseGray)) {return true;}if (userUid.isEmpty()) {return false;}if (!userUid.isEmpty() && uidArray.contains(userUid)) {return true;}String lastTwoChars = userUid.substring(userUid.length() - 2);int mappedValue = lastTwoChars.charAt(0) * 36 + lastTwoChars.charAt(1) - '0';double userPercentage = (mappedValue - 1728) / 2738.0 * 100;log.debug("userPercentage: {}", userPercentage);if (userPercentage <= uidPercent) {return true;}return false;}}
后台服务按版本寻址
请求服务有两个来源,一种网关到服务,一种是别的服务。这类请求都会带上服务本身版本信息,这时配合 Nacos 的服务注册能力,以及本文在【版本命中策略】中定下的匹配策略,进行请求版本的匹配与服务寻址,找到符合要求的服务将请求传递过去即可。
package xxx.common.config;@Slf4jpublic class EnvRoundRobinRule extends RoundRobinRule {private AtomicInteger nextServerCyclicCounter;public EnvRoundRobinRule() {nextServerCyclicCounter = new AtomicInteger(0);}@Overridepublic Server choose(ILoadBalancer lb, Object key) {if (lb == null) {log.warn("no load balancer");return null;}Server server = null;int count = 0;NacosDiscoveryProperties nacosDiscoveryProperties= SpringUtils.getBean(NacosDiscoveryProperties.class);String currentEnvironmentVersion = nacosDiscoveryProperties.getMetadata().getOrDefault("version","");while (Objects.isNull(server) && count++ < 10) {List<Server> reachableServers = lb.getReachableServers();List<Server> allServers = lb.getAllServers();int upCount = reachableServers.size();int serverCount = allServers.size();if ((upCount == 0) || (serverCount == 0)) {log.warn("No up servers available from load balancer: " + lb);return null;}List<NacosServer> filterServers = new ArrayList<>();for (Server serverInfo : reachableServers) {NacosServer nacosServer = (NacosServer) serverInfo;String version = nacosServer.getMetadata().get("version");if(StringUtils.equals(version,currentEnvironmentVersion)){filterServers.add(nacosServer);}}if (CollectionUtils.isEmpty(filterServers)) {for (Server serverInfo : reachableServers) {NacosServer nacosServer = (NacosServer) serverInfo;filterServers.add(nacosServer);}}int filterServerCount = filterServers.size();int nextServerIndex = incrementAndGetModulo(filterServerCount);server = filterServers.get(nextServerIndex);NacosServer nacosServer = (NacosServer) server;String version = nacosServer.getMetadata().getOrDefault("version","");log.info("调用的version版本号:{},currentEnvironmentVersion:{},filterServers.size:{}", version,currentEnvironmentVersion,filterServers.size());if (server == null) {Thread.yield();continue;}if (server.isAlive() && (server.isReadyToServe())) {return (server);}server = null;}if (count >= 10) {log.warn("No available alive servers after 10 tries from load balancer: " + lb);}return server;}private int incrementAndGetModulo(int modulo) {for (; ; ) {int current = nextServerCyclicCounter.get();int next = (current + 1) % modulo;if (nextServerCyclicCounter.compareAndSet(current, next)) return next;}}}
前端资源匹配
前端资源的灰度,我们是通过 Nginx + OpenResty + 自定义 Lua 来实现。以下是 nginx.conf 文件的主要逻辑:
1.首先定义了nginx_cache,prometheus_metrics,lua_package_path有关缓存、监控的变量。
2.第二步在 init_worker_by_lua_block worker 初始化勾子里,初始化定时任务,用于定时拉取灰度规则的数据,并初始化上报的对象。然后在log_by_lua_block 勾子进行上报。
3.第三步有一个值得关注的配置就是 resolver,用于配置 dns 地址,这样在 Lua 脚本才可以请求外部的服务。在本地调试的时候,可以配置电脑上的 dns ip,而如果已经部署到 K8S 集群,则可以向运维同事索取 K8S 的 dns 地址,比如示例代码中的 kube-dns.kube-system.svc.cluster.xxx。
nginx.conf文件:
nginx.conf -- docker-openrestyuser root;worker_processes 2;pcre_jit on;error_log logs/nginx.error.log debug;events {worker_connections 1024;}env NODE_ENV;http {include mime.types;default_type application/octet-stream;lua_shared_dict nginx_cache 100m;lua_shared_dict prometheus_metrics 25m;lua_package_path "/usr/local/openresty/site/lualib/prometheus/?.lua;;";init_worker_by_lua_block {print("=====time start====")require("lua/timer").run();print("======time end=====")prometheus = require("prometheus").init("prometheus_metrics")metric_requests = prometheus:counter("nginx_http_requests_total", "Number of HTTP requests", {"host", "status"})metric_latency = prometheus:histogram("nginx_http_request_duration_seconds", "HTTP request latency", {"host"})metric_connections = prometheus:gauge("nginx_http_connections", "Number of HTTP connections", {"state"})}log_by_lua_block {metric_requests:inc(1, {ngx.var.server_name, ngx.var.status})metric_latency:observe(tonumber(ngx.var.request_time), {ngx.var.server_name})}log_format main '$remote_addr - $remote_user [$time_local] "$request" ''$status $body_bytes_sent "$http_referer" ''"$http_user_agent" "$http_x_forwarded_for"';access_log logs/nginx.access.log main;client_body_temp_path /var/run/openresty/nginx-client-body;proxy_temp_path /var/run/openresty/nginx-proxy;fastcgi_temp_path /var/run/openresty/nginx-fastcgi;uwsgi_temp_path /var/run/openresty/nginx-uwsgi;scgi_temp_path /var/run/openresty/nginx-scgi;sendfile on;tcp_nopush on;keepalive_timeout 65;gzip on;resolverkube-dns.kube-system.svc.cluster.xxxvalid=30sipv6=off;include /usr/local/openresty/nginx/conf/conf.d/*.conf;}
除了 nginx.conf 针对 nginx 的公共配置,还需要在业务中配置 `default.conf`,用于业务的请求路由的处理:
1.如果是二级目录的业务,可以配置一个 $prefix 变量,比如业务中有个 a.com/h5 的业务路由,则可像下面代码一样,设置 $prefix 为 /h5 。
2.content_by_lua_block 是用于导出默认的监控上报内容,呼应上面 nginx.conf 的监控上报配置。
3.最后,请在每一个需要实施灰度的路由中,配置 access_by_lua_block 的内容,请置入核心的灰度初始化方法。
default.conf文件:
server {listen 80;server_name localhost;set $prefix /h5;location /h5/metrics {content_by_lua_block {metric_connections:set(ngx.var.connections_reading, {"reading"})metric_connections:set(ngx.var.connections_waiting, {"waiting"})metric_connections:set(ngx.var.connections_writing, {"writing"})prometheus:collect()}}location ~ .*\.(gif|jpg|jpeg|png)$ {access_by_lua_block {require("lua/entry").run()}expires 30d;}location ~ .*\.(js|css|eot|ttf|woff)$ {access_by_lua_block {require("lua/entry").run()}expires 30d;gzip on;gzip_types text/css application/javascript;add_header Access-Control-Allow-Origin *;add_header Access-Control-Allow-Methods 'GET, POST, OPTIONS';add_header Access-Control-Allow-Headers 'DNT,X-Mx-ReqToken,Keep-Alive,User-Agent,X-Requested-With,If-Modified-Since,Cache-Control,Content-Type,Authorization';}location ~ .*\.(json)$ {access_by_lua_block {require("lua/entry").run()}expires 30d;gzip on;gzip_types application/json;add_header Content-Type application/json;default_type application/json;add_header Access-Control-Allow-Origin *;add_header Access-Control-Allow-Methods 'GET, POST, OPTIONS';add_header Access-Control-Allow-Headers 'DNT,X-Mx-ReqToken,Keep-Alive,User-Agent,X-Requested-With,If-Modified-Since,Cache-Control,Content-Type,Authorization';}location ^~ /h5 {access_by_lua_block {require("lua/entry").run()}try_files $uri $uri/ /h5/index.html;}error_page 500 502 503 504 /50x.html;location = /50x.html {root /usr/share/nginx/html;}}
entry.lua 中的 run 方法是灰度的主流程,主要通过读取灰度规则,在程度中判断若命中灰度,则走灰度版本的资源,否则就使用全量版本的资源。至于使用资源的逻辑,一切都是通过 setNginxRoute 这个方法,确定好走哪个资源版本和资源的目录后,通过 `ngx.req.set_uri` 方法设置资源读取的目录,并顺便给用户返回资源版本号信息 X-Version,方便问题排查。
entry.lua核心灰度逻辑:
local _util = require("lua/util")local _constant = require("lua/constant")local _cookie = require("lua/cookie")local _timer = require("lua/timer")local _cjson = require("cjson")local _entry = {}local default_version_requests = prometheus:counter("default_version_requests", "Number of HTTP requests For Default Version", {"host", "status"})local gray_version_requests = prometheus:counter("gray_version_requests", "Number of HTTP requests For Gray Version", {"host", "status"})local local_gray_version = nillocal local_default_version = nilfunction setLocalVersion()if local_gray_version == nil or local_default_version == nil thenlocal_gray_version = _util.read_file(_constant.LOCAL_RES_PATH .. "/html_gray/release-version")local_default_version = _util.read_file(_constant.LOCAL_RES_PATH .. "/html_default/release-version")endendlocal function reportProm(ext, isGray)if ext ~= "html" thenreturn;endif isGray thengray_version_requests:inc(1, {ngx.var.server_name, ngx.var.status} )elsedefault_version_requests:inc(1, {ngx.var.server_name, ngx.var.status} )endendlocal function setNginxRoute(isGray, grayRule)local uri = ngx.var.urilocal ext = _util.getFileExt(ngx.var.uri)local prefix = ""local index = "index.html"local resFolder = ""if ngx.var.prefix ~= nil thenprefix = ngx.var.prefixendif ngx.var.index ~= nil thenindex = ngx.var.indexend-- 如果是 html 文件,且没有以 / 结尾,则重定向到以 / 结尾的 urlif prefix == uri and uri:sub(-1, -1) ~= "/" thenngx.redirect(uri .. "/")endif isGray thenresFolder = "/html_gray"ngx.header["X-Gray"] = "true"ngx.header["X-Version"] = local_gray_versionelsengx.header["X-Gray"] = "false"-- grayRule 为 nil 时,一定不命中灰度if grayRule == nil thenngx.header["X-Version"] = local_default_versionend-- 如果 releaseDefault >= 本地的html_gray目录的版本,则通通走 html_gray 目录-- 其余则走 html_default 目录if grayRule ~= nil and tonumber(grayRule.releaseDefault) >= tonumber(local_gray_version) thenresFolder = "/html_gray"ngx.header["X-Version"] = local_gray_versionelseresFolder = "/html_default"ngx.header["X-Version"] = local_default_versionendendlocal resPath = resFolder .. string.gsub(uri, prefix, "")ngx.req.set_uri(resPath)-- 上报到metricsreportProm(ext, isGray)endlocal function checkProject(userProjectId, projectId)if userProjectId == "" or projectId == _cjson.null thenreturn falseendif _util.has_value(projectId, userProjectId) thenreturn trueendreturn falseendlocal function checkUser(userUid, uid, userPercent)-- 如果配置100%用户命中,包括不带uid和projectId的用户均命中灰度if userPercent and userPercent == 100 thenreturn trueendif userUid == "" thenreturn falseend-- 命中指定 uidif uid ~= _cjson.null and _util.has_value(uid, userUid) thenreturn trueend-- 命中灰度范围if userPercent and _util.distributeGrayscale(userUid, userPercent) thenreturn trueendreturn false;endfunction _entry.run()-- 从缓存中获取定时任务拿到的灰度规则数据local grayRule = _util.getGrayRule()--获取资源请求头中的 cookie 数据local allCookie = _cookie:new():get_all()-- 前端的静态资源包中内含资源版本号,在此读取到内存中pcall(setLocalVersion)-- 若灰度规则为空,则走全量版本if not grayRule or grayRule == nil thenreturn setNginxRoute(false, grayRule);end-- 获取从用户侧传过来的 cookie uid 和 projectIdlocal userUid = ""local userProjectId = ""if allCookie and allCookie.uid thenuserUid = allCookie.uidendif allCookie and allCookie.projectId thenuserProjectId = allCookie.projectIdend-- 若命中项目id,走灰度版本if checkProject(userProjectId, grayRule["project"]) thenreturn setNginxRoute(true, grayRule);end-- 若命中用户id,走灰度版本if checkUser(userUid, grayRule["uid"], grayRule["uidPercent"]) thenreturn setNginxRoute(true, grayRule);end-- 其余默认走全量版本setNginxRoute(false, grayRule);endreturn _entry
timer.lua 定时任务:
local _timer = {}local _util = require("lua/util")local _constant = require("lua/constant")local _cjson = require("cjson")function _timer.fetch()-- 获取配置中灰度服务的地址local config = _util.getConfig()local res = _util.get(config.api, "", {headers = {["Content-Type"] = "application/json"},keepalive_timeout = _constant.API_TIMEOUT,})if res == nil then_util.print("res is nil and update api failed")returnendlocal resJson = _cjson.decode(res)-- 将灰度信息写入本的文件和内存中if resJson and resJson.data then_util.print("update api success: " .. _cjson.encode(res))local res = resJson.data_util.write_file(_constant.LOCAL_FILE_PATH .. _constant.GRAY_RULE_FILE_NAME,_cjson.encode(res))_util.setCache(_constant.GRAY_RULE_KEY,_cjson.encode(res))endend-- 定时任务拉取灰度规则数据function _timer.run()local new_timer_every = ngx.timer.everylocal action = function(premature)if not premature then_timer.fetch()else_util.print("timer failed")endend-- 用于调试,平时要注释掉-- action(false)print("worker id" .. ngx.worker.id())if 0 == ngx.worker.id() thenlocal ok_every = new_timer_every(_constant.API_TIMER_LENGTH, action)if not ok_every then_util.print("failed to create new_timer_every")returnendendendreturn _timer
以下是Dockerfile 文件,主要用于安装 OpenResty,以及相关的一些依赖,还有拷贝基础的 nginx 配置、灰度 Lua 脚本,默认静态资源等,用于封装核心的前端灰度逻辑供各业务的前端可以快速复用。
FROM openresty/openresty:1.21.4.3-2-alpine-apkRUN apk add curl \&& apk add busybox \&& apk add perl \&& curl https://raw.githubusercontent.com/openresty/opm/master/bin/opm > /usr/local/openresty/bin/opm \&& chmod +x /usr/local/openresty/bin/opm \&& opm get knyar/nginx-lua-prometheusCOPY lua /usr/local/openresty/lualib/luaCOPY publish.config.json /usr/local/openresty/lualib/luaCOPY nginx.conf /usr/local/openresty/nginx/conf/nginx.confCOPY default.conf /usr/local/openresty/nginx/conf/conf.d/default.confCOPY ./html_gray /usr/local/openresty/nginx/html/html_grayCOPY ./html_default /usr/local/openresty/nginx/html/html_default
上面的 Lua 脚本中有不少是使用了开源的基础库,比如值得一推的是B站团队写的这个库: GitHub – bilibili/oresty,包括了请求、文件处理、Redis 处理等等。
坑点
1.对后台而言,由于在灰度过程中相当于有两个环境并存,在灰度逐步扩大的过程中,请需要时刻关注服务和机器的健康度,避免由于在灰度扩大的过程中,由于流量过大导致灰度服务崩溃,因此需要提前为灰度环境准备好充足的资源,以及规划好在灰度过程中灰度环境服务需要部署多少实例。
2.对前端而言,在扩大灰度的过程中,可能用户当前并没有刷新页面。对那些单页应用来说,在没有刷新页面而被扩大灰度所覆盖的情况下,旧的资源可能会发生拉不到的情况。为了避免这种情况的发生,有两种办法,一是将除了html以外的所有资源cdn化,保证新旧版本资源的可读;二是省成本的办法,将所有除了 html 以外的资源都存放到 nginx 的同一目录下,并保证文件名带 md5 后缀不至于资源互相覆盖的情况出现。
流量监控
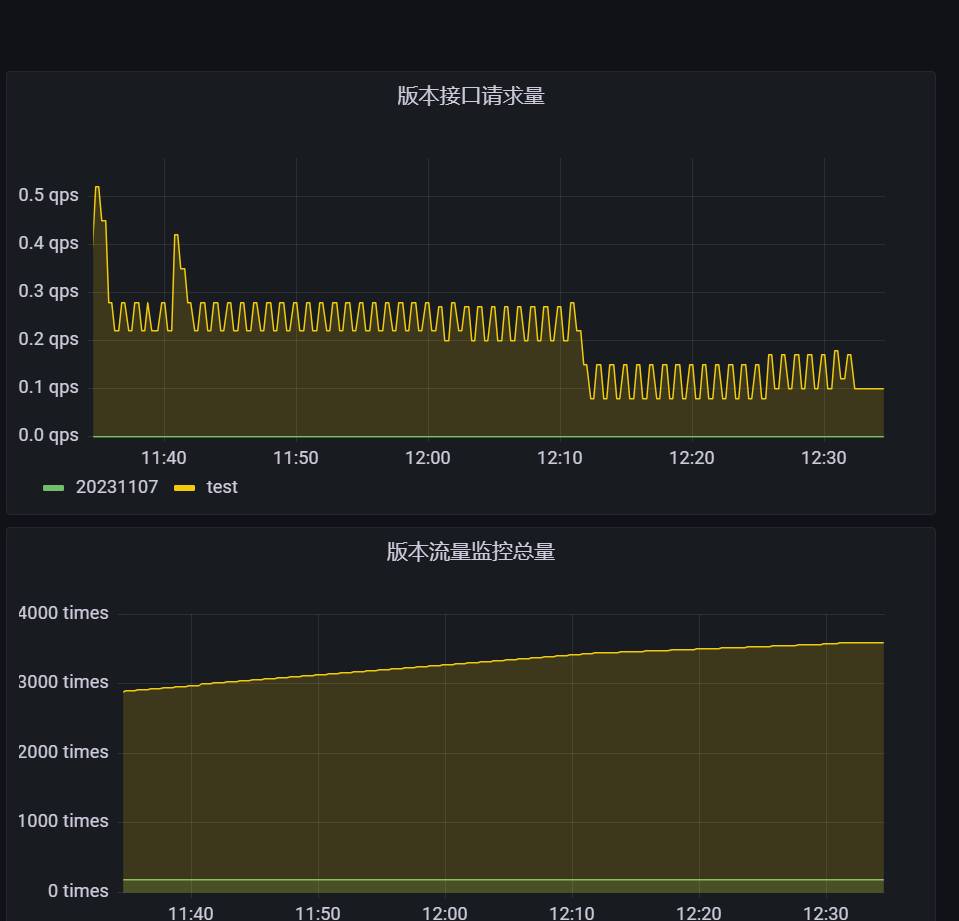
在方案中,无论是前端还是后台,目前都是采用 Prometheus(下称 Prom)的方案进行上报,搭配 Grafana 装组监控图表。后台采用的是 io.micrometer.micrometer-registry-prometheus这个包,而前端则是使用 OpenResty 配套的 `knyar/nginx-lua-prometheus`。通过上报的监控,能比较及时的发布灰度规则的扩大是否能带来相对应流量的增减,这样才好判断灰度是否按发布工程师的预期进行。如果发现异常,发布工程师也可以快速进行回滚。
如有谬误,恳请斧正!
