
包阅导读总结
1.
关键词:`
2.
总结:本文介绍了 HTML 中的`
3.
主要内容:
– 介绍网页开发中`
– 之前创建对话框复杂,HTML5 中的`
– 理解`
– 是简单标签,可包含各种 HTML 内容,有`open`和`modal`等属性
– 对`
– 需用 CSS 自定义样式,考虑与现有设计系统整合和响应式设计
– 用 JavaScript 打开和关闭对话框
– 可用`showModal()`和`close()`方法,通过事件处理和用户操作控制
– `
– 包括模态和焦点管理、考虑可访问性、用于各种 UI 组件等
– 总结`
思维导图: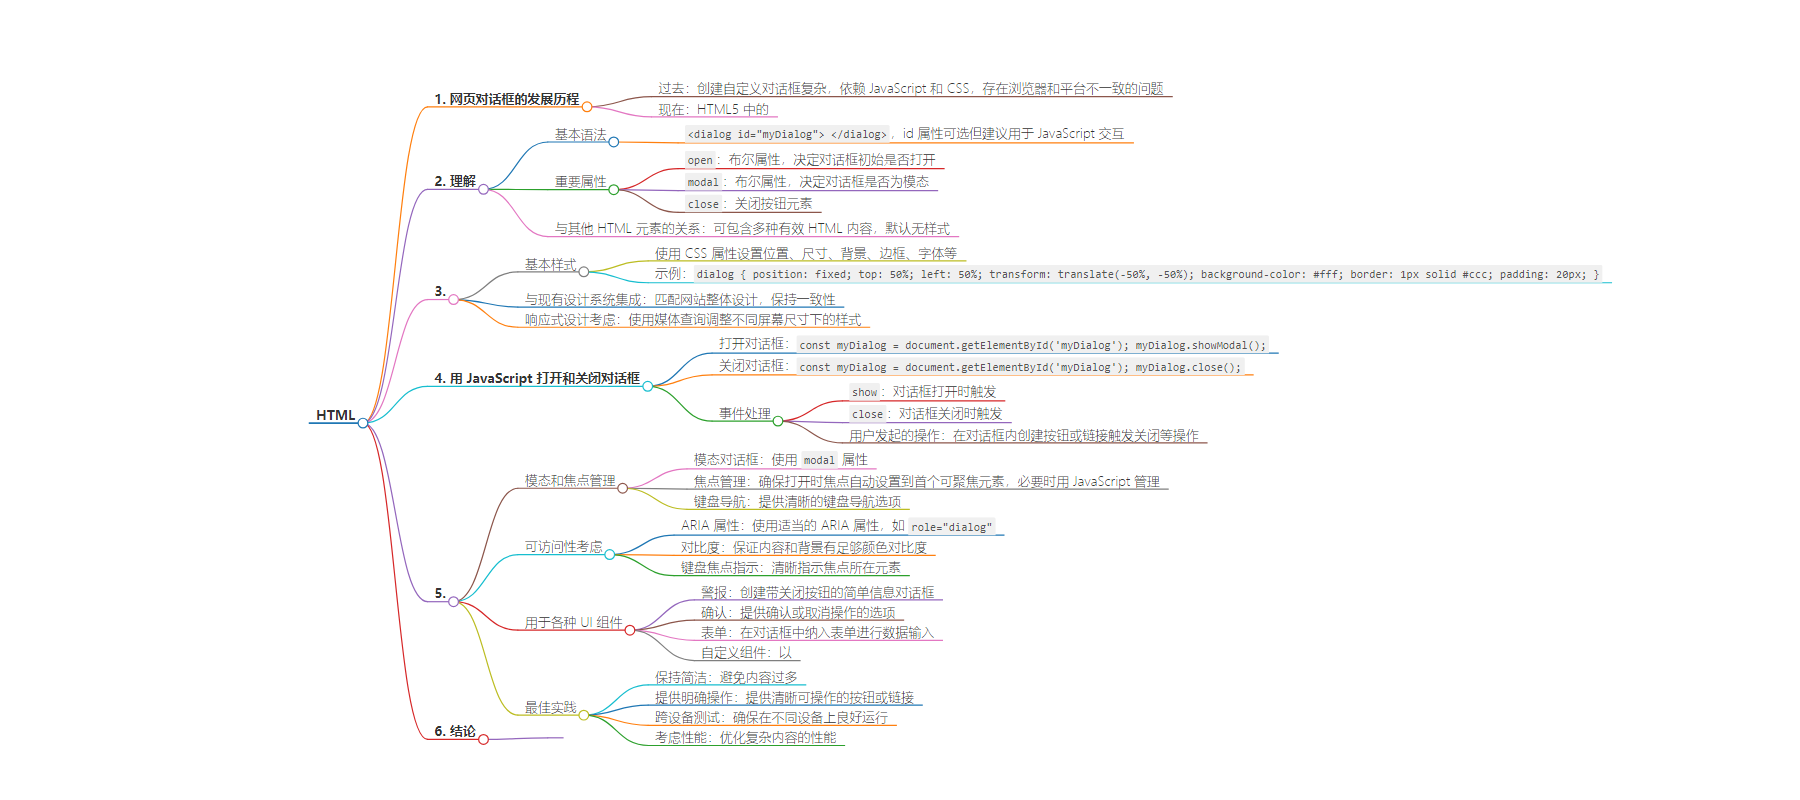
文章地址:https://www.javacodegeeks.com/2024/07/revolutionizing-user-interactions-with-the-html-tag.html
文章来源:javacodegeeks.com
作者:Eleftheria Drosopoulou
发布时间:2024/7/20 13:31
语言:英文
总字数:1211字
预计阅读时间:5分钟
评分:87分
标签:HTML,网页开发,用户体验,JavaScript,CSS
以下为原文内容
本内容来源于用户推荐转载,旨在分享知识与观点,如有侵权请联系删除 联系邮箱 media@ilingban.com
The web development landscape is constantly evolving, with new HTML elements emerging to enhance user experiences. One such game-changer is the <dialog> tag. This relatively new element offers a standardized approach to creating custom dialog boxes, previously requiring complex JavaScript and CSS solutions.
In this article, we’ll delve into the intricacies of the <dialog> tag, exploring its syntax, usage, and potential applications. We’ll discuss how to style, open, and close dialogs effectively, and provide practical examples to illustrate its implementation. By the end, you’ll have a solid understanding of how to leverage the <dialog> tag to create engaging and interactive web experiences.
Let’s embark together on a journey to discover the power of the <dialog> tag and how it can transform your web development projects.
1. A Brief History of Dialog Boxes on the Web and the Rise of
Before the advent of HTML5, creating custom dialog boxes on the web was a complex undertaking. Developers relied heavily on JavaScript and CSS to construct overlay elements, position them correctly, and handle interactions. This approach often resulted in inconsistencies across different browsers and platforms, making it challenging to build accessible and user-friendly dialogs.
The <dialog> element, introduced in HTML5, provides a native and standardized way to create dialog boxes. It simplifies the development process, ensuring consistent behavior across browsers and improving accessibility.
This article will delve into the world of <dialog>, exploring its syntax, styling, and interaction capabilities. We’ll cover best practices, potential use cases, and how to integrate dialogs seamlessly into your web applications. By the end, you’ll be equipped to create engaging and user-friendly dialog experiences.
Let’s explore the potential of this powerful HTML element together.
2. Understanding the <dialog> Tag
The <dialog> element is a relatively simple tag to understand. It defines a dialog box or window. You can place any valid HTML content within it, such as headings, paragraphs, forms, or buttons.
Basic Syntax
<dialog id="myDialog"> </dialog>
The id attribute is optional but highly recommended for JavaScript interaction.
Essential Attributes
- open: A boolean attribute that indicates whether the dialog is initially open or closed. If present, the dialog is open by default.
- modal: A boolean attribute that indicates whether the dialog is modal. A modal dialog prevents interaction with the rest of the page until it is closed.
<dialog id="myDialog" open modal> </dialog>
- close: This is not an attribute but a button element often used within the dialog to close it.
Relationship with Other HTML Elements
The <dialog> element can contain any valid HTML content, including:
- Headings (<h1>, <h2>, etc.)
- Paragraphs (<p>)
- Forms (<form>)
- Buttons (<button>)
- Images (<img>)
- Lists (<ul>, <ol>)
- And many more
It’s important to note that the <dialog> element itself is not styled by default. You’ll need to apply CSS to customize its appearance.
In the next section, we’ll delve into styling the <dialog> element.
3. Styling the <dialog> Element
While the <dialog> element provides a solid foundation for creating dialog boxes, its default styling is minimal. To create visually appealing and consistent dialogs, you’ll need to apply CSS styles.
Basic Styling
You can style the <dialog> element like any other HTML element using CSS properties such as:
- Position: Determine the positioning of the dialog (absolute, fixed, relative).
- Dimensions: Set the width, height, and margin of the dialog.
- Background: Apply background color, image, or gradient.
- Border: Add borders to define the dialog’s boundaries.
- Box-shadow: Create depth and visual separation.
- Font: Customize font styles for text within the dialog.
dialog { position: fixed; top: 50%; left: 50%; transform: translate(-50%, -50%); background-color: #fff; border: 1px solid #ccc; padding: 20px;}
Integrating with Existing Design Systems
To ensure consistency with your website’s overall design, style the <dialog> to match your existing components and color palette. Use CSS variables or preprocessor features to maintain a cohesive look and feel.
Responsive Design Considerations
Make your dialogs responsive by using media queries to adjust their appearance based on screen size. Consider different breakpoints and create appropriate styles for each.
4. Opening and Closing Dialogs with JavaScript
While the <dialog> element provides a basic structure, JavaScript is essential for controlling its behavior. You can programmatically open and close dialogs, as well as handle user interactions.
Opening a Dialog
To open a dialog, you can use the showModal() method on the dialog element. This method displays the dialog as a modal, preventing interaction with the rest of the page.
const myDialog = document.getElementById('myDialog');myDialog.showModal();
Closing a Dialog
To close a dialog, you can use the close() method on the dialog element.
const myDialog = document.getElementById('myDialog');myDialog.close();
Event Handling
You can use JavaScript event listeners to trigger actions when the dialog is opened or closed. Common events include:
show: Fired when the dialog is opened.close: Fired when the dialog is closed.
const myDialog = document.getElementById('myDialog');myDialog.addEventListener('show', () => { console.log('Dialog opened');});myDialog.addEventListener('close', () => { console.log('Dialog closed');});
User-Initiated Actions
You can create buttons or links within the dialog to trigger its closure or other actions. For example:
<dialog id="myDialog"> <p>This is a dialog.</p> <button>Close</button></dialog>
const closeButton = document.querySelector('#myDialog button');closeButton.addEventListener('click', () => { myDialog.close();});
By combining these techniques, you can create interactive dialogs that respond to user input and enhance the user experience.
5. Advanced Usage and Best Practices for <dialog>
While the basic functionality of <dialog> is straightforward, there are several advanced techniques and best practices to consider for creating effective and accessible dialogs.
Modality and Focus Management
- Modal Dialogs: Use the
modalattribute to create dialogs that prevent interaction with the rest of the page until closed. - Focus Management: Ensure that focus is automatically set to the first focusable element within the dialog when it opens. Use JavaScript to manage focus if necessary.
- Keyboard Navigation: Provide clear keyboard navigation options for users who cannot use a mouse.
Accessibility Considerations
- ARIA Attributes: Use appropriate ARIA attributes to enhance accessibility for screen reader users. The
role="dialog"attribute is essential. - Contrast Ratios: Ensure sufficient color contrast between the dialog content and background.
- Keyboard Focus Indicators: Clearly indicate which element has focus within the dialog.
Using Dialogs for Various UI Components
- Alerts: Create simple informational dialogs with a close button.
- Confirmations: Provide users with options to confirm or cancel actions.
- Forms: Incorporate forms within dialogs for data input.
- Custom Components: Build more complex UI components using
<dialog>as a base.
Best Practices
- Keep Dialogs Concise: Avoid overwhelming users with excessive content.
- Provide Clear Actions: Offer clear and actionable buttons or links.
- Test Across Devices: Ensure your dialogs work well on different screen sizes and devices.
- Consider Performance: Optimize dialogs for performance, especially when dealing with complex content.
6. Conclusion
The <dialog> element has revolutionized the way we create custom dialog boxes on the web. By providing a standardized and accessible approach, it simplifies development and enhances user experience. Through careful styling, JavaScript interaction, and attention to accessibility, developers can craft engaging and informative dialogs that seamlessly integrate into their web applications.
By mastering the <dialog> tag, you gain the power to create a variety of interactive components, from simple alerts to complex forms, all while maintaining consistency and accessibility. Embrace this new HTML element to elevate your web development projects to new heights.
With the <dialog> tag, the possibilities are vast. Experiment, innovate, and create exceptional user experiences.