
包阅导读总结
1. 关键词:Linux 存储管理、分区、文件系统、存储设备识别、命令操作
2. 总结:本文主要介绍了 Linux 存储管理,包括存储设备的识别、分区的创建与管理、文件系统的安装、挂载点的创建等,强调操作时要谨慎以防数据丢失,并提及相关命令和操作步骤。
3. 主要内容:
– 存储管理概述
– 指出管理存储空间是常见的 Linux 系统管理员任务。
– 存储设备识别
– 介绍在 Linux 中存储设备在`/dev`目录中以特定文件表示。
– 可用`ls`查看`/dev/disk`目录,`lsblk`命令可更方便显示磁盘信息。
– 分区管理
– 介绍`fdisk`和`parted`两种分区管理工具。
– 详细说明了使用`fdisk`创建分区的步骤。
– 指出`parted`功能更强大但操作需谨慎。
– 文件系统安装
– 支持`ext4`和`XFS`等多种文件系统。
– 可用`mkfs`命令安装文件系统。
– 创建挂载点
– 说明 Linux 不像 Windows 用盘符标记存储空间,而是通过挂载操作使用存储。
思维导图: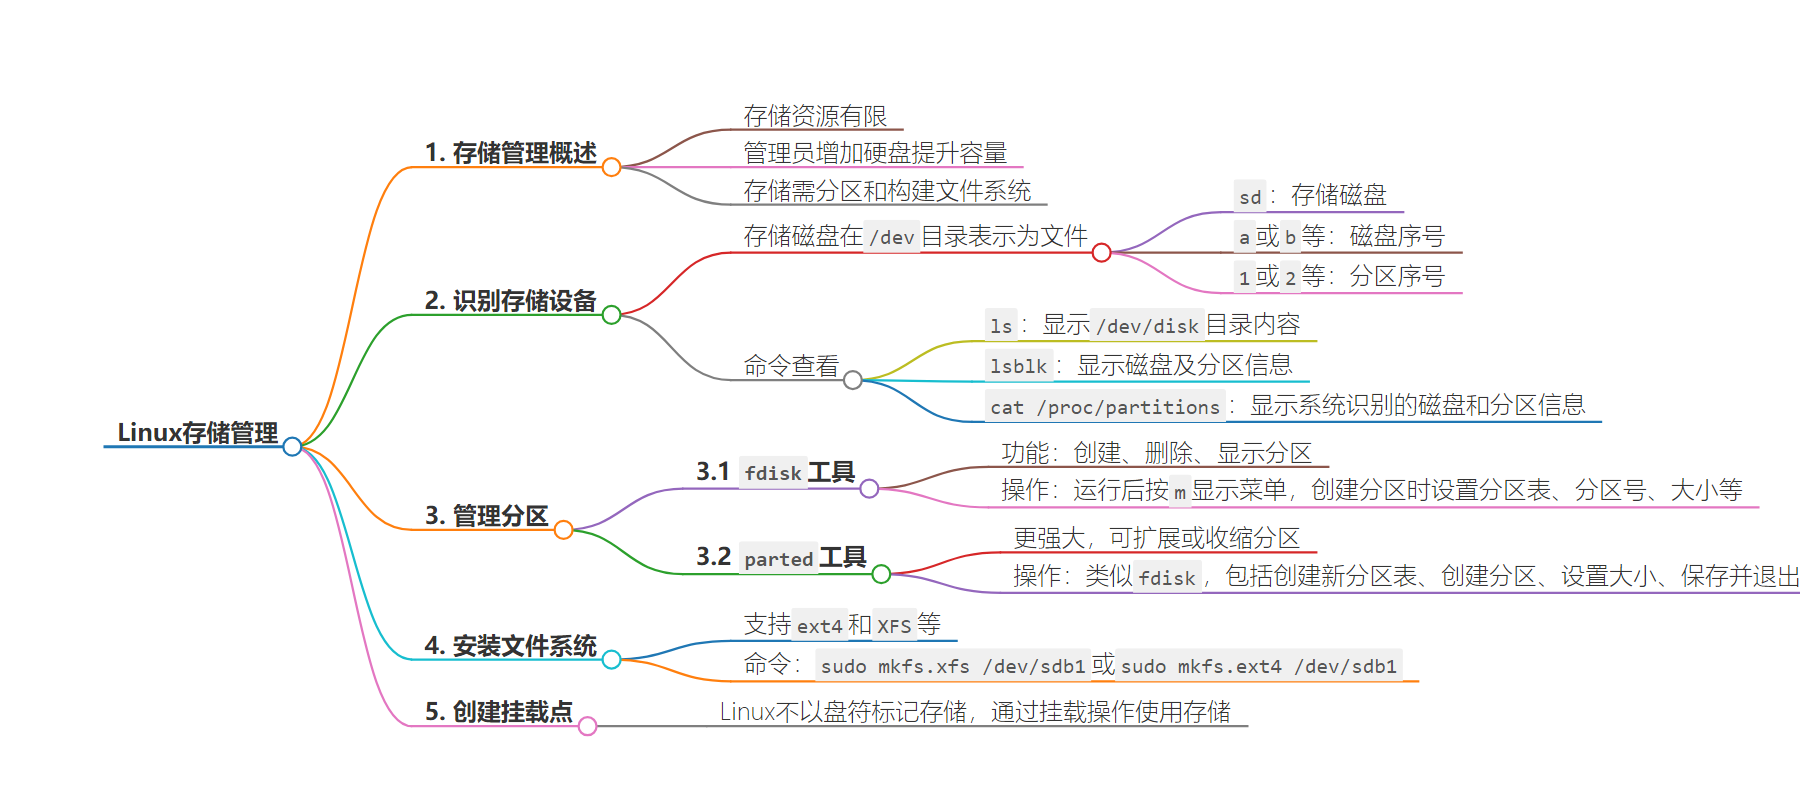
文章地址:https://thenewstack.io/how-to-manage-linux-storage/
文章来源:thenewstack.io
作者:Damon M. Garn
发布时间:2024/7/2 16:17
语言:英文
总字数:2783字
预计阅读时间:12分钟
评分:82分
标签:Linux,存储管理,分区,文件系统,挂载
以下为原文内容
本内容来源于用户推荐转载,旨在分享知识与观点,如有侵权请联系删除 联系邮箱 media@ilingban.com
One of the most common Linux sysadmin tasks is managing storage space. Storage drives contain all kinds of information: user data, log files, temporary files, updates, and more. Many end-users don’t realize that storage space is still a finite resource on today’s computer systems, and they often fill the capacity with redundant, useless, and non-business files.
Administrators add solid-state or hard disk drives to Linux systems to increase capacity. However, the storage space must be organized into partitions and structured with a filesystem before use.
This article demonstrates how to add and identify storage space, including partitioning and installing a filesystem. It also shows the commands you need to investigate drive space utilization. You can work with these commands without any additional setup, but you may find it useful to review the Understand the Linux Command Line article. You will need to add a storage disk to your lab computer or virtual machine to practice adding storage.
Be very careful when working with the commands below on systems containing actual data. Tools that manipulate partitions and filesystems can easily cause you to lose data, so always begin with a backup. Using a lab computer that does not contain any real user or business files is even better. Refer to this tutorial if you’d like to build a lab environment to practice these commands.
Note: It is a poor security practice to log on to a Linux system as the root (administrator) user. Most systems force you to log on as a regular user and then use the sudo (super user do) command to elevate your privileges. You may be prompted for your password when usingsudo.
Identify Storage Devices
Suppose a user has consumed all the space on their Linux system’s storage drive, or perhaps a server’s storage disk is full. While teaching users to manage space efficiently is helpful, it’s often true that the data consuming the drive is legitimate and necessary. That means you’ll need to add more storage space.
Assume you’ve physically installed an additional solid-state or hard disk drive in the computer. Your next task is to identify it so you can add one or more partitions.
Drive Identification
Linux makes it easy to see the actual storage disks by representing them as files in the/dev directory. Each disk is identified by a series of letters.
- sd = storage disk
- a or b = first or second disk (it also counts c, d, etc.)
- 1 or 2 = partitions on the disk (it also counts higher)
The result is that/dev/sdb1is storage device (sd), second device (b), first partition (1), or the first partition on the second storage device.
It is critical to understand that storage disks a, b, c, etc.in Linux have no relationship to C: or D: disks in Windows. The two operating systems do not represent their storage capacity in the same way.
Use thelscommand to display the contents of the/dev/diskdirectory. In Ubuntu, you can view storage devicesby–id,by–path, etc. You should see at least one entry that readssda. That’s the first storage disk in the system. When you add a second disk, it will be labeled assdb. Other identifiers include the disk’s Universally Unique ID (UUID).

Figure 1: Display disk information from the /dev/disk directory, including the disk’s UUID.
However, using thelsblkcommand to display the disks is easier. The tree-like output shows the storage devices, includingsdaandsdb (assuming two physical disks are installed). It also shows any existing partitions.

Figure 2: Display disk and partition information using the lsblk command.
After you identify the new disk (probablysdb), the next step is creating one or more partitions on it to organize data. Administrators create partitions to store various types of data on different sections of the drive. Often, you’ll simply create a single partition that consumes the entire drive.
Another helpful command for showing partition information iscat /proc/partitions. This output displays all storage disks and partitions the system currently recognizes.
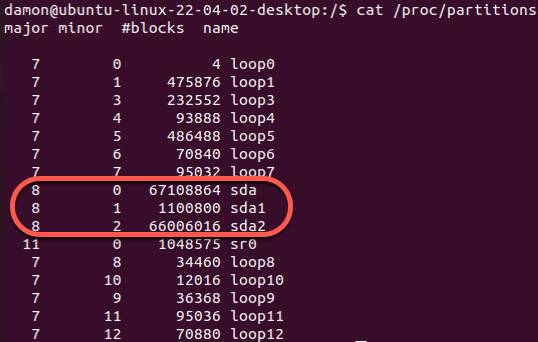
Figure 3: Display disk and partition information using the cat /proc/partitions command.
Manage Partitions
Linux uses two primary tools to manage partitions:fdisk andparted. They share many basic features (create, delete, and display partitions), but their advanced usage differs significantly.
Manage Partitions with fdisk
Thefdisk utility has been part of system setup for years. Its primary functions include creating and deleting partitions. It also displays partition information, helping administrators understand and plan storage capacity.
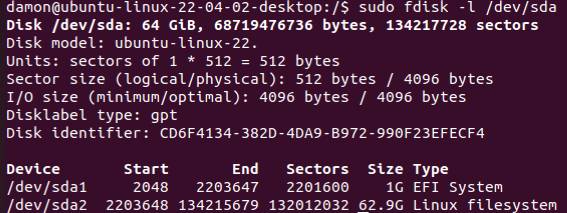
Figure 4: Display disk and partition information using fdisk.
fdisk is an interactive program. Run it by typingfdisk /dev/sda, then press the m key to display a menu. Here are the common menu items to be aware of:
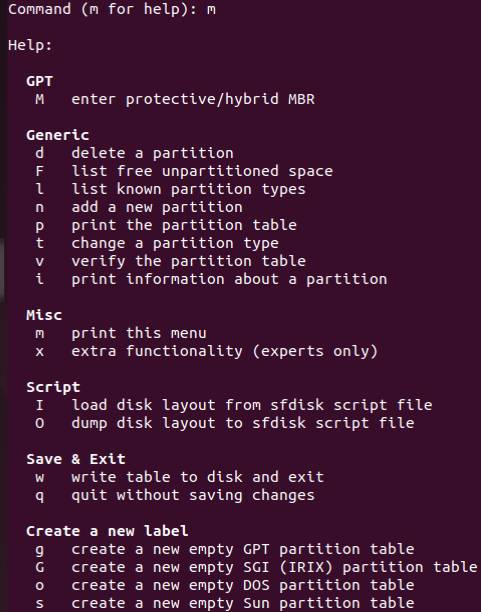
Figure 5: The fdisk help menu.
fdisk can handle more tasks, but these are the primary ones. Be aware that deleting or changing partitions makes existing data difficult or impossible to recover.
When you select the option to create a new partition (n in the menu),fdisk prompts you through the rest of the partition configuration. You’ll set the partition size, which may be displayed and entered by identifying sectors or specifying capacity, such as mebibyte or gibibyte.
Note that gibibytes and gigabytes are slightly different measurements. Gibibytes are a precise measure of multiples of 1024, while gigabytes are based on powers of ten. The measures result in totals like 1024 (gibibytes) versus 1000 (gigabytes).
Here are the step-by-step instructions on creating a partition withfdisk :
- Openfdisk by specifying the drive you want to partition. For example, to work with drive/dev/sdb , typefdisk /dev/sdb.
- If necessary, set the partition table to GUID Partition Table (GPT) or Master Boot Record (MBR).
- Select n to create a new partition.
- Enter a partition number (1-4 for MBR tables and 1-128 for GPT tables). Note that if you choose to create an MBR table, you can define up to three primary partitions or one extended partition. This is only necessary with MBR tables.
- Set the size by defining the first available sector.
- Set the rest of the size. It’s easiest just to tellfdisk to add a certain amount of space starting from the defined first sector. For example, to create a 50-gibibyte partition, set the ending size as +50G.
- Enter p to print or display the partitions, including your new one. Note thatfdisk has not yet made changes to the disk.
- If you’re happy with the new partition’s settings, write (save) the changes using the w This will also exitfdisk . If you don’t want to keep the changes, go back through and edit the settings or quitfdisk without saving by pressing q.
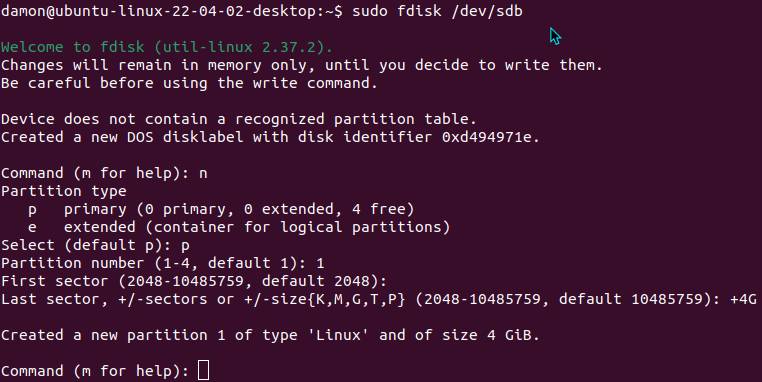
Figure 6: Create a new 4 GiB partition on /dev/sdb with fdisk.
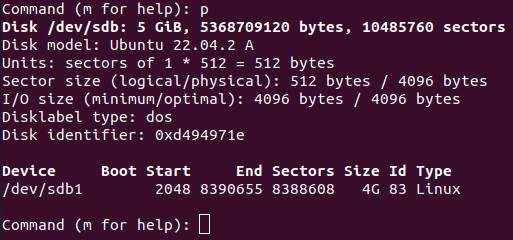
Figure 7: Print the partition table in fdisk to confirm the new 4 GiB partition.
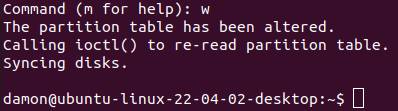
Figure 8: Write the partition to the table to save the changes and exit fdisk.
Once you save the partition information and exitfdisk , use thelsblk command to display the new disk and partitions. On some systems, you may need to type thepartprobe command to update the partition information.

Figure 9: Display disk information for /dev/sdb using the lsblk command.
Manage Partitions with parted
The GNU parted (partition editor) utility serves a similar purpose asfdisk , though it is more robust because it allows administrators to extend or shrink partitions.
Likefdisk,parted is an interactive tool. Once you’re in the program, type help to see the various configuration options.
Common commands include:
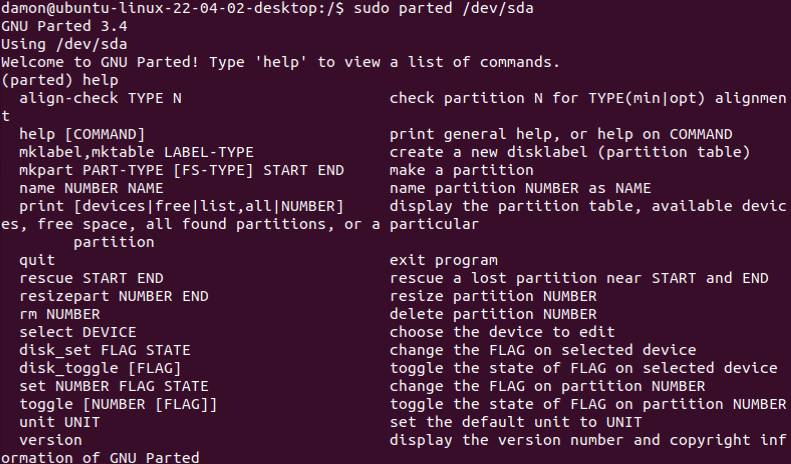
Figure 10: The parted help menu.
The general partition configuration steps are the same as those forfdisk . The steps are:
- Open parted to edit a drive, such as/dev/sdb , by typingparted /dev/sdb.
- If necessary, create a new partition table with the mklabel {type} You can enter msdos for a Master Boot Record table or gpt for a GUID Partition Table. You’ll probably want to enter msdos.
- Create a new partition using mkpart and the desired type and size. Types include primary or logical if you plan to use the ext4 filesystem.
- Parted prompts you for the first and last GiB, which is necessary to set the size you want. You can also set the size using percentages of the space.
- Use the print command to display the modified (but unsaved) table.
- Save your changes and exit parted using the quit command.
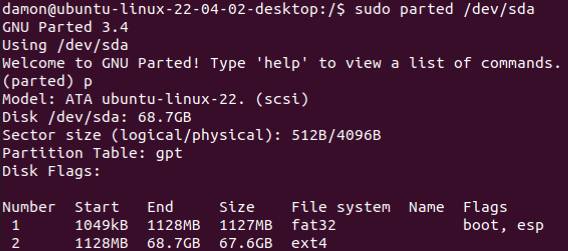
Figure 11: Display disk and partition information using parted.
Remember to review the final configuration using thelsblk command. Try thepartprobe command if the new partition isn’t displayed.
Parted is extremely flexible and powerful. The above steps are just the minimum commands to create a new partition.
Be careful if you use the resize command in parted to shrink a partition that contains data. You risk losing your data. I strongly recommend a backup before resizing partitions.
Install a Filesystem
Now that you’ve divided the storage disk’s capacity into one or more partitions, you must add a filesystem to organize data. Windows typically relies on a single filesystem (NTFS), but Linux supports multiple filesystem options. The two most common are ext4 and XFS.
Use themkfs command to install a filesystem on a specified partition. For example, to add the XFS filesystem to/dev/sdb1, type:
|
$ sudo mkfs.xfs /dev/sdb1 |
A similar example using the ext4 filesystem looks like this:
|
$ sudo mkfs.ext4 /dev/sdb1 |
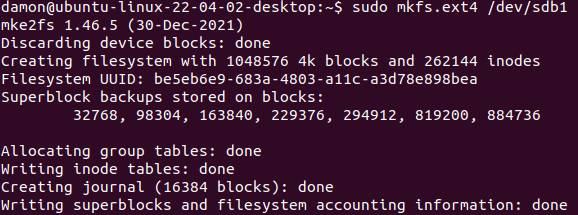
Figure 12: Create an ext4 filesystem on /dev/sdb1 using the mkfs command.
Themkfs command has a few variations or options, but they are less commonly used.
The storage space is now ready for users. The only remaining step is making the capacity available by mounting it to a directory where they can save data.
Create Mount Points
Linux does not label storage space with drive letters like Windows. Instead, administrators attach or “mount” the storage space to directories. Maybe the file server you’re working on is low on storage space, and a team is about to begin a major project. In the earlier steps, you added a disk, partitioned it, and installed a filesystem. Next, create a directory namedprojects and mount the new storage space there, making the capacity available.
First, create a directory at the root of the filesystem namedprojects by using this command:

Figure 13: Create a /projects directory to act as a mount point.
Then, attach the storage space by using themount command:
|
$ sudo mount /dev/sdb1 /projects |

Figure 14: Mount the /dev/sdb1 storage space to the /projects directory.
The syntax formountis to specify the physical device (/dev/sdb1 in the above example) then the directory where it should be mounted (/projectsin the above example).
Verify the existence of the storage space by using thedfcommand.

Figure 15: Use the df command to confirm the projects directory uses the /dev/sdb1 space.
There’s more information on thedfcommand below.
Don’t forget to use Linux permissions to control access to this storage space.
A Note About umount
Removable media, such as DVDs and USB drives, must also be mounted using themountcommand. These temporary storage areas must also be detached using theumountcommand. Notice the spelling of the command; to unmount, use theumountcommand (without the n character).
Check Storage Utilization
The above tools provide information on adding and configuring storage space, but two of the most useful investigative tools for managing drives areduanddf. Their primary role is to show how storage space is currently being used.
Use the du Command
The du command displays disk usage. It shows the storage capacity specified directories consume, allowing you to identify which directories use the most space. For example, these directories might contain log files or user data.
Like other Linux commands,duincludes various flags or options to gather just the information you’re looking for.
Of these, I suggest you pay the most attention to the–h option. This flag displays the consumed space in human-readable increments, such as megabytes or gigabytes.

Figure 16: Notice the second example uses -h and labels the file size with K (kilobytes).
Type this command to see how much space log files consume on your system:
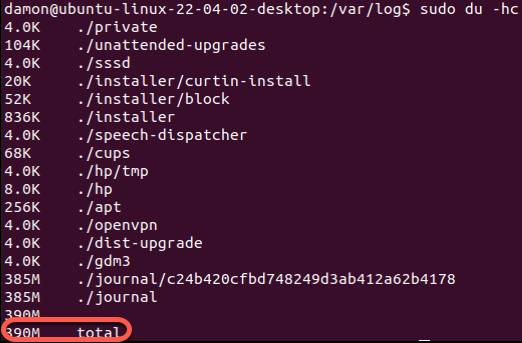
Figure 17: Notice the -c option provides a total storage consumption at the bottom. The -h flag adds the megabyte units.
Use the df Command
The df command displays available storage space, which is the opposite information fromdu (consumed space). It’s common to use the two tools together. For example, you might need to know how much storage capacity remains on a specific disk partition. Thedf command and its related options show you this information.
Likedu ,df also benefits from the–h option to make the results more human-friendly and readable. The example below assumes your home directory.
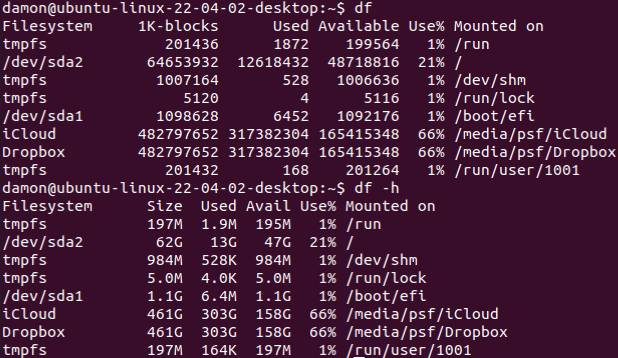
Figure 18: Compare the output differences. The second example includes the -h flag to make the results easier to understand.
You’ll quickly discover thatdu anddf are two essential commands for day-to-day Linux administration.
Summarizing the Process
Rely on tools likedu,df, andlsblkto investigate storage space utilization. Use the–h option to show the size in a human-friendly format. Don’t forget that adding the–l or–s flags to thelscommand will also provide file size information.
I’ll summarize the process of adding and managing storage space to a Linux system.
- Physically install the storage media (solid-state drive or hard disk drive).
- Identify it using commands likelsblk andcat /proc/partitions.
- Partition it using parted orfdisk. Parted is quite a bit more robust.
- Add a filesystem using themkfs command.
- Create a directory to act as a mount point using themkdir command.
- Mount the storage space to the directory using themount command.
- Check the storage space using thedfandducommands.
- Set standard Linux permissions (or access control lists) to control access to the storage space.
Wrap Up
Storage capacity is not unlimited, and Linux users must be able to manage disk space on workstations and servers. This management begins with identifying newly installed storage drives, then creating partitions and adding filesystems to organize data. Administrators also mount the storage capacity to a directory to make it available to end-users. Standard Linux permissions control access to this storage space.
In addition to configuration, Linux users must analyze how storage space is used. Theduanddfcommands are essential for this task. Both commands rely on powerful flags to show exactly the information you need to manage your systems.
Remember to be very careful when working with any partitions that contain data. It’s very easy to make a mistake with tools likefdisk and parted that cause you to lose data. It’s a best practice to begin the process with a backup.
Start today by usingcat /proc/partitions,lsblk,du, anddfto examine your current storage use. Then use the other tools and commands to configure additional storage disks on your system if necessary.
YOUTUBE.COM/THENEWSTACK
Tech moves fast, don’t miss an episode. Subscribe to our YouTubechannel to stream all our podcasts, interviews, demos, and more.