
包阅导读总结
1. 关键词:Linux 服务器、Chrony、时间同步、时区设置、NTP 服务
2. 总结:本文介绍了在 Linux 服务器上使用 Chrony 避免时间漂移的方法,包括设置时区、安装 Chrony、启用 NTP 服务、配置 Chrony 等步骤,强调了正确时间对服务器的重要性。
3. 主要内容:
– 问题引出
– 多次在 Linux 上操作时因时间问题出错,如安装包、下载 Docker 图像等。
– 解决方案 – Chrony
– 前提:设置正确的时区。
– 安装:不同发行版有对应的安装命令。
– 启用 NTP 服务:使用特定命令。
– 配置:可编辑配置文件,更改默认池,还可将机器配置为 Chrony NTP 服务器,注意修改 IP 子网,并通过防火墙允许 NTP 服务。
– 总结
– 使用 Chrony 避免时间相关问题,减少困扰。
思维导图: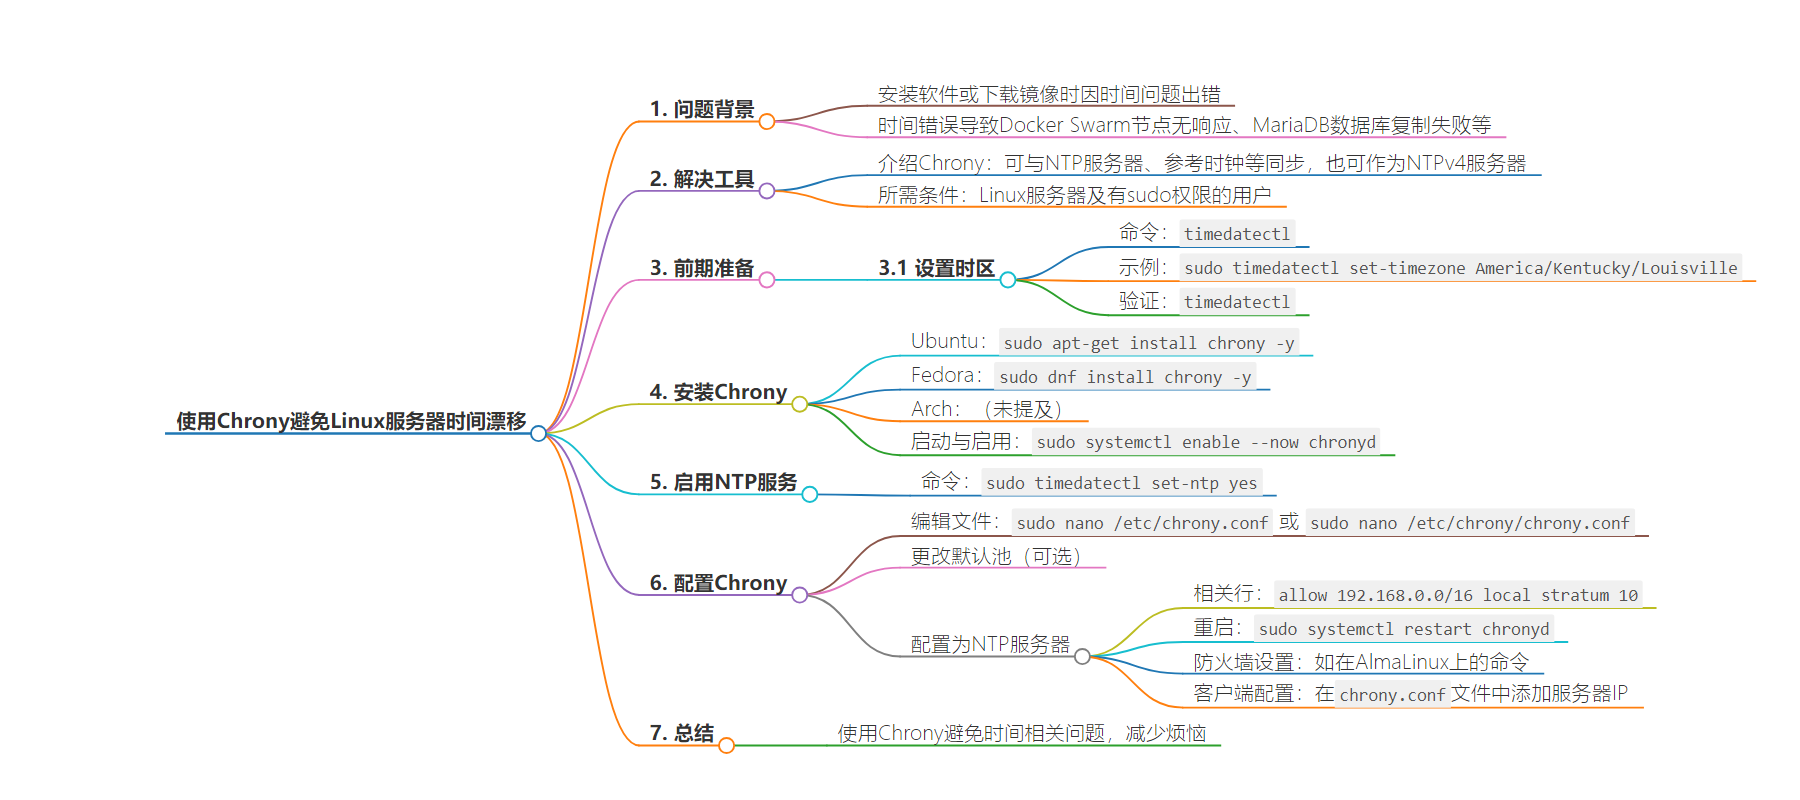
文章地址:https://thenewstack.io/how-to-avoid-time-drifts-on-your-linux-servers-with-chrony/
文章来源:thenewstack.io
作者:Jack Wallen
发布时间:2024/8/14 15:26
语言:英文
总字数:995字
预计阅读时间:4分钟
评分:86分
标签:Linux,时间同步,Chrony,NTP,服务器管理
以下为原文内容
本内容来源于用户推荐转载,旨在分享知识与观点,如有侵权请联系删除 联系邮箱 media@ilingban.com
I cannot tell you how many times I’ve gone to install a package on Linux or download a Docker image, only to get an error that it couldn’t be done. The very first time this happened was a hair-pulling experience because it took me far longer than it should to resolve the issue.
Turns out, it was all about time.
Either from an incorrectly configured locale or a simple drift in time, you could find yourself in a similar situation. Maybe you have a Docker Swarm deployed and one of your nodes is no longer responding or connected. Or maybe you’re experiencing MariaDB database replication that’s started to fail. You’d be surprised at how much can go wrong because of incorrect time on a server.
So, how do you avoid this? There’s a simple tool you can install called Chronythat keeps your server time in constant sync. Chrony can synchronize a system clock with NTP servers, reference clocks and manual input, as well as operate as an NTPv4 server and peer to keep the time on all of your Linux servers in sync.
Let me show you how to install and use Chrony on Linux.
What You’ll Need
To work with Chrony, you’ll need one or more Linux servers and a user with sudo privileges.
Before we get to Chrony, there’s one task you must complete first.
Setting Your Time Zone
To make sure your servers have the right time, Chrony requires that all of them must be configured for the right time zone. If your servers are all set to the same wrong time zone — or if they’re set to different time zones — Chrony will be of no use to you.
Ergo, let’s set the time zone on your servers.
This step is taken care of with the timedatectl command, which is installed on most Linux servers by default. Before you do this, you’ll want to know which timezone you should set. To view a listing of all timezones, issue the command:
|
timedatectl list–timezones |
Scroll through that listing until you find the correct one for your area. For example, if you live in Louisville, Ky., the proper time zone is America/Kentucky/Louisville and is set like this:
|
sudo timedatectl set–timezone America/Kentucky/Louisville |
Once you’ve done that, you can verify the change with:
Make sure you do the above on all of your servers (be they on bare metal, virtual machines or containers).
You’re now ready for Chrony.
Installing Chrony
Chrony is found in the standard repositories for most distributions, which means the installation is very easy. For example, on a Ubuntu-based distribution, the installation command would be:
|
sudo apt–get install chrony –y |
If you’re on a Fedora-based distribution, the command is:
|
sudo dnf install chrony –y |
For Arch-based distributions:
Once Chrony is installed, make sure to start and enable it with the command:
|
sudo systemctl enable —now chronyd |
Enabling the Chrony NTP service
Next, you must enable the Chrony NTP service with the command:
|
sudo timedatectl set–ntp yes |
You’ll receive no output from the above command.
With that taken care of, check the time with:
It should be spot on. Not only that, but you should also now see that the NTP service is listed as active, which means Chrony is keeping your time in check.
Do note that if you had to change the timezone of your machine, you should reboot so the changes take effect.
Configuring Chrony
You shouldn’t have to do anything to Chrony to make it work correctly. Should you want to investigate the configuration, you can open the file for editing with:
|
sudo nano /etc/chrony.conf |
If you find the file isn’t there, try the command:
|
sudo nano /etc/chrony/chrony.conf |
At the top of the file, you’ll find a single public server listed that is used to keep time in sync. On my AlmaLinux test server, that line is:
|
pool 2.almalinux.pool.ntp.org iburst |
If you want, you can always change the default pool. For example, according to the NTP Pool Project, you could use the following pools for the United States:
server 0.us.pool.ntp.org
server 1.us.pool.ntp.org
server 2.us.pool.ntp.org
server 3.us.pool.ntp.org
There are several other options you can look through but you’ll most likely want to keep them as is.
You can also configure your Linux machine as a Chrony NTP server. For this, you must uncomment (remove the leading # character) the following lines in the Chrony configuration file:
|
allow 192.168.0.0/16 local stratum 10 |
Make sure to also change the IP subnet to that of your LAN. Save and close the file. Next, restart Chrony with:
|
sudo systemctl restart chronyd |
Make sure to allow the NTP service through your firewall. For example, on AlmaLinux that would require the following two commands:
|
sudo firewall–cmd —add–service=ntp –permanent sudo firewall–cmd —reload |
You could then configure your NTP server within the chrony.conf files of the clients on your network. For example, if your NTP server is at 192.168.1.210, you could add the following in the Chrony config file:
|
pool 192.168.1.210 iburst maxsources 4 |
At this point, your client will remain in sync with your server. As long as your server is in sync with the NTP pool, any server (or desktop) that uses it as a time server will remain in sync.
Avoid time-related issues with this simple-to-use tool, and you’ll pull less hair and lose less sleep.
YOUTUBE.COM/THENEWSTACK
Tech moves fast, don’t miss an episode. Subscribe to our YouTubechannel to stream all our podcasts, interviews, demos, and more.