
包阅导读总结
1. 关键词:
– RAG App
– Nvidia NIM
– Milvus
– Local Deployments
– GPU Acceleration
2. 总结:
本文介绍如何在本地部署包含 Nvidia NIM 和 Milvus 的 RAG 应用,通过使用 Docker 和 Nvidia 相关工具,分别部署了 LLM、嵌入模型和向量数据库,并设置了相应的环境变量和 API 端点。
3. 主要内容:
– 背景
– 前一篇文章使用了 Nvidia NIM 托管 API 和 Zilliz 向量数据库,本次切换到本地自托管部署,代码不变。
– 环境准备
– 安装两个 Nvidia GeForce RTX 4090 GPU。
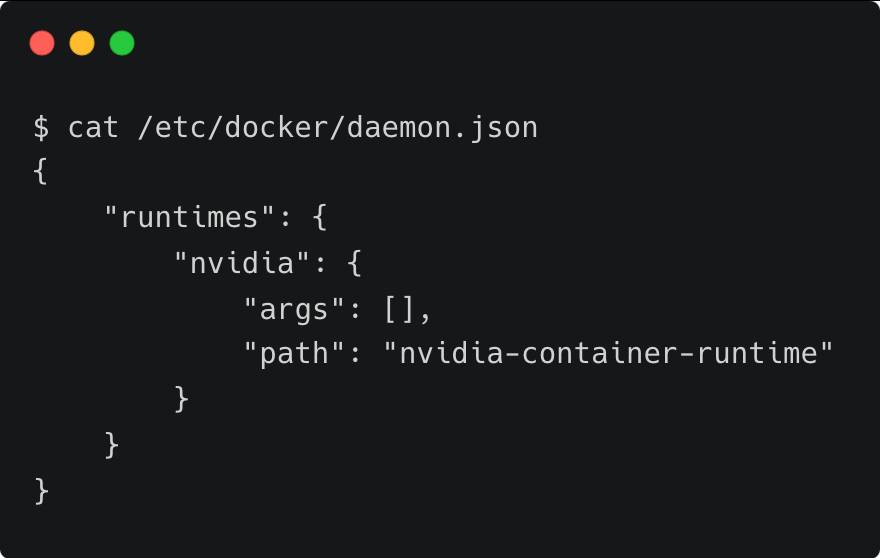
– 安装 Docker 和 Nvidia Container Toolkit 并配置 Nvidia 容器运行时为 Docker 默认环境。
– 部署步骤
– 部署 Llama3 8B Parameter LLM
– 设置环境变量,指定容器名、镜像名和 API 密钥。
– 运行命令部署容器,指定使用第一个 GPU,下载模型权重。
– 部署文本嵌入模型
– 同样设置环境变量,指定容器名、镜像名和 API 密钥。
– 部署容器,指定使用第二个 GPU。
– 部署 GPU 加速向量数据库 Milvus
– 下载 Docker Compose 文件并修改配置,指定使用第二个 GPU。
– 运行命令启动 Milvus。
– 运行 RAG Notebook 并更新 API 端点
– 使用上一篇教程的 Jupyter Notebook,修改.env 文件中的端点。
思维导图:
文章地址:https://thenewstack.io/build-a-rag-app-with-nvidia-nim-and-milvus-running-locally/
文章来源:thenewstack.io
作者:Janakiram MSV
发布时间:2024/8/26 14:21
语言:英文
总字数:993字
预计阅读时间:4分钟
评分:89分
标签:RAG 应用,Nvidia NIM,Milvus,GPU 加速,Docker
以下为原文内容
本内容来源于用户推荐转载,旨在分享知识与观点,如有侵权请联系删除 联系邮箱 media@ilingban.com
In the previous post, we built an application that consumes Nvidia NIM APIs and a hosted Zilliz vector database. In this tutorial, we will switch to self-hosted local deployments of the same components while maintaining the same codebase.
Nvidia NIM is available as both APIs hosted within Nvidia’s infrastructure and as containers that can be deployed in an on-premises environment. Similarly, we can deploy Milvus as a stand-alone vector database running in containers. Since Milvus is one of the first open source vector databases to take advantage of GPU acceleration, we can leverage the available GPUs to run the entire stack on an accelerated computing infrastructure.
Let’s start by exploring the environment where we deploy this stack. For my generative AI testbed, I installed two Nvidia GeForce RTX 4090 GPUs. Having two GPUs helps us dedicate one for the LLM while scheduling the embeddings model and the vector database on the other.
I also installed Docker and the Nvidia Container Toolkit to enable the containers to access the underlying GPUs. The Nvidia container runtime is configured as the default runtime environment for Docker.
Let us begin deploying the building blocks — the LLM, embeddings model and vector database — on the GPU machine.
Step 1: Deploy the Llama3 8B Parameter LLM
Let’s start by setting the environment variables.
|
export CONTAINER_NAME=llama–3–8b–instruct export IMG_NAME=“nvcr.io/nim/meta/llama3-8b-instruct:1.0.3” export NGC_API_KEY=”YOUR_API_Key” |
You can use the same key generated in the last tutorial or by logging into NGC.
Run the command below to deploy meta/llama3-8b-instruct as a container.
|
docker run \ –d \ —rm \ —name=$CONTAINER_NAME \ —gpus device=0\ —shm–size=16GB \ –e NGC_API_KEY=$NGC_API_KEY\ –v “$LOCAL_NIM_CACHE:/opt/nim/.cache” \ –u $(id –u) \ –p 8000:8000 \ $IMG_NAME |
The model will be downloaded to the /opt/nim/.cache directory. This will help in caching the model weights rather than downloading them each time the container is started. Notice that we are setting the --gpus device parameter to 0, which will dedicate the first GPU to the LLM.
Wait for the model weights to be downloaded. In a few minutes, the container will be ready for inference. You can check the status by running the docker logs -f $CONTAINER_NAME command.
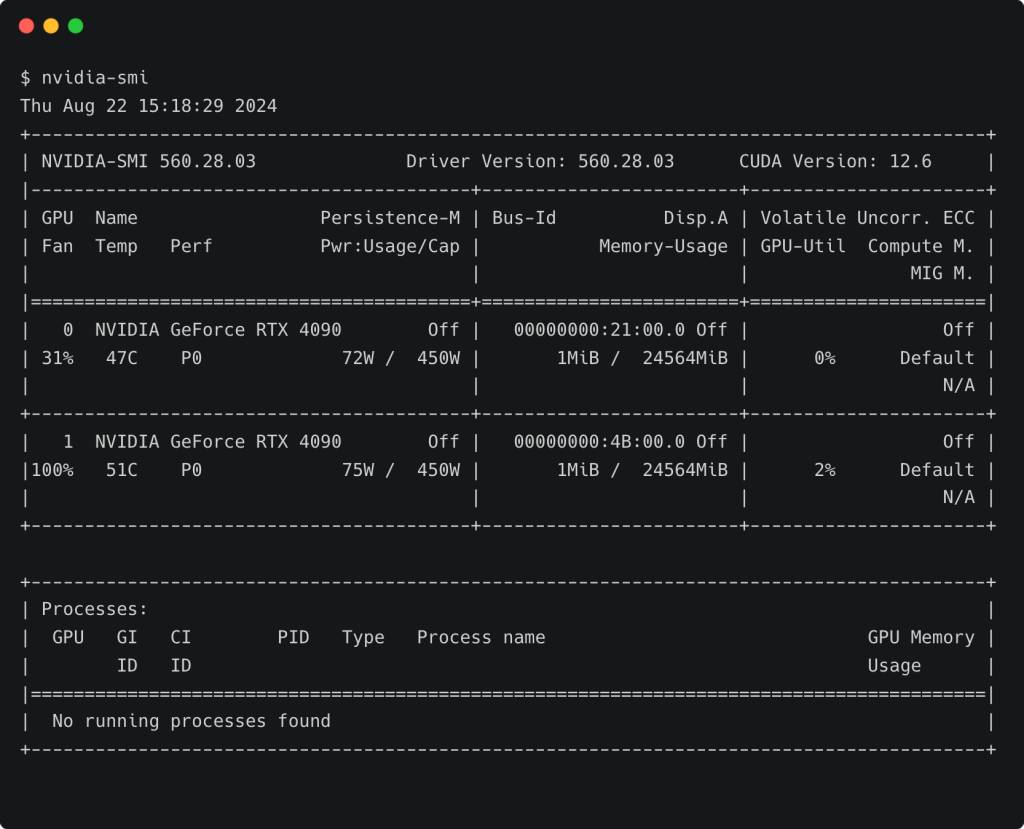
If we run the nvidia-smi command again, we will see that the first GPU (device 0) is 100% utilized.
Let’s perform a test to check if the model is ready for inference.
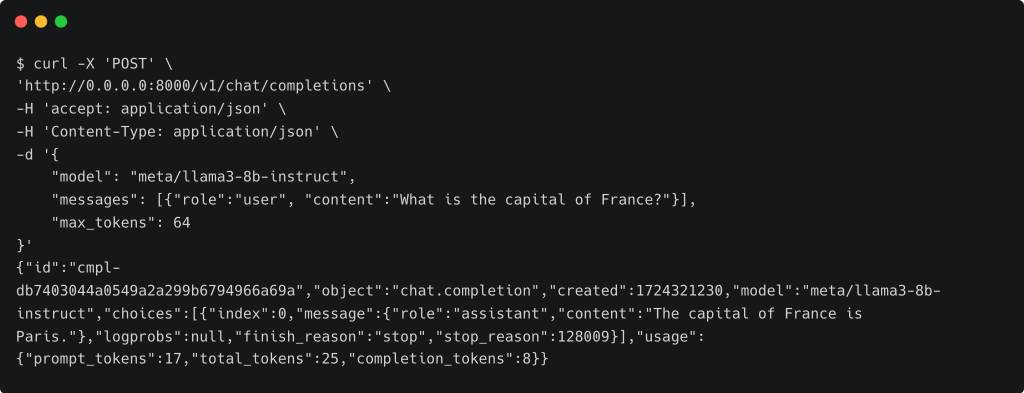
The above output confirms that the LLM is ready to serve.
Step 2: Deploy the Text Embeddings Model
In this step, we will deploy the same model that we used in the last tutorial: nvidia/nv-embedqa-e5-v5.
Similar to the steps mentioned above, we will run the model within the container.
|
export CONTAINER_NAME=nv–embedqa–e5–v5 export IMG_NAME=“nvcr.io/nim/nvidia/nv-embedqa-e5-v5:1.0.0” export NGC_API_KEY=”YOUR_API_Key” |
Let’s deploy the container.
|
docker run –it —rm —name=$CONTAINER_NAME \ –d \ —rm \ —runtime=nvidia \ —gpus device=1\ —shm–size=16GB \ –e NGC_API_KEY=$NGC_API_KEY \ –v “$LOCAL_NIM_CACHE:/opt/nim/.cache” \ –u $(id –u) \ –p 8001:8000 \ $IMG_NAME |
We are using the second GPU for the embeddings model by setting the --gpus device parameter to 1. Wait for the container to get initialized.
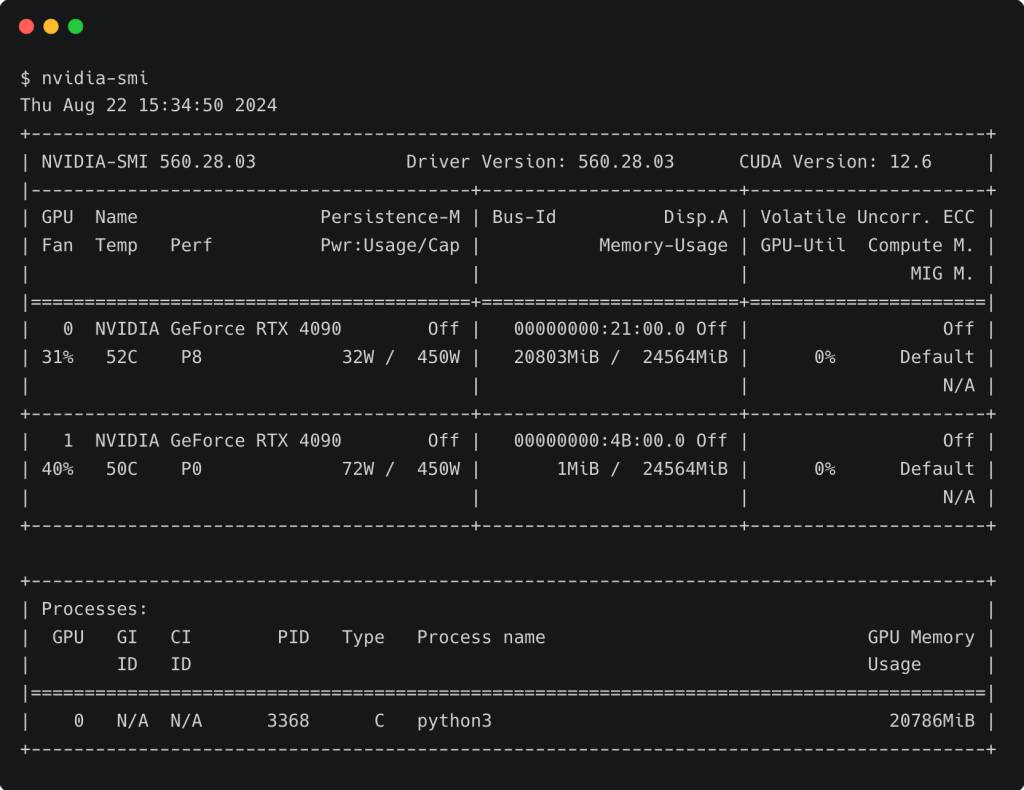
Running nvidia-smi confirms that the embeddings model is loaded on the second GPU.
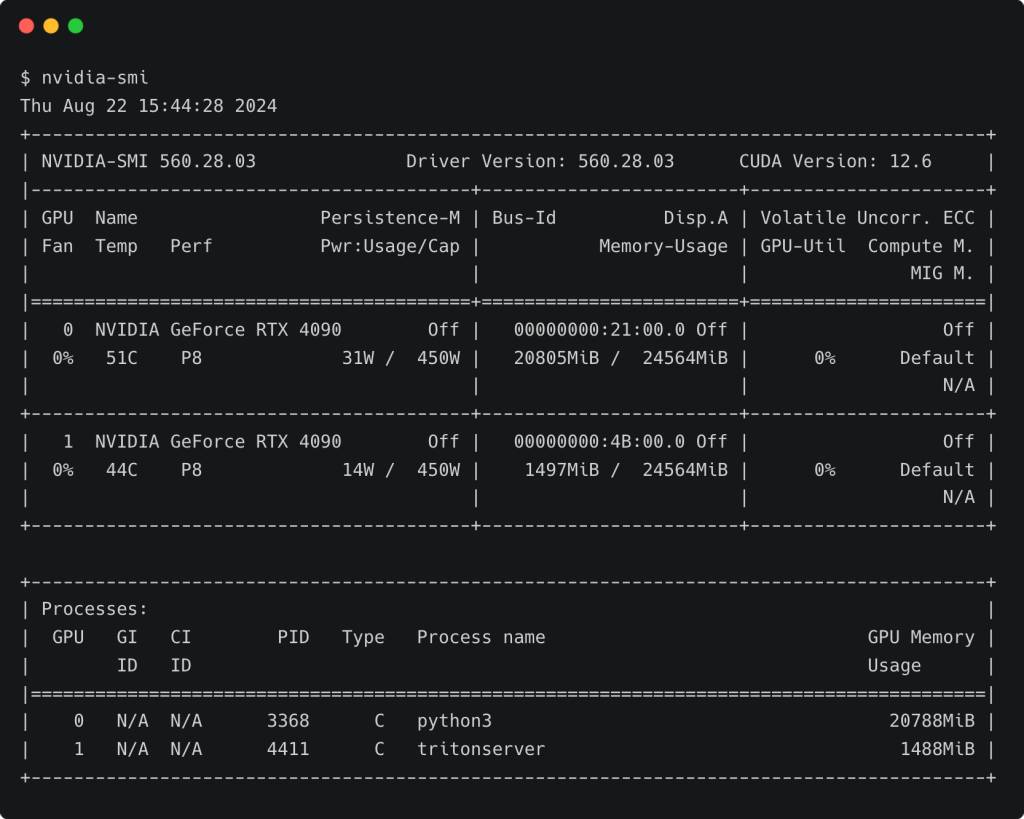
Since the model is not as heavy as the LLM, it only takes 1.4 GiB of the GPU VRAM.
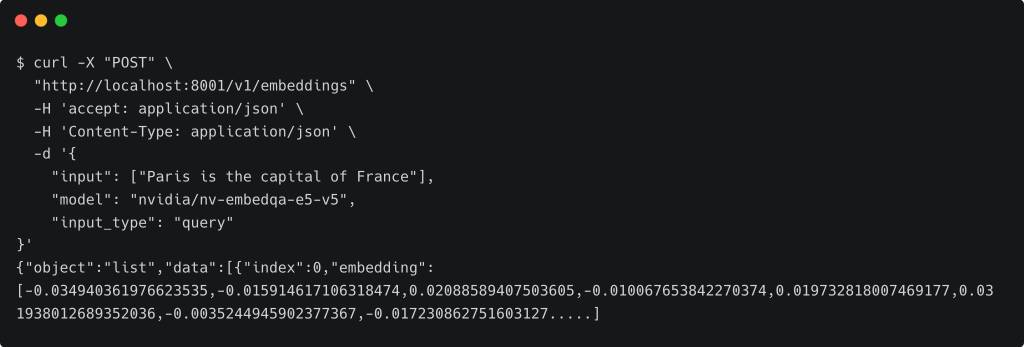
Let’s test by generating the embeddings for a phrase through curl. The output in the screenshot is truncated for brevity.
We now have both the LLM and the embeddings model running locally. In the next step, we will deploy Milvus, the vector database.
Step 3: Deploy the GPU-Accelerated Vector Database
Milvus is an open source vector database that was created and primarily developed by Zilliz. Zilliz is the company behind Milvus, with its founders and engineers being the main contributors to the Milvus project.
Follow the below steps to deploy Milvus.
|
mkdir milvus && cd milvus wget https://raw.githubusercontent.com/milvus–io/milvus/master/deployments/docker/standalone/docker–compose.yml |
This downloads the Docker Compose file, which has the definitions and dependencies for running Milvus as a stand-alone vector database on GPU.
|
1 2 3 4 5 6 7 8 9 10 11 12 13 14 15 16 17 18 |
…. environment: CUDA_VISIBLE_DEVICES: 1 ETCD_ENDPOINTS: etcd:2379 MINIO_ADDRESS: minio:9000 volumes: – ${DOCKER_VOLUME_DIRECTORY:-.}/volumes/milvus:/var/lib/milvus ports: – “19530:19530” – “9091:9091” deploy: resources: reservations: devices: – driver: nvidia capabilities: [“gpu”] device_ids: [“1”] …. |
I changed the CUDA_VISIBLE_DEVICES and device_ids to 1. This will collocate the container on the second GPU, which has room even after running the embeddings model.
Launch Milvus by running docker compose up -d command.
At this point, we have the below API endpoints running each of the required building blocks.
LLM – http://0.0.0.0:8000
Embeddings Model – http://0.0.0.0:8000
Vector Database – http://0.0.0.0:19530
Step 4: Run the RAG Notebook With Updated API Endpoints
We will use exactly the same Jupyter Notebook that we used in the last tutorial. The only change we need to make is to the .env file. Update it to reflect the new endpoints.
|
IP=”Your_GPU_MACHINE_IP” LLM_URI=“http://$IP:8000/v1” EMBED_URI=“http://$IP:8001/v1” VECTORDB_URI=“http://$IP:19530” |
The complete code is shown below. You can also download the Notebook from GitHub.
YOUTUBE.COM/THENEWSTACK
Tech moves fast, don’t miss an episode. Subscribe to our YouTubechannel to stream all our podcasts, interviews, demos, and more.