包阅导读总结
1.
关键词:Spring Boot、Neon Postgres、Azure App Service、CRUD 应用、自动缩放
2.
总结:本文介绍了如何使用 Spring Boot 和 Neon Postgres 开发 CRUD 应用,并部署到 Azure App Service,包括设置数据库、构建应用、部署流程、自动缩放配置等,还介绍了 Neon 的特点和优势。
3.
主要内容:
– 开发 CRUD 应用的整体介绍
– 目的:使用 Spring Boot 和 Neon Postgres 开发,部署到 Azure App Service 并实现自动缩放和多环境设置
– 前置条件:对 Java、Maven、Spring Boot、SQL 数据库等有一定了解
– Neon Postgres 相关
– 是什么:完全托管的无服务器 Postgres 数据库平台,具有高可用性等特点
– 如何设置数据库:创建账号、选择计划、创建项目、设置计算大小和暂停时间等
– 仪表盘:提供多种连接方式
– 构建 Spring Boot CRUD 应用
– 依赖:Spring Web、Spring Data JPA、PostGres Driver
– 创建实体类、仓库接口、REST 控制器
– 配置数据库连接
– 部署到 Azure App Service
– 创建新 Web App
– 部署应用
– 访问应用
– 设置自动缩放
– Azure 中的自动缩放:在门户中配置规则
– Neon 中的自动缩放:在仪表盘配置规则
思维导图: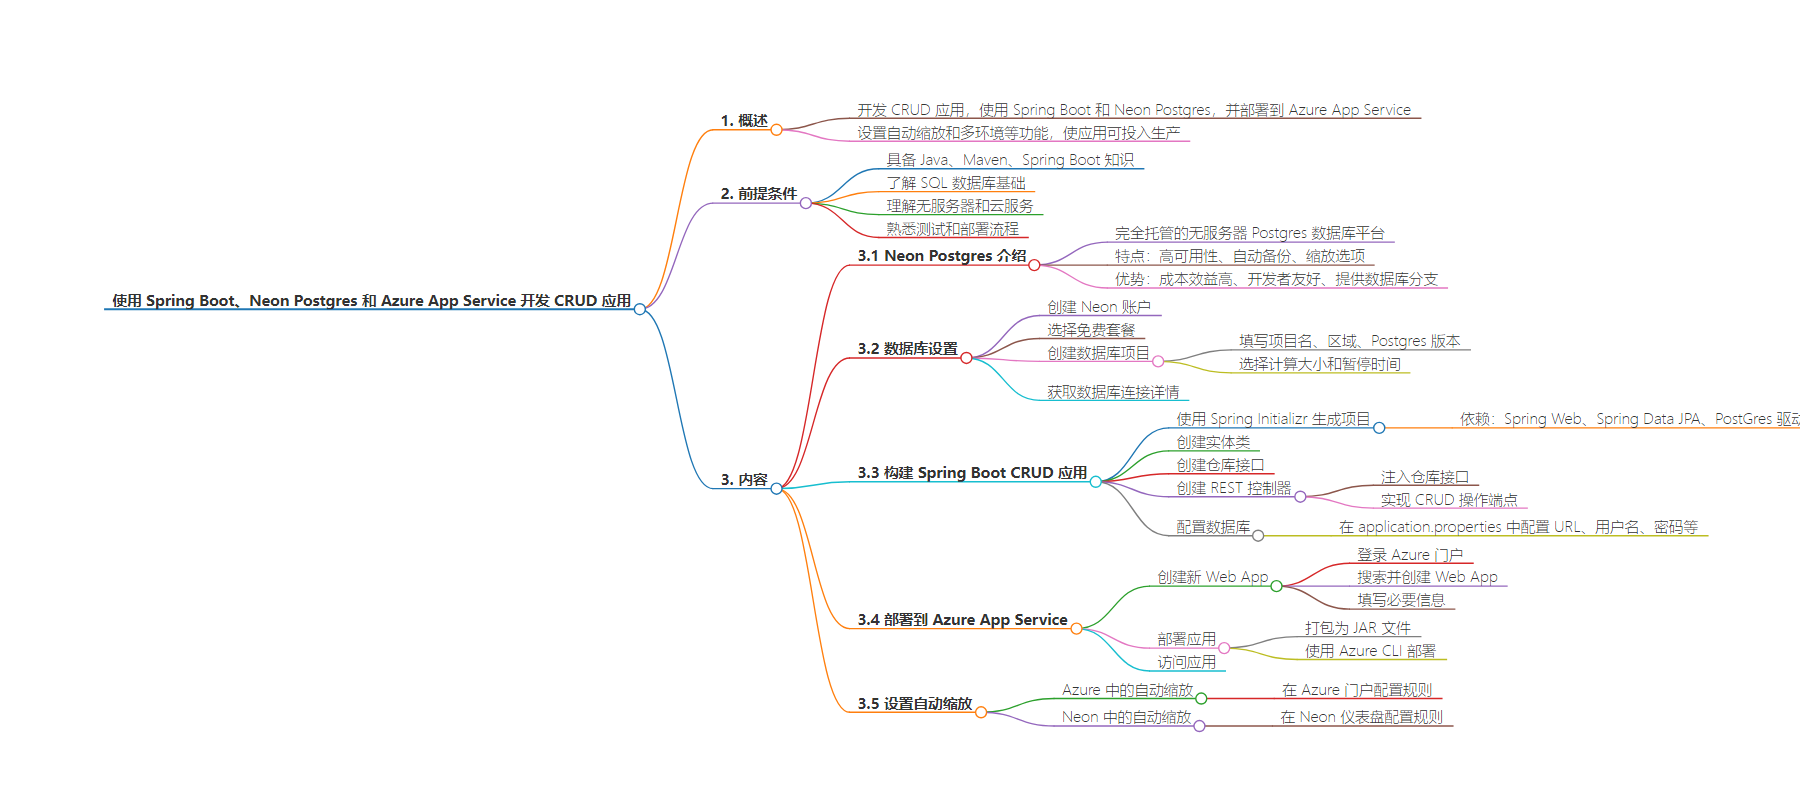
文章地址:https://www.freecodecamp.org/news/build-a-crud-app-spring-boot-neon-postgres/
文章来源:freecodecamp.org
作者:Abhinav Pandey
发布时间:2024/7/26 19:14
语言:英文
总字数:1946字
预计阅读时间:8分钟
评分:86分
标签:春天启动,新星Postgres,阿兹尔应用服务,CRUD 应用程序,自动缩放
以下为原文内容
本内容来源于用户推荐转载,旨在分享知识与观点,如有侵权请联系删除 联系邮箱 media@ilingban.com
In this article, we’ll explore how to develop a CRUD (Create, Read, Update, Delete) application using Spring Boot and Neon Postgres.
We’ll also deploy the application on Azure App Service and make it production-ready by setting up features like autoscaling and multiple environments.
You’ll learn how Neon Postgres can make your development and deployment processes easier along the way.
Here’s what we’ll cover:
- Setting up a Neon Postgres database and exploring its features
- Building a CRUD application using Spring Boot and deploying the application on Azure App Service
- Why Neon is a good fit for infrastructure that auto-scales
- Database branching in Neon Postgres and how it can ease the development workflow
Prerequisites
- Working knowledge of Java, Maven, and Spring Boot
- Basics of SQL databases
- Understanding of serverless and cloud services
- Familiarity with testing and deployment processes
Table of Contents
What is Neon Postgres?
Neon is a fully managed serverless Postgres database platform. It offers features such as high availability, automatic backups, and scaling options to handle varying traffic levels.
Neon is designed to be cost-efficient and developer-friendly, and it focuses on providing a seamless experience for developers.
In addition to the standard Postgres features, it provides capabilities like database branching, allowing you to create Git-like branches of the database for different purposes.
How to Set Up the Database
To begin with, let’s explore how you can set up a Neon database for your application.
Firstly, you’ll need to create an account on the Neon website. It doesn’t require a credit card to sign up, and you’re automatically set up with the free tier to get started.
Here’s a pricing and features comparison of Neon plans:
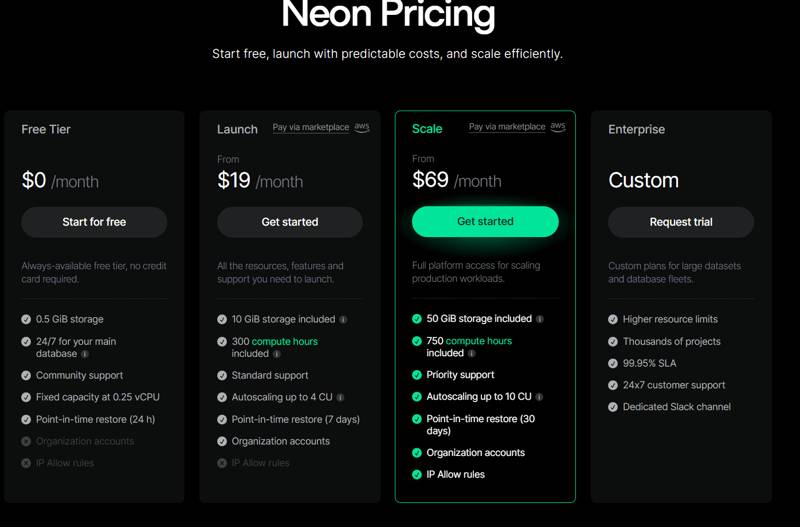 Neon pricing plans
In the free tier, we get 0.5 GB of storage with basic computing which is enough for playing around with the database and building small applications.
Create the Database
Once you’ve signed up, you can access the dashboard and create a new project.
Star by filling in the project name, region, and Postgres version options. In addition to this, we can choose two additional options:
- compute size – You can choose a min and max compute size for the database. This is useful for autoscaling the database based on the load.
- suspend time – You can set a time after which the database will be suspended if not being used. This is useful for saving costs when the database is not being used.
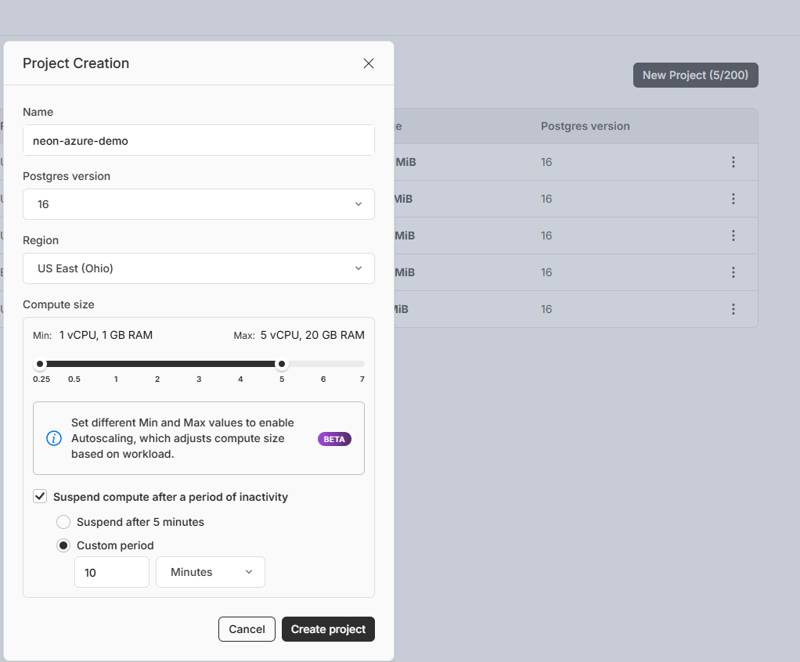 Creating a database project in Neon
Once you submit the form, Neon will create the database and provide the connection details.
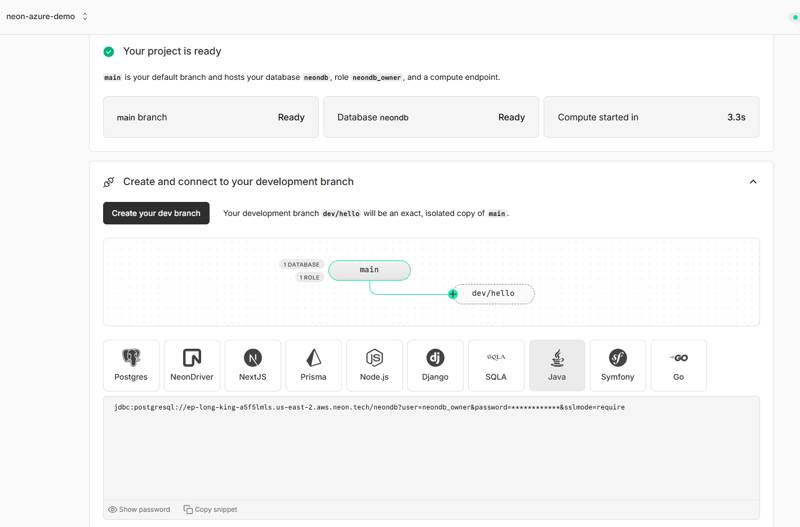 Neon Dashboard
As you can see, the database was set up in 3.3 seconds (compared to hours of installing and setting up your own infrastructure). You can choose multiple ways to connect to the database. For this tutorial, select Java as your programming language and get the JDBC connection string.
How to Build the Spring Boot CRUD App
Next, let’s set up our CRUD application. We’ll use Spring Boot, as it provides easy bootstrapping and configuration for building web applications.
We can use the Spring Initializr to generate a new Spring Boot project with the necessary dependencies:
- Spring Web – for building web applications
- Spring Data JPA – for working with databases using JPA
- PostGres Driver – for connecting to the Postgres database
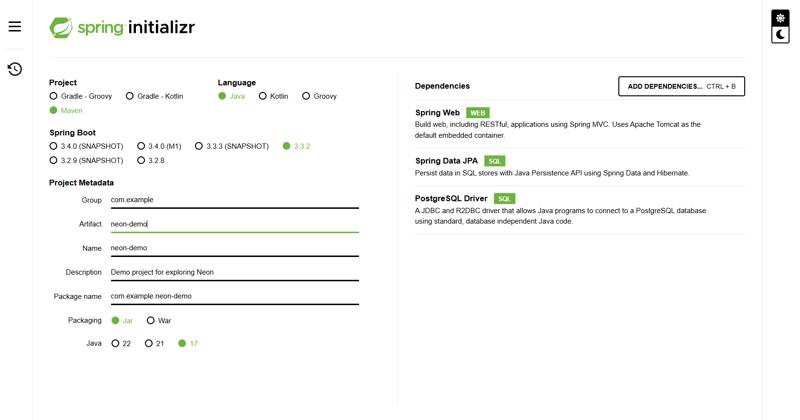 Creating a Spring Boot project using Spring Initializer
You can generate, download, and import the project into your favorite IDE.
Create an Entity Class
Let’s create an entity class to represent the data in the application. First, create a User class:
@Entity(name = "users")public class User { @Id @GeneratedValue(strategy = GenerationType.IDENTITY) private Long id; private String name; private String email; }The entity name users is the name of the table you want to use in your database.
Create a Repository
Next, create a repository interface to interact with the database. You’ll extend the JpaRepository interface provided by Spring Data JPA:
@Repositorypublic interface UserRepository extends JpaRepository<User, Long> {}You need to annotate the interface with @Repository to mark it as a Spring bean. The JpaRepository interface provides methods for CRUD operations like save, findAll, findById, delete, and so on, so you don’t need to write the queries manually.
You’ll provide your entity class User and the type of the primary key Long as type arguments to the JpaRepository interface.
Create a REST Controller
Finally, create a REST controller to handle the CRUD operations. You’ll inject the UserRepository into the controller and implement the necessary endpoints:
@RestController@RequestMapping("/users")public class UserController { private final UserRepository userRepository; public UserController(UserRepository userRepository) { this.userRepository = userRepository; } @GetMapping public List<User> getUsers() { return userRepository.findAll(); } @PostMapping public User createUser(@RequestBody User user) { return userRepository.save(user); } @PutMapping("/{id}") public User updateUser(@PathVariable Long id, @RequestBody User user) { user.setId(id); return userRepository.save(user); } @DeleteMapping("/{id}") public void deleteUser(@PathVariable Long id) { userRepository.deleteById(id); }}Here are a few things to note:
- You’re using the
@RestControllerannotation to mark the class as a controller that handles REST requests. - The
@RequestMappingannotation specifies the base URL for the endpoints. - You’re injecting the
UserRepositoryinto the controller using constructor injection. - Finally, you’re implementing your API endpoints for CRUD operations using the
@GetMapping,@PostMapping,@PutMapping, and@DeleteMappingannotations.
Configure the Database
To connect your Spring Boot application to the Neon Postgres database, you need to configure the database URL, username, and password in the application.properties file:
spring.datasource.url=jdbc:postgresql:spring.datasource.username=<username>spring.datasource.password=<password>spring.jpa.hibernate.ddl-auto=updateHere, you configured the database URL, username, and password provided by Neon when you created the database. The spring.jpa.hibernate.ddl-auto=update property tells Spring Boot to automatically create the necessary tables or columns based on the entity classes when the application starts.
How to Deploy on Azure App Service
Now that your Spring Boot application is ready, it’s time to deploy it on Azure App Service.
Create a New Web App
To deploy your Spring Boot application on Azure App Service, you’ll first create a new Web App. You can do this through the Azure portal by following these steps:
- Log in to the Azure portal.
- Click on the
Create a resourcebutton. - Search for
Web Appand select theCreateoption. - Fill in the necessary details like resource group, app name, runtime stack, and region.
- Click the
Review + createbutton.
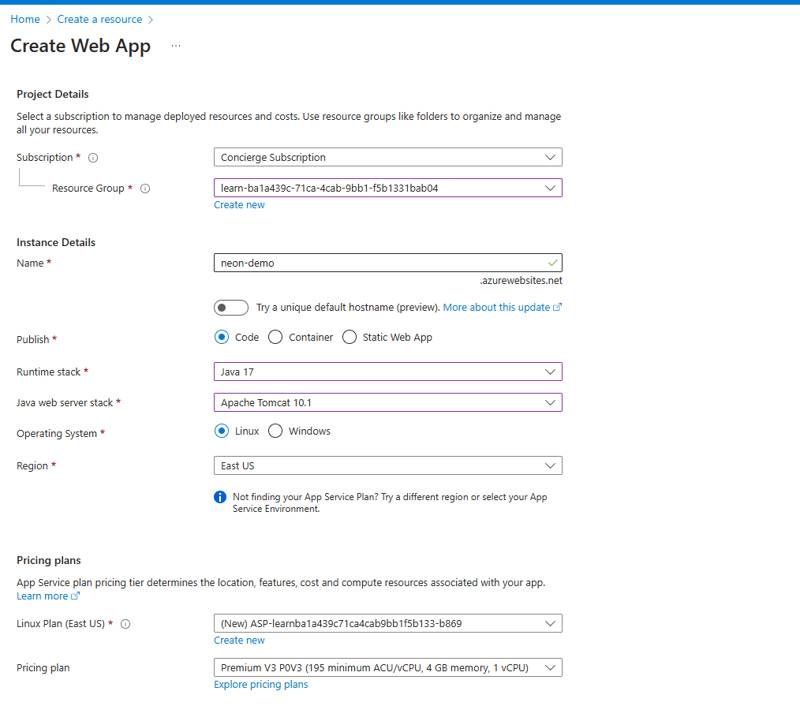 Creating a Web App in Azure
Deploy the Application
The Web App takes a couple of minutes to create. Once done, you can deploy your Spring Boot application to Azure App Service.
One of the easiest ways to deploy is to package your Spring Boot application as a JAR file and deploy it to Azure App Service using the Azure CLI.
To do this, run the below commands:
mvn packageaz webapp deploy --src-path neon-demo-0.0.1-SNAPSHOT.jar --resource-group learn-ba1a439c-71ca-4cab-9bb1-f5b1331bab04 --name neon-appHere, you’re packaging your Spring Boot application using Maven and deploying the JAR file to Azure App Service using the Azure CLI. You’ve provided the path to the JAR file, the resource group, and the app name you previously configured.
Access the Application
Once the deployment is complete, you can access your Spring Boot application on Azure App Service by navigating to the URL of the Web App. Your app is available at neon-app.azurewebsites.net
Let’s use _curl _to test the endpoints.
Create a User
curl -X POST -d '{"name":"John Doe","email":"john@gmail.com"}' https:Here you provide user data in JSON format to create a new user.
Get Users
You can also can test that the user was created by fetching all users:
curl -X GET https:How to Set Up Autoscaling
A production application may experience varying levels of traffic, and it’s important to scale the application dynamically based on the load.
Let’s explore how you can autoscale your application when needed.
Autoscaling in Azure
Azure App Service provides autoscaling options that let you automatically adjust the number of instances as needed.
You can configure autoscaling rules in the Azure portal by following these steps:
- Navigate to the Web App in the Azure portal.
- Click the
Scale out (App Service Plan)option from the left menu. - Configure the autoscaling rules – you can choose predefined rules like traffic or create custom rules based on metrics like CPU usage, memory usage, or custom metrics.
- Save.
Azure will automatically scale the application based on the configured rules.
Autoscaling in Neon
Since your application is automatically scaled based on the load, you’ll want to ensure that the database can handle the increased traffic.
Neon provides autoscaling options to scale the database dynamically based on the load. You can configure autoscaling rules in the Neon dashboard to ensure the database can handle the increased load.
Follow the below steps to configure autoscaling in Neon:
- Navigate to the Neon dashboard and select the database. Then select the branch to configure autoscaling.
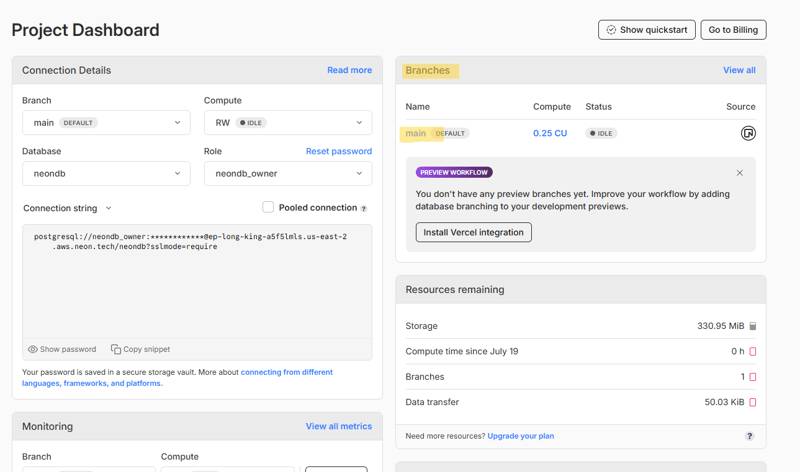 Selecting a branch from Neon project dashboard
- Click on the
Editbutton next to theComputesection. Configure the autoscaling rules based on metrics like CPU usage, memory usage, or custom metrics.
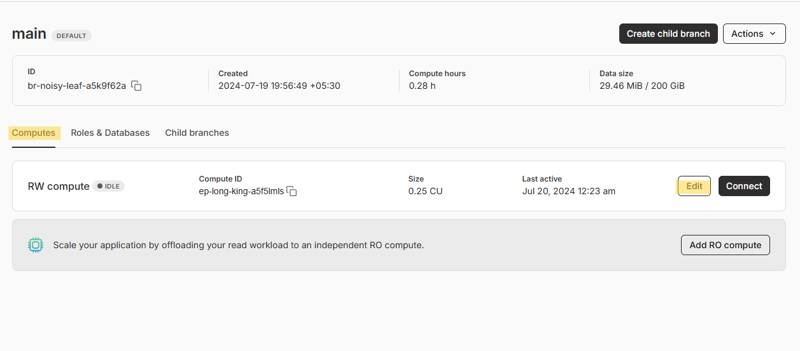 Branch details view in Neon
- Configure the min-max compute size and Save. Neon will automatically scale the database based on the configured rules when needed.
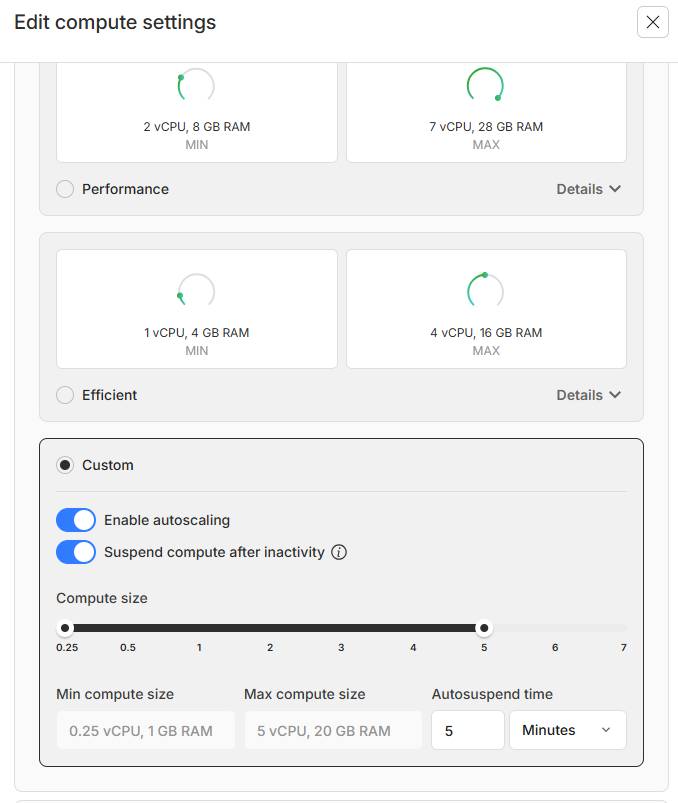 Setting up autoscaling for compute
Ensuring that both the application and the database can scale dynamically based on the load will help you handle varying levels of traffic efficiently.
How to Configure Database Branches in Neon
In a typical development workflow, multiple databases may be used for different purposes like development, testing, and production.
Neon Postgres provides database branching to create multiple branches for different purposes. Each branch is an instance of the database that you can use independently.
This Git-like feature helps set up a copy of the database for different environments like development, staging, and production. It also helps preserve data for different versions of the application.
Let’s explore how you can create and manage branches in Neon Postgres:
- Navigate to the Neon dashboard and select the database.
- In the
Branchessection, click on theView Allbutton. - You can create a new branch from an existing one by clicking on the
Create Branchbutton. You’ll need to provide the branch name and what data to copy from the parent branch.
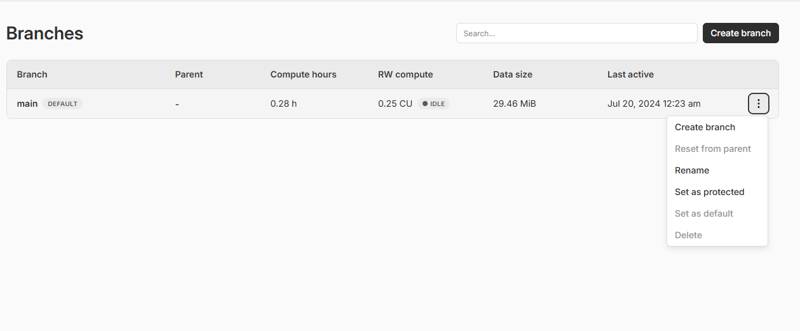 Create branch option
- You can either copy all the data or copy until a point in time or a specific record. This is useful for multiple purposes like restoring data, creating a new environment, or testing new features.
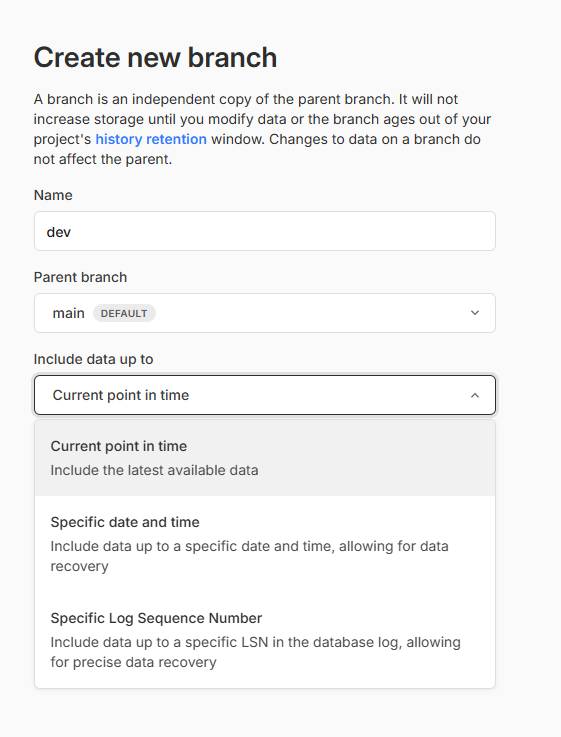 Creating a new branch
- Neon will create a new branch of the database that can be used independently. You can find the URL, username, and password for the new branch in the dashboard. And this happens in real time without any downtime and delays.
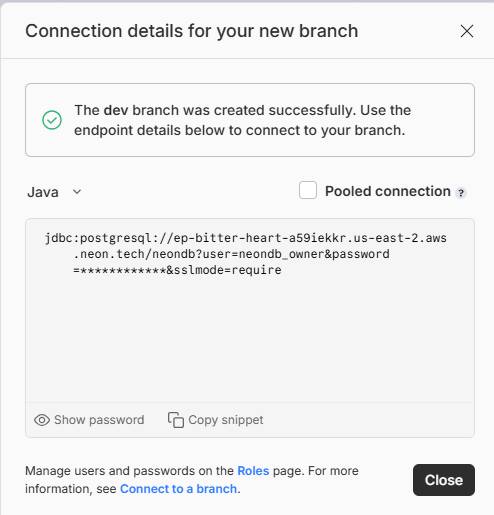 Branch-specific connection details
Now you can use your dev branch for local development and testing, and the main branch for production. This helps in keeping the data separate and ensures that changes in one branch do not affect the other branches.
Summary
In this article, we built a CRUD application using Spring Boot, Neon Postgres, and Azure App Service.
We explored how to set up the Neon Postgres database, build a basic CRUD application using Spring Boot, deploy the application on Azure App Service, and configure autoscaling for the application and the database.
We also learned about how the database branching feature in Neon Postgres helps you create branches of the database for different environments and purposes.
