
包阅导读总结
1. 关键词:MarsCode AI、跨语言项目、VSCode 插件、代码开发、功能介绍
2. 总结:本文介绍了 MarsCode AI 插件在 VSCode 中的使用,包括安装配置和各功能的使用方法,并以一个使用 Python 和 C 语言开发的跨语言 Web 应用为例,阐述了项目的结构、主要功能和实现。
3. 主要内容:
– 概述
– 跨语言项目开发复杂,MarsCode AI 插件能提升效率
– 工具使用过程
– MarsCode 插件简介
– 安装和配置
– 安装
– 配置
– 各个功能的使用
– 代码补全
– 代码补全 Pro
– 代码生成
– 代码编辑
– 代码解释
– 代码注释生成
– 单元测试生成
– 智能修复
– 智能问答
– 项目的功能和逻辑
– 项目概述
– 项目结构
– 主要功能和实现
– Flask 应用部分
– `app/__init__.py`
– `app/models.py`
– `app/routes.py`
– 样式、JavaScript 和模板文件
– C 代码部分
– `c_library/geometry.c`
– `c_library/geometry.h`
– `c_library/setup.py`
– 项目入口和配置
– `app.py`
思维导图: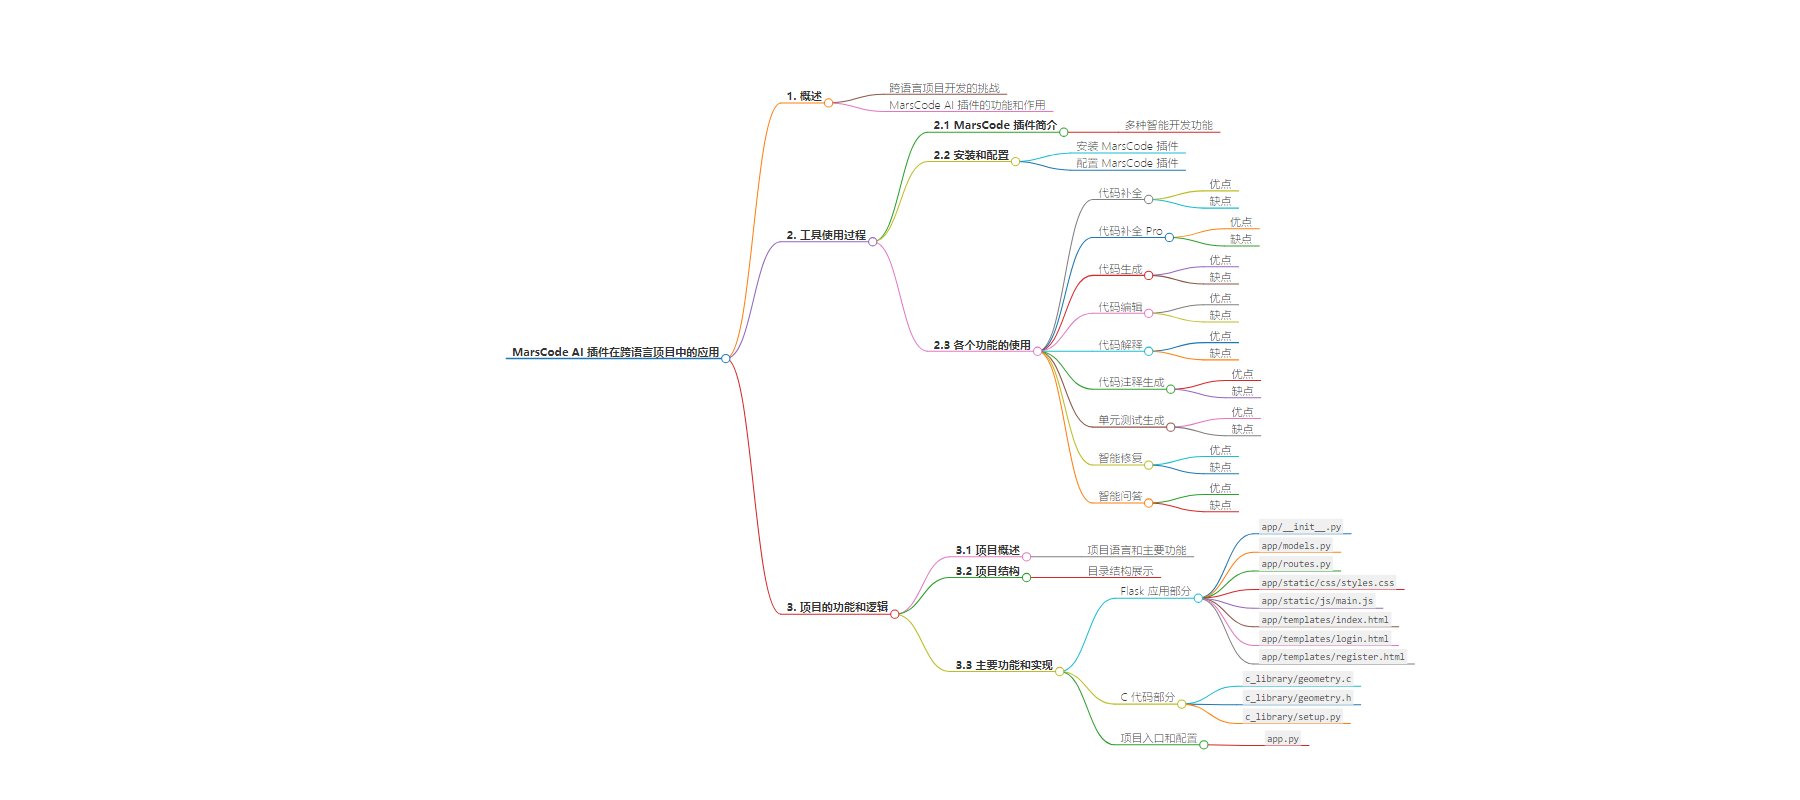
文章地址:https://juejin.cn/post/7389643487912198180
文章来源:juejin.cn
作者:Rjdeng
发布时间:2024/7/10 1:00
语言:中文
总字数:6786字
预计阅读时间:28分钟
评分:87分
标签:AI 编辑助手,VSCode 插件,跨语言开发,MarsCode AI,智能编辑助手
以下为原文内容
本内容来源于用户推荐转载,旨在分享知识与观点,如有侵权请联系删除 联系邮箱 media@ilingban.com
我正在参加「豆包MarsCode初体验」征文活动,点击查看活动介绍:https://juejin.cn/post/7384997062416252939

1. 概述
在AI时代软件开发中,跨语言项目开发是一项复杂且具有挑战性的任务。特别是当涉及到多语言组合开发时,如何高效地进行开发、调试和维护成为了关键。 MarsCode AI插件是一款强大的VSCode扩展,利用AI技术提供智能代码补全、代码生成、代码编辑、代码解释等多种功能,大大提升了开发效率。本篇文章将详细介绍如何使用MarsCode AI插件在VSCode中开发一个跨语言项目,帮助开发者快速上手并充分利用这款工具的强大功能。
2. 工具使用过程
2.1 MarsCode插件简介
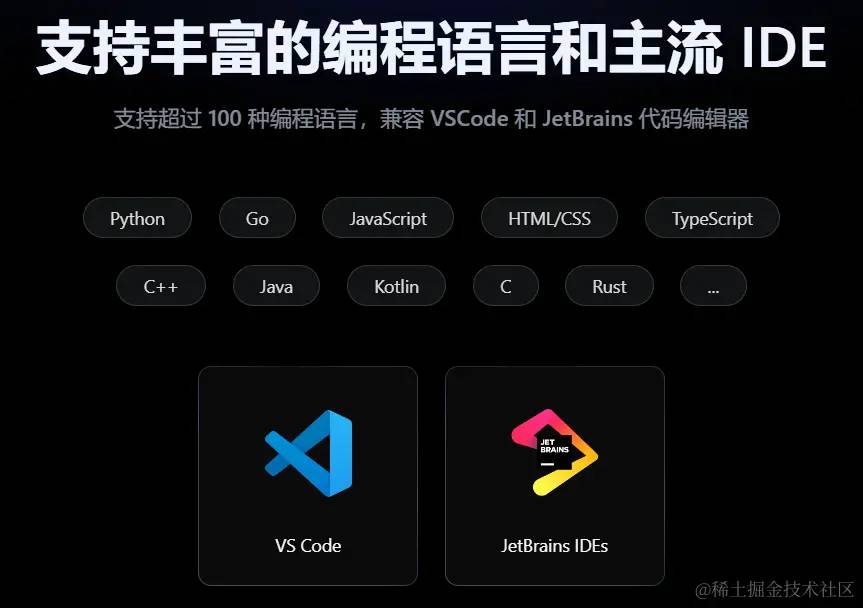
MarsCode是一款集成了AI技术的VSCode插件,提供了多种智能开发功能,如代码补全、代码生成、代码编辑、代码解释、代码注释生成、单元测试生成、智能修复和智能问答等。这些功能可以显著提升开发效率,减少代码错误,并加快项目的开发进度。
2.2 安装和配置
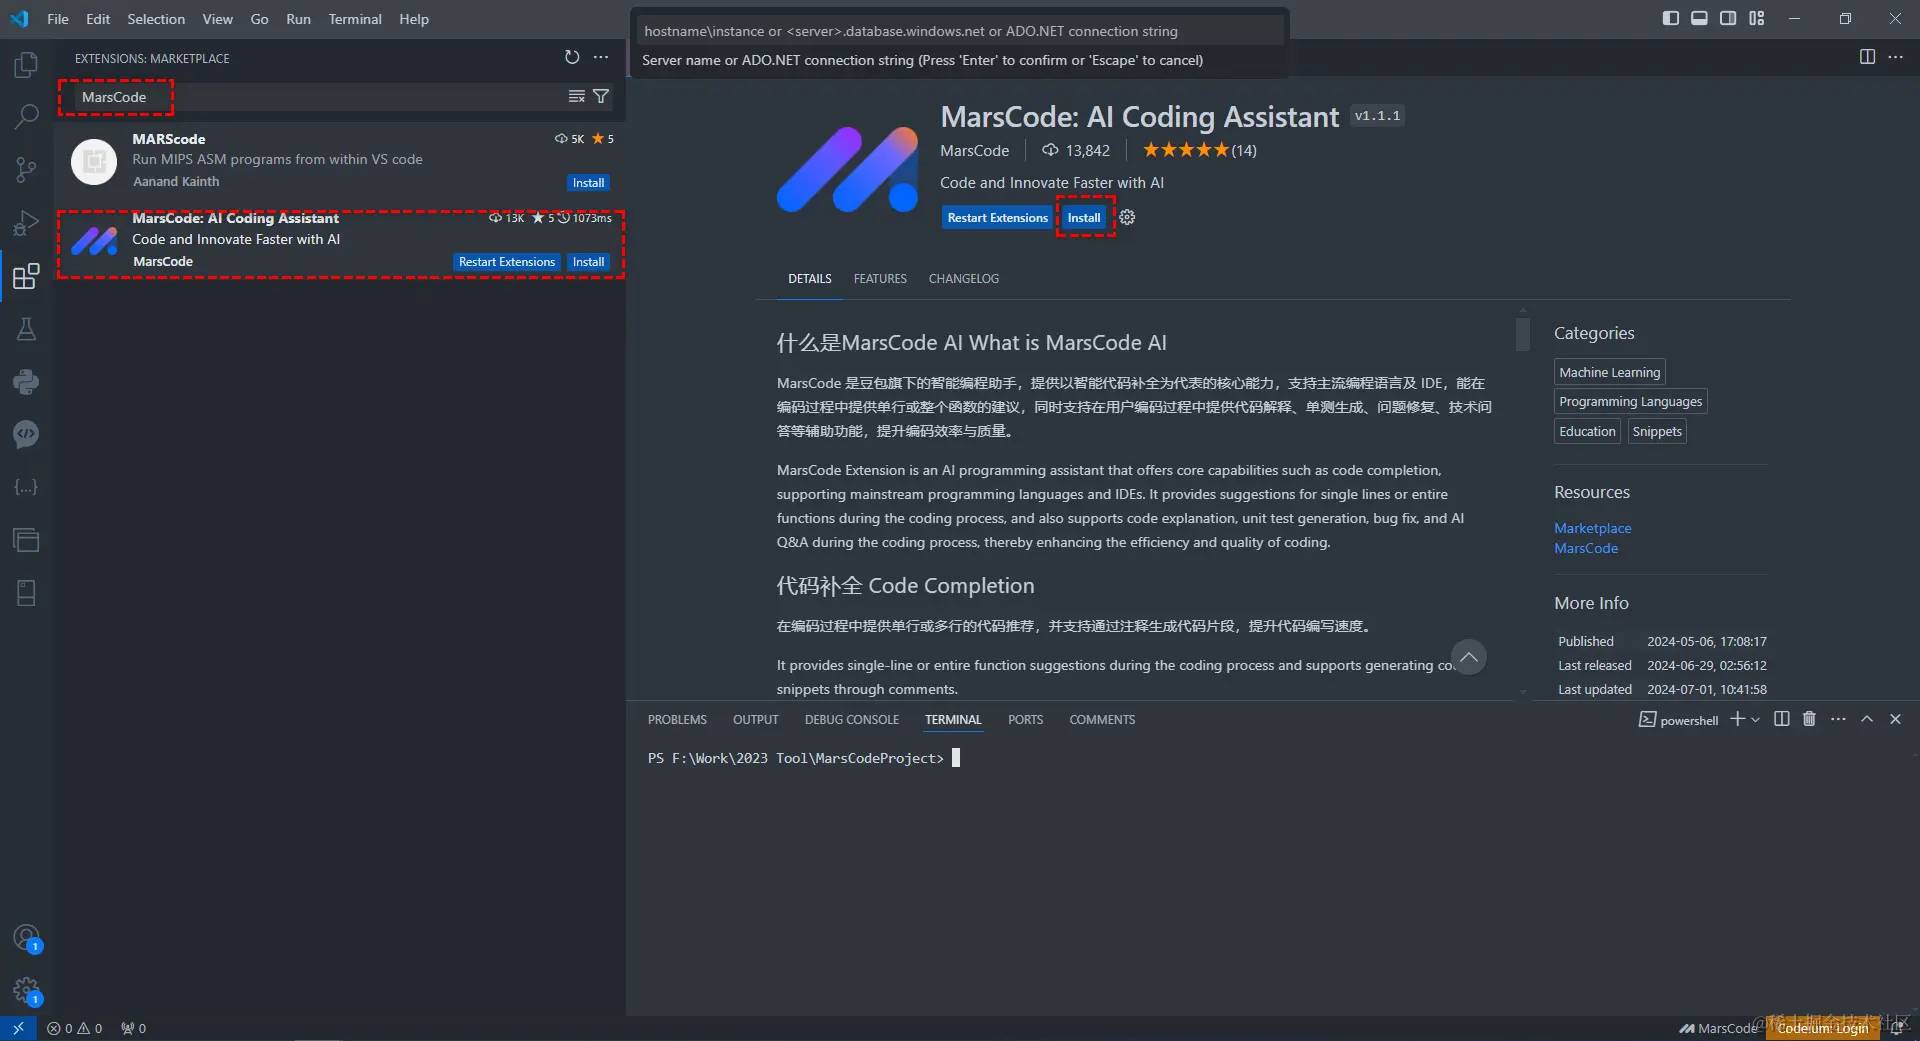
2.2.1 安装MarsCode插件
- 打开VSCode。
- 点击左侧活动栏的扩展图标(四个方块图标)。
- 在搜索栏中输入
MarsCode。 - 找到并安装
MarsCode插件。 - 重启VSCode。
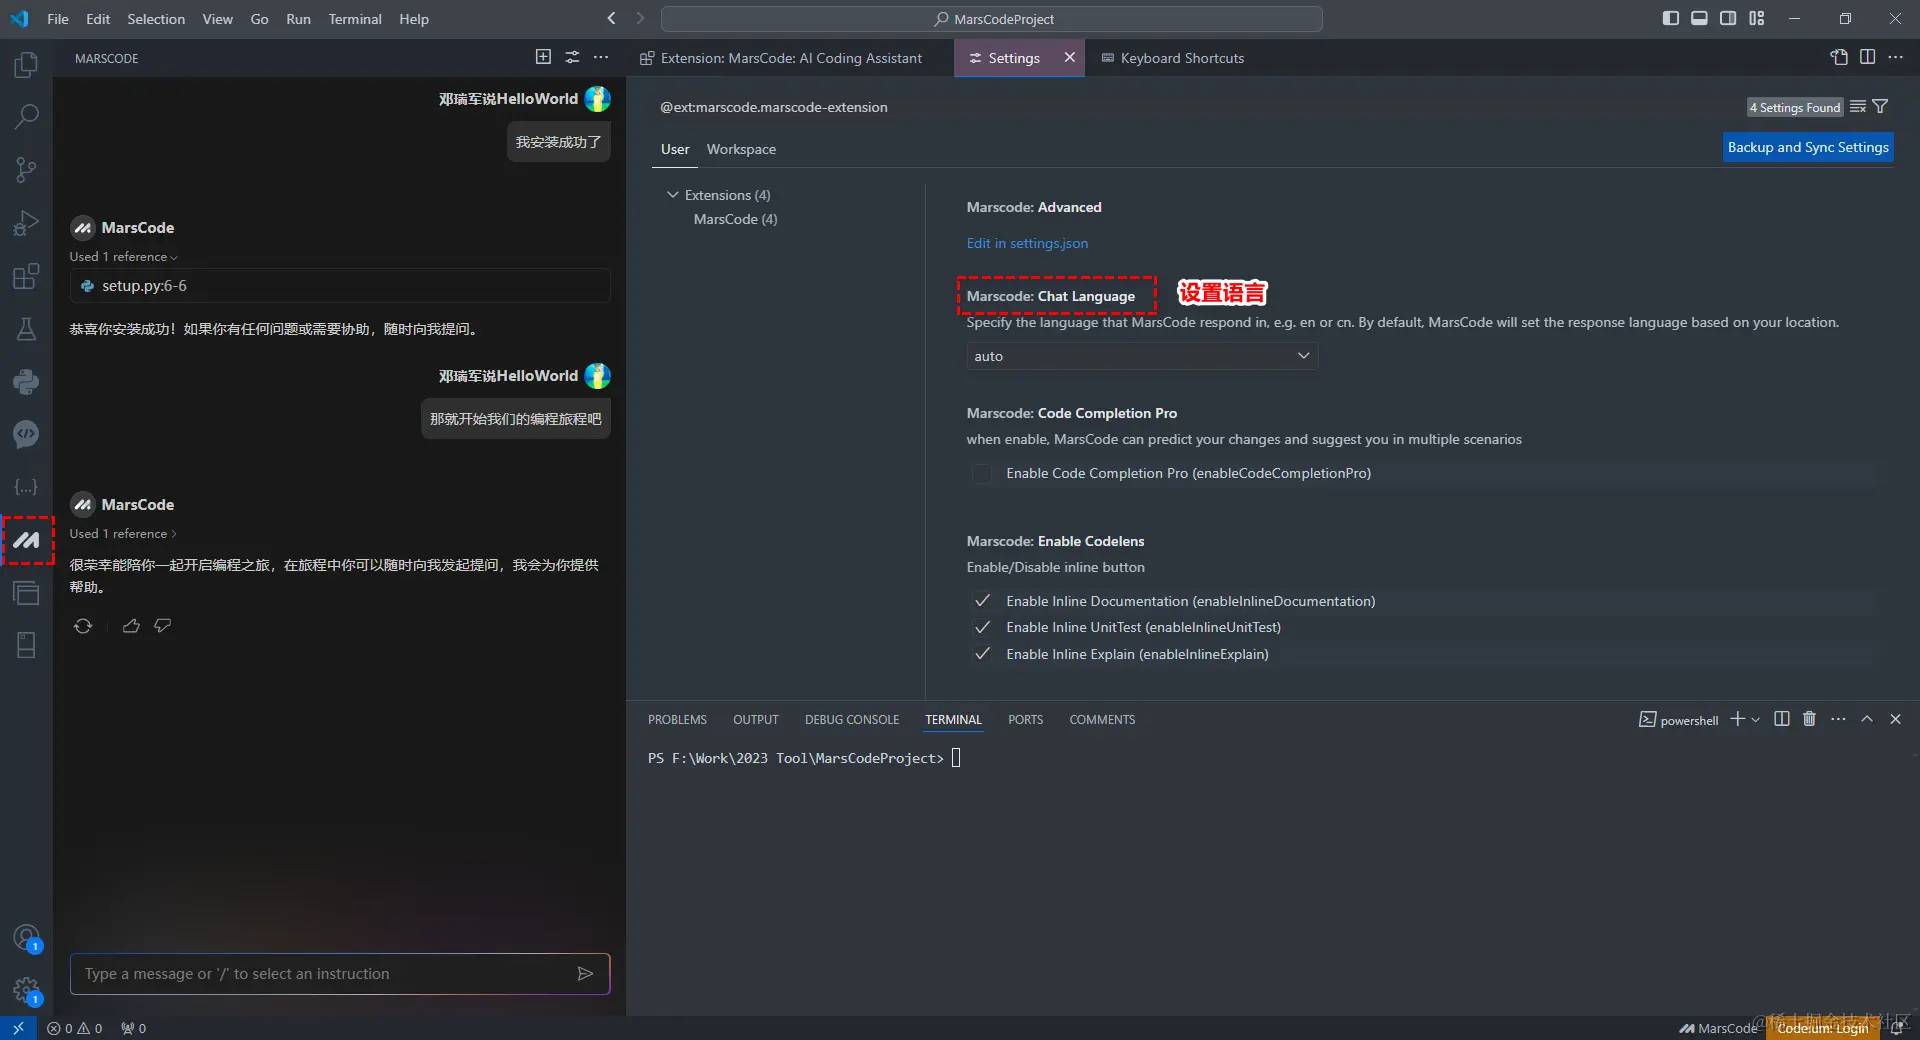
2.2.2 配置MarsCode插件
- 安装完成后,点击VSCode右下角的齿轮图标(设置)。
- 选择
Settings。 - 在搜索栏中输入
MarsCode,进入插件的配置页面。 - 根据需要调整MarsCode的配置选项,例如启用或禁用某些功能,设置API密钥等。
2.3 各个功能的使用
2.3.1 代码补全
代码补全功能可以帮助开发者快速编写代码,通过智能分析上下文提供代码补全建议。
使用方法:
- 在编辑器中开始编写代码。
- 当光标停留在某个位置时,MarsCode会自动弹出代码补全建议。
- 选择合适的建议并按下Tab键进行补全。

优点:
缺点:
2.3.2 代码补全 Pro【操作提示,No suggestion from Model,不知道是不是版本的问题】
代码补全 Pro功能基于上一次的编辑内容及代码情况,预测下一个改动点并提供推荐代码。
使用方法:
- 在编辑器中进行代码编辑。
- MarsCode会自动分析编辑历史并提供预测性代码补全建议。
- 选择合适的建议并按下Tab键进行补全。
优点:
缺点:
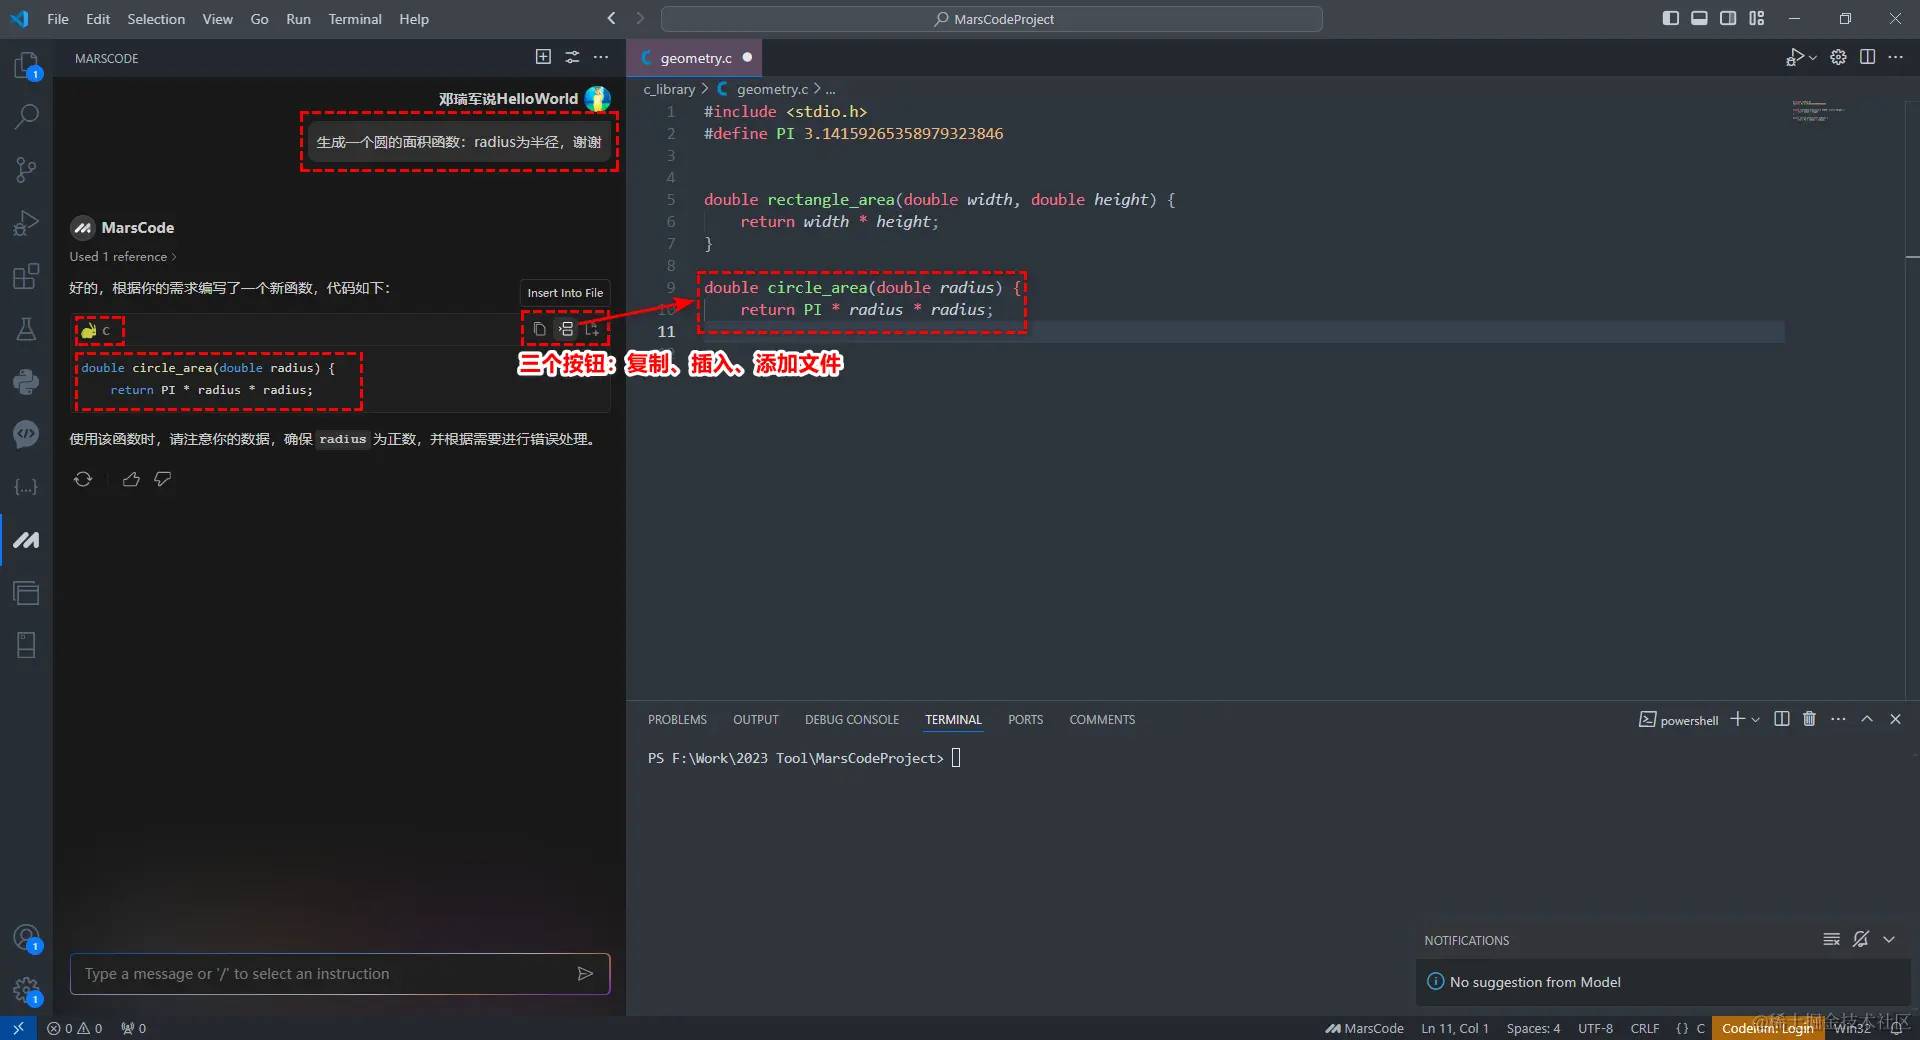
2.3.3 代码生成
代码生成功能可以理解自然语言并生成所需代码。
使用方法:
- 在注释中输入自然语言描述,说明需要生成的代码功能。
- MarsCode会根据描述生成相应的代码片段。
优点:
缺点:
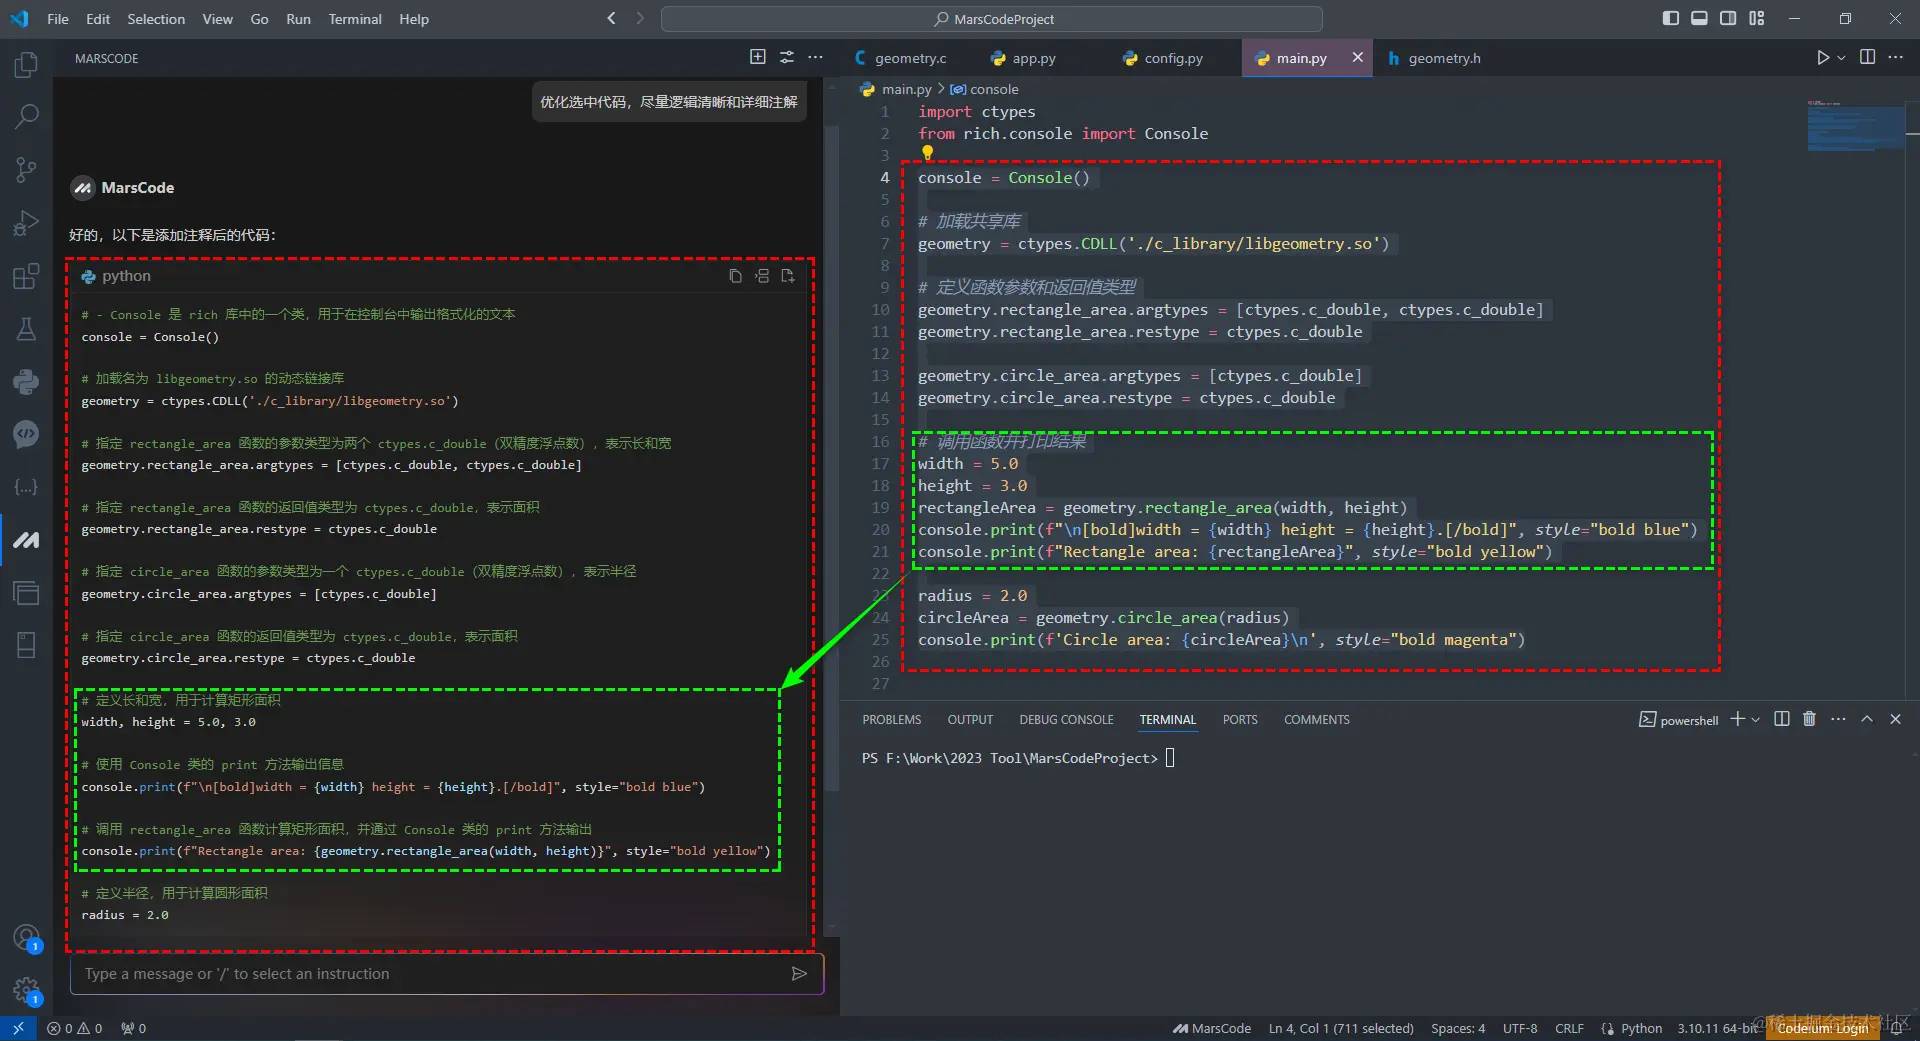
2.3.4 代码编辑
代码编辑功能可以编辑指定代码,包括重构、优化、修改部分逻辑等。
使用方法:
- 选中需要编辑的代码片段。
- 右键菜单中选择
MarsCode: AI Chat也可以直接在对话框里提问题。 - 根据提示进行相应的编辑操作。
优点:
缺点:
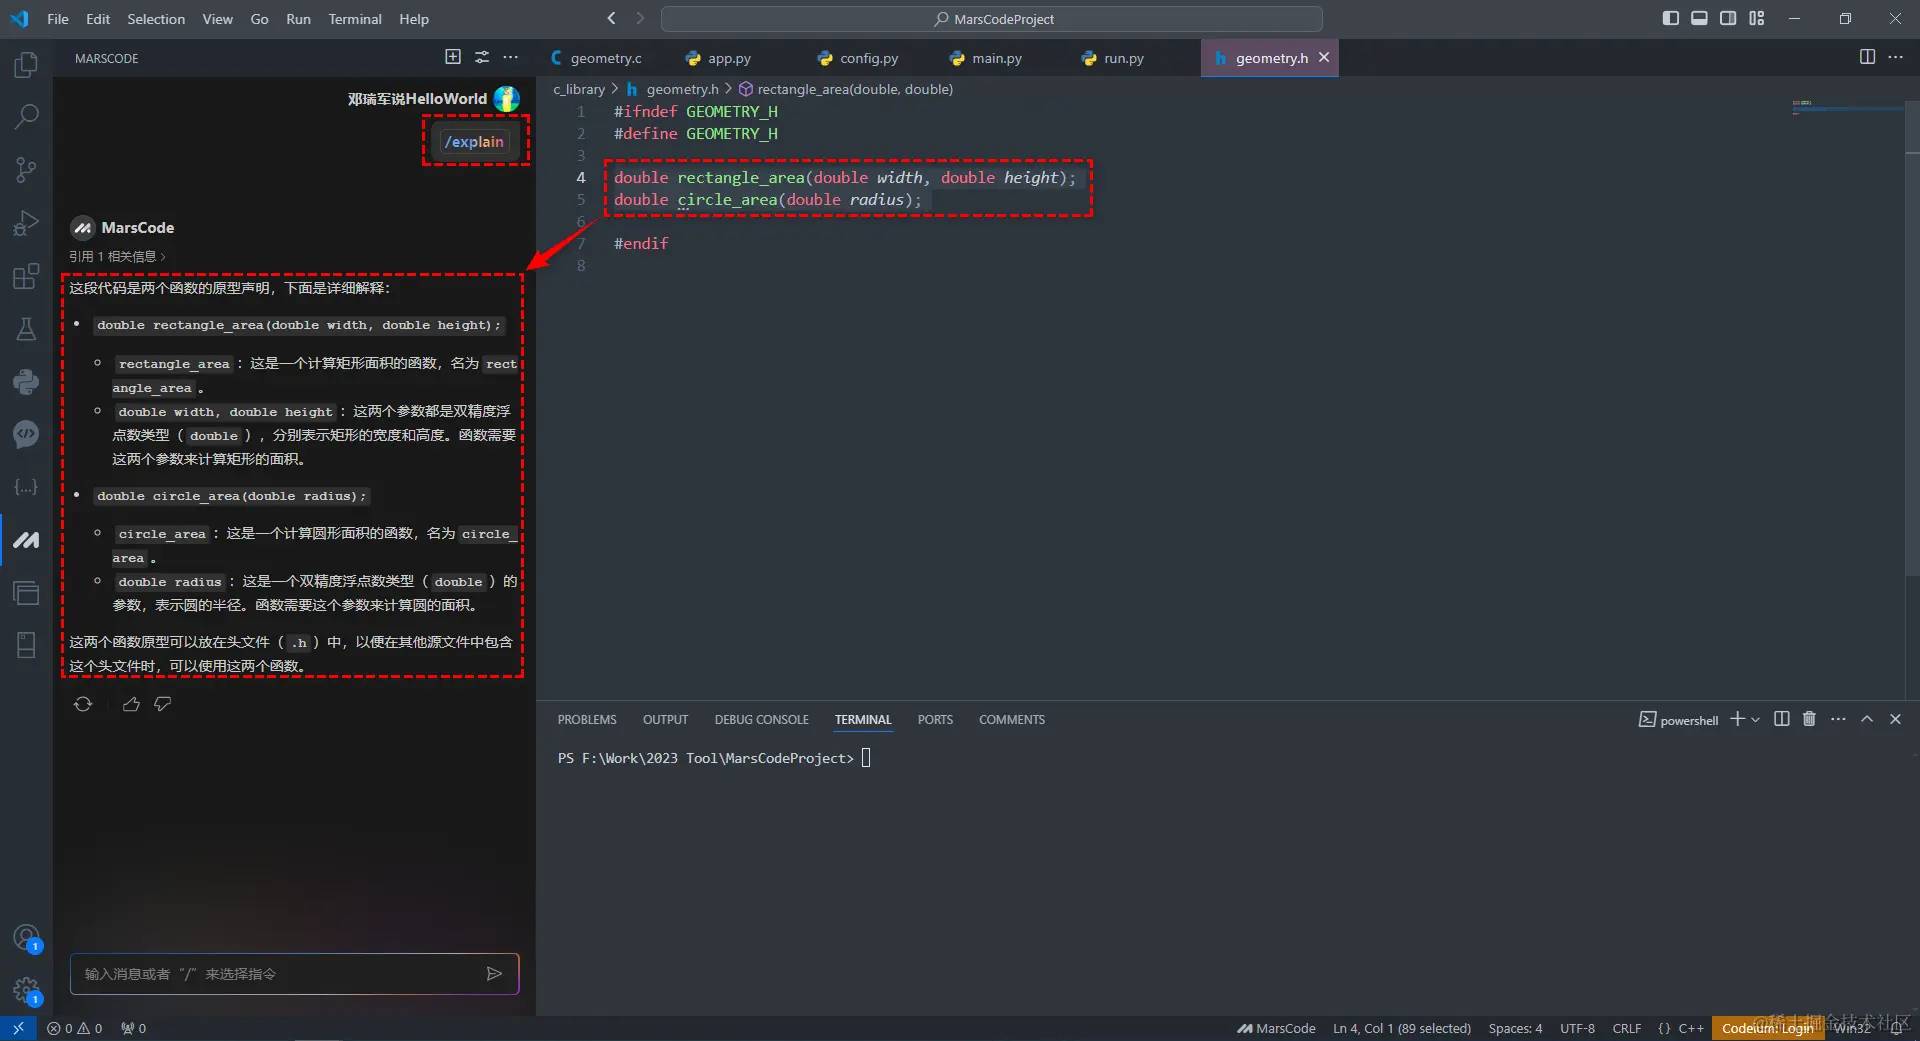
2.3.5 代码解释
代码解释功能可以精准解释项目代码,帮助开发者快速上手开发。
使用方法:
- 选择需要解释的代码片段。
- 右键菜单中选择
MarsCode: Explain Code。 - MarsCode会生成相应的解释说明。
优点:
缺点:
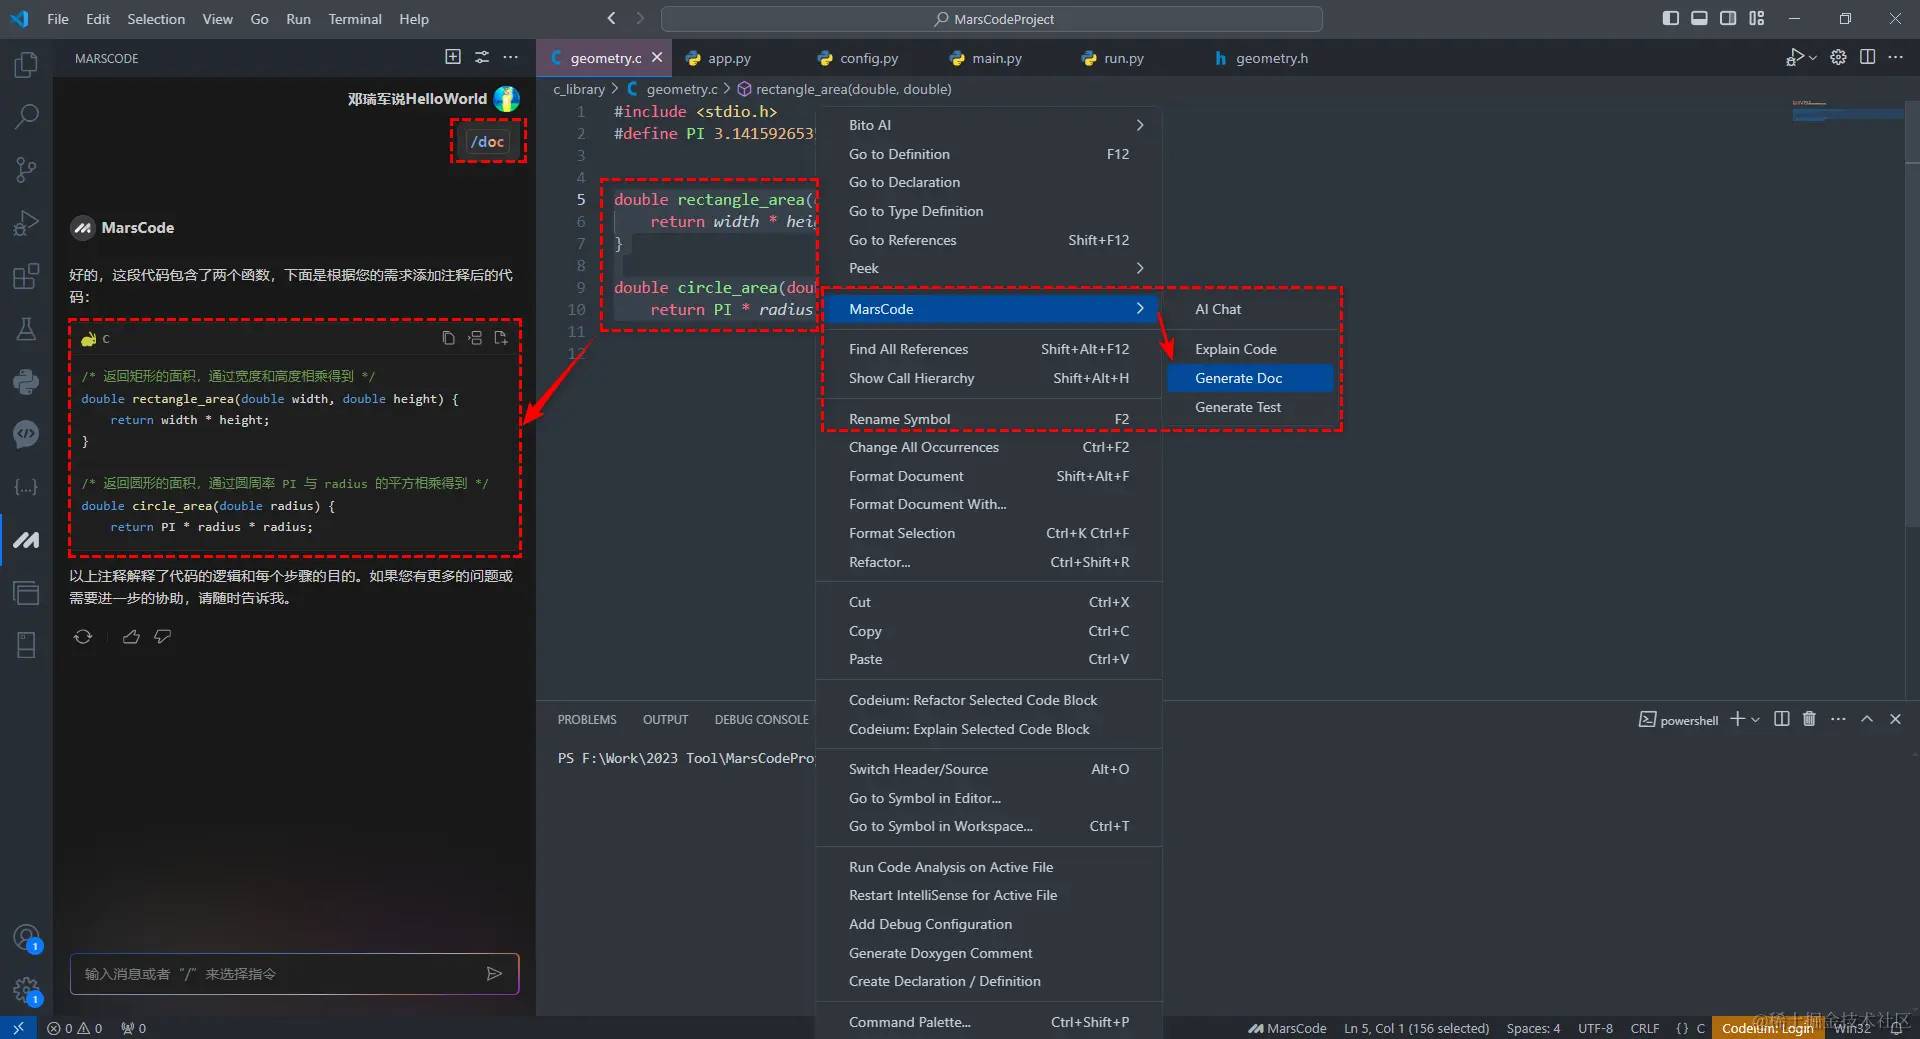
2.3.6 代码注释生成
代码注释生成功能可以生成函数级注释或更详细的行间注释。
使用方法:
- 选择需要注释的代码片段。
- 右键菜单中选择
MarsCode: Generate Doc。 - MarsCode会生成相应的注释。
优点:
缺点:
2.3.7 单元测试生成
单元测试生成功能可以为指定代码片段生成单元测试。
使用方法:
- 选择需要生成单元测试的代码片段。
- 右键菜单中选择
MarsCode: Generate Test。 - MarsCode会生成相应的单元测试代码。
优点:
- 提高代码的测试覆盖率。
- 减少手动编写单元测试的工作量。
缺点:
2.3.8 智能修复
智能修复功能可以发现代码中的问题并修复。
使用方法:
- 选择需要修复的代码片段。
- 在对话框中输入自然语言描述(例如:修复选中的代码片段)或 /fix 指令
- MarsCode会自动修复代码中的问题。
优点:
缺点:
2.3.9 智能问答
智能问答功能针对研发领域定向优化问答质量,提供更精准的问答结果。
使用方法:
- 在编辑器中输入问题描述。
- 在输入框中输入你的问题,然后点击 发送 按钮或敲击回车键。
- MarsCode会提供相应的答案和建议。
优点:
- 提供快速的技术支持。
- 帮助解决开发过程中的疑难问题。
缺点:
3. 项目的功能和逻辑
3.1 项目概述
本项目是一个使用Python和C语言开发的跨语言Web应用,主要实现用户注册和登录功能,并通过调用C语言编写的共享库(.so文件)来扩展功能。项目使用Flask框架开发Web应用,并通过SQLAlchemy管理数据库。
3.2 项目结构
以下是项目的目录结构:
project_directory/├── app/│ ├── __init__.py│ ├── models.py│ ├── routes.py│ ├── static/│ │ ├── css/│ │ │ └── styles.css│ │ └── js/│ │ └── main.js│ └── templates/│ ├── index.html│ ├── login.html│ └── register.html├── c_library/│ ├── geometry.c│ ├── geometry.h│ ├── libgeometry.so│ └── setup.py├── app.py├── config.py├── run.py└── main.py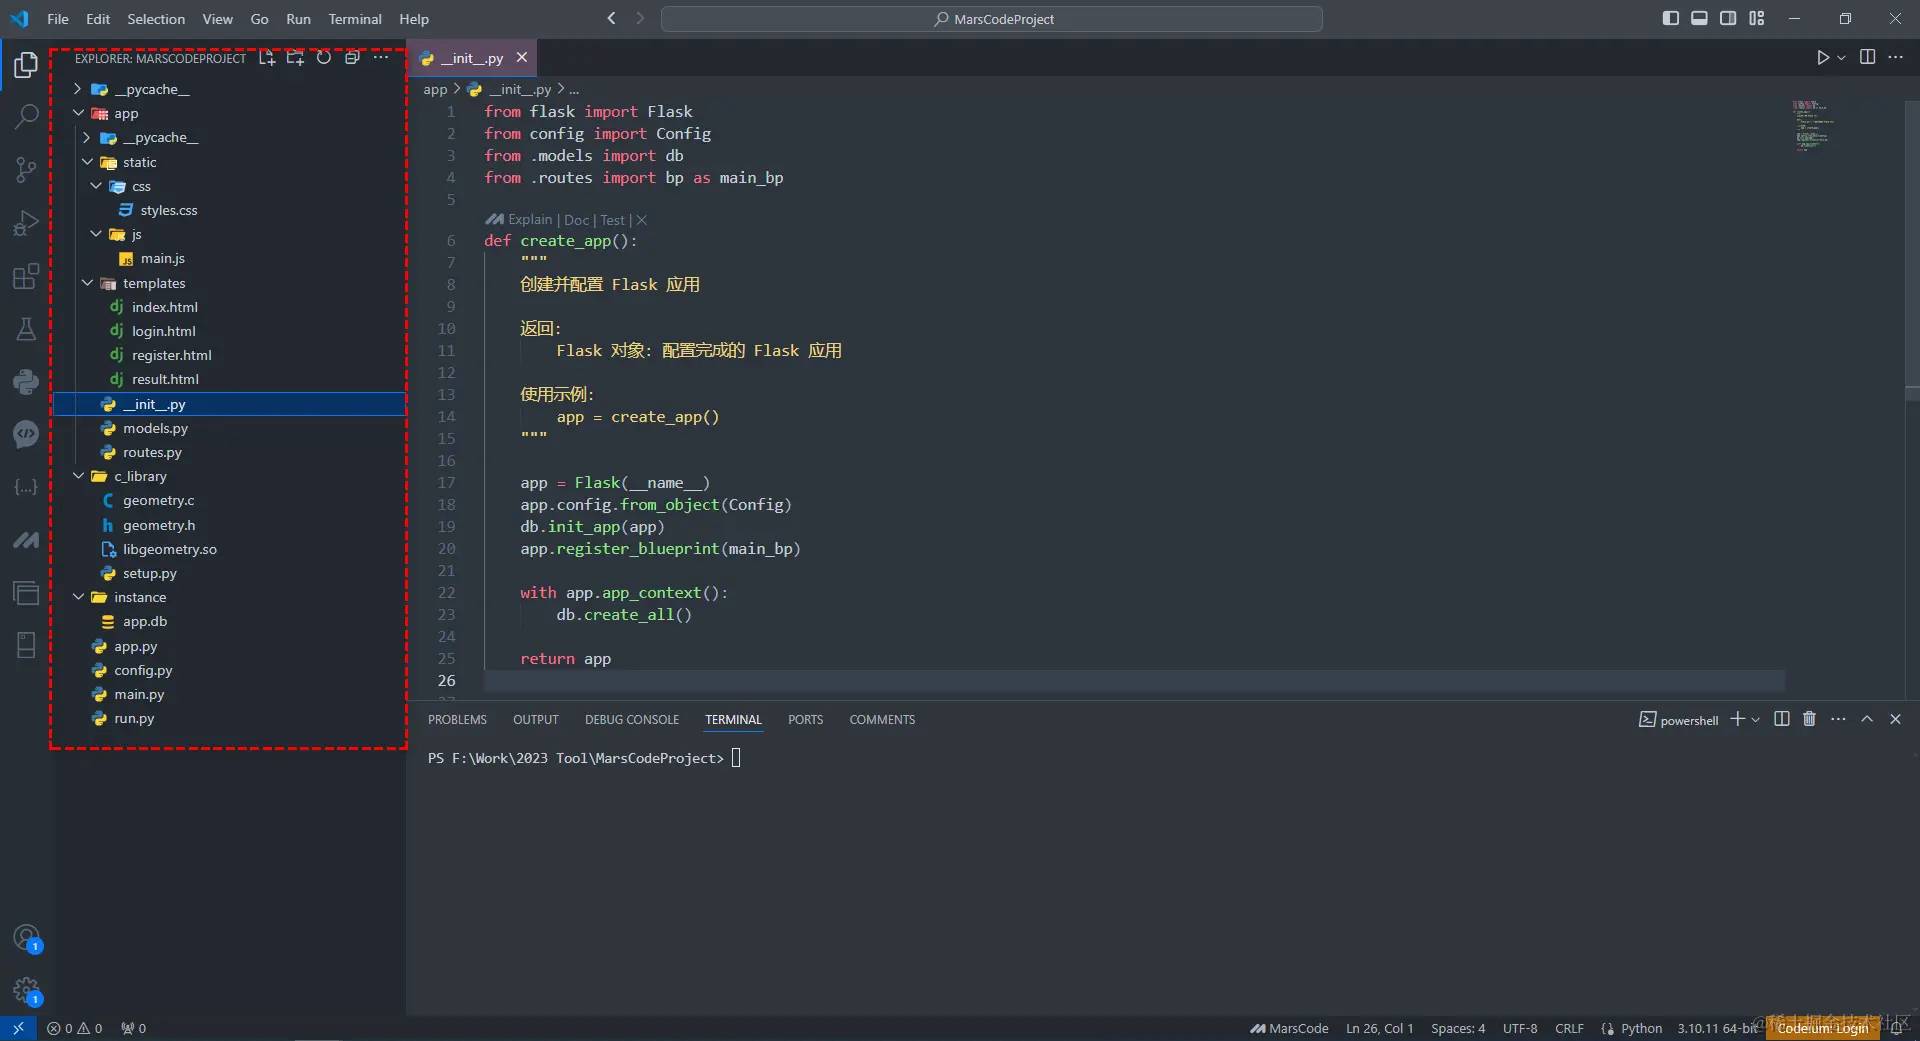
3.3 主要功能和实现
3.3.1 Flask应用部分
app/__init__.py
这个文件用于创建Flask应用实例,并初始化各种扩展(如SQLAlchemy和Blueprint)。
from flask import Flaskfrom config import Configfrom .models import dbfrom .routes import bp as main_bpdef create_app(): """ 创建并配置 Flask 应用 返回: Flask 对象: 配置完成的 Flask 应用 使用示例: app = create_app() """ app = Flask(__name__) app.config.from_object(Config) db.init_app(app) app.register_blueprint(main_bp) with app.app_context(): db.create_all() return appapp/models.py
这个文件定义了数据库模型(例如User表)。
from flask_sqlalchemy import SQLAlchemyfrom werkzeug.security import generate_password_hash, check_password_hashdb = SQLAlchemy()class User(db.Model): id = db.Column(db.Integer, primary_key=True) username = db.Column(db.String(80), unique=True, nullable=False) email = db.Column(db.String(120), unique=True, nullable=False) password_hash = db.Column(db.String(128), nullable=False) def set_password(self, password): """ 此方法用于设置用户的密码 参数: password (str): 用户提供的密码 返回: None 使用示例: user = User() user.set_password("new_password") """ self.password_hash = generate_password_hash(password) def check_password(self, password): """ 这个方法用于检查用户提供的密码是否与当前用户对象中的哈希密码匹配 参数: password (str): 要检查的密码 返回: bool: 如果密码匹配则返回 True,否则返回 False 使用示例: user = User() user.set_password("123456") print(user.check_password("123456")) """ return check_password_hash(self.password_hash, password)app/routes.py
这个文件定义了应用的路由和视图函数,包括用户注册和登录逻辑。
from flask import Blueprint, render_template, redirect, url_for, request, flashfrom .models import db, Userbp = Blueprint('main', __name__)@bp.route('/')def index(): return render_template('index.html')@bp.route('/register', methods=['GET', 'POST'])def register(): if request.method == 'POST': username = request.form['username'] email = request.form['email'] password = request.form['password'] user = User(username=username, email=email) user.set_password(password) db.session.add(user) db.session.commit() flash('Registration successful!') return redirect(url_for('main.login')) return render_template('register.html')@bp.route('/login', methods=['GET', 'POST'])def login(): """ 登录视图函数 处理用户的登录请求,验证用户名和密码是否正确 返回: 根据登录结果,重定向到不同的页面 """ if request.method == 'POST': username = request.form['username'] password = request.form['password'] user = User.query.filter_by(username=username).first() if user is None or not user.check_password(password): flash('Invalid username or password') return redirect(url_for('main.login')) flash('Login successful!') return redirect(url_for('main.index')) return render_template('login.html')app/static/css/styles.css
这个文件定义了应用的样式。
body { font-family: Arial, sans-serif; background-color: #f5f5f5; margin: 0; padding: 0; display: flex; justify-content: center; align-items: center; height: 100vh;}#app { background-color: white; padding: 2em; border-radius: 8px; box-shadow: 0 0 10px rgba(0, 0, 0, 0.1);}h1 { margin-bottom: 1em;}form { display: flex; flex-direction: column;}label { margin-bottom: 0.5em;}input { margin-bottom: 1em; padding: 0.5em; border: 1px solid #ccc; border-radius: 4px;}button { padding: 0.5em; border: none; border-radius: 4px; background-color: #007bff; color: white; cursor: pointer;}button:hover { background-color: #0056b3;}p { margin-top: 1em;}app/static/js/main.js
这个文件包含了应用的JavaScript逻辑。
document.addEventListener('DOMContentLoaded', function() { console.log('JavaScript is working!');});app/templates/index.html
这个文件定义了主页的HTML结构。
<!DOCTYPE html><html lang="en"><head> <meta charset="UTF-8"> <meta name="viewport" content="width=device-width, initial-scale=1.0"> <title>Geometry Calculator</title> <link rel="stylesheet" href="{{ url_for('static', filename='css/styles.css') }}"></head><body> <h1>Geometry Calculator</h1> <p>Circle Area: {{ circle_area }}</p> <p>Rectangle Area: {{ rectangle_area }}</p></body></html>app/templates/login.html
这个文件定义了登录页的HTML结构。
<!DOCTYPE html><html lang="en"><head> <meta charset="UTF-8"> <title>Login</title> <link rel="stylesheet" href="{{ url_for('static', filename='css/styles.css') }}"></head><body> <div id="app"> <h1>Login</h1> <form action="{{ url_for('main.login') }}" method="post"> <label for="username">Username:</label> <input type="text" id="username" name="username" required> <label for="password">Password:</label> <input type="password" id="password" name="password" required> <button type="submit">Login</button> </form> <p>Don't have an account? <a href="{{ url_for('main.register') }}">Register here</a></p> </div></body></html>app/templates/register.html
这个文件定义了注册页的HTML结构。
<!DOCTYPE html><html lang="en"><head> <meta charset="UTF-8"> <title>Register</title> <link rel="stylesheet" href="{{ url_for('static', filename='css/styles.css') }}"></head><body> <div id="app"> <h1>Register</h1> <form action="{{ url_for('main.register') }}" method="post"> <label for="username">Username:</label> <input type="text" id="username" name="username" required> <label for="email">Email:</label> <input type="email" id="email" name="email" required> <label for="password">Password:</label> <input type="password" id="password" name="password" required> <button type="submit">Register</button> </form> <p>Already have an account? <a href="{{ url_for('main.login') }}">Login here</a></p> </div></body></html>3.3.2 C代码部分
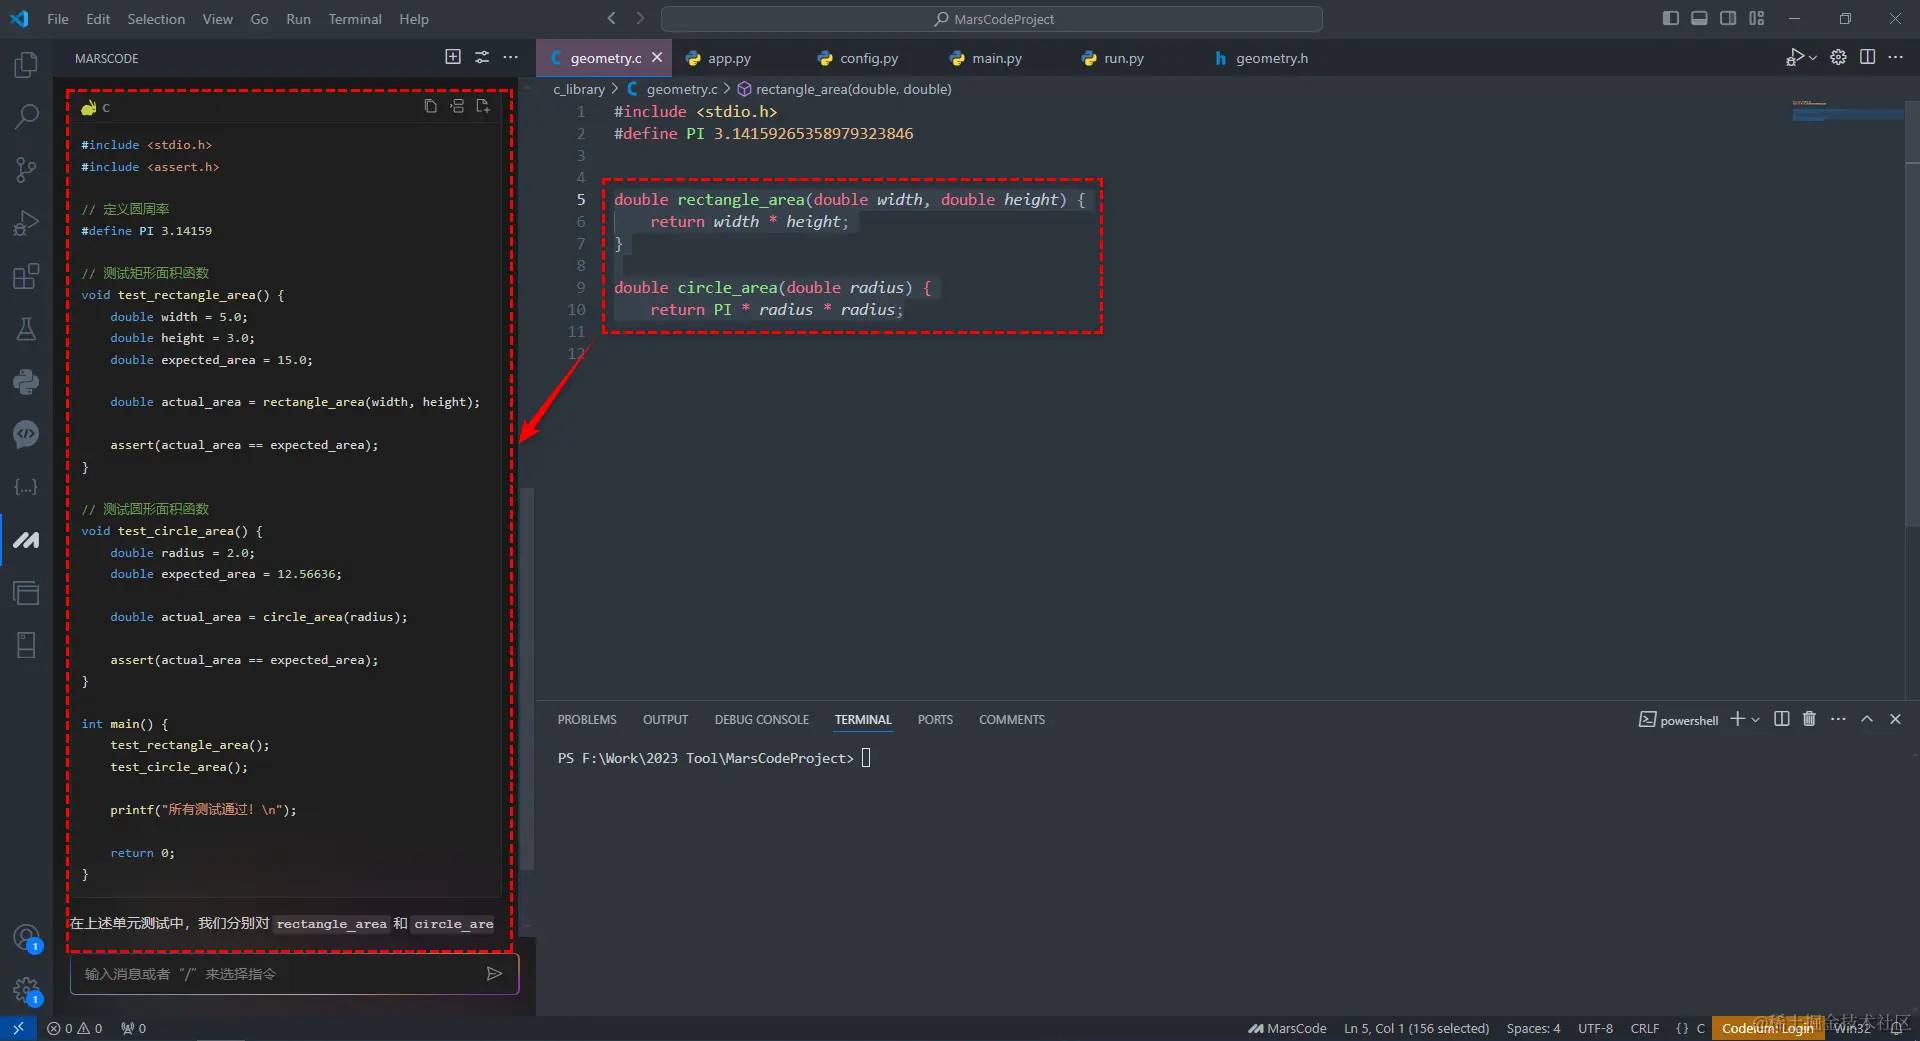
c_library/geometry.c
这个文件包含了C语言的功能实现,例如计算几何图形的面积和周长。
#include <stdio.h>#define PI 3.14159265358979323846double rectangle_area(double width, double height) { return width * height;}double circle_area(double radius) { return PI * radius * radius;}c_library/geometry.h
这个文件是C语言库的头文件,声明了函数接口。
#ifndef GEOMETRY_H#define GEOMETRY_Hdouble rectangle_area(double width, double height);double circle_area(double radius);#endifc_library/setup.py
这个文件用于编译和构建C语言库。
from distutils.core import setupfrom Cython.Build import cythonizesetup( ext_modules = cythonize("geometry.c"))3.3.3 项目入口和配置
app.py
这个文件是Flask应用的入口点。
from flask import Flask, request, render_templateimport ctypesapp = Flask(__name__)geometry = ctypes.CDLL('./libgeometry.so')geometry.rectangle_area.argtypes = [ctypes.c_double, ctypes.c_double]geometry.rectangle_area.restype = ctypes.c_doublegeometry.circle_area.argtypes = [ctypes.c_double]geometry.circle_area.restype = ctypes.c_double@app.route('/')def index(): return render_template('index.html')@app.route('/calculate', methods=['POST'])def calculate(): """ 该函数根据用户的请求来计算特定形状的面积,并渲染结果页面 返回值: 渲染后的结果模板,包含计算得到的面积 使用示例: 用户在表单中选择矩形,输入宽度和高度,提交后服务端计算矩形面积, 并将面积值传递给'result.html'模板进行展示 """ shape = request.form['shape'] if shape == 'ectangle': width = float(request.form['width']) height = float(request.form['height']) area = geometry.rectangle_area(width, height) elif shape == 'circle': radius = float(request.form['radius']) area = geometry.circle_area(radius) else: area = None return render_template('result.html', area=area)if __name__ == '__main__': app.run(debug=True)config.py
这个文件定义了Flask应用的配置。
import osclass Config: SECRET_KEY = os.environ.get('SECRET_KEY') or 'you-will-never-guess' SQLALCHEMY_DATABASE_URI = os.environ.get('DATABASE_URL') or 'sqlite:///app.db' SQLALCHEMY_TRACK_MODIFICATIONS = Falserun.py
这个文件用于运行Flask应用。
import sysimport osimport ctypesfrom flask import Flask, render_templatec_library_path = os.path.abspath(os.path.join(os.path.dirname(__file__), 'c_library'))geometry_so_path = os.path.join(c_library_path, 'geometry.so')print(f"geometry.so path: {geometry_so_path}")try: geometry = ctypes.CDLL(geometry_so_path) print("Successfully loaded geometry.so")except OSError as e: print(f"Error loading geometry.so: {e}")geometry.circle_area.argtypes = [ctypes.c_double]geometry.circle_area.restype = ctypes.c_doublegeometry.rectangle_area.argtypes = [ctypes.c_double, ctypes.c_double]geometry.rectangle_area.restype = ctypes.c_doubleapp = Flask(__name__, template_folder='app/templates')@app.route('/')def index(): try: circle_area = geometry.circle_area(5.0) rectangle_area = geometry.rectangle_area(4.0, 3.0) print(f"Circle area: {circle_area}, Rectangle area: {rectangle_area}") except Exception as e: print(f"Error calling geometry functions: {e}") circle_area = None rectangle_area = None return render_template('index.html', circle_area=circle_area, rectangle_area=rectangle_area)if __name__ == '__main__': app.run(debug=True)4. 代码库与跨语言集成的实现细节
为了更好地展示MarsCode插件在VSCode中开发跨语言项目的使用方法,下面将详细介绍如何实现代码库和跨语言集成的细节。
Python与C语言的集成
在本项目中,我们将使用Python调用C语言编写的库,以实现计算几何图形面积的功能。具体步骤如下:
编写C语言库
首先,我们编写一个简单的C语言库来计算几何图形的面积。
c_library/geometry.c
#include <stdio.h>#define PI 3.14159265358979323846double rectangle_area(double width, double height) { return width * height;}double circle_area(double radius) { return PI * radius * radius;c_library/geometry.h
#ifndef GEOMETRY_H#define GEOMETRY_Hdouble rectangle_area(double width, double height);double circle_area(double radius);#endif编译C语言库
接下来,我们需要编译这个C语言库。可以使用以下命令生成共享库:
gcc -shared -o libgeometry.so -fPIC geometry.c或者使用Python的setuptools来编译:
c_library/setup.py
from distutils.core import setupfrom Cython.Build import cythonizesetup( ext_modules = cythonize("geometry.c"))运行以下命令来编译:
python setup.py build_ext --inplace使用Python调用C语言库
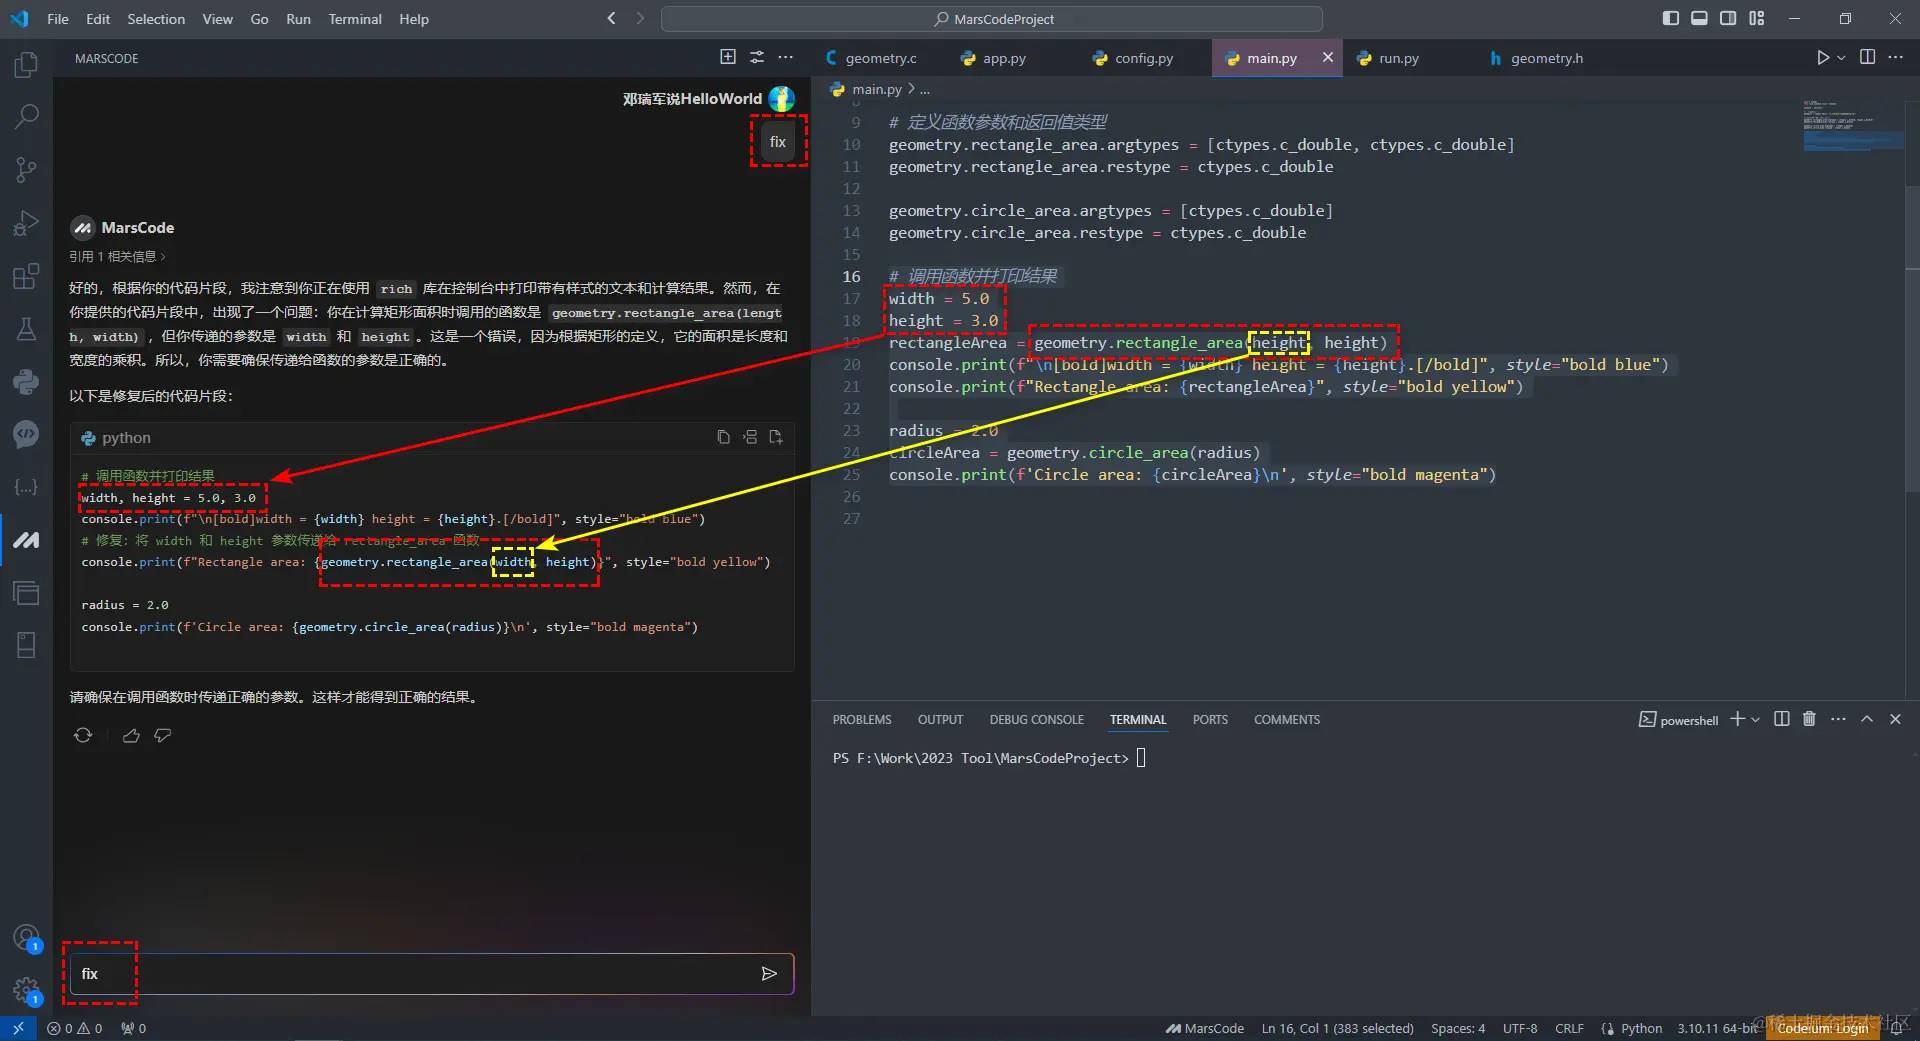
编译完成后,我们可以在Python中加载并调用这个共享库。
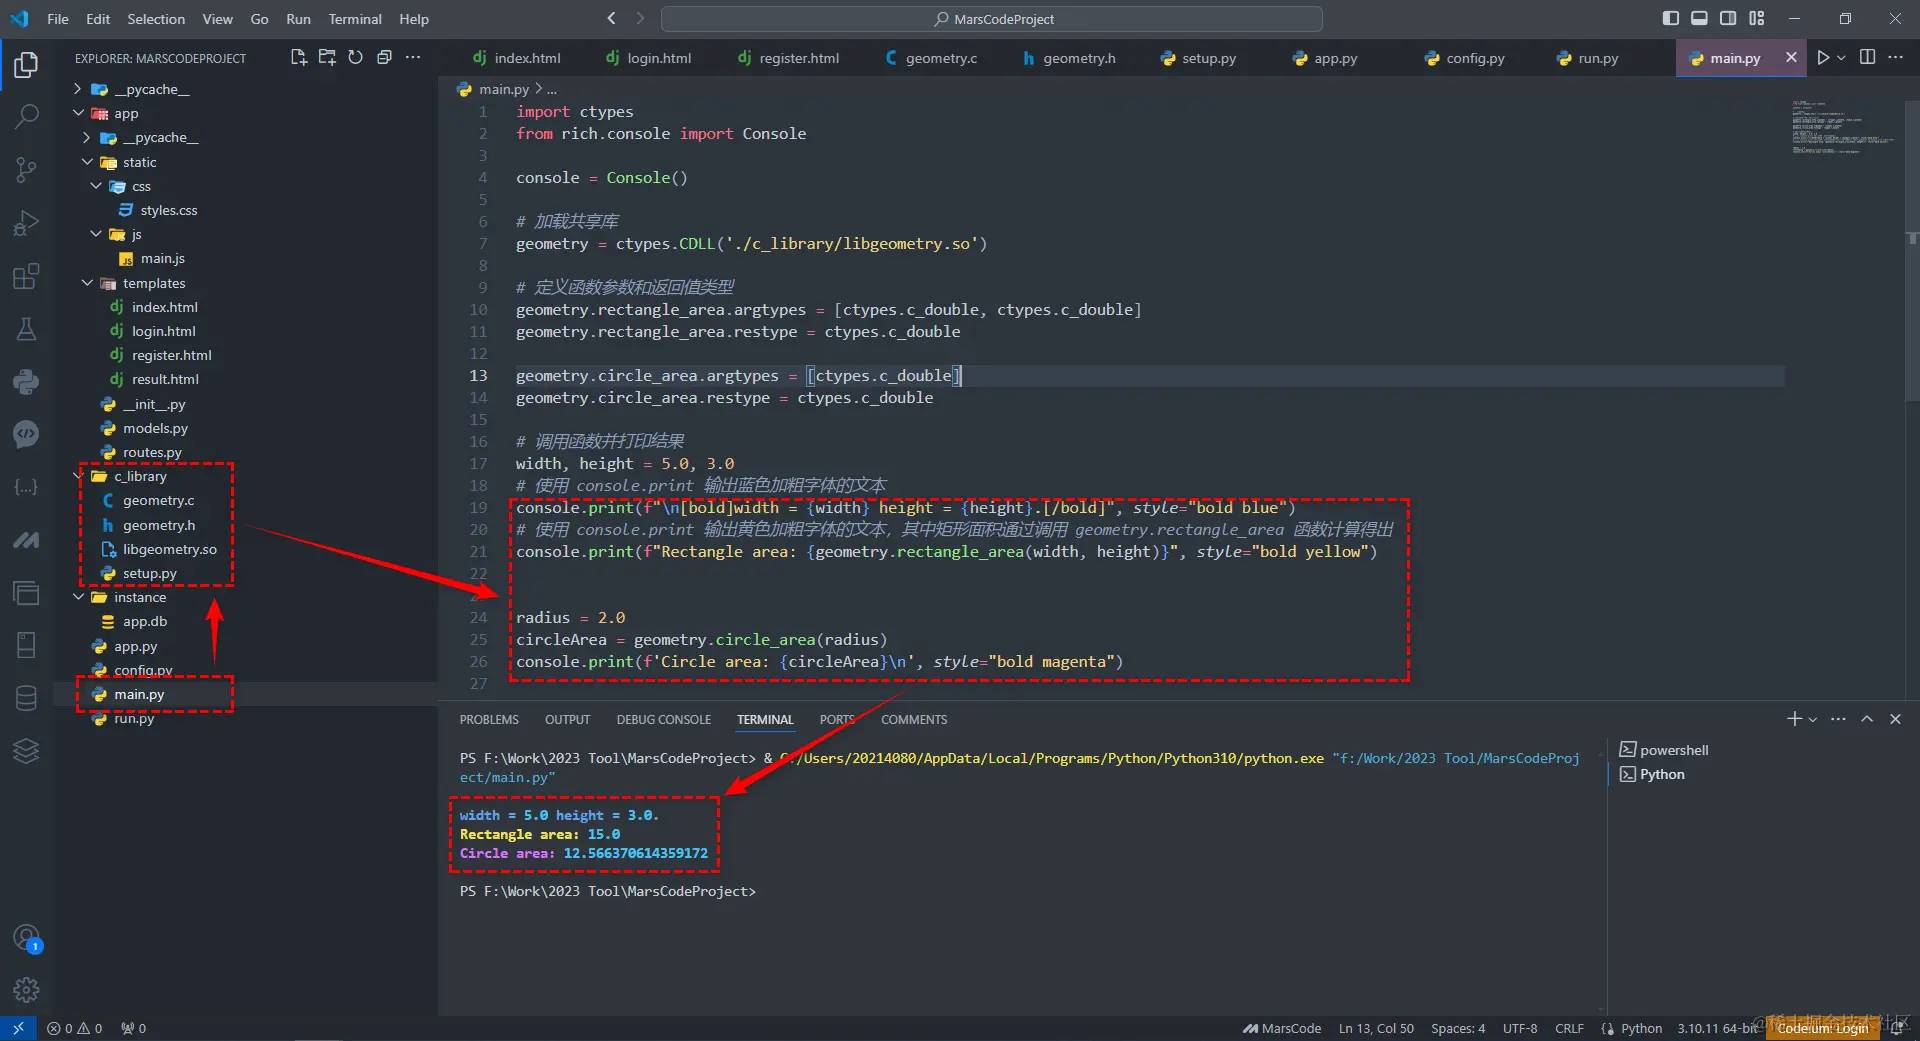
main.py
import ctypesfrom rich.console import Consoleconsole = Console()geometry = ctypes.CDLL('./c_library/libgeometry.so')geometry.rectangle_area.argtypes = [ctypes.c_double, ctypes.c_double]geometry.rectangle_area.restype = ctypes.c_doublegeometry.circle_area.argtypes = [ctypes.c_double]geometry.circle_area.restype = ctypes.c_doublewidth, height = 5.0, 3.0console.print(f"\n[bold]width = {width} height = {height}.[/bold]", style="bold blue")console.print(f"Rectangle area: {geometry.rectangle_area(width, height)}", style="bold yellow")radius = 2.0circleArea = geometry.circle_area(radius)console.print(f'Circle area: {circleArea}\n', style="bold magenta")通过以上步骤,我们成功实现了Python与C语言的跨语言集成,运行结果如下:
5. 项目技术说明
在本项目中,我们创建了一个简单的Flask web应用,并通过C语言库实现了一些几何图形的计算功能。
5.1 项目技术实现
-
Flask框架: 使用Flask框架搭建Web应用,包括路由、模板渲染、静态文件管理等。
-
C语言计算库: 在
c_library目录下编写了几何计算的C语言库geometry.c,并编译为共享库geometry.so。该库包含两个函数:double circle_area(double radius):计算圆的面积。double rectangle_area(double width, double height):计算矩形的面积。
-
Python与C混合编程: 使用Python的
ctypes库加载C语言共享库,并调用C函数进行计算。 -
模板渲染: 使用Flask模板引擎Jinja2渲染HTML页面,展示计算结果。
5.2 关键代码实现
5.2.1 C语言几何计算库(geometry.c)
#include <stdio.h>#define PI 3.14159265358979323846double rectangle_area(double width, double height) { return width * height;}double circle_area(double radius) { return PI * radius * radius;}编译命令:
gcc -shared -o geometry.so -fPIC geometry.c5.2.2 Flask应用(run.py)
import sysimport osimport ctypesfrom flask import Flask, render_templatec_library_path = os.path.abspath(os.path.join(os.path.dirname(__file__), 'c_library'))geometry_so_path = os.path.join(c_library_path, 'geometry.so')print(f"geometry.so path: {geometry_so_path}")try: geometry = ctypes.CDLL(geometry_so_path) print("Successfully loaded geometry.so")except OSError as e: print(f"Error loading geometry.so: {e}")geometry.circle_area.argtypes = [ctypes.c_double]geometry.circle_area.restype = ctypes.c_doublegeometry.rectangle_area.argtypes = [ctypes.c_double, ctypes.c_double]geometry.rectangle_area.restype = ctypes.c_doubleapp = Flask(__name__, template_folder='app/templates')@app.route('/')def index(): try: circle_area = geometry.circle_area(5.0) rectangle_area = geometry.rectangle_area(4.0, 3.0) print(f"Circle area: {circle_area}, Rectangle area: {rectangle_area}") except Exception as e: print(f"Error calling geometry functions: {e}") circle_area = None rectangle_area = None return render_template('index.html', circle_area=circle_area, rectangle_area=rectangle_area)if __name__ == '__main__': app.run(debug=True)5.2.3 模板文件(index.html)
<!DOCTYPE html><html lang="en"><head> <meta charset="UTF-8"> <meta name="viewport" content="width=device-width, initial-scale=1.0"> <title>Geometry Calculator</title> <link rel="stylesheet" href="{{ url_for('static', filename='css/styles.css') }}"></head><body> <div class="container"> <h1>Geometry Calculator</h1> <div class="result"> <p>Circle Area: <span class="result-value">{{ circle_area }}</span></p> <p>Rectangle Area: <span class="result-value">{{ rectangle_area }}</span></p> </div> </div></body></html>5.2.4 样式文件(styles.css)
body { font-family: Arial, sans-serif;}.container { margin: 20px;}h1 { text-align: left; margin-bottom: 20px;}.result { padding: 10px; border: 1px solid #ccc; border-radius: 5px;}.result p { margin: 10px 0; text-align: left; }.result-value { color: #007BFF; font-weight: bold;}5.3 项目运行及效果展示
项目运行后,在浏览器中访问 http://127.0.0.1:5000,将显示几何形状的计算结果: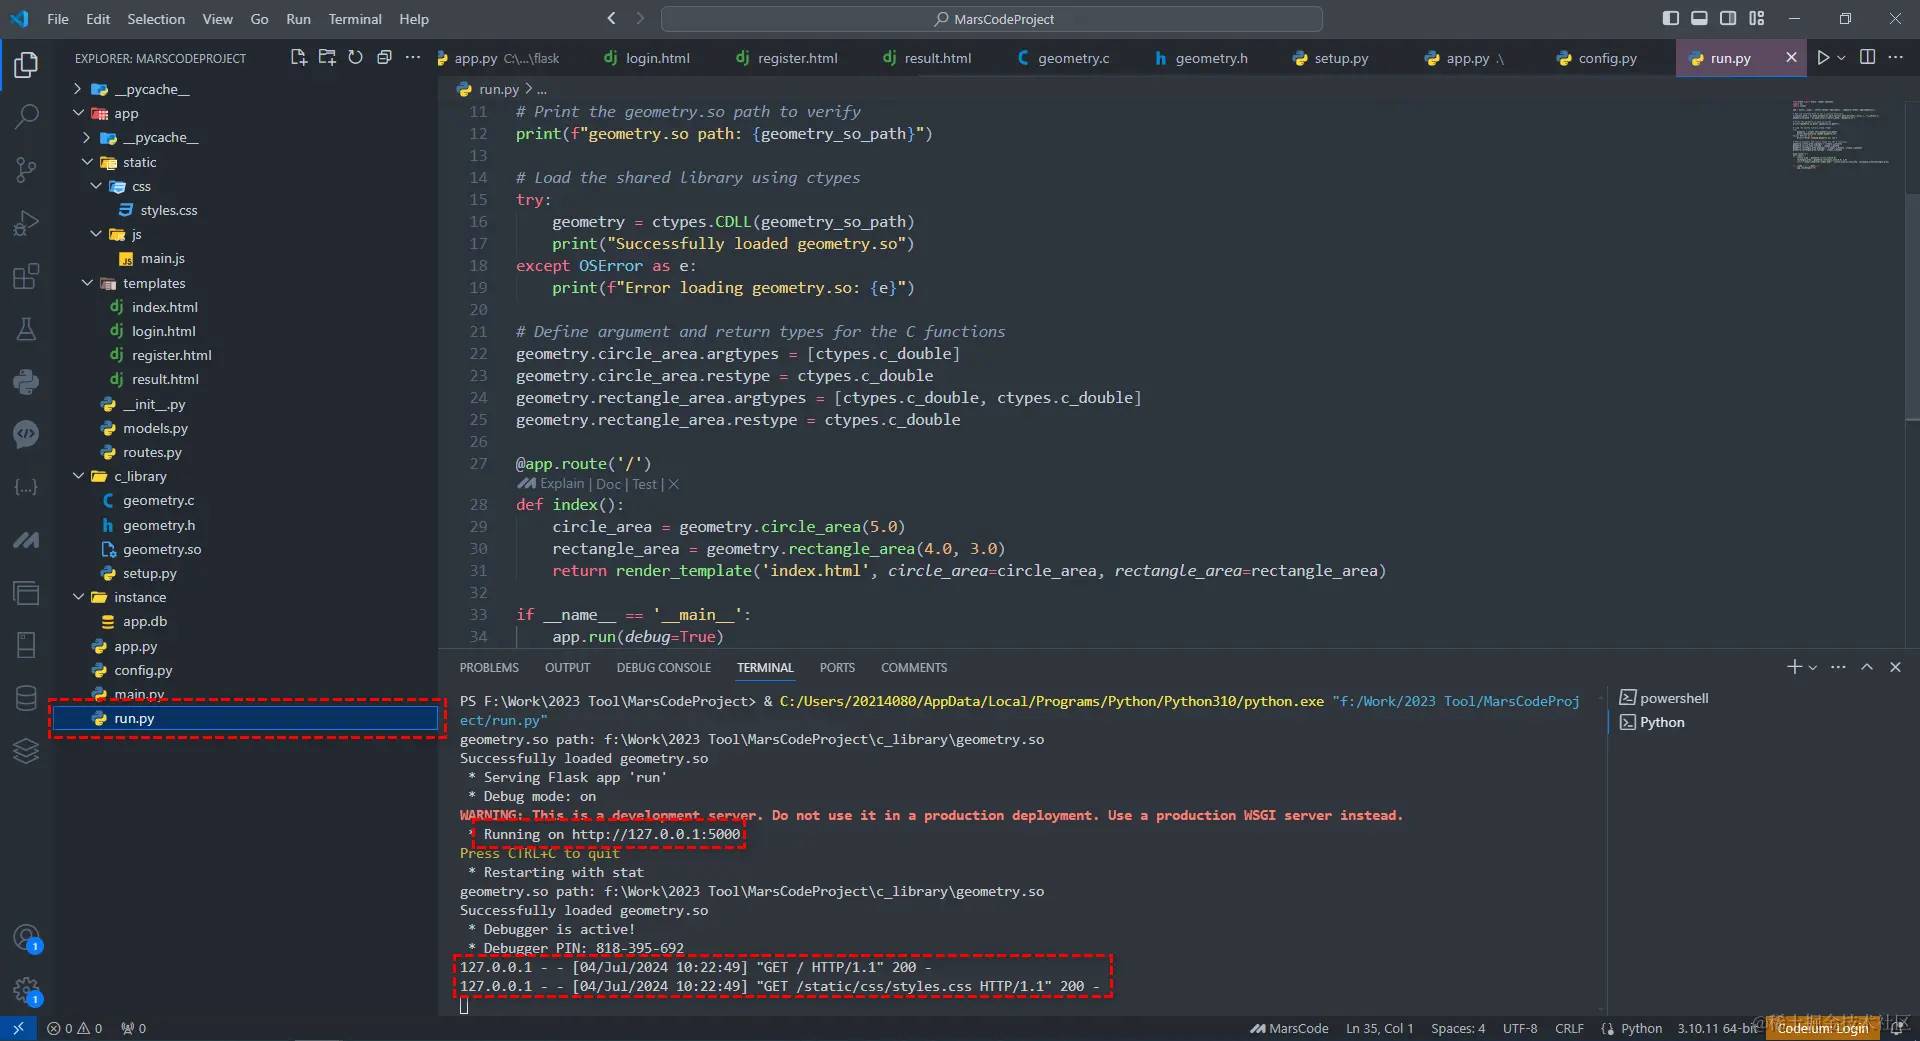

6. 商业化场景及项目完善
6.1 场景
-
教育领域: 作为在线教育平台的几何计算工具,帮助学生理解和练习几何知识。
-
工程计算: 工程师可以使用该工具进行日常几何计算,提高工作效率。
-
科学研究: 科研人员可以用它来验证和计算几何数据,辅助研究工作。
6.2 完善
-
功能扩展: 可以扩展更多的几何形状计算功能,例如三角形、梯形等。
-
用户交互: 提供表单让用户输入数据进行实时计算,并展示结果。
-
API接口: 开发RESTful API接口,支持其他应用通过API调用计算服务。
-
数据持久化: 集成数据库,保存用户的计算历史记录和结果。
-
性能优化: 针对高并发请求进行性能优化,提升响应速度。
7. 结论
通过本文详细介绍了如何使用MarsCode插件在VSCode中开发跨语言项目(Python和C),并展示了各个功能的使用方法和优缺点。还通过一个具体的项目示例,展示了如何利用MarsCode插件的各种功能来实现跨语言项目的开发。
在实际开发过程中,MarsCode插件的代码补全、代码生成、代码编辑等功能可以显著提高开发效率,减少代码错误,并加快项目的开发进度。同时,智能修复和智能问答功能也可以帮助开发者发现和解决问题,从而提高代码质量和开发效率。
通过以上内容,项目已经完整地介绍了技术实现、运行结果以及未来展望和商业化场景。希望这些内容对你有所帮助!
8. MarsCode AI助手的未来展望
MarsCode AI助手作为一个集成开发环境(IDE)插件,旨在通过人工智能技术提升开发者的编程效率和体验。以下是MarsCode AI助手未来的展望和发展方向:
1. 增强的智能编码功能
MarsCode将继续改进其智能编码功能,包括但不限于更精确的代码补全、智能代码生成和编辑建议。未来的版本将更加智能化,能够基于上下文和开发者的编码习惯,提供更准确和个性化的代码建议。
2. 更广泛的语言支持
未来的MarsCode将扩展对更多编程语言的支持,包括主流的和新兴的编程语言。这将使开发者能够在不同项目和技术栈中无缝切换,并享受到相似的智能化支持。
3. 深度集成的跨语言开发能力
随着软件开发领域的复杂性增加,跨语言开发变得越来越普遍。MarsCode将进一步优化其跨语言开发能力,提供更强大的工具和功能来简化不同语言之间的集成和协作。
4. 智能调试和错误修复
除了智能编码功能外,MarsCode还将增强其智能调试和错误修复能力。未来版本将能够更快速地定位和解决代码中的问题,减少开发者在调试过程中的时间和精力消耗。
5. 更强大的项目管理和协作功能
随着团队协作和项目管理的重要性增加,MarsCode将增强其项目管理和协作功能。这包括更好的版本控制集成、团队代码审查工具以及实时协作能力,以提升团队的协作效率和代码质量。
6. 机器学习驱动的智能问答
未来的MarsCode AI助手可能会引入机器学习技术,以提供更智能和个性化的问答支持。这将使开发者能够更快速地获取技术文档、解决方案和编程建议,从而加快开发周期并提升开发效率。
7. 更友好的用户界面和用户体验
随着用户体验设计的进步,MarsCode将持续改进其用户界面和交互设计。未来的版本将更加直观和易用,使新手和有经验的开发者都能轻松上手并充分利用其功能。
通过持续的创新和技术进步,MarsCode AI助手将继续成为开发者工具中的重要组成部分,帮助开发者更高效、更智能地进行软件开发工作。
8. 望
MarsCode是AI时代的产物,是解放开发者的有效AI工具,祝MarsCode越来越好用易用,越来越火,火到全球,真正帮助到全球每一位开发者......
附:更详细内容请阅官方文档:*https://docs.marscode.cn/introduction
欢迎点赞|关注|收藏|评论,您的肯定是我创作的动力