
包阅导读总结
1.
关键词:Linux、NordVPN、安全、网络、加密
2.
总结:本文主要介绍在 Linux 上安装 NordVPN 以增强安全性,包括其作用、安装所需条件及步骤,还提及了登录方式和连接/断开服务器的命令,强调在使用公共网络时此操作的重要性。
3.
主要内容:
– 介绍默认情况下 Linux 是安全的操作系统,但仍需增强安全性
– 计算机联网就有风险,应采取手段保护数据
– 现代 VPN 的作用
– 隐藏 IP 地址和位置,加密网络流量
– 防止公共网络中数据被读取
– NordVPN 及安装
– 多种服务计划可选
– 安装所需:有效 NordVPN 账户和基于 Debian 或 Ubuntu 的 Linux 发行版
– 安装步骤:下载软件、安装、更新、添加用户到 nordvpn 组、重启
– 登录 NordVPN 账户
– 命令行方式呈现 URL 登录
– 系统托盘图标方式登录
– 终端命令连接/断开服务器
思维导图:
文章地址:https://thenewstack.io/install-nordvpn-on-linux-for-an-added-layer-of-security/
文章来源:thenewstack.io
作者:Jack Wallen
发布时间:2024/7/2 20:43
语言:英文
总字数:956字
预计阅读时间:4分钟
评分:81分
标签:Linux,网络,安全,NordVPN,VPN
以下为原文内容
本内容来源于用户推荐转载,旨在分享知识与观点,如有侵权请联系删除 联系邮箱 media@ilingban.com
By default (and design), Linux is one of the most secure operating systems on the planet. That doesn’t mean, however, that you can or should assume that the out-of-the-box experience gives you all the security you need.
I tend to assume this: If a computer is attached to a network, it’s vulnerable. You should always keep that in mind when considering the security of the desktop or server you are using and you should take any means possible to protect the data within and the data you transmit and receive.
At this point, you’ve probably heard of virtual private networks (VPNs). They’re everywhere. Of course, the VPNs of today aren’t exactly the same as the ones we used years ago. Back in the day, when you needed to connect to your company network (to access various resources), you connected to a VPN, and your local computer was treated as if it was a part of the remote network.
Although those types of VPNs are still in use across the globe, the type of VPN most people talk about today is more about privacy and security.
What Modern VPNs Do
Essentially, a modern VPN hides your IP address and location and also encrypts your network traffic. This is of serious importance, especially when you find yourself working on a public network, where you cannot be certain if it has been configured properly or if those connected to the network can be trusted.
If the wrong people have connected to the network you’re using, they could read the data you send. That data might include your bank account credentials, usernames and passwords for the sites and services you use, and more. You do not want that information falling into the wrong hands. Unfortunately, you don’t have any control over how those public Wi-Fi networks are configured.
That’s where a VPN comes into play. With a VPN installed and enabled, your outgoing data is encrypted, so it’s exponentially harder for any ne’er do well to read it. Also, your IP address and location are masked, so it might look like you’re sitting in a coffee shop in a completely different country.
Yeah, VPNs are handy.
There are quite a few VPN services available, and many of them have applications that can be installed on Linux. Most VPN services do have an associated cost, but the security they offer is worth the price of entry.
One such VPN is NordVPN, which is almost always included in best of listings. NordVPN not only hides your IP address/location and encrypts your traffic, but it also blocks trackers and ads.
I’m going to walk you through the process of installing and using NordVPN on Ubuntu Linux, so you too can enjoy an added layer of security when connected to untrusted networks.
What You’ll Need
First off, you’ll need a valid NordVPN account. You can use the Basic ($3.69/month), Plus ($4.69/month), or Ultimate ($6.69/month) plans but do note that the basic plan does not include ad and tracker blocking. You’ll also need a Linux distribution based on Debian or Ubuntu.
With that at the ready, let’s install.
Installing NordVPN
Log into your Linux desktop and open a terminal application. Download the latest version of the software (as of this writing it is 1.0.0) with the command:
|
wget https://repo.nordvpn.com/deb/nordvpn/debian/pool/main/nordvpn–release_1.0.0_all.deb |
Once the file has been downloaded, install it with:
|
sudo dpkg –i nordvpn*.deb |
You’ll be prompted for your sudo password.
The above command only installs the required repository information. You then need to run an update and finally install NordVPN. Both of those tasks can be accomplished with:
|
sudo apt–get update && sudo apt–get install nordvpn –y |
Once the installation is completed, NordVPN should be ready to go. If errors occur during the installation, you should be able to resolve them with the command:
Finally, you must add your user to the nordvpn group with the command:
|
sudo usermod –aG nordvpn $USER |
Reboot the machine, so the changes take effect.
Logging Into Your NordVPN Account
The first step to logging in is to issue the following command:
This will present a URL that you can copy and then paste into your default browser. You will then be presented with the NordVPN login page. Once you’ve successfully logged in, you can dismiss the browser and go back to the terminal window.
If you don’t want to use the command line to manage your NordVPN account, you should find an icon in your system tray. Click that icon the first time and it’ll present you with a login button. Click that button and a pop-up will appear (Figure 1) with the link to open your browser for first-time login.
-
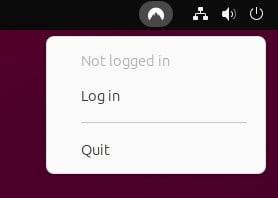
Figure 1: The NordVPN system tray icon on Ubuntu Linux.
At the terminal window, connect to a NordVPN server with the command:
NordVPN will automatically select the most suitable (and fastest) VPN server. You are now connected and all of your traffic will be encrypted and your IP address hidden.
You can then disconnect with the command:
After your initial login, you can also connect/disconnect via an icon you’ll find in your desktop system tray.
And that’s all there is to adding an extra layer of security on your Linux desktop or laptop. This is especially important if you’re using a laptop and connecting to public Wi-Fi networks.
YOUTUBE.COM/THENEWSTACK
Tech moves fast, don’t miss an episode. Subscribe to our YouTubechannel to stream all our podcasts, interviews, demos, and more.