
包阅导读总结
1. 关键词:Git、GitHub、分支、版本控制、代码变更
2. 总结:
本文介绍了 Git 和 GitHub 中分支的使用方法,包括 Git 与 GitHub 的区别,分支的概念及重要性,还详细说明了如何创建、切换分支,对分支进行修改、提交等操作,强调了不要直接在主分支进行修改。
3. 主要内容:
– Git 和 GitHub 基础
– Git 是版本控制系统,GitHub 是使 Git 协作更友好的云平台。
– 分支概念
– 分支是具有唯一名称的一组独特代码更改。
– 主分支通常是最终合并所有更改的稳定版本。
– 使用分支的步骤
– 查看现有分支:使用 `git branch -a` 命令。
– 创建新分支:使用 `git checkout -b 分支名` 命令。
– 在工作分支进行修改,如创建新文件。
– 对工作分支的更改进行暂存和提交。
– 将工作分支合并回主分支。
思维导图: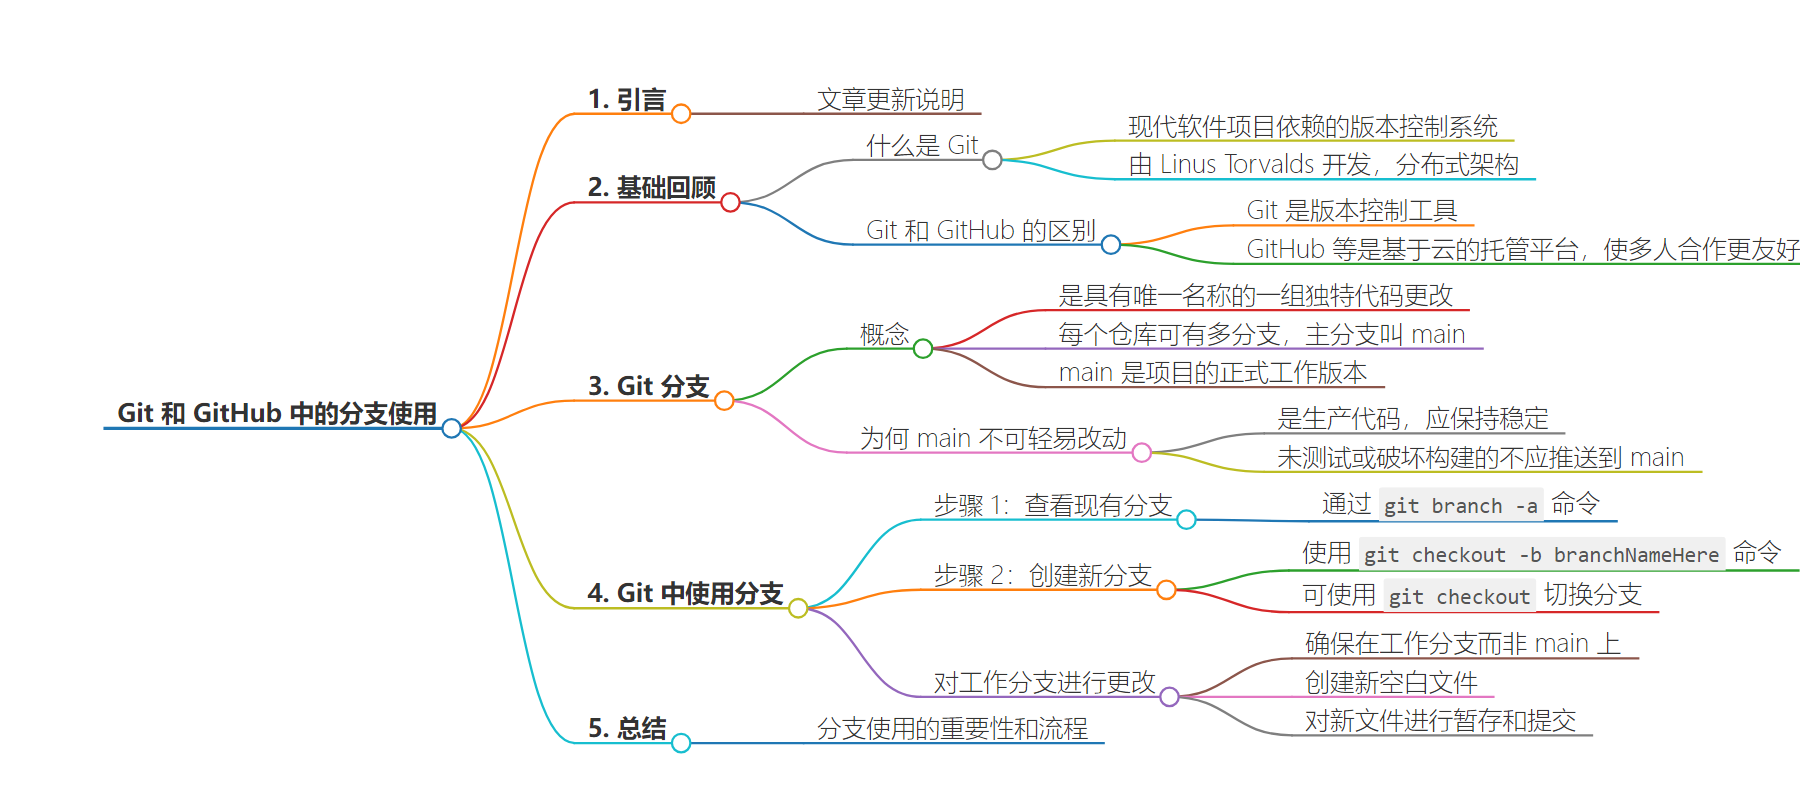
文章地址:https://thenewstack.io/dont-mess-with-the-master-working-with-branches-in-git-and-github/
文章来源:thenewstack.io
作者:Michelle Gienow
发布时间:2024/7/23 19:33
语言:英文
总字数:2406字
预计阅读时间:10分钟
评分:87分
标签:Git,GitHub,版本控制,分支管理,合并冲突
以下为原文内容
本内容来源于用户推荐转载,旨在分享知识与观点,如有侵权请联系删除 联系邮箱 media@ilingban.com
This article has been updated and republished from a post originally published May 18, 2018.
In two previous tutorials for the git version-control software, we learned the essential basic commands for using git, as well ashow to work with Githubto establish a repository and push our project code to the website.
Now it is time to start actually working with GitHub (and git) the way they are meant to be used: making changes in the project safely off to one side, and merging them back into the original project once they have proved to be correct (or at least not disastrous).
First, a quick review: what is git, and how it is different from GitHub.
What Is Git?
The vast majority of modern software projects today rely on the git version control system for managing changes in their codebases. Before Linus Torvalds developed git in 2005 as an open source version-control tool, developers depended on single-thread systems (like CVS or SVN) to track the full history of their software.
Git’s distributed architecture, though, granted every developer on a given project access to a working copy of the code as a repository that contains the full history of all changes to the codebase.
What Is the Difference Between Git and GitHub?
Git is a tool — the versioning system itself. As a developer, you install git and work with it locally on your machine. Platforms like GitHub, GitLab, and BitBucket make working with git, especially on group projects, more user-friendly by hosting git repositories on the cloud where developers can store, share, and collaborate with others on the code that they write. (We are using GitHub for the purposes of this tutorial, but other git-based versioning platforms will work in the same way).
What Are Git Branches?
By now you understand that git saves each version of your project as a snapshot of the code exactly as it was at the moment you committed it. You are using git to create a timeline of different versions of a project as it progresses, so that you can roll back to an earlier version in the event everything breaks.
The way git, and GitHub, manage this timeline — especially when more than one person is working in the project and making changes — is by using branches. A branch is essentially a unique set of code changes with a unique name.
Each repository can have one or more branches. The main branch — the one where all changes eventually get merged back into — is called, fittingly enough, main. This is the version you see when you visit the project repository at github.com/yourname/projectname. The main branch is the official working version of any git-versioned GitHub project, whether open source or commercial. For production software, main is (almost always) the branch that is currently deployed for users.
All projects, however, rest upon the same fundamental law: Do not mess with main.
If you make changes to the main branch of a group project while other people are also working on it, your on-the-fly changes will ripple out to affect everyone else. Your merged code is now the new main version … and, as a result, anyone else doing work on their own local branch is now working with an outdated version, with no idea that anything has changed. No idea, that is, until they try to merge their change branch back to main, only to be met with the dreaded merge conflict error message.
This can cause weeping, the rending of garments and people running around screaming with their hair on fire — merge conflicts can be that serious. But even if they are not, they can still waste time for the people who have to track down where main diverged from their own working versions, and then reconcile all the diffs between.
Why is main so untouchable? One word: deployable. The main branch is your production code, ready to roll out into the world. Main is meant to be stable. The universal social contract of open source software to never, ever push anything to main that is not tested, or that breaks the build.
The entire reason GitHub works for everyone, from solo devs to massive commercial projects with hundreds of developers, is that it is always safe to work from main. (It is also why many organizations utilize a “don’t merge your own pull requests” culture as a guardrail that ensures no one ever inadvertently pushes changes to main that then break everything for everybody).
How To Use Branches in Git
Instead of working directly on the main branch, everyone creates new branches off of main to experiment, bug fix, and generally make edits, additions and changes. Once ready, this new version branch gets merged back into main — but only once the code has been approved and is known to work. Main is then updated to contain all the new stuff.
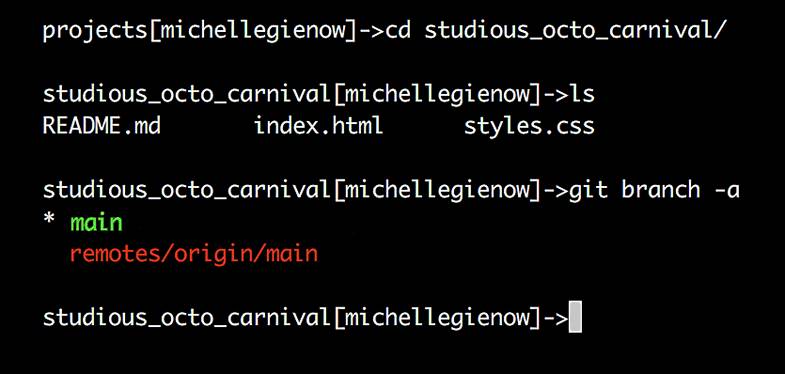
To begin working on anything new in a project, or to change existing things, you create a branch off the stable main branch. Let’s continue working with the sample project created for our previous tutorial, good ol’ studious_octo_carnival. Please now open up your version on your computer and cd into the directory.
Step 1:Take inventory.
Prior to creating new branches, we want to check for any other existing branches. We know about the main, but who knows what our project collaborators may be up to, those mischievous monkeys?
Thus, the very first step is to view all existing branches by typing git branch -a into terminal, which tells git that we want to see all the branches in this project, even ones that are not in our local workspace.
For our project, the git branch command returns the output you see in the code example below. Its appearance may vary somewhat, depending on your OS and terminal application, but the info is ultimately the same. The asterisk next to main in the first line of the output indicates that we are currently on that branch. The second line tells us that on our remote, named origin, there is a single branch, also called main. (Remember that our remote is the GitHub repo for this project).
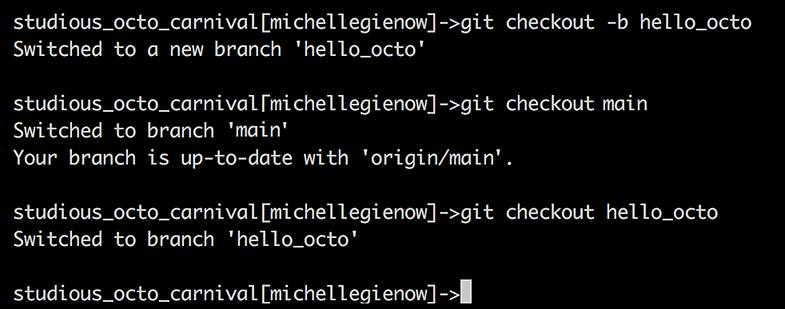
Step 2: Create a New Branch
Now that we know how to view branches, let’s make one! Bear in mind as we go that we have our original project from the previous tutorial sitting there as main.
We are now going to create a local branch as a new copy version of the project downloaded to our own computers. This way, we can play around with and make changes to the project locally, in our own dev environments, while the original version of the project, main, remains safely unmolested up there on GitHub. We give the new branch a descriptive name to remind us what we intend to do while working in it. In this case, it’s going to be a simple “Hello World” thingy, so let’s call it hello_octo.
To create this new branch, type git checkout -b branchNameHere (so, in our case, git checkout -b hello_octo).
Assuming nobody else has already made a branch named hello_octo, git returns “Switched to a new branch ‘hello_octo’.” (In the case where a branch by that name already exists, git would tell us instead “fatal: A branch named ‘hello_octo’ already exists.” No big deal, just do git checkout -b again with a new name variation).
We can also use the git checkout command to toggle back and forth between our two branches. Type git checkout branchName to switch to that branch. So, git checkout main takes you to master while git checkout hello_octo takes you back to the hello_octo branch.
If you try to switch to a branch that doesn’t exist, such as git checkout hello_kitty, git will let you know that’s a no-go:

How does git know what branch you’re currently on? Git is always watching what you do and keeps a special pointer called HEAD. Like the needle on a compass always points north, HEAD always indicates the local branch you’re currently on.
We could also have created our branch using the git command git branch branchNameHere, and then switch to it with git checkout. However, the neat little shortcut with the -b in git checkout -b branchNameHere both creates the branch and switches to it.
I cannot tell you how many new-to-git coders generate error messages and frustration because they simply have not remembered to change to their new branch after creating it. Hence, we are sticking with git checkout -b, mmmkay?)
Making Changes to a Working Branch
Now that we have multiple branches — our working branch to make changes on, and our main branch remaining safely unmolested — we can get to work. In our scenario, we are going to use our hello_octo branch for making and testing our changes, and then push these back up to the main branch on GitHub.
Remember to make sure you’re on your working branch, and not main, with good old git branch -a.
Step 3. Create a New Blank File, Named hello_octo_world:

(This blank file is just for demonstration purposes, so no worries that there is no file extension name/type.)
Since it is brand new, right now this file is only on your branch. Use the ls command to view it:
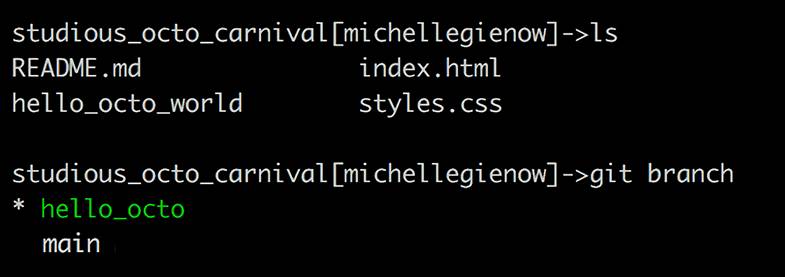
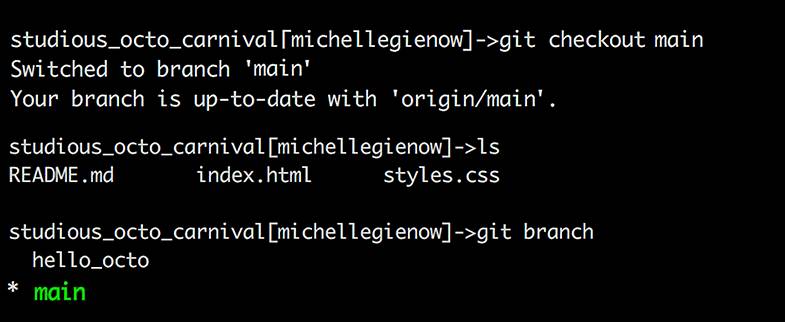
However, recall that we are on our working branch, hello_octo, where we created this new thing. The main doesn’t know anything about hello_octo, because it is safely insulated from any willy-nilly changes we are making over here on the working branch. It is still the same serenely unchanged main we started with:

Step 4: Stage and Commit Our New File to Working Branch.
Now it is time to stage (add) and commit our new file on the working branch. (Sound familiar?) This will attach this new entity to the working branch in preparation for eventually moving it over to main. This file now exists on the hello_octo branch; as we saw above, it doesn’t currently exist on the main branch.
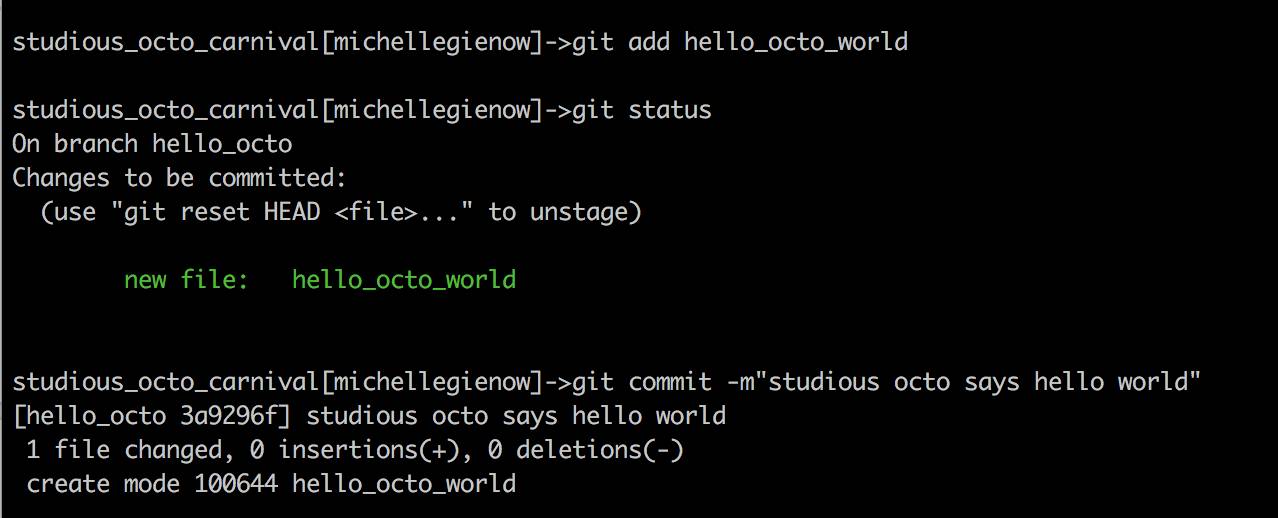
At this point, you have just taken a snapshot of changes to the branch. In a real-world project, there are likely more changes and work to be done. Now is when you would go do this, making commits along the way at logical points.
Remember that, on GitHub, commits represent your consecutive saves. Each commit has an associated commit message, which is a description explaining specifically what you did there and why. Commit messages capture the history of your changes, so future you, as well as other project contributors, can understand what you’ve done and why.
Merging Code Between Branches
Once we are finally done with all changes and additions — and everything works* — it’s time to merge. The interesting part comes after we switch back to our master branch (which — say it with me! — we do with git checkout main). Hello_octo_world appears to be missing, but it’s not — currently, it exists on our working branch. Currently, we are on main. Main does not yet know that this new branch exists, because we haven’t merged the new branch (i.e., pushed it up to GitHub).
I’m showing you this again because it is at the heart of understanding branches in git:
Now: in this exercise, hello_octo_world represents any change to any file (or the addition of a whole new file) that has passed all testing on our development branch, and is ready to be in production. The process of moving code between branches (often from development to production) is known as merging.
Very important: when merging, we need to be on the branch that we want to merge to. Basically, we will be telling git, “See that new thing? It’s OK to bring it over here now.”
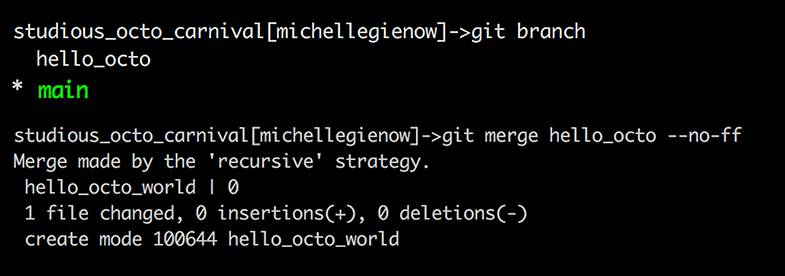
Step 5: Merge Changes From a Working Branch
In this case, since we want to merge from our working branch, where the hello_octo_world file exists, to our main branch, we need to be on the main.
Once on the main branch, all we have to do is run the merge command. The best way to do this is to type git merge --no-ff. The additional --no-ff tells git we want to retain all of the commit messages prior to the merge. This will make tracking changes easier in the future:
Getting Back to GitHub
The last thing we now need to do is to let GitHub know that we’ve been monkeying around with main down here on our local development environment.
In other words, it’s time for git push. You got this!
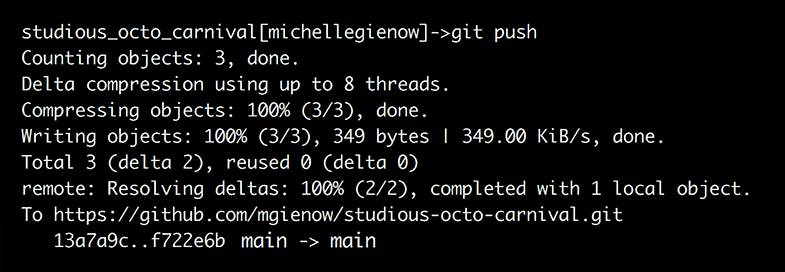
The git output confirms that the merge from your develop branch to the master branch on your local environment, has now been copied to the remote server: “master → master.”
And that’s it! We have: (1) successfully created a local working branch separate from main. (2) Made changes to it. (3) Staged and committed those changes. Then (4) merged them back into main on our local working environment. Finally, we (5) pushed everything up to GitHub so that all versions of our project are the same, everywhere!
Don’t Forget to Clean Up
Some cleanup is in order now: since we have successfully merged our hello_octo branch, we no longer need it. Keeping it around might also confuse future changes to new branches, so let’s get rid of it.
To delete a merged branch, simply type git branch -d branchName:

No worries: if you accidentally attempt to delete a branch that has not yet been merged, git will throw an error.
So! This far we have been using an extremely simplified sample project, because at this point the most important thing is to understand and assimilate the git workflow. There is a lot more to merging than this in the real world— for example, what happens if you get error messages because your merge has conflicts? No worries, new git-ster, we will get there.
Your homework: create (touch) some more new files in the example project and practice making changes, staging, committing, and finally merging them back. Take care to understand where your HEAD is pointing — i.e., what your current branch is. Only commit changes to your working branch.
Because, remember: Don’t. Mess. With. The. Main.
Next in the Getting Legit with Git series: Cloning and Forking
YOUTUBE.COM/THENEWSTACK
Tech moves fast, don’t miss an episode. Subscribe to our YouTubechannel to stream all our podcasts, interviews, demos, and more.