
包阅导读总结
1. 关键词:`AWS S3、Multipart Upload、Large Files、Node.js、File Upload`
2. 总结:本文介绍了如何使用 AWS S3 的多部分上传功能高效上传大文件,包括其工作原理、前期准备、设置步骤(创建 S3 存储桶和配置策略、使用 Node.js 设置后端)、代码示例及相关路由,旨在优化应用中的文件上传过程。
3. 主要内容:
– 介绍
– 传统单部分上传大文件的弊端
– AWS S3 多部分上传功能的优势
– 前提准备
– 拥有带有 IAM 用户凭证的 AWS 账户
– 安装 Node.js
– 具备 JavaScript、React 和 Node.js 基础知识
– 工作原理
– 将大文件分为小部分上传
– 可配置重试、暂停和恢复
– 设置步骤
– 创建和配置 S3 存储桶
– 使用 Node.js 初始化项目
– 安装必要包
– 创建服务器文件,配置中间件和 AWS SDK
– 创建路由:初始化上传、上传部分、完成上传
– 启动服务器
– 设置环境变量
思维导图:
文章地址:https://www.freecodecamp.org/news/upload-large-files-with-aws/
文章来源:freecodecamp.org
作者:Destiny Erhabor
发布时间:2024/7/8 12:02
语言:英文
总字数:2575字
预计阅读时间:11分钟
评分:89分
标签:AWS S3,分块上传,Node.js,React,文件上传
以下为原文内容
本内容来源于用户推荐转载,旨在分享知识与观点,如有侵权请联系删除 联系邮箱 media@ilingban.com
Imagine running a media streaming platform where users upload large high-definition videos. Uploading such large files can be slow and may fail if the network is unreliable.
Using traditional single-part uploads can be cumbersome and inefficient for large files, often leading to timeout errors or the need to restart the entire upload process if any part fails. This is where the Amazon S3 multipart upload feature comes into play, offering a robust solution to these challenges.
In this article, you’ll explore how to efficiently handle large files with Amazon S3 multipart upload. We’ll discuss the benefits of using this feature, walk through the process of uploading files in parts, and provide code examples using the AWS SDK for full-stack Node and React project.
By the end of this article, you should have a good understanding of how to leverage the Amazon S3 multipart upload to optimize file uploads in your applications.
Prerequisites
Before we start, ensure you have the following:
- An AWS account with IAM user credentials.
- Node.js installed on your development machine.
- Basic knowledge of JavaScript, React, and Node.js.
Table of Contents:
How It Works
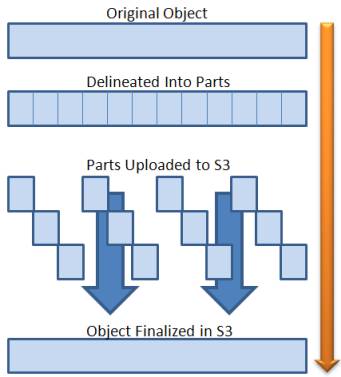
A large file upload is divided into smaller parts/chunks, each part is uploaded independently to Amazon S3. Once all the parts have been uploaded, they are combined to create the final object.
Example: Uploading a 100MB file in 5MB parts would result in 20 parts being uploaded to S3. Each part is uploaded with a unique identifier, and the order is maintained to ensure that the file can be reassembled correctly.
Retries can be configured to automatically retry failed parts, and the upload can be paused and resumed at any time. This makes the process more robust and fault-tolerant, especially for large files.
 multipart AWS s3 uploads
Learn more on the Amazon S3 multipart upload docs.
Let’s get started!
Step 1: How to Set Up AWS S3
How to Create an S3 Bucket
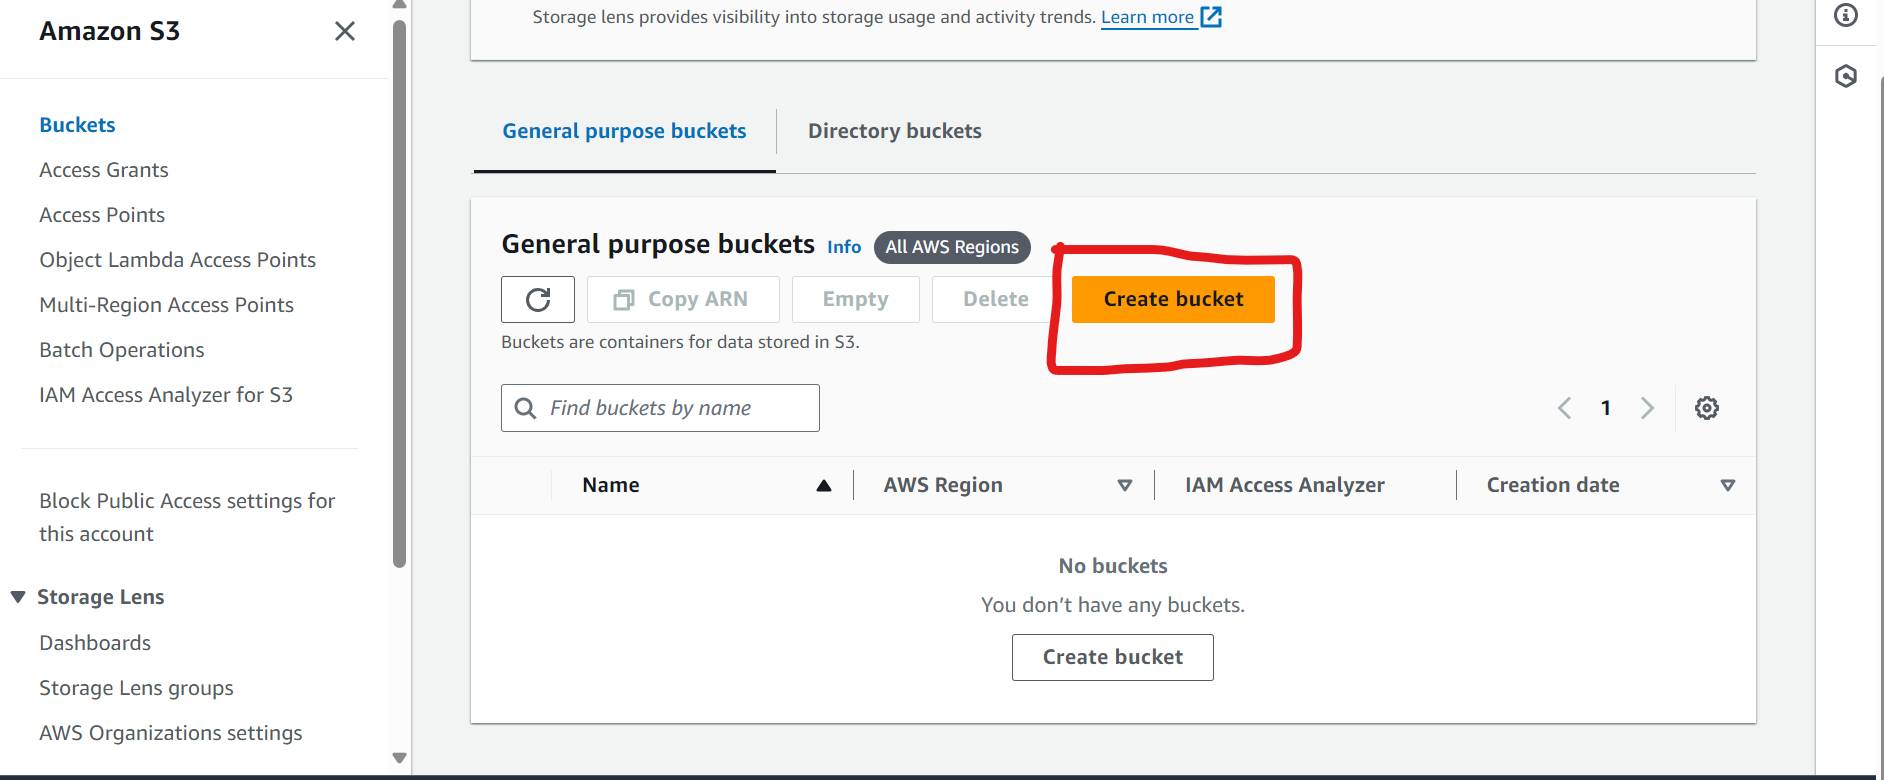
First, log into the AWS Management console
- Navigate to the S3 service.
 How to create an s3 bucket
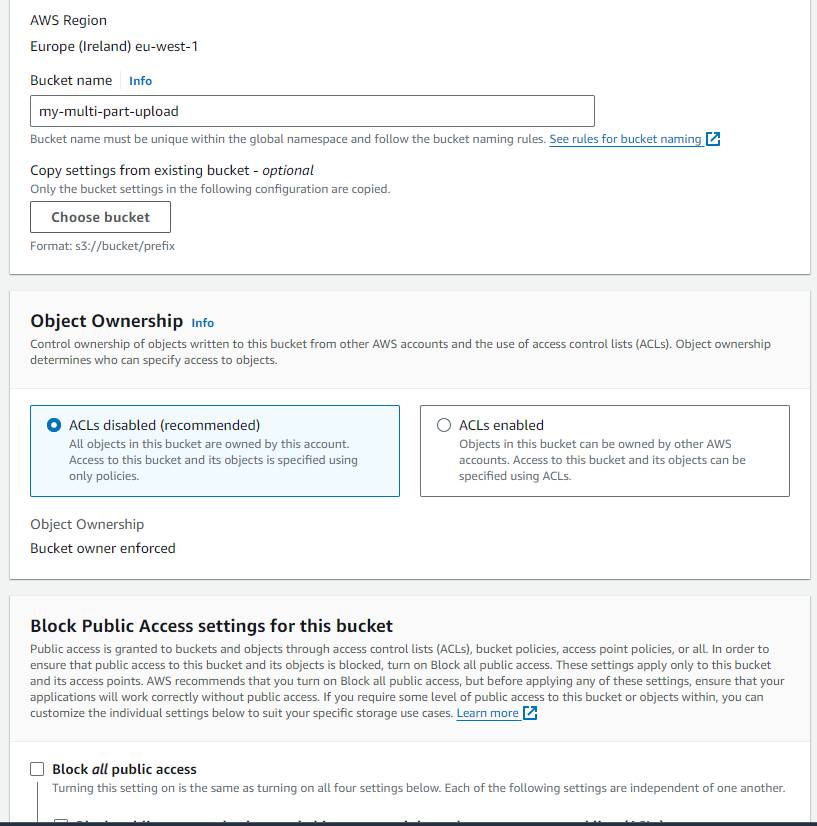
Create a new bucket and take note of the bucket name.
Uncheck the Public Access settings for simplicity We’ll also configure bucket access using IAM policies after creating the bucket.
 How to create an s3 bucket
- Leave other settings as default and create the bucket.
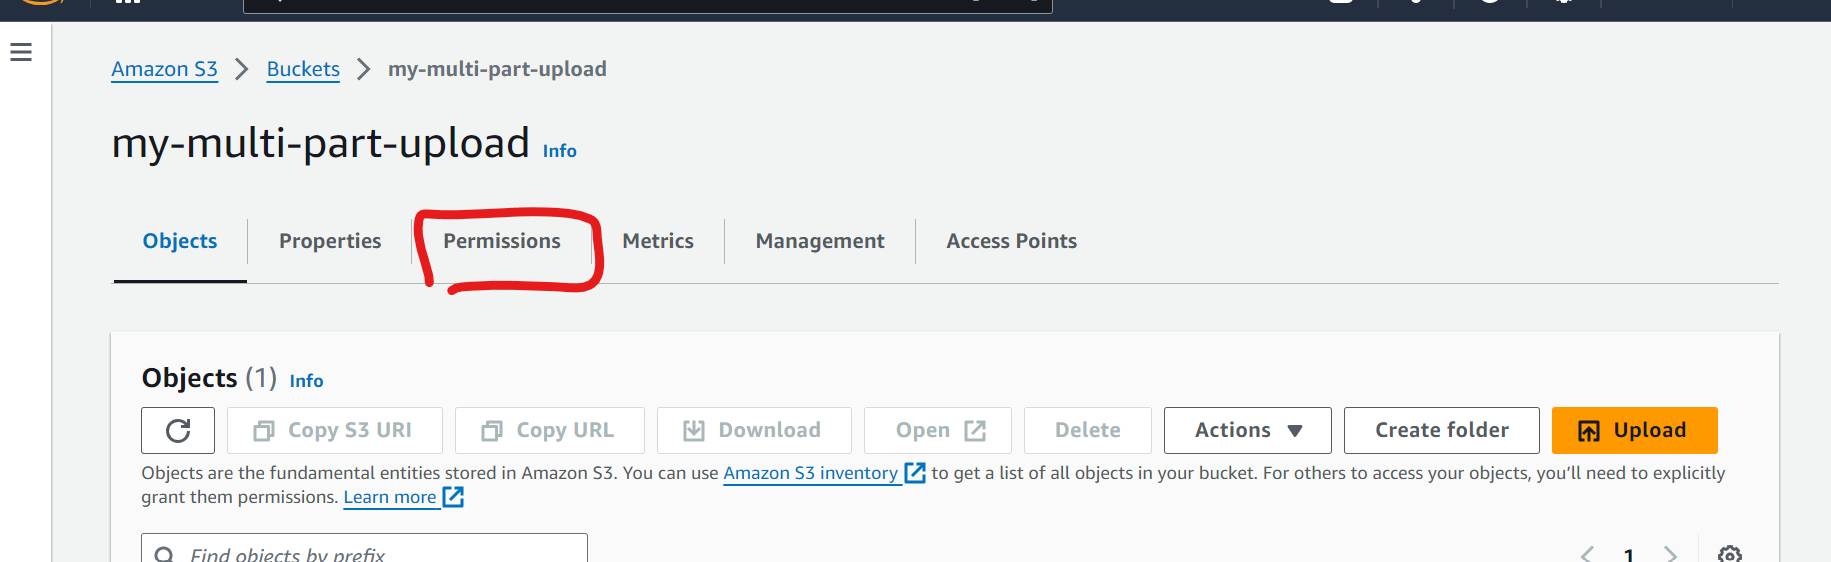
How to Configure S3 Bucket Policy
Now, that you have created the bucket, let’s set up the policy to allow users read your objects(file/videos) url.
- Click on the bucket name and navigate to the
Permissionstab.
 How to configure s3 bucket policy
Navigate to the Bucket Policy section and click on Edit.
Input the following policy, and replace your-bucket-name with your actual bucket name:
{ "Version": "2012-10-17", "Statement": [ { "Effect": "Allow", "Principal": "*", "Action": "s3:GetObject", "Resource": "arn:aws:s3:::your-bucket-name/*" } ]}Version: Amazon S3 object version number for the bucket policy language.
Statement: An array of one or more individual statements that define the policy.
Effect: The effect determines whether the statement allows or denies access.
Principal: The entity that the policy is applied to. In this case, we are allowing all principals. In production, you should specify the IAM user or role that needs access.
Action: The action that the policy allows or denies. In this case, we are allowing the s3:GetObject action, which allows users to retrieve objects from the bucket.
Resource: The Amazon Resource Name (ARN) of the bucket and objects that the policy applies to. In this case, we are allowing access to all objects in the bucket.
Click on Save changes to apply the policy.
Step 2: How to Set Up AWS S3 Backend with Node.js
Next, let’s set up the backend server with AWS SDK to handle the file upload process.
How to Initialize a Node.js Project
Create a new directory for your project and initialize a new Node.js project:
mkdir s3-multipart-uploadcd s3-multipart-uploadnpm init -yInstall Required Packages
Install the following packages using npm:
npm install express dotenv multer aws-sdkCreate Server File
Create a new file named app.js (For simplicity, we are going to use this file only for all the upload logic) and add the following code:
Imports and Configurations
const cors = require("cors");const express = require("express");const AWS = require("aws-sdk");const dotenv = require("dotenv");const multer = require("multer");const multerUpload = multer();dotenv.config();const app = express();const port = 3001;Imports
cors: Middleware for enabling Cross-Origin Resource Sharing (CORS). This is necessary to allow your frontend application interact with the backend hosted on a different domain or port.
express: A minimal and flexible Node.js web application framework.
AWS: The AWS SDK for JavaScript, which allows you to interact with AWS services.
dotenv: A module that loads environment variables from a .env file into process.env.
multer: Middleware for handling multipart/form-data, which is primarily used for uploading files.
Configurations
multerUpload: Initializes multer for handling file uploads.
dotenv.config(): Loads the environment variables from a .env file.
app: Initializes an Express application.
port: Sets the port on which the Express application will run.
Middleware and AWS Configuration
Next, add the following code to configure middleware and AWS SDK:
app.use(cors());AWS.config.update({ accessKeyId: process.env.AWS_ACCESS_KEY, secretAccessKey: process.env.AWS_SECRET_KEY, region: process.env.AWS_REGION,});const s3 = new AWS.S3();app.use(express.json({ limit: "50mb" }));app.use(express.urlencoded({ limit: "50mb", extended: true }));app.use(cors()): Enables CORS for all routes, allowing your frontend to communicate with the backend without issues related to cross-origin requests.
AWS.config.update({ ... }): Configures the AWS SDK with the access key, secret key, and region from the environment variables.
const s3 = new AWS.S3(): Creates an instance of the S3 service.
app.use(express.json({ limit: '50mb' })): Configures Express to parse JSON bodies with a size limit of 50MB.
app.use(express.urlencoded({ limit: '50mb', extended: true })): Configures Express to parse URL-encoded bodies with a size limit of 50MB.
Routes
It’s time to start creating our routes. The routes required for the multipart upload process are as follows:
- Initialization of the upload process.
- Uploading parts of the file.
- Completing the upload process.
Start/Initialize Upload Endpoint
This route puts the upload process in play. Add the following code to create an endpoint for initializing the multipart upload process:
app.post("/start-upload", async (req, res) => { const { fileName, fileType } = req.body; const params = { Bucket: process.env.S3_BUCKET, Key: fileName, ContentType: fileType, }; try { const upload = await s3.createMultipartUpload(params).promise(); res.send({ uploadId: upload.UploadId }); } catch (error) { res.send(error); }});The function above creates a POST endpoint /start-upload that expects a JSON body with fileName and fileType properties. It then uses the createMultipartUpload method from the S3 service to initialize the multipart upload process. If successful, it returns the uploadId to the user, which will be used to upload parts of the file.
Upload Part Endpoint
This is the route where the different smaller parts of the large file upload are received and tagged. Add the following code to create an endpoint for uploading parts of the file:
app.post("/upload-part", multerUpload.single("fileChunk"), async (req, res) => { const { fileName, partNumber, uploadId, fileChunk } = req.body; const params = { Bucket: process.env.S3_BUCKET, Key: fileName, PartNumber: partNumber, UploadId: uploadId, Body: Buffer.from(fileChunk, "base64"), }; try { const uploadParts = await s3.uploadPart(params).promise(); console.log({ uploadParts }); res.send({ ETag: uploadParts.ETag }); } catch (error) { res.send(error); }});The function above creates a POST endpoint at /upload-part that expects a form-data body with uploadId, partNumber, and fileName properties. It uses the uploadPart method from the S3 service to upload the part of the file. If successful, it returns the ETag of the uploaded part to the client.
The ETag is a unique identifier for the upload part that will be used to complete the multipart upload.
Complete Upload Endpoint
Once the part has been uploaded, the final step is to combine all the parts to create the final object.
Add the following code to create an endpoint for completing the multipart upload process:
app.post("/complete-upload", async (req, res) => { const { fileName, uploadId, parts } = req.body; const params = { Bucket: process.env.S3_BUCKET, Key: fileName, UploadId: uploadId, MultipartUpload: { Parts: parts, }, }; try { const complete = await s3.completeMultipartUpload(params).promise(); console.log({ complete }); res.send({ fileUrl: complete.Location }); } catch (error) { res.send(error); }});The function above creates a POST endpoint at /complete-upload that expects a JSON body with uploadId, fileName, and parts properties. It uses the completeMultipartUpload method from the S3 service to combine the uploaded parts and creates the final object. If successful, it returns the data object containing fileUrl about the completed upload.
Start the Server
Finally, add the following code to start the Express server:
app.listen(port, () => { console.log(`Server running on port ${port}`);});This code starts the Express server on port 3001 and logs a message to the console when the server is running.
Environment Variables
Create a new file named .env in the root directory of your project and add the following environment variables:
AWS_ACCESS_KEY=your-access-keyAWS_SECRET_KEY=your-secret-keyAWS_REGION=your-regionS3_BUCKET=your-bucket-nameReplace your-access-key, your-secret-key, your-region, and your-bucket-name with your actual AWS credentials and bucket name.
Running the Server
To run the server, execute the following command in your terminal:
node app.jsThis will start the server on port 3001.
Step 3: How to Set Up the Frontend with React
Now that the backend is set up, let’s create a React frontend to interact with the server and upload files to S3 using the multipart upload process.
The frontend will be in charge of splitting the file into parts, uploading each part to the server, and completing the upload process.
How to Initialize a React Project
Create a new React project using Create React App:
npx create-react-app s3-multipart-upload-frontendcd s3-multipart-upload-frontendInstall Required Packages
Install the following packages using npm:
npm install axiosCreate Components
Create a new file named Upload.js in the src/components directory and add the following code:
import React, { useState } from "react";import axios from "axios";const CHUNK_SIZE = 5 * 1024 * 1024; const FileUpload = () => { const [file, setFile] = useState(null); const [fileUrl, setFileUrl] = useState(""); const handleFileChange = (e) => { setFile(e.target.files[0]); }; const handleFileUpload = async () => { const fileName = file.name; const fileType = file.type; let uploadId = ""; let parts = []; try { const startUploadResponse = await axios.post( "http://localhost:3001/start-upload", { fileName, fileType, } ); uploadId = startUploadResponse.data.uploadId; const totalParts = Math.ceil(file.size / CHUNK_SIZE); console.log(totalParts); for (let partNumber = 1; partNumber <= totalParts; partNumber++) { const start = (partNumber - 1) * CHUNK_SIZE; const end = Math.min(start + CHUNK_SIZE, file.size); const fileChunk = file.slice(start, end); const reader = new FileReader(); reader.readAsArrayBuffer(fileChunk); const uploadPart = () => { return new Promise((resolve, reject) => { reader.onload = async () => { const fileChunkBase64 = btoa( new Uint8Array(reader.result).reduce( (data, byte) => data + String.fromCharCode(byte), "" ) ); const uploadPartResponse = await axios.post( "http://localhost:3001/upload-part", { fileName, partNumber, uploadId, fileChunk: fileChunkBase64, } ); parts.push({ ETag: uploadPartResponse.data.ETag, PartNumber: partNumber, }); resolve(); }; reader.onerror = reject; }); }; await uploadPart(); } const completeUploadResponse = await axios.post( "http://localhost:3001/complete-upload", { fileName, uploadId, parts, } ); setFileUrl(completeUploadResponse.data.fileUrl); alert("File uploaded successfully"); } catch (error) { console.error("Error uploading file:", error); } }; return ( <div> <input type="file" onChange={handleFileChange} /> <button disabled={!file} onClick={handleFileUpload}> Upload </button> <hr /> <br /> <br /> {fileUrl && ( <a href={fileUrl} target="_blank" rel="noopener noreferrer"> View Uploaded File </a> )} </div> );};export default FileUpload;The FileUpload component above handles the file upload process using the multipart upload method. It splits the file into chunks, uploads each part to the server, and completes the upload process.
The component consists of the following key parts:
CHUNK_SIZE: The size of each part in bytes. In this case, we are using 5MB parts.
handleFileChange: A function that sets the selected file in the state.
handleFileUpload: A function that initiates the multipart upload process by sending the file to the server in parts.
- It starts the upload process by calling the /start-upload endpoint and retrieves the uploadId.
- It splits the file into chunks and uploads each part to the server using the /upload-part endpoint.
- It completes the upload process by calling the /complete-upload endpoint with the uploadId and parts array.
fileUrl: A state variable that stores the URL of the uploaded file.
The component renders an input field for selecting a file, a button to upload the file, and a link to view the uploaded file.
App Component
Update the App.js file in the src directory with the following code:
import React from "react";import FileUpload from "./components/FileUpload";function App() { return ( <div className="App"> <h1>Large File Upload with S3 Multipart Upload</h1> <FileUpload /> </div> );}export default App;The App component renders the FileUpload component, which handles the file upload process.
How to Start the Frontend
To run the frontend, execute the following command in your terminal:
npm startThis will start the React development server on port 3000 and open the application in your default web browser.
Testing
Let’s test the application by uploading a large file using the frontend. You should see the file being uploaded in parts and then combined to create the final object on the server inspecting your network tab.
Part Upload
In the image below, the start-upload endpoint is called to initialize and start the upload process. The large file uploaded is broken into chunks and uploaded with the upload-part endpoint. You can see up to 10 or more (depending on the size of each chunk to the total file size).
Each upload part has a unique identifier Etag used for the complete upload.
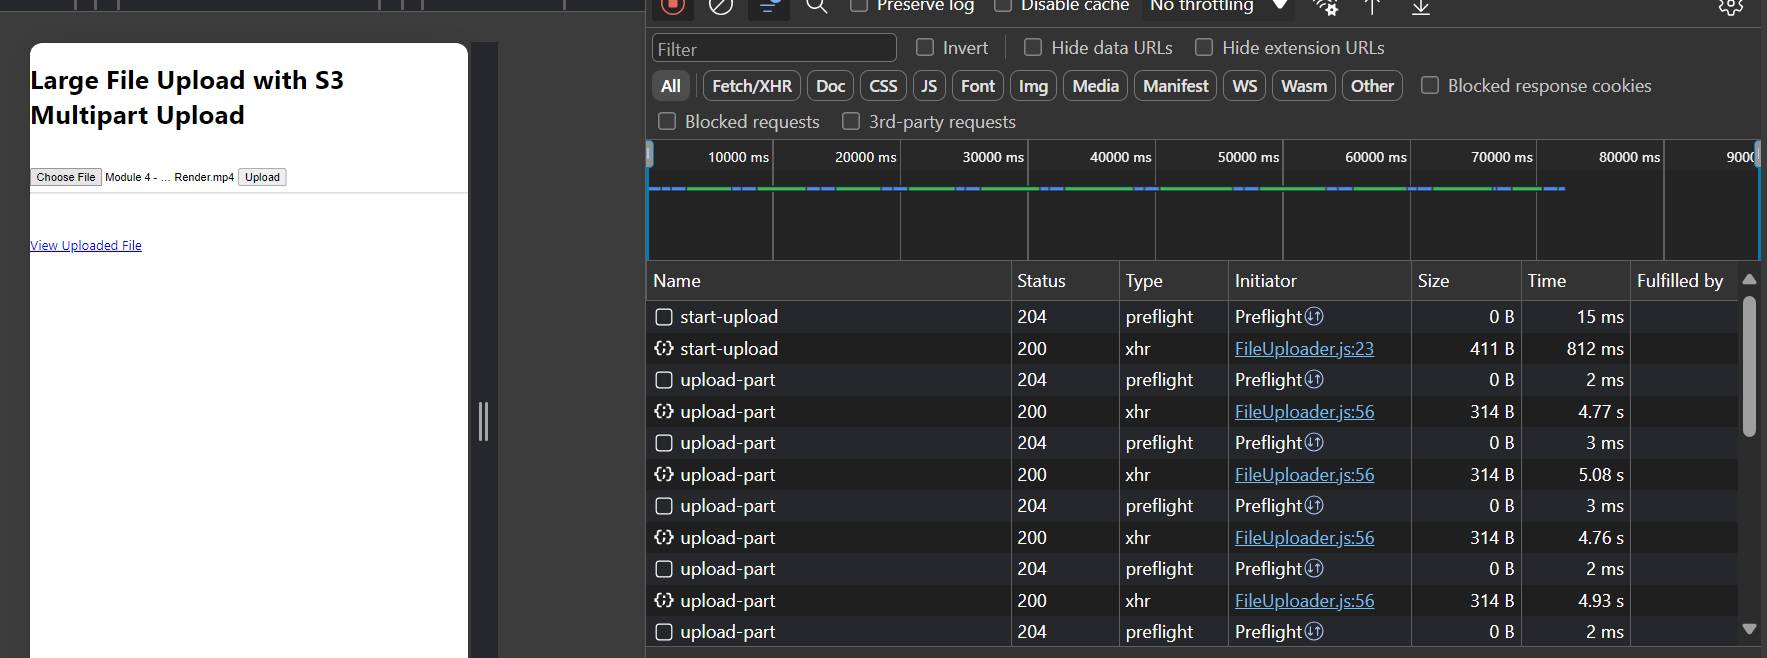 Image uploading in parts
Complete Part Upload
The last and final step of the process is the complete-upload endpoint where the upload parts are combined to form a single object for the file uploaded.
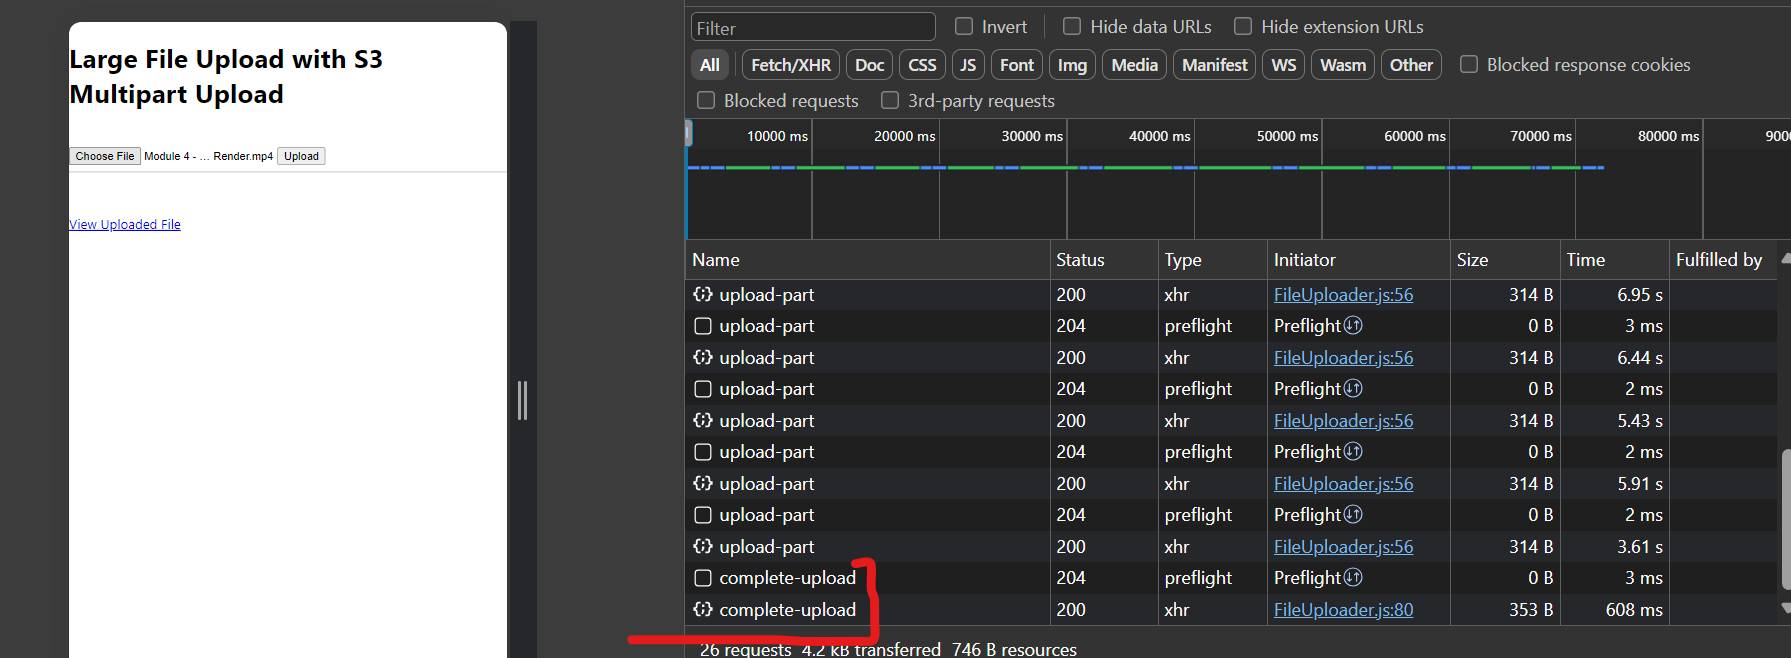 Image uploads completed
You can click on the View Uploaded File to access your uploaded file.
Full Code on GitHub
Click the link below to access the full code on GitHub:
Multipart file uploads with react and NodeJS
Conclusion
In this article, we explored how to efficiently handle large files with Amazon S3 multipart upload. We discussed the benefits of using this feature, walked through the process of uploading files in parts, and provided code examples using Node.js and React.
This is a high-level implementation of the multipart upload process, you can further enhance it by adding more features like progress tracking, error handling, and resumable uploads.
By leveraging Amazon S3 multipart upload, you can optimize file uploads in your applications by dividing large files into smaller parts, uploading them independently, and combining them to create the final object. This approach not only enhances upload performance but also adds fault tolerance and flexibility to pause and resume uploads, making it ideal for handling large files over unstable networks.