
包阅导读总结
1. 关键词:ComfyUI、自定义节点、工作流、小部件、部署
2. 总结:本文是关于 ComfyUI 自定义节点的指南,涵盖向服务器 API 添加路由、更改画布菜单、小部件操作、数据类型处理等,还介绍了部分 Comfy 类型和 Python 对象,以及自定义节点的部署方式和节点执行顺序。
3. 主要内容:
– 向服务器 API 添加路由
– Python 代码示例
– JavaScript 代码示例
– 画布菜单操作
– 右键点击背景出现,可添加自定义项
– 更改小部件的值
– 更改自身节点小部件值
– 更改其他节点小部件值
– 让小部件拥有 control_after_generate
– 以 KSampler 节点为例
– 在其他节点中的实现代码
– 自定义数据类型
– 在自定义节点间传递 Python 对象
– 作为必需输入和创建新数据类型的小部件
– 仅用于显示的小部件
– 节点代码及相关功能实现
– 处理输入和输出的小部件
– 提供 `getCustomWidgets` 方法声明
– 自定义小部件的字段
– Comfy 类型和 Python 对象
– 介绍多种类型及备注
– 调节传递对象的格式
– 自定义节点的部署
– 通过 `NODE_CLASS_MAPPINGS` 加载
– 可提供 `NODE_DISPLAY_NAME_MAPPINGS`
– 节点执行顺序
– 通过 Tiny Terra Nodes 添加选项显示执行顺序
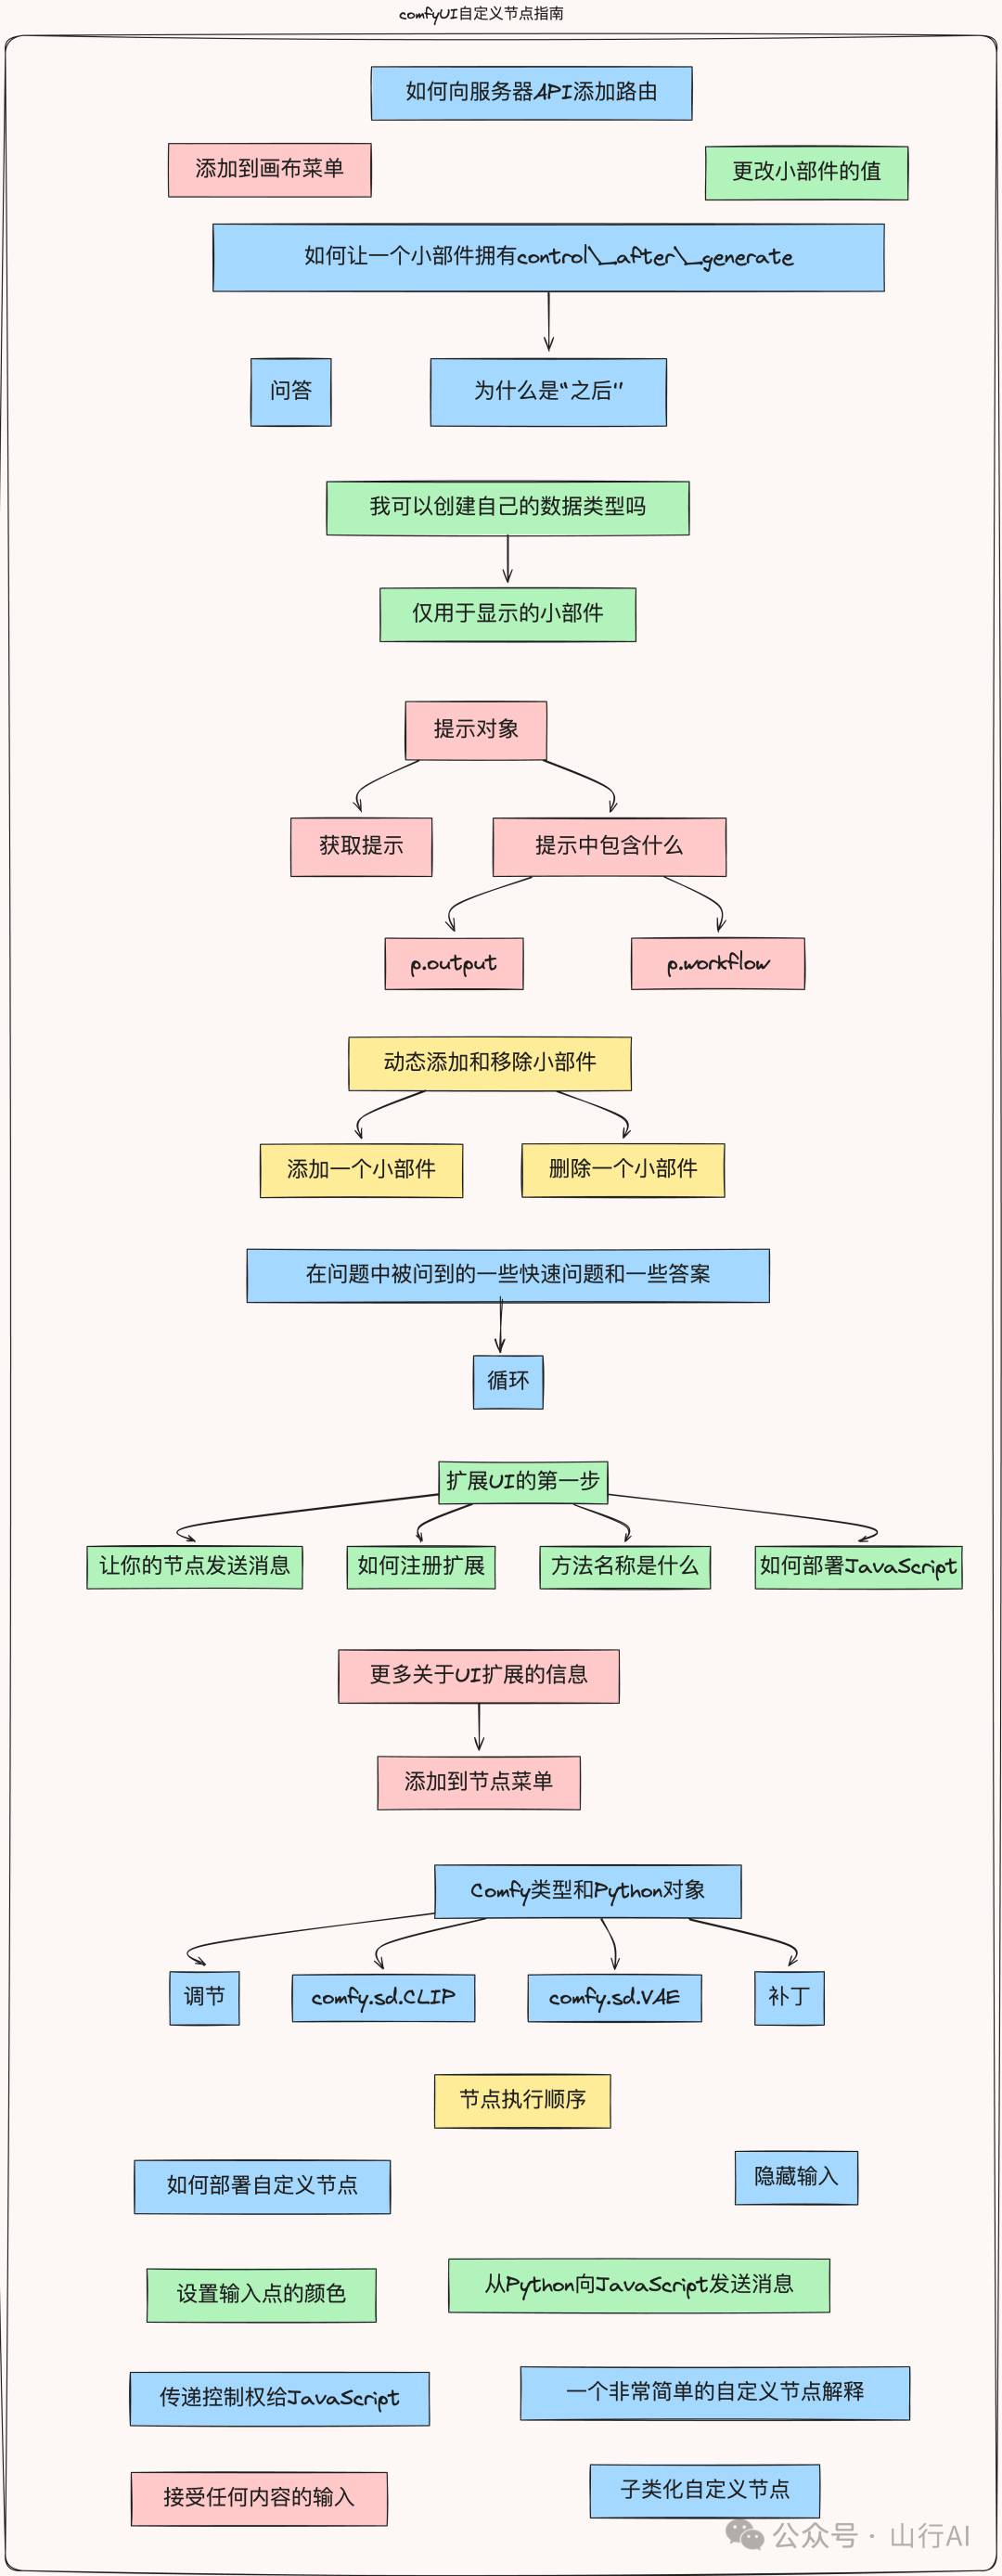
思维导图: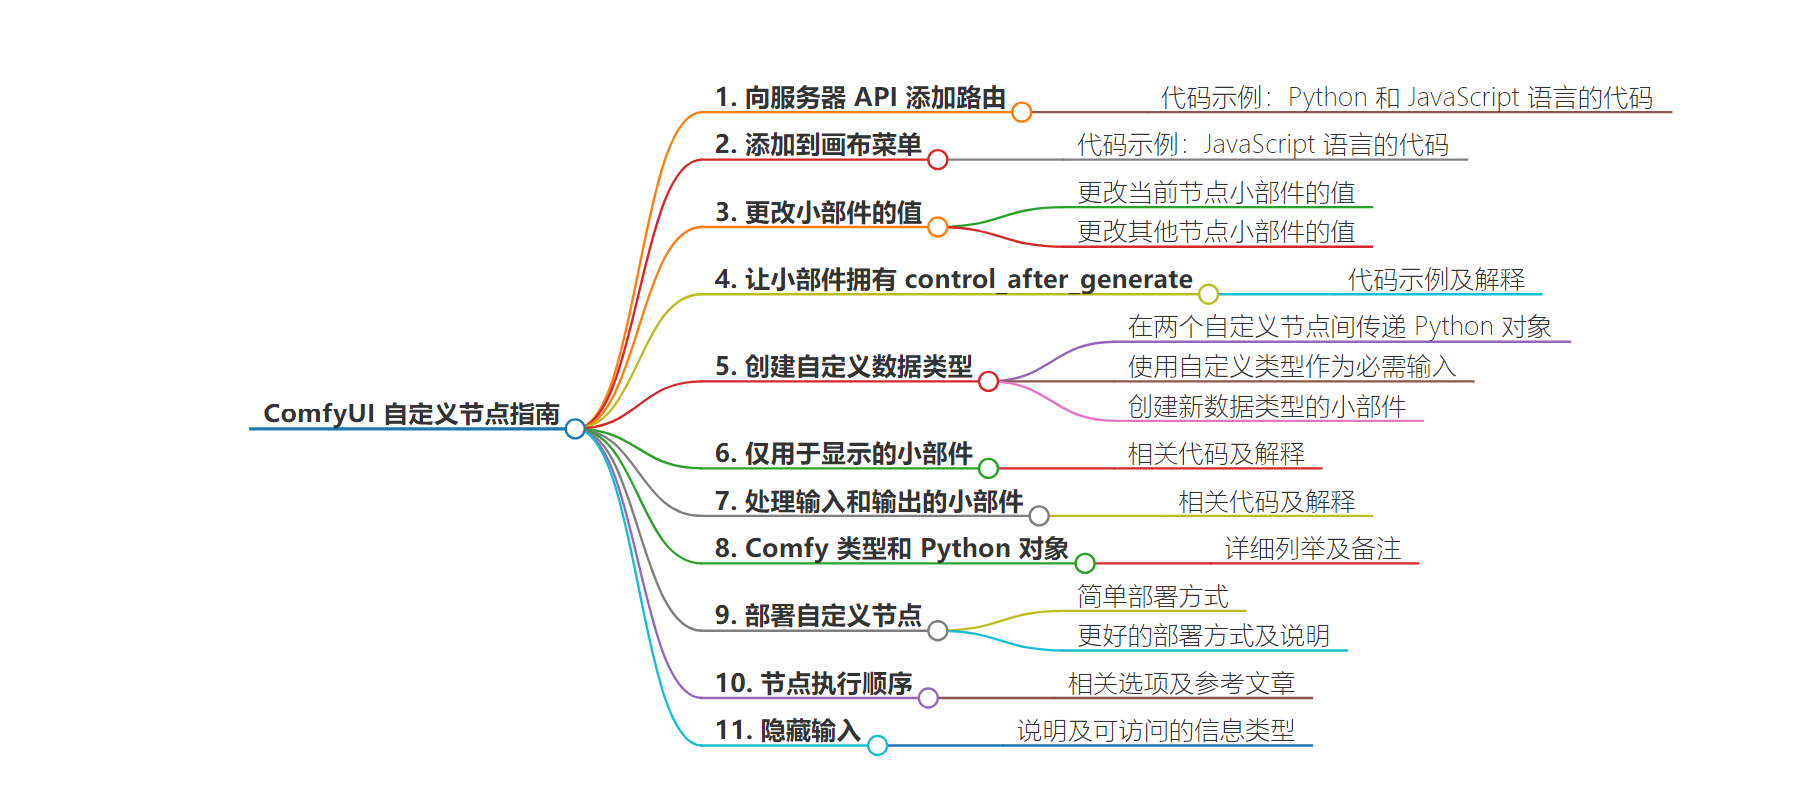
文章地址:https://mp.weixin.qq.com/s/H03FExLnB6kshtvz59U2HQ
文章来源:mp.weixin.qq.com
作者:山行AI
发布时间:2024/8/1 13:01
语言:中文
总字数:8417字
预计阅读时间:34分钟
评分:90分
标签:ComfyUI,自定义节点,服务器 API 集成,Python 对象,JavaScript 集成
以下为原文内容
本内容来源于用户推荐转载,旨在分享知识与观点,如有侵权请联系删除 联系邮箱 media@ilingban.com
本文整理自github仓库,是笔者见到的众多有指导意义的ComfyUI节点指南之一。这里的所有内容(最终)将成为更官方文档的一部分,地址是docs.comfy.org[1].
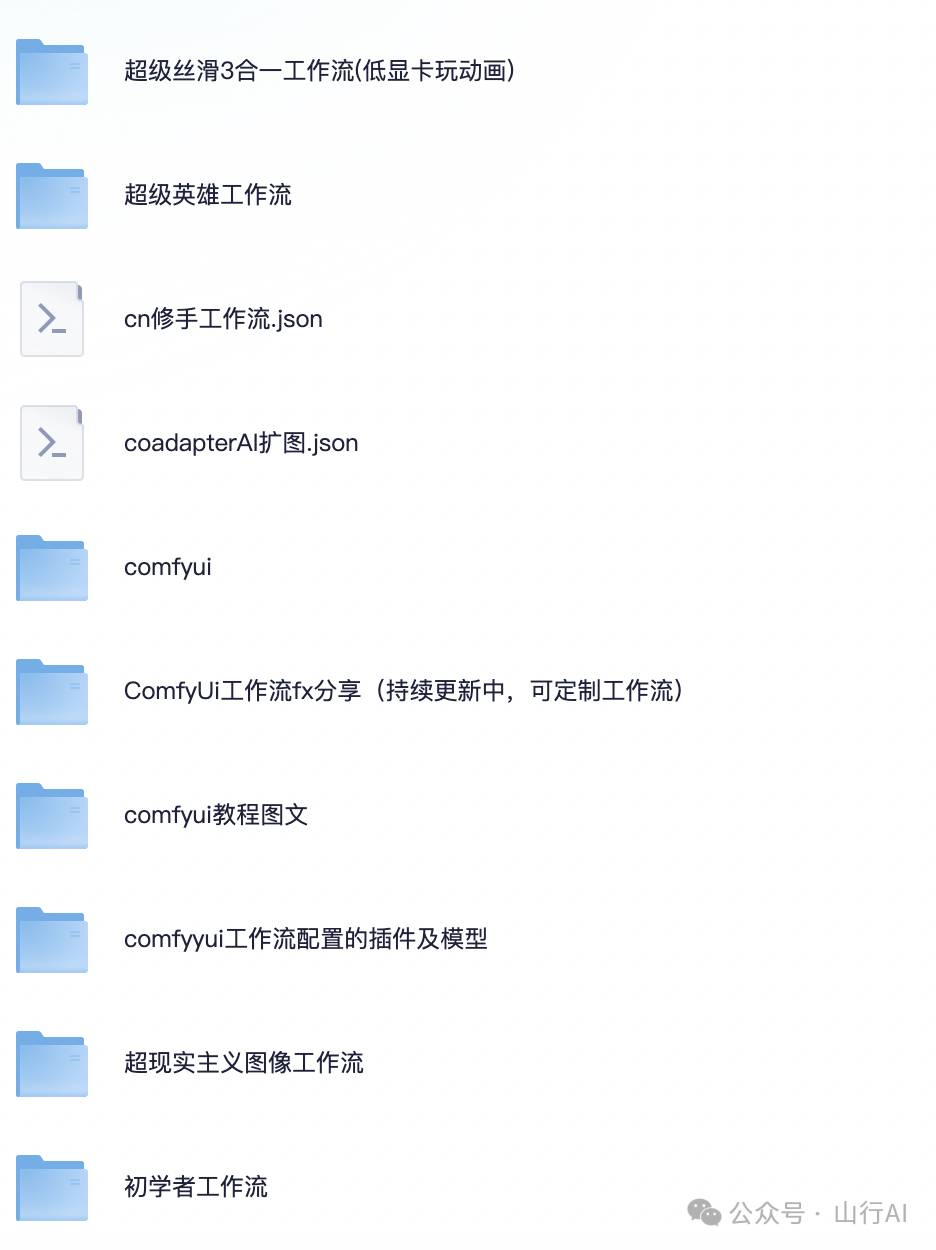
另外,这里提供一个福利,小伙伴可以在公众号后台回复关键字“工作流”或“comfyui”即可免费获取全套工作流,部分截图如下:
如何向服务器 API 添加路由
在您的自定义节点 Python 文件中…
from server import PromptServerfrom aiohttp import webroutes = PromptServer.instance.routes@routes.post('/a_new_path')async def my_hander_method(request):post = await request.post()x = post.get("something")return web.json_response({})
在 JavaScript 中,代码类似于:
```javascriptconst exampleFunction = () => {console.log('This is an example function');};exampleFunction();
function send_message(message) {const body = new FormData();body.append('something',message);api.fetchApi("/a_new_path", { method: "POST", body, });}
添加到画布菜单
画布菜单是当你右键点击背景时出现的菜单,可以用于添加节点等。你可以向其中添加:
async setup() {const original_getCanvasMenuOptions = app.canvas.getCanvasMenuOptions; // save the original functionapp.canvas.getCanvasMenuOptions = function () {const options = original_getCanvasMenuOptions.apply(this, arguments); // call the original functionoptions.push(null); // divideroptions.push({content: `Menu item text`,disabled: false, // or a function determining whether to disablecallback: () => {// action when clicked goes in here}});return options; // return the menu options with your custom ones added}}
更改小部件的值
也许你希望一个节点更新其小部件。这并不难,但有一个陷阱:这不会更改当前运行的值(即使节点尚未执行,整个提示已经被发送)。这就是为什么Comfy有control_after_generate而不是control_before_generate!
// somewhere inside a callback, perhaps in onExecuted, you want to set the value of a widget called `name_of_widget` to `new_value`var w = this.widgets?.find((w) => w.name === 'name_of_widget')if (w) {w.value = new_value;this.onResize?.(this.size); // onResize redraws the node}
如果你想更改的是另一个节点呢?如果你知道它的id,操作方式基本相同:
var node_id = parseInt(other_node_id); // if you have it as a string it needs to be an intvar node = this.graph._nodes_by_id[node_id]; // for you to look it up like thisvar w = node?.widgets.find((w) => w.name==='name_of_widget'); // and then it's just the sameif (w) {w.value = new_value;node.onResize?.(node.size);}
如何让一个小部件拥有 control_after_generate
在 KSampler 节点中,种子(Seeds)是一个带有附加功能的 INT – 控制生成后设置(control_after_generate)。这个功能会自动添加到任何名为 seed 或 noise_seed 的 INT 中。如果你想将它应用到另一个小部件(例如,variation_seed…),以下是我在 variation noise 节点中使用的代码:
import { app } from "../../../scripts/app.js";import { addValueControlWidget } from "../../../scripts/widgets.js";app.registerExtension({name: "my.unique.extension.name",async nodeCreated(node) {const variationSeedWidgetIndex = node.widgets?.findIndex((w) => w.name === 'variation_seed');if (variationSeedWidgetIndex > -1) {const variationSeedWidget = node.widgets[variationSeedWidgetIndex];const variationSeedValueControl = addValueControlWidget(node, variationSeedWidget, "fixed");node.widgets.splice(variationSeedWidgetIndex+1,0,node.widgets.pop());}}});
nodeCreated 会在每个节点类型被创建时调用;在节点的小部件中查找名为 variation_seed 的小部件,使用 addValueControlWidget 方法将控件添加到小部件列表的末尾,然后使用 splice 方法将其移动到 variation_seed 之后。
为什么是“之后”?
控件位于生成按钮之后是因为 ConfyUI 的工作方式:当你队列一个提示时,整个内容(图表和小部件的值)会被打包并发送到后端。代码通常会在节点上响应运行(进度条、图像等),此时更改小部件对执行没有任何影响。所以通常JavaScript只能在下一次运行前更改一些内容。
我可以创建自己的数据类型吗?
如果你只是想在两个自定义节点之间传递Python对象,你不需要做任何复杂的操作。只需选择一个(唯一的)字符串(比如,CHEESE),并用它来描述RETURN_TYPE和INPUT_TYPE。ComfyUI(无论是在Python后端的execution.py文件中,还是在JavaScript前端)只会检查字符串是否相同——因此你将能够连接这些节点,并且你的Python对象会被传递过去。drago87[3]发现,如果你想使用自定义类型作为必需输入,你需要执行一个 forceInput:
"required": {"info": ("CHEESE",{"forceInput": True})}
如果你需要一个创建新数据类型的小部件,你将需要一个自定义小部件[4]。
仅用于显示的小部件
以下是一个仅显示一些 HTML 的节点代码…
import { app } from "../../../scripts/app.js";import { $el } from "../../../scripts/ui.js";/*A method that returns the required style for the html*/function get_position_style(ctx, widget_width, y, node_height) {const MARGIN = 4; // the margin around the html element/* Create a transform that deals with all the scrolling and zooming */const elRect = ctx.canvas.getBoundingClientRect();const transform = new DOMMatrix().scaleSelf(elRect.width / ctx.canvas.width, elRect.height / ctx.canvas.height).multiplySelf(ctx.getTransform()).translateSelf(MARGIN, MARGIN + y);return {transformOrigin: '0 0',transform: transform,left: `0px`,top: `0px`,position: "absolute",maxWidth: `${widget_width - MARGIN*2}px`,maxHeight: `${node_height - MARGIN*2}px`, // we're assuming we have the whole height of the nodewidth: `auto`,height: `auto`,}}app.registerExtension({name: "the.unique,name",async beforeRegisterNodeDef(nodeType, nodeData, app) {if (nodeType.comfyClass=="HtmlNode") {/*Hijack the onNodeCreated call to add our widget*/const orig_nodeCreated = nodeType.prototype.onNodeCreated;nodeType.prototype.onNodeCreated = function () {orig_nodeCreated?.apply(this, arguments);const widget = {type: "HTML", // whatevername: "flying", // whateverdraw(ctx, node, widget_width, y, widget_height) {Object.assign(this.inputEl.style, get_position_style(ctx, widget_width, y, node.size[1])); // assign the required style when we are drawn},};/*Create an html element and add it to the document.Look at $el in ui.js for all the options here*/widget.inputEl = $el("img", { src: "http://127.0.0.1:8188/view?filename=misc-stained+glass_00001_.png&subfolder=2023-10-16&type=output" });document.body.appendChild(widget.inputEl);/*Add the widget, make sure we clean up nicely, and we do not want to be serialized!*/this.addCustomWidget(widget);this.onRemoved = function () { widget.inputEl.remove(); };this.serialize_widgets = false;}}},})
class HtmlNode:CATEGORY = "quicknodes"@classmethoddef INPUT_TYPES(s):return { "required":{} }RETURN_TYPES = ()RETURN_NAMES = ()FUNCTION = "func"def func(self):return ()
处理输入和输出的小部件
一个节点插件可以提供一个方法getCustomWidgets来声明一个处理数据类型CHEESE的小部件。
getCustomWidgets(app) {return {CHEESE(node, inputName, inputData, app) { // We return an object containing a field CHEESE which has a function (taking node, name, data, app)const widget = /* see below */; // that creates a widgetwidget.something = something; // maybe adds stuff to itnode.addCustomWidget(widget); // adds it to the nodereturn widget; // and returns it.}}},
我们可以在输入和输出中使用CHEESE。
"required": { "slice": ("CHEESE",),一个自定义小部件可能会有很多字段,但这里有一些开始使用的字段:
const widget = {type: inputData[0], // the type, CHEESEname: inputName, // the name, slicesize: [128,128], // a default sizedraw(ctx, node, width, y) {// a method to draw the widget (ctx is a CanvasRenderingContext2D)},computeSize(...args) {return [128,128]; // a method to compute the current size of the widget},async serializeValue(nodeId,widgetIndex) {return "Data That Goes to the Python Side";}}
查看litegraph.js[5]可以为你提供有关节点组件的更多信息。
Comfy 类型和 Python 对象
| 舒适类型 | Python | 备注 |
| CLIP | comfy.sd.CLIP | 见下文 |
| CONDITIONING | 条件列表 | 见下文 |
| FLOAT | float | 作为输入,您可以指定 “min”、”max”、”default”、”step” |
| IMAGE | torch.Tensor,形状为 [B,H,W,C] | 一批 B 张图像。C=3 (RGB) |
| INT | int | 作为输入,您可以指定 “min”、”max”、”default” |
| LATENT | dict | ‘samples’ 是样本的键,值为 torch.Tensor |
| MASK | torch.Tensor,形状为 [H,W] 或 [B,C,H,W] | 注意与 IMAGE 的形状区别! |
| MODEL | model_base.BaseModel 或 model_base.SD21UNCLIP | 见 model_base.py |
| STRING | str | 作为输入类型,必须提供 “default” |
| VAE | comfy.sd.VAE | 见下文 |
调节
传递的对象是一个列表,其中的每个元素代表一个调节(所以该列表可以表示一个或多个调节)。列表中的每个条目本身是一个长度为2的列表,包含一个张量(形状,至少对于SDXL来说,是[1,77,2048]),该张量保存了77个调节向量(我假设第一个维度是批次?),以及一个最初包含键pooled_output的字典,值是一个张量(形状为[1,1280])。可以将其他内容添加到此字典中,以控制调节的使用;请参阅各种ConditioningSet....节点。
comfy.sd.CLIP
请参阅 sd.py 中的定义,特别是它在 load_checkpoint 方法中的构造方式。
一个 CLIP 对象包含:
•一个comfy.model_patcher.ModelPatcher,它包装了一个模型并允许对其应用补丁(见下文)•底层的 clip 通常是sd2_clip.SD2ClipModel或sd1_clip.SD1ClipModel•一个分词器,通常是 sd2_clip.SD2Tokenizer 或 sd1_clip.SD1Tokenizer•一个 layer_idx(用于 clip_skip?)
comfy.sd.VAE
一个VAE基本上是其self.first_stage_model的封装器,该self.first_stage_model是一个ldm.models.autoencoder.AutoencoderKL
补丁
Comfy中的模型(可以)被封装在一个ModelPatcher类中,该类允许对模型应用补丁(例如LoRAs);ModelPatcher基本上只是保持这些补丁,直到模型运行时,它们才会被应用到模型的适当步骤。
如何部署自定义节点
自定义节点通过NODE_CLASS_MAPPINGS属性由 ComfyUI 加载,该属性是一个字典,以全局唯一的节点名称作为键,自定义节点类型作为值。您还可以选择提供NODE_DISPLAY_NAME_MAPPINGS,将唯一节点名称映射到显示名称。
如果您有一些非常简单的内容,您只需将 Python 文件放入 custom_nodes 目录,并添加
NODE_CLASS_MAPPINGS = { "my unique name" : SimpleCustomNode }NODE_DISPLAY_NAME_MAPPINGS = { "my unique name" : "Image inverter" }
这是它工作的截图…
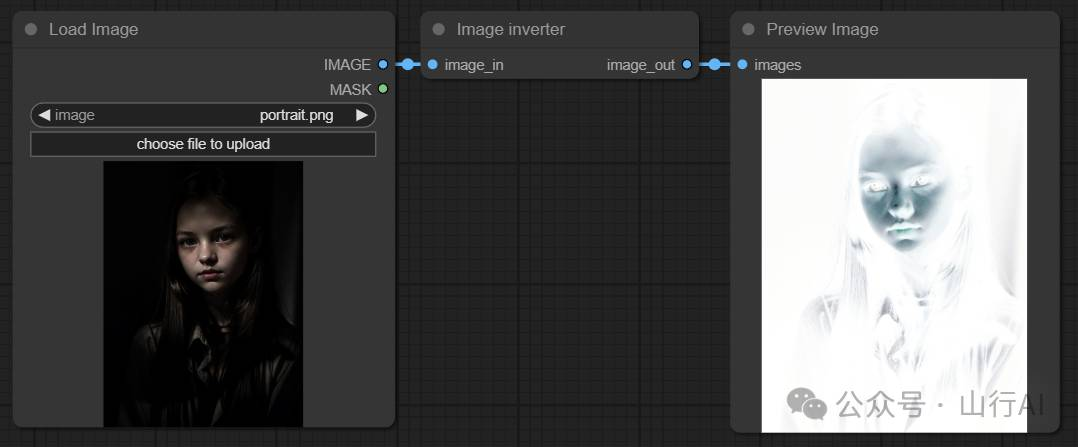 screenshot
但更好的做法是将自定义节点放在它们自己的子目录中(如果你打算通过 git 部署它们,这就是它们的最终形式),在这种情况下,你需要添加一个__init__.py文件,其内容如下:
from .simple_source_file import SIMPLE_CUSTOM_NODENODE_CLASS_MAPPINGS = { "my unique name" : SimpleCustomNode }NODE_DISPLAY_NAME_MAPPINGS = { "my unique name" : "Image inverter" }__all__ = ['NODE_CLASS_MAPPINGS', 'NODE_DISPLAY_NAME_MAPPINGS']
不确定__init__.py文件是什么?当一个模块(目录)被导入时,Python 会加载它。对于自定义节点,你只需要知道你需要创建一个目录(在custom_nodes中),并在该目录中放置你的源代码文件和包含上述代码的__init__.py文件。除此之外暂时不需要其他东西。
节点执行顺序
Tiny Terra Nodes[6]在节点右键上下文菜单中添加了“显示执行顺序 (ttN)”选项,该选项会在节点角落切换执行顺序标志(以及其他许多功能!) 你可能想阅读的是这篇文章[7]
隐藏输入
由INPUT_TYPES返回的字典有一个可选键'hidden',该键允许节点接收不来自节点输入的信息。可以通过这种方式访问三种信息,它们分别由字符串PROMPT、EXTRA_PNGINFO和UNIQUE_ID标识。要查看所有这些信息:
@classmethoddef INPUT_TYPES(cls):return {"required" : {},"hidden" : {"prompt": "PROMPT","extra_info": "EXTRA_PNGINFO","id": "UNIQUE_ID",}}def my_function(self, prompt:dict, extra_info:dict, id:int):...code...
注意,hidden的值只是str,而不像required和optional那样使用tuple(str,dict)。
EXTRA_PNGINFO是将在图像中保存的元数据字典。你可以选择向其中添加自定义元数据。
PROMPT是提示(由前端发送的工作请求)。它比较复杂,但你可以使用它来访问(甚至更改)小部件的值或之前计算的输出。你需要了解执行顺序才能使其工作。在方法中设置一个断点,并使用调试器查看字典。UNIQUE_ID节点的ID(由UI确定并在提示中使用)
Lerc 提供的一些详细信息:
隐藏输入是指不需要显式提供的输入。它们在节点类的FUNCTION字段中声明的执行函数中作为输入起作用。
隐藏输入的值会自动填充。
https://github.com/comfyanonymous/ComfyUI/blob/77c124c5a17534e347bdebbc1ace807d61416147/execution.py#L32
h = valid_inputs["hidden"]for x in h:if h[x] == "PROMPT":input_data_all[x] = [prompt]if h[x] == "EXTRA_PNGINFO":if "extra_pnginfo" in extra_data:input_data_all[x] = [extra_data['extra_pnginfo']]if h[x] == "UNIQUE_ID":input_data_all[x] = [unique_id]
设置输入点的颜色
可能有点小众,但…你最有可能想在onConnectionsChange中执行此操作,所以:
const onConnectionsChange = nodeType.prototype.onConnectionsChange;nodeType.prototype.onConnectionsChange = function (side,slot,connect,link_info,output) {this.inputs[0].color_on = app.canvas.default_connection_color_byType["STRING"]; // set color_on on an input - here I'm reading the color for STRING from the color palletonConnectionsChange?.apply(side,slot,connect,link_info,output); // and then process the change (which includes a redraw)}
提示对象
提示对象是通过JavaScript发送到后端服务器的内容。
获取提示
相关调用是异步函数
所以要查看当前工作流程的提示,您可以等待它:
const p = structuredClone(await app.graphToPrompt());我不确定structuredClone是否必不可少,但使用它可以确保如果你确实进行更改,它们只会影响你的副本,而不会影响任何底层对象——由于底层代码可能在未来的版本中发生变化,最好还是安全一点。
如果你想更改发送的提示语,可以劫持这个调用
async setup() {/*The graphToPrompt method is called when the app is going to send a prompt to the server.We hijack it, call the original, and return a modified copy.*/_original_graphToPrompt = app.graphToPrompt;app.graphToPrompt = async function () {const p = StructuredClone(await _original_graphToPrompt.apply(app));// edit preturn p;}
提示中包含什么?
像往常一样,最好的答案是在你的浏览器代码检查器中添加一个断点,并查看!
p包含两样东西:p.output和p.workflow。
p.output
一个由 node_id 索引的所有节点的列表,包含所有输入到节点的值。是的,一个输入列表在一个叫做output的对象中。搞清楚了吧。
p.output[node_id].class_type // string of the unique name of the node class (from the python)p.output.inputs[input_name] // the value of the widget// OR a list indicating the node this input is connected to [node_id_as_string, output_slot]// OR undefined for unconnected input
p.workflow
工作流程。
p.workflow.config // not sure - seems to be emptyp.workflow.extra // not sure - seems to be emptyp.workflow.groups // a list of groupsp.workflow.groups[n].bounding // list length 4 for the bounding box - I think its [x,y,w,h] in the current view.color.font_size.titlep.workflow.last_link_id // the highest numbered link in the links list (below)p.workflow.last_node_id // the highest numbered node in the nodes list (below)p.workflow.links // a list of links, each of which is a list containing:// [link_id, source_node_id, source_node_output_slot, destination_node_id, destination_node_input_slot, type]// type is a string, the rest are integersp.workflow.nodes // a list of nodes (see below)p.workflow.version // current value 0.4node = p.workflow.nodes[n]node.flags // dunnonode.id // id (as an integer)node.mode // 0 = ALWAYS, 1 = ON_EVENT, 2 = NEVER, 3 = ON_TRIGGER, 4 = BYPASSED (I've only seen 0 and 4 in Comfy)node.order // position in execution order (zero index)node.outputs // the outputsnode.outputs[n].links // array of integers which correspond to the link_id in p.workflow.links.name.slot_index.typenode.pos // position (relative to current view, I think)node.properties // I've only seen 'Node node for S&R'node.size // size!node.type // string of the unique name of the node class (from the python)node.widgets_values // array of the value of the widgets
从Python向JavaScript发送消息
在Python中,只需使用Prompt Server通过一个唯一的句柄发送消息。消息是JSON可序列化的字典。
from server import PromptServerdictionary_of_stuff = {"something":"A text message"}PromptServer.instance.send_sync("my-message-handle", dictionary_of_stuff)
在JavaScript中,为你的唯一句柄添加一个事件监听器,并为其提供一个方法来调用事件。发送的字典可以在event.detail中找到。
import { app } from "../../../scripts/app.js";def myMessageHandler(event) {alert(event.detail.something);}// in setup()api.addEventListener("my-message-handle", myMessageHandler);
更多内容,请查看此处的示例:传递控制权给JavaScript[8]
传递控制权给JavaScript
由lakmeer[9]贡献
这个示例简化了@chrisgoringe的图像选择器[10]节点,以说明如何暂停图形执行并等待在JavaScript端处理某些事情。首先,以正常方式定义你的自定义节点。在这个例子中,节点将有一个输入和一个输出,类型都是INT,前端只会将输入的数字加倍并传递到输出。
后端:custom_nodes/proxy.py
from server import PromptServerfrom aiohttp import webimport time
我们将使用这些材料来处理收到的回复。
class ClientProxy:def __init__(self): pass@classmethoddef INPUT_TYPES(s):return {"required": {},"optional": {"input": ("INT", {}),},"hidden": {"id": "UNIQUE_ID",}}CATEGORY = "proxies"FUNCTION = "run"RETURN_TYPES = ("INT",)RETURN_NAMES = ("out",)
这是所有正常的自定义节点内容,它创建了我们的单进单出节点,并将其放入Comfy节点菜单的“proxies”类别。不要忘记RETURN属性中的尾随逗号,否则Python会将我们的1元组折叠成一个单一值。
def IS_CHANGED(id):return float("NaN")
定义此函数可以让你有机会强制节点每次都执行。默认情况下,Comfy会跳过你的节点,除非输入发生了变化。通过在这里设置为True,客户端代码将始终被调用。
【Chris编辑 – 这段代码最初是return True,你可能会认为这是合理的。但comfy代码使用IS_CHANGED像哈希值一样,比较它与上次调用的值if is_changed != is_changed_old:,所以要让它始终重新执行,你需要返回一个之前从未返回过的值。NaN可以做到这一点,或者random.random()也是一个替代方案。】
def run(self, id, input):me = prompt[id]PromptServer.instance.send_sync("proxy", {"id": id,"input": input,})outputs = MessageHolder.waitForMessage(id)return (outputs['output'],)
在我们的节点主方法中,我们从隐藏输入中请求id,并将其打包到发往前端的消息中。
同一个文件,新的类:
# Message Handlingclass MessageHolder:messages = {}@classmethoddef addMessage(self, id, message):self.messages[str(id)] = message@classmethoddef waitForMessage(self, id, period = 0.1):sid = str(id)while not (sid in self.messages):time.sleep(period)message = self.messages.pop(str(id),None)return message
waitForMessage将一直运行,直到 API 收到具有匹配 ID 的消息,并通过addMessage添加该消息。
向 Comfy 的 API 添加一个新路由:
routes = PromptServer.instance.routes@routes.post('/proxy_reply')async def proxy_handle(request):post = await request.json()MessageHolder.addMessage(post["node_id"], post["outputs"])return web.json_response({"status": "ok"})
请求体可以是您需要的任何内容,在本示例中,它看起来如下:
{node_idoutputs: {output}}
我们只提取outputs块传递给MessageHolder。
回到run方法中,waitForMessage将给我们outputs块,我们可以返回这些值作为节点的输出,并且执行将从那里继续。
前端
在你的前端代码中,通过使用 Comfy 的 API 类(import {api} from '../../scripts/api.js')来建立与 API 的连接。你现在可以订阅 websockets 流上的proxy事件:
api.addEventListener('proxy', function proxyHandler (event) {const data = event.detailconst reply = {node_id: data.id,outputs: {output: data.input * 2}}
在这里,我们为示例实现了倍增函数,构建了回复对象,然后将其发送到我们的自定义 API 路由:
api.fetchApi("/proxy_reply", {method: "POST",headers: {"Content-Type": "application/json",},body: JSON.stringify(reply),})})
这应该是你在前端处理一些数据作为工作流执行的一部分所需的一切。要获得更复杂的实现,请参考图片选择器[11]节点,该节点实现了一种在waitForMessage中中止while循环的方法,以防止服务器卡住,在新提示开始时重置状态,以及其他一些你需要考虑的事项,以为节点用户创造无缝的体验。
在问题中被问到的一些快速问题和一些答案
循环
我需要一个简单的循环逻辑,有没有什么实现的想法?我想象有一个节点 “LoopStart” 和一个节点 “LoopEnd”,它们将决定是否激活返回到开始的连接或向前到下一个节点的连接,具体取决于循环索引。不过,我找不到任何信息来确定是否可以决定激活或不激活某些输出/连接,而且我猜 ComfyUI 可能会因循环而阻塞工作流。
你能给一些建议吗?建议你不要这样做 : )。Comfy 的工作方式是从一开始就提交一个完整的提示——之后修改逻辑并不容易。如果你提交一个带有循环的提示,通常会导致 Python 后端崩溃。
我所做的是使用在运行之间保持状态的节点,然后使用自动提交选项使 Comfy 重复提交相同的工作流。
动态添加和移除小部件
添加一个小部件
假设你想添加一个小部件来显示一些文本… 代码看起来会有点像这样(假设this是节点的上下文)
import { ComfyWidgets } from "../../../scripts/widgets.js";//...var w = this.widgets?.find((w) => w.name === "name_of_the_widget"); // see if it already existsif (w === undefined) {w = ComfyWidgets["STRING"](this, "name_of_the_widget", ["STRING", { multiline: true }], app).widget; // see description beloww.inputEl.readOnly = true; // make it read onlyw.inputEl.style.opacity = 0.6; // any css styling you wantw.inputEl.style.fontSize = "9pt";}w.value = "Text to display";this.onResize?.(this.size); // this will make it redraw
主线是调用文件scripts/widgets.js中的一个方法,其中有
export const ComfyWidgets = {//...STRING(node, inputName, inputData, app) {// code that creates the widget as res and adds it to the node using node.addWidget or similar callsreturn res;
看看 – 在撰写本文时,大约在第318行。
首先要注意的是参数——它接受一个父节点(在我们的调用中是this),一个输入名称,inputData,以及对应用程序的引用。inputData是javascript中等同于在python中用于定义INPUT_TYPE的tuple(str, dict)。
另外要注意的是,返回的对象包含一个.widget属性的小部件。我还没有看到其他可能包含在res中的示例——无论如何,我们的代码只提取.widget属性。
删除一个小部件
以下是一个函数,如果命名的小部件存在,它将从节点中移除该小部件:
function remove_widget(node, widget_name) {const w = node.widgets?.findIndex((w) => w.name === widget_name); // search for the widget nameif (w>=0) { // if we find it (if not, w = -1)const wid = node.widgets[w]; // get the widget itself (w is the index)node.widgets.splice(w,1); // remove itwid?.onRemove(); // let the widget do any cleaning upnode.size = node.computeSize(); // work out what size the node should be nownode.setDirtyCanvas(true, true); // mark for redrawing}}
最后一行是另一种(可能更好)使节点被绘制的方法——我们将其画布标记为“脏”(两个参数分别是前景和背景)
一个非常简单的自定义节点解释
这是一个自定义节点,它有一个(图像)输入和一个(图像)输出,并且简单地反转图像。
class SimpleCustomNode:@classmethoddef INPUT_TYPES(cls):return {"required": { "image_in" : ("IMAGE", {}) },}RETURN_TYPES = ("IMAGE",)RETURN_NAMES = ("image_out",)FUNCTION = "invert"CATEGORY = "examples"def invert(self, image_in):image_out = 1 - image_inreturn (image_out,)
代码定义了输入 (INPUT_TYPES)、输出 (RETURN_TYPES和RETURN_NAMES)、实际函数 (FUNCTION和invert),以及在添加节点菜单中的位置 (CATEGORY)。
CATEGORY是指在 ComfyUI 的“添加节点”菜单中找到节点的位置。所以上述示例会将自定义节点放入一个名为“examples”的菜单项中。你可以通过路径来创建子菜单(例如CATEGORY = "examples/simple"会在 examples 菜单中创建一个名为 simple 的子菜单,就像内置节点中的“latent/inpaint”一样)。FUNCTION是节点在执行时将调用的函数名称(在本例中为invert)。
RETURN_TYPES是一个字符串元组,用于指定输出的数据类型。注意("IMAGE",)末尾的逗号吗?那是因为 Python 会将("IMAGE")解释为一个字符串,然后当它被作为迭代器处理时,会依次返回"I"、"M"、然后…
RETURN_NAMES是一个字符串元组,用于指定输出的名称。它是可选的——如果你不提供RETURN_NAMES,则使用RETURN_TYPES。INPUT_TYPES指定了输入,这是唯一复杂的部分。请注意,它是一个@classmethod。该方法返回一个字典,该字典必须包含键required,还可以包括optional和hidden。这些键的值是另一个字典。这个内部字典为每个输入节点提供一个键值对——键是输入节点的名称,值是一个元组 (str, dict),其中字符串是输入节点的类型,字典提供其他参数(例如默认值、最小值和最大值等)。所以在这个例子中,我们指定了一个必需的输入,名为image_in,它是一个 IMAGE(没有额外的参数)。
接下来是函数本身:invert(在FUNCTION类属性中命名)。它将会接收与INPUT_TYPES中指定的输入名称相匹配的关键字参数——因此是invert(self, image_in),因为image_in是返回的字典 INPUT_TYPES 中的一个键。必需的输入将始终被提供,可选的输入如果附有内容也会被提供,隐藏的输入如果可用也会被提供。函数返回一个与RETURN_TYPES顺序匹配的元组。再次注意末尾的逗号!
就是这样。现在只需部署它[12]。
接受任何内容的输入
可以使用类型 ‘*’ 来指定一个可选输入(但不是必需的)。
@classmethoddef INPUT_TYPES(s):return { "required" : {}, "optional" : { 'anything' : ( "*", {} ) } }def my_func(self, anything=None):# anything will be passed if the node is connected
如果你对一个必需节点执行此操作,你将会得到一个验证错误。
你可以将任何输出连接到一个可选的 * 节点,但它们与原语或重路由不兼容。
子类化自定义节点
你可以对节点进行子类化。最简单的例子就是预览节点是保存图像节点的一个子类。
class PreviewImage(SaveImage):def __init__(self):self.output_dir = folder_paths.get_temp_directory()self.type = "temp"self.prefix_append = "_temp_" + ''.join(random.choice("abcdefghijklmnopqrstupvxyz") for x in range(5))@classmethoddef INPUT_TYPES(s):return {"required":{"images": ("IMAGE", ), },"hidden": {"prompt": "PROMPT", "extra_pnginfo": "EXTRA_PNGINFO"},}
INPUT_TYPES 被重写了,因此您不再有一个前缀编辑小部件,并且初始化设置了一个临时文件用于保存预览图像。子类化自定义节点可能依赖于作用域的可见性。如果子类和父类在同一个文件中,我看不出有什么理由它不能工作。如果父节点类在你希望创建子类的上下文中不可见,可能会出现问题。对于给定的上下文,可以使用globals()["ParentClass"]来轻松测试这一点。
扩展UI的第一步
让你的节点发送消息
class MyNode:IS_OUTPUT = True...def the_func(self, input, ...):return { "ui": {"name":value}, "result" : (the output tuple) }
只有输出节点会向前端发送消息;该消息的定义方式是将函数末尾的常规元组替换为一个字典,其中元组对应的键为result,消息字典对应的键为ui。
如何注册扩展
你很可能会想写成这样:
import { app } from "../../../scripts/app.js";app.registerExtension({ // 1name: "a.unqiue.name.for.this.extension",async beforeRegisterNodeDef(nodeType, nodeData, app) { // 2if (node?.comfyClass === "The unique name of my node class on the backend") { // 3const onExecuted = nodeType.prototype.onExecuted; // 4nodeType.prototype.onExecuted = function (message) {onExecuted?.apply(this, arguments); // 5// do something with the message // 6}}},}),
逐步解析:
•1 使用 ComfyUI 的 app.js,我们通过传递一个唯一的名称和一个异步函数来注册一个扩展•2 函数名决定了它何时被调用 – 详见下文•3 beforeRegisterNodeDef 在每个 nodeType 上被调用,所以检查是否是你的节点•4 onExecuted 在节点执行完毕时被调用。如果已经存在 onExecuted 方法,将其保存到常量中•5 用你的新代码替换 onExecuted;第一行代码调用你保存的那个方法•5a 唯一另一个有用的方法是 onExecutionStart,它在运行开始时被调用且没有参数•6 message 是你在 python ‘ui’ 返回中定义的字典
方法名称是什么?
在 app.js 中搜索invokeExtensions– 这些方法可以在启动过程中被调用,从而使你的代码得以执行。
| 方法 | 参数 | 调用时机 | 返回值 |
| init | 无 | 页面加载时,在任何节点或工作流之前 | |
| setup | 无 | 设置结束时 | |
| addCustomNodeDefs | defs – 每种节点类型的节点信息 | 在定义任何节点类型之前调用一次 | |
| getCustomWidgets | 无 | 生成自定义小部件列表时调用一次 | 自定义小部件 |
| nodeCreated | 节点类型的 ComfyNode 对象 | 每创建一个节点类型时调用一次 | |
| beforeRegisterNodeDef | 节点类型的 ComfyNode 对象及其节点数据 | 创建完每个节点类型后,在注册到 LiteGraph 之前调用一次 | |
| registerCustomNodes | 无 | 所有自定义节点类型添加完毕后调用一次 | |
| loadedGraphNode | 节点 | 每次加载节点时 | 不异步调用 |
如何部署JavaScript
在你的代码库中添加一个js文件夹,并在__init__.py文件中包含如下代码:
WEB_DIRECTORY = "./js"__all__ = ["NODE_CLASS_MAPPINGS", "NODE_DISPLAY_NAME_MAPPINGS", "WEB_DIRECTORY"]
当 ComfyUI 加载你的自定义节点时,js目录将被复制到 [comfy]/web/extensions/A_UNIQUE_NAME,并且其中的所有.js文件将在页面加载时发送到浏览器并执行。
更多关于 UI 扩展的信息
我非常感谢ttN[13]的作者写了如此清晰的代码,我从中学到了很多……
添加到节点菜单
在你的扩展的 init() 中(代码摘自 ttN)
LGraphCanvas.prototype.myFunction = function(node) { // add a function to the LGraphCanvas prototype so all nodes get it// do something to the node}const getNodeMenuOptions = LGraphCanvas.prototype.getNodeMenuOptions; // store the existing methodLGraphCanvas.prototype.getNodeMenuOptions = function (node) { // replace itconst options = getNodeMenuOptions.apply(this, arguments); // start by calling the stored onenode.setDirtyCanvas(true, true); // force a redraw of (foreground, background)options.splice(options.length - 1, 0, // splice a new option in at the end{content: "My Menu Option", // with a namecallback: () => { LGraphCanvas.prototype.myFunction(node) ; } // and the callback},null // a divider);return options; // and return the options};
References
[1]docs.comfy.org:https://docs.comfy.org/[2]问答:./aaa_index[3]drago87:https://github.com/chrisgoringe/Comfy-Custom-Node-How-To/issues/12[4]自定义小部件:./custom_widgets[5]litegraph.js:https://github.com/jagenjo/litegraph.js[6]Tiny Terra Nodes:https://github.com/TinyTerra/ComfyUI_tinyterraNodes[7]这篇文章:https://github.com/rgthree/rgthree-comfy#to-understand-muting-is-to-understand-the-graph-flow[8]传递控制权给JavaScript:https://github.com/chrisgoringe/Comfy-Custom-Node-How-To/wiki/Passing-control-to-javascript[9]lakmeer:https://github.com/lakmeer[10]图像选择器:https://github.com/chrisgoringe/cg-image-picker[11]图片选择器:https://github.com/chrisgoringe/cg-image-picker[12]部署它:./deploying[13]ttN:https://github.com/TinyTerra/ComfyUI_tinyterraNodes