
包阅导读总结
1. 关键词:大屏、日历组件、vue、样式、日期生成
2. 总结:本文主要介绍了大屏开发中自定义vue日历组件的封装方法,包括核心思路分析、页面的数据结构、日期列表生成、基础样式搭建、组件参数设计以及逻辑功能实现等,以满足大屏定制化样式需求。
3. 主要内容:
– 大屏日历组件需求
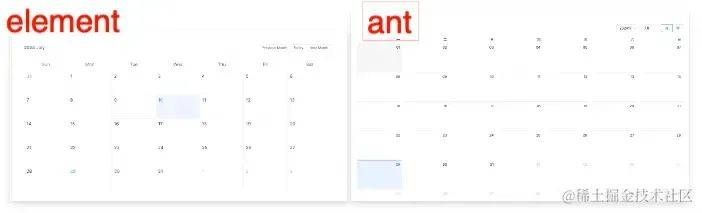
– 传统第三方UI组件难以满足大屏样式要求
– 手搓日历组件样式可完全自定义
– 核心思路分析
– 核心是每页日期数据生成,是76的一维列表
– 计算出列表第一项日期数据,后续依次加1,处理非当前月日期置灰
– 页面的数据结构
– 76日期列表封装到数组,每行对应日期每行数据
– 为每个日期对象增加数据,如label、date、active、isCurrent
– 生成日期列表
– 找到当前选中年月日历面板起始日期
– 计算选中月1号时间及周几,得到起始时间,遍历生成列表
– 技术方案
– 基础样式搭建
– 组件参数设计
– 日期生成与页面渲染
– 逻辑功能实现
– 日期切换事件
– 年月切换
– 其他样式逻辑,如选中年是否当前年等
思维导图:
文章地址:https://mp.weixin.qq.com/s/a0yRYbu3ni3vKfjPm4n1Ww
文章来源:mp.weixin.qq.com
作者:石小石Orz
发布时间:2024/7/30 5:18
语言:中文
总字数:3970字
预计阅读时间:16分钟
评分:80分
标签:前端开发,Vue.js,日历组件,大屏开发,自定义UI
以下为原文内容
本内容来源于用户推荐转载,旨在分享知识与观点,如有侵权请联系删除 联系邮箱 media@ilingban.com
往期精彩文章:
前后端新机遇!为什么我建议学习鸿蒙?
前端鸿蒙入门极速版:超简洁保姆级教程!纯干货,快收藏!
用云编译器半小时完成轮播组件紧急开发!被公司奖励500!
直接使用git pull拉取代码,被同事狠狠地diss了!
快收藏!超实用标签title属性重写,让同事对你刮目相看
简介
大家好,我是石小石!在大屏开发中,我们可能会遇到日历组件的使用,然而,对于一些定制化的大屏,传统的第三方UI组件很难满足我们的样式要求。
这个时候,我们一般有两个选择:
❝
说服UI和老板,使用第三方组件(客户吐槽,最终可能要改) ❞
「实际上,大屏使用的日历组件大多只是展示使用,业务简单,我们手搓一个其实非常简单,最重要的是,样式完全可以自定义!」
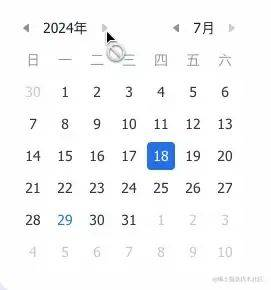
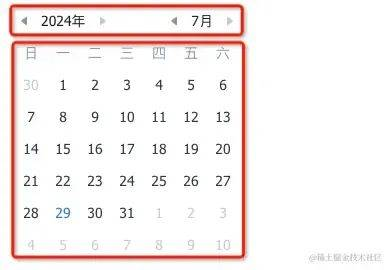
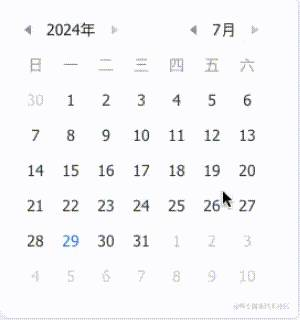
这篇文章,我将向大家展示如何封装一个vue日历组件,可以直接引入使用。它的样式功能如下
核心思路分析
日历组件的核心其实是「每页日期数据的生成」,日期数据是一个「7*6的一维列表」,我们只要计算出这个列表的第一项日期数据,后面的日期依次加1即可。其次,就是一些简单的样式处理,非当前月的日期进行置灰即可。
页面的数据结构
为了便于页面的渲染,我们可以将7*6的日期列表封装到一个数组里,数组的每一行对应日期的每一行数据
为了便于后续的样式拓展,我们可以给每个日期对象增加一些数据,比如
{
//显示的标签
label:'30',
//标签对应的实际数据
date:'2024-06-30',
//是否被选中
active:false,
//是否当前日期
isCurrent:false
}
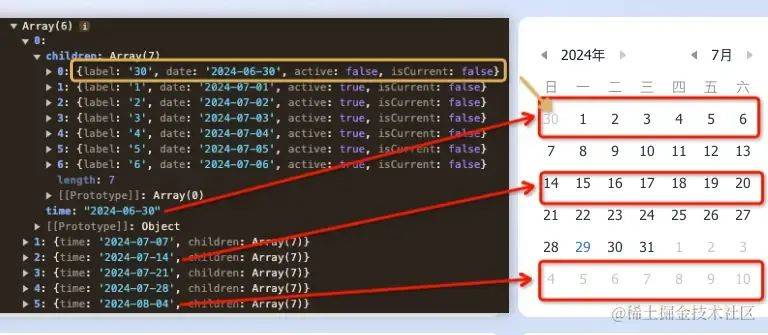
那么,一个比较完整的日期列表数据,结构就应该如下
[
{
"time":"2024-06-30",
"children":[
{
"label":"30",
"date":"2024-06-30",
"active":false,
"isCurrent":false
},
{
"label":"1",
"date":"2024-07-01",
"active":true,
"isCurrent":false
},
{
"label":"2",
"date":"2024-07-02",
"active":true,
"isCurrent":false
},
{
"label":"3",
"date":"2024-07-03",
"active":true,
"isCurrent":false
},
{
"label":"4",
"date":"2024-07-04",
"active":true,
"isCurrent":false
},
{
"label":"5",
"date":"2024-07-05",
"active":true,
"isCurrent":false
},
{
"label":"6",
"date":"2024-07-06",
"active":true,
"isCurrent":false
}
]
},
{
"time":"2024-07-07",//第二行起始日期
"children":[]//内容省略,格式同第一条数据
},
{
"time":"2024-07-14",//第三行起始日期
"children":[]
},
{
"time":"2024-07-21",//第四行起始日期
"children":[]
},
{
"time":"2024-07-28",//第五行起始日期
"children":[]
},
{
"time":"2024-08-04",//第六行起始日期
"children":[]
}
]
如何生成日期列表
要生成日期列表,最核心的就是找到当前选中年月的日历面板的起始日期。
比如,我们选中2024年7月,我们的核心就是计算出当前面板的第一个标签的时间。

要计算当前日历面板的第一个时间,我们可以先找到当前选中年月的1号时间
constyear=ref(dayjs().year())
constmonth=ref(dayjs().month()+1)
//获取当前选中月份的1号
letselectDay=`${year.value}-${month.value}-01`
然后,我们可以计算出选中月是周几,便可以计算出起始时间
//选中时间是周几
constweekDay=dayjs(selectDay).day()
//日历组件的起始日期
constfirstDay=dayjs(selectDay).subtract(weekDay,'day')
接下来,我们遍历生成整个日期列表即可
//生成日期列表
constgetTimeListByYearAndMonth=()=>{
//获取当前选中月份的1号
letselectDay=`${year.value}-${month.value}-01`;//构造当前选中年份和月份的第一天日期字符串
//选中时间是周几
constweekDay=dayjs(selectDay).day();//获取当前选中日期是星期几(0-6,周日为0)
//日历组件的起始日期
constfirstDay=dayjs(selectDay).subtract(weekDay,'day');//计算出日历显示的第一天,减去当前星期几的天数,得到上个月的最后几天或本月的第一天
//初始化日期列表数组
constdayList=[];
//遍历6周
for(leti=0;i<6;i++){
//初始化每周的日期数组
constchildrenList=[];
//遍历每周的7天
for(lettime=0;time<7;time++){
//计算当前日期
letday=dayjs(firstDay).add(i*7+time,"day");
//格式化当前日期为字符串
constdate=day.format("YYYY-MM-DD");
childrenList.push({
label:day.format("D"),//获取当前日期的日
date,//当前日期的完整格式
//判断当前日期是否属于选中的月份
active:Number(day.format("M"))==month.value,
//判断当前日期是否是今天
isCurrent:date===dayjs().format("YYYY-MM-DD")
});
}
dayList.push({
//当前周的第一天日期
time:dayjs(firstDay).add(i*7,"day").format("YYYY-MM-DD"),
//当前周的所有日期
children:childrenList
});
}
//返回生成的日期列表
returndayList;
}
技术方案
基础样式搭建
日历组件的样式其实非常简单,无非就是头部切换功能样式,和主体日历时间部分样式,这部分大家完全可以按照业务情况自己开发。
组件参数设计
作为一个公用组件,一些核心的组件props参数是必不可少的,这个组件可以传递默认选中的年份year、月份month,以及一些灵活的拓展参数:是否禁用未来日期disabledFutureDay、是否高亮当前日期highlightCurrentDay等等。
相应的,它还需要一些核心的emit事件抛出,如年份切换事件yearChange、月份切换事件 monthChange、日期切换事件dateChange。
interfaceProps{
year?:number
month?:1|2|3|4|5|6|7|8|9|10|11|12
//是否禁用未来日期
disabledFutureDay?:boolean
//是否高亮当前日期
highlightCurrentDay?:boolean
}
interfaceTimeEmitInfo{
year:number,month:number,date:number|null,time:string
}
constprops=withDefaults(defineProps<Props>(),{
year:dayjs().year(),
month:dayjs().month()+1,
disabledFutureDay:true,
highlightCurrentDay:true,
})
constemit=defineEmits<{
yearChange:[params:TimeEmitInfo],
monthChange:[params:TimeEmitInfo],
dateChange:[params:TimeEmitInfo]
}>()
日期生成与页面渲染
日期的生成我们在【思路分析】章节已经详细分析过,结合数据渲染,他的页面结构和核心代码如下
<template>
<divclass="schedule-calendar">
<!--日历组件年月栏-->
<divclass="time-switch-tool">

</div>
<!--日历组件星期显示区域-->
<divclass="week-day">
<span>日</span><span>一</span><span>二</span><span>三</span>
<span>四</span><span>五</span><span>六</span>
</div>
<!--日历组件时间遍历生成-->
<divclass="calendar-wrap">
<divclass="day-list"v-for="timeindayList">
<divclass="day-cell"v-for="itemintime.children"@click="selectDay(item.date)">
<spanclass="day">
{{item.label}}
</span>
</div>
</div>
</div>
</div>
</template>
<scriptlang="ts"setup>
importdayjsfrom"dayjs";
importweekOfYearfrom"dayjs/plugin/weekOfYear"
dayjs.extend(weekOfYear);

interfaceProps{
year?:number
month?:1|2|3|4|5|6|7|8|9|10|11|12
//是否禁用未来日期
disabledFutureDay?:boolean
//是否高亮当前日期
highlightCurrentDay?:boolean
}
interfaceTimeEmitInfo{
year:number,month:number,date:number|null,time:string
}
constprops=withDefaults(defineProps<Props>(),{
year:dayjs().year(),
//@ts-ignore
month:dayjs().month()+1,
disabledFutureDay:true,
highlightCurrentDay:true,
})
constemit=defineEmits<{
yearChange:[params:TimeEmitInfo],
monthChange:[params:TimeEmitInfo],
dateChange:[params:TimeEmitInfo]
}>()

//#选中年
constyear=ref(props.year)
//#选中月
constmonth=ref(props.month)
//#选中的日
constselectDate=ref<null|string>(null)

//选中日期后的事件处理
constselectDay=()=>{}

//#生成日期列表
constgetTimeListByYearAndMonth=()=>{
//!清空选中日期
selectDate.value=null
//获取当前选中月份的1号
letselectDay=`${year.value}-${month.value}-01`
//选中时间是周几
constweekDay=dayjs(selectDay).day()
//日历组件的起始日期
constfirstDay=dayjs(selectDay).subtract(weekDay,'day')
constdayList=[]
for(leti=0;i<6;i++){
constchildrenList=[]
for(lettime=0;time<7;time++){
letday=dayjs(firstDay).add(i*7+time,"day")
constdate=day.format("YYYY-MM-DD")
childrenList.push(
{label:day.format("D"),date,active:Number(day.format("M"))==month.value,isCurrent:date===dayjs().format("YYYY-MM-DD")}
)
}
dayList.push({
time:dayjs(firstDay).add(i*7,"day").format("YYYY-MM-DD"),
children:childrenList
})
}
console.log('dayList:',dayList);

returndayList
}

constdayList=ref(getTimeListByYearAndMonth())
上述代码基本就是日历组件的核心部分。注意,我们引入了dayjs用于处理时间,同时,引入了它的weekOfYear包用于处理日期周相关的逻辑。
逻辑功能实现
日期切换事件
切换日期后,我们应该告诉父组件我们当前选择的时间。
constselectDay=(day:string)=>{
if(day===selectDate.value){
selectDate.value=null
}else{
selectDate.value=day
}
emit("dateChange",day)
}
根据页面的遍历逻辑,上述代码中的day是一个具体日期的时间字符如:2024-06-30
实际上,我们传递给父组件的数据可以更加详细具体些,以便上层进行业务逻辑处理。我们可以将选中的时间进行更加详细的封装:
constemitTimeInfo=computed(()=>{
consttime=selectDate.value||`${year.value}-${month.value}-01`;
return{year:year.value,month:month.value,date:selectDate.value?Number(dayjs(selectDate.value).format("D")):null,time}
})
constselectDay=(day:string)=>{
if(day===selectDate.value){
selectDate.value=null
}else{
selectDate.value=day
}
emit("dateChange",emitTimeInfo.value)
}
年月切换
年月的切换,核心就是重新计算日历的起始时间,我们在点击的时候重新调用getTimeListByYearAndMonth方法给要渲染的列表dayList赋值即可。
//#增加年
constaddYear=()=>{
if(disabledYear.value)return
year.value&&year.value++
//!不可点击未来月时,避免时间溢出
if(props.disabledFutureDay&&month.value&&month.value>dayjs().month()+1){
//@ts-ignore
month.value=dayjs().month()+1
}
dayList.value=getTimeListByYearAndMonth()
emit("yearChange",emitTimeInfo.value)
}
//减少年
constminusYear=()=>{
year.value&&year.value--
dayList.value=getTimeListByYearAndMonth()
emit("yearChange",emitTimeInfo.value)
}
//#增加月
constaddMonth=()=>{
if(disabledMonth.value)return
if(month.value==12){
month.value=1
year.value&&year.value++
}else{
month.value&&month.value++
}
dayList.value=getTimeListByYearAndMonth()
emit("monthChange",emitTimeInfo.value)
}
//减少月
constminusMonth=()=>{
if(month.value==1){
year.value&&year.value--
month.value=12
}else{
month.value&&month.value--
}
dayList.value=getTimeListByYearAndMonth()
emit("monthChange",emitTimeInfo.value)
}
一些其他的样式逻辑
为了完善日历组件的样式,我们可以增加一些自定义的计算属性,用于控制样式。
//#选中年是否当前年
constisLastYear=computed(()=>year.value===newDate().getFullYear())
//#选中月是否当前月
constisLastMonth=computed(()=>isLastYear.value&&month.value===dayjs().month()+1)
//#年份禁用
constdisabledYear=computed(()=>props.disabledFutureDay&&isLastYear.value)
//#月份禁用
constdisabledMonth=computed(()=>props.disabledFutureDay&&isLastMonth.value)
完整代码
<template>
<divclass="schedule-calendar">
<divclass="time-switch-tool">
<divclass="time-tool">
<IconMeriComponentArrowLeftclass="icon"color="#8B949E"@click.stop="minusYear">
</IconMeriComponentArrowLeft>
<m-buttontype="text"size="small">
<divclass="time">{{year}}年</div>
</m-button>
<IconMeriComponentArrowRightclass="icon":class="{disabled:isLastYear&&disabledFutureDay}"
:color="disabledYear?'':'#8B949E'"@click.stop="addYear">
</IconMeriComponentArrowRight>
</div>
<divclass="time-tool">
<IconMeriComponentArrowLeftclass="icon"color="#8B949E"@click.stop="minusMonth">
</IconMeriComponentArrowLeft>
<m-buttontype="text"size="small">
<divclass="time">{{month}}月</div>
</m-button>
<IconMeriComponentArrowRightclass="icon":class="{disabled:disabledMonth}"
:color="disabledMonth?'':'#8B949E'"@click.stop="addMonth">
</IconMeriComponentArrowRight>
</div>
</div>
<divclass="week-day">
<span>日</span><span>一</span><span>二</span><span>三</span>
<span>四</span><span>五</span><span>六</span>
</div>
<divclass="calendar-wrap">
<divclass="day-list"v-for="timeindayList">
<divclass="day-cell"v-for="itemintime.children":class="{select:item.date===selectDate}"
@click="selectDay(item.date)">
<spanclass="day"
:class="[{active:item.active},{current:item.isCurrent&&props.highlightCurrentDay}]">
{{item.label}}
</span>
<span:class="{dot:isShowDot(item.date)}"></span>
</div>
</div>
</div>
</div>
</template>
<scriptlang="ts"setup>
import{IconMeriComponentArrowLeft,IconMeriComponentArrowRight}from"xxx-icon";
importdayjsfrom"dayjs";
importweekOfYearfrom"dayjs/plugin/weekOfYear"
dayjs.extend(weekOfYear);

interfaceProps{
year?:number
month?:1|2|3|4|5|6|7|8|9|10|11|12
//是否禁用未来日期
disabledFutureDay?:boolean
//是否高亮当前日期
highlightCurrentDay?:boolean
//选中的日期列表
dotDateList?:string[]
}
interfaceTimeEmitInfo{
year:number,month:number,date:number|null,time:string
}
constprops=withDefaults(defineProps<Props>(),{
year:dayjs().year(),
//@ts-ignore
month:dayjs().month()+1,
disabledFutureDay:true,
highlightCurrentDay:true,
dotDateList:()=>[]
})
constemit=defineEmits<{
yearChange:[params:TimeEmitInfo],
monthChange:[params:TimeEmitInfo],
dateChange:[params:TimeEmitInfo]
}>()

//#选中年
constyear=ref(props.year)
//#选中月
constmonth=ref(props.month)
//#选中的日
constselectDate=ref<null|string>(null)

constemitTimeInfo=computed(()=>{
consttime=selectDate.value||`${year.value}-${month.value}-01`;
return{year:year.value,month:month.value,date:selectDate.value?Number(dayjs(selectDate.value).format("D")):null,time}
})
constselectDay=(day:string)=>{
if(day===selectDate.value){
selectDate.value=null
}else{
selectDate.value=day
}
emit("dateChange",emitTimeInfo.value)
}
//#生成日期列表
constgetTimeListByYearAndMonth=()=>{
//!清空选中日期
selectDate.value=null
//获取当前选中月份的1号
letselectDay=`${year.value}-${month.value}-01`
//选中时间是周几
constweekDay=dayjs(selectDay).day()
//日历组件的起始日期
constfirstDay=dayjs(selectDay).subtract(weekDay,'day')
constdayList=[]
for(leti=0;i<6;i++){
constchildrenList=[]
for(lettime=0;time<7;time++){
letday=dayjs(firstDay).add(i*7+time,"day")
constdate=day.format("YYYY-MM-DD")
childrenList.push(
{label:day.format("D"),date,active:Number(day.format("M"))==month.value,isCurrent:date===dayjs().format("YYYY-MM-DD")}
)
}
dayList.push({
time:dayjs(firstDay).add(i*7,"day").format("YYYY-MM-DD"),
children:childrenList
})
}
console.log('dayList:',dayList);

returndayList
}

constdayList=ref(getTimeListByYearAndMonth())

//#选中年是否当前年
constisLastYear=computed(()=>year.value===newDate().getFullYear())
//#选中月是否当前月
constisLastMonth=computed(()=>isLastYear.value&&month.value===dayjs().month()+1)
//#年份禁用
constdisabledYear=computed(()=>props.disabledFutureDay&&isLastYear.value)
//#月份禁用
constdisabledMonth=computed(()=>props.disabledFutureDay&&isLastMonth.value)
//#增加年
constaddYear=()=>{
if(disabledYear.value)return
year.value&&year.value++
//!不可点击未来月时,避免时间溢出
if(props.disabledFutureDay&&month.value&&month.value>dayjs().month()+1){
//@ts-ignore
month.value=dayjs().month()+1
}
dayList.value=getTimeListByYearAndMonth()
emit("yearChange",emitTimeInfo.value)
}
//减少年
constminusYear=()=>{
year.value&&year.value--
dayList.value=getTimeListByYearAndMonth()
emit("yearChange",emitTimeInfo.value)
}
//#增加月
constaddMonth=()=>{
if(disabledMonth.value)return
if(month.value==12){
month.value=1
year.value&&year.value++
}else{
month.value&&month.value++
}
dayList.value=getTimeListByYearAndMonth()
emit("monthChange",emitTimeInfo.value)
}
//减少月
constminusMonth=()=>{
if(month.value==1){
year.value&&year.value--
month.value=12
}else{
month.value&&month.value--
}
dayList.value=getTimeListByYearAndMonth()
emit("monthChange",emitTimeInfo.value)
}

//是否展示dot
constisShowDot=(date:string)=>{
if(props.dotDateList?.length===0)returnfalse
returnprops.dotDateList?.find((res)=>dayjs(res).format("YYYY-MM-DD")===dayjs(date).format("YYYY-MM-DD"))
}
</script>

<stylelang="less"scoped>
.schedule-calendar{
user-select:none;

.time-switch-tool{
height:22px;
display:flex;
justify-content:space-between;
align-items:center;

.time-tool{
.icon{
width:16px;
height:16px;
color:#8B949E;
cursor:pointer;

&.disabled{
cursor:not-allowed;
}
}

.time{
color:#1B2129;
text-align:center;
font-size:14px;
font-weight:400;
line-height:22px;
margin:04px;
user-select:none;
}

display:flex;
justify-content:space-between;
align-items:center;
}
}

.week-day{
margin-top:7px;
display:flex;
justify-content:space-between;
align-items:center;
height:28px;

span {
display:block;
width:28px;
color:#8B949E;
text-align:center;
font-size:14px;
font-weight:400;
line-height:22px;
}
}

.calendar-wrap{
.day-list{
display:flex;
margin-top:4px;
height:28px;
justify-content:space-between;
align-items:center;

.day-cell{
width:28px;
height:28px;
position:relative;

>span {
display:block;
text-align:center;
font-size:14px;
font-weight:400;
line-height:28px;
cursor:pointer;
color:#C4C9CF;

&.active{
color:#2E3742;
}

&.current{
color:#246FE5;
}
}

&:hover{
background:#E8ECF0;
border-radius:5px;
}

.dot{
position:absolute;
width:4px;
height:4px;
border-radius:50%;
background:#246FE5;
bottom:1px;
left:12px;

}
}

.select{
border-radius:4px;
background:#246FE5;

.day{
color:#FFF!important;
}

&:hover{
background:#246FE5;
border-radius:4px;
}

.dot{
background:#FFF;
}
}
}
}
}
</style>
注意,上述代码中的年月切换箭头采用了其他UI库,实际使用时,需要进行替换。
「效果演示」
总结
❝
本文分享了一个日历组件的实现方案,样式、功能都比较完备,是一个可以直接在项目中使用的组件。 大家可以根据自己的业务需求、样式进行适当调整。
❞