
包阅导读总结
1.
关键词:PKCE、Spring Authorization Server、OAuth 2.0、Single Page Application、Authentication
2.
总结:本文探讨了在单页面应用中使用 PKCE 扩展与 Spring Authorization Server 实现认证,介绍了 PKCE 的原理和认证流程,包括服务器配置及在 SPA 中的实现。
3.
主要内容:
– 什么是 PKCE
– 是一种增强OAuth 2.0安全性的扩展,通过生成代码挑战和验证器对降低授权码拦截风险。
– 详细说明了带有 PKCE 的认证流程,包括生成代码对、发起请求、用户认证授权等步骤。
– 设置 Spring Authorization Server
– 在 pom.xml 中添加依赖。
– 提供 YAML 模板进行配置,包括服务器端口、客户端信息、授权类型等。
– 通过代码块配置安全设置,包括安全过滤链、用户详情、密码编码和 CORS 设置。
– 在 SPA 中实现 PKCE
– 利用 oidc-client-ts 库,以 Vue.js 应用为例展示了前端设置。
思维导图:
文章来源:javacodegeeks.com
作者:Omozegie Aziegbe
发布时间:2024/7/23 11:53
语言:英文
总字数:1541字
预计阅读时间:7分钟
评分:82分
标签:OAuth 2.0,PKCE,SPA 认证,Spring 授权服务器,Spring 安全
以下为原文内容
本内容来源于用户推荐转载,旨在分享知识与观点,如有侵权请联系删除 联系邮箱 media@ilingban.com
This article will explore implementing authentication in a Single Page Application (SPA) using the Proof Key for Code Exchange (PKCE) extension in the Spring Authorization Server. PKCE is a security extension that provides an additional layer of security for OAuth 2.0 authorization flows.
1. What is PKCE?
PKCE is a security enhancement that reduces the risk of authorization code interception attacks in OAuth 2.0. It adds an extra layer of security by requiring the client to generate a code challenge and code verifier pair. The code challenge is sent with the authorization request, and the code verifier is used during the token exchange. This ensures that only the client that initiated the authorization request can complete the authorization process.
1.1 The Flow of Authentication with PKCE
Here is a graphical representation of the authentication flow with PKCE:

1.2 Explanation of the Flow
- Generate Code Verifier and Code Challenge: The client generates a cryptographically random code verifier and computes a code challenge derived from the code verifier.
- Authorization Request: The client initiates the authorization request to the authorization server, including the code challenge and specifying the code challenge method (S256).
- User Authentication and Authorization: The user authenticates and authorizes the client application.
- Authorization Code: Upon successful authorization, the authorization server redirects back to the client with an authorization code.
- Token Request: The client makes a token request to the authorization server, including the authorization code, the code verifier, and other necessary parameters.
- Token Response: The authorization server validates the code verifier against the code challenge and issues an access token if valid.
- Access Protected Resource: The client uses the access token to request protected resources from the resource server.
- Protected Resource: The resource server responds with the requested protected resource.
2. Setting Up the Spring Authorization Server
The Spring Authorization Server supports PKCE. To add PKCE support to the application, include the spring-boot-starter-oauth2-authorization-server dependency in the pom.xml file:
<dependency> <groupId>org.springframework.boot</groupId> <artifactId>spring-boot-starter-oauth2-authorization-server</artifactId> </dependency>
2.1 YAML Template for Spring Authorization Server Configuration
This YAML configuration file sets up the Spring Authorization Server with settings necessary for handling OAuth2 and OpenID Connect (OIDC) flows.
## YAML Template.---server: port: 8000 spring: security: oauth2: authorizationserver: client: public-client: registration: client-id: "spa-client" client-authentication-methods: - "none" authorization-grant-types: - "authorization_code" redirect-uris: - "http://127.0.0.1:5000/callback.html" - "http://127.0.0.1:5000" - "http://127.0.0.1:5000/silent-renew.html" scopes: - "openid" - "profile" - "email" require-authorization-consent: true require-proof-key: true
This file configures the server to run on port 8000.
- client-id: Specifies the unique identifier for the client application. In this case, it’s set to “spa-client”.
- client-authentication-methods: Indicates the authentication method used by the client. Here, “none” means that no client authentication is required, suitable for public clients like SPAs.
- authorization-grant-types: Lists the types of authorization grants that the client can use. “authorization_code” is included, which is appropriate for SPAs to securely obtain tokens.
- redirect-uris: Defines the URIs where the authorization server will redirect the client after successful authentication. The URIs include:
http://127.0.0.1:5000/callback.html: The primary redirect URI after login.http://127.0.0.1:5000: Another acceptable redirect URI.http://127.0.0.1:5000/silent-renew.html: Used for silent token renewal without user interaction.
- scopes: Specifies the scopes that the client can request. “openid”, “profile”, and “email” are included to access basic user information.
- require-authorization-consent: Set to
trueto require explicit user consent for the requested scopes. - require-proof-key: Set to
trueto enforce Proof Key for Code Exchange (PKCE), enhancing security by mitigating authorization code interception attacks.
2.2 Configuring Spring Authorization Server with PKCE
This code block configures the security settings for the Spring Authorization Server, including support for OAuth2, OpenID Connect (OIDC), and PKCE. The configuration includes setting up security filter chains, user details, password encoding, and CORS settings.
@Configuration@EnableWebSecuritypublic class AuthorizationServerConfig { @Bean @Order(1) SecurityFilterChain configure(HttpSecurity http) throws Exception { OAuth2AuthorizationServerConfiguration.applyDefaultSecurity(http); http.getConfigurer(OAuth2AuthorizationServerConfigurer.class) .oidc(Customizer.withDefaults()); http.exceptionHandling((exceptions) -> exceptions.defaultAuthenticationEntryPointFor(new LoginUrlAuthenticationEntryPoint("/login"), new MediaTypeRequestMatcher(MediaType.TEXT_HTML))) .oauth2ResourceServer((oauth2) -> oauth2.jwt(Customizer.withDefaults())); return http.cors(Customizer.withDefaults()) .build(); } @Bean @Order(2) SecurityFilterChain defaultConfigure(HttpSecurity http) throws Exception { http.authorizeHttpRequests((authorize) -> authorize.anyRequest() .authenticated()) .formLogin(Customizer.withDefaults()); return http.cors(Customizer.withDefaults()) .build(); } @Bean public PasswordEncoder passwordEncoder() { return new BCryptPasswordEncoder(); } @Bean public UserDetailsService userDetailsService() throws Exception { InMemoryUserDetailsManager manager = new InMemoryUserDetailsManager(); manager.createUser(User .withUsername("thomas") .password(encoder().encode("paine")) .roles("ADMIN").build()); manager.createUser(User .withUsername("bill") .password(encoder().encode("withers")) .roles("USER").build()); return manager; } @Bean public PasswordEncoder encoder() { return new BCryptPasswordEncoder(); } @Bean public CorsFilter corsFilter() { UrlBasedCorsConfigurationSource source = new UrlBasedCorsConfigurationSource(); CorsConfiguration config = new CorsConfiguration(); config.setAllowCredentials(true); config.addAllowedOriginPattern("*"); config.addAllowedOrigin("http://127.0.0.1:5000"); config.addAllowedHeader("*"); config.addAllowedMethod("*"); source.registerCorsConfiguration("/**", config); return new CorsFilter(source); }}
- The
configuremethod configures the security filter chain for the OAuth2 Authorization Server. TheOAuth2AuthorizationServerConfiguration.applyDefaultSecurity(http)method applies default security settings for the authorization server. It also enables OpenID Connect (OIDC) by callinghttp.getConfigurer(OAuth2AuthorizationServerConfigurer.class).oidc(Customizer.withDefaults()). This setup ensures the server is configured to handle PKCE for secure authentication. - Exception handling is configured to use a custom login entry point for HTML requests, while the OAuth2 resource server is set up to handle JWT tokens. The method returns a configured security filter chain with CORS support enabled.
- The
defaultConfiguremethod sets up a second security filter chain that ensures all requests are authenticated. It also enables form-based login with default settings. This method provides a fallback security configuration for any remaining requests not handled by the first filter chain. It also returns a security filter chain with CORS support. - The
userDetailsServicebean creates an in-memory user details manager with two users: “thomas” (with the role ADMIN) and “bill” (with the role USER). Passwords for these users are encoded using the BCrypt encoder provided by theencoderbean. - The
corsFilterbean sets up a CORS filter that allows all origins, headers, and methods. This configuration is registered for all paths (/**) in the application, enabling cross-origin requests to be handled correctly.
3. Implementing PKCE in the SPA
On the client side, we will utilize the oidc-client-ts library to support OIDC and OAuth2.
3.1 Frontend: Vue.js Application Setup
The AuthService class shown below provides authentication functionalities using the oidc-client library. This class handles user authentication and token management for our Vue application.
import { UserManager, WebStorageStateStore, User } from 'oidc-client';export default class AuthService { private userManager: UserManager; constructor() { const SAS_DOMAIN: string = 'http://127.0.0.1:8000'; const settings: any = { userStore: new WebStorageStateStore({ store: window.localStorage }), authority: SAS_DOMAIN, client_id: 'spa-client', redirect_uri: 'http://127.0.0.1:5000/callback.html', automaticSilentRenew: true, silent_redirect_uri: 'http://127.0.0.1:5000/silent-renew.html', response_type: 'code', scope: 'openid profile email', post_logout_redirect_uri: 'http://127.0.0.1:5000/', }; this.userManager = new UserManager(settings); } public getUser(): Promise<User | null> { return this.userManager.getUser(); } public login(): Promise<void> { return this.userManager.signinRedirect(); } public logout(): Promise<void> { return this.userManager.signoutRedirect(); } public getAccessToken(): Promise<string> { return this.userManager.getUser().then((data: any) => { return data.access_token; }); }}
The above code snippet:
- Imports the necessary components from
oidc-client:UserManager,WebStorageStateStore, andUser. - Constructor:
- Initializes the
userManagerwith settings for interacting with the OIDC provider. SAS_DOMAIN: The domain of the Spring Authorization Server.userStore: UseslocalStorageto store user information.authority: The URL of the OIDC provider.client_id: The client identifier for the SPA.redirect_uri: The URL to redirect to after login.automaticSilentRenew: Enables silent token renewal.silent_redirect_uri: The URL for silent token renewal.response_type: The response type for the authentication request (e.g., ‘code’).scope: The scopes requested (e.g., ‘openid’, ‘profile’, ’email’).post_logout_redirect_uri: The URL to redirect to after logout.
- Initializes the
- Methods:
getUser(): Retrieves the current user information.login(): Initiates the login process using a redirect.logout(): Initiates the logout process using a redirect.getAccessToken(): Retrieves the access token for the current user.
4. Running the Application
4.1 Running the Spring Authorization Server
The Spring Boot application is configured with the provided application.yml settings. The Spring Authorization Server should run on http://127.0.0.1:8000
4.2 Running the Vue.js Application
Ensure your Vue.js application is configured with the necessary oidc-client-ts settings. Run the Vue.js application using the following command:
npm run serve
The Vue application should start and be accessible on http://localhost:5000.
Logging In
Open a web browser and go to http://localhost:5000. You should see the home page of the Vue.js application with a “Login” button.
Initiate Login
Click the “Login” button. This action triggers the login method in the Vue.js application, which redirects the user to the authorization server for authentication.
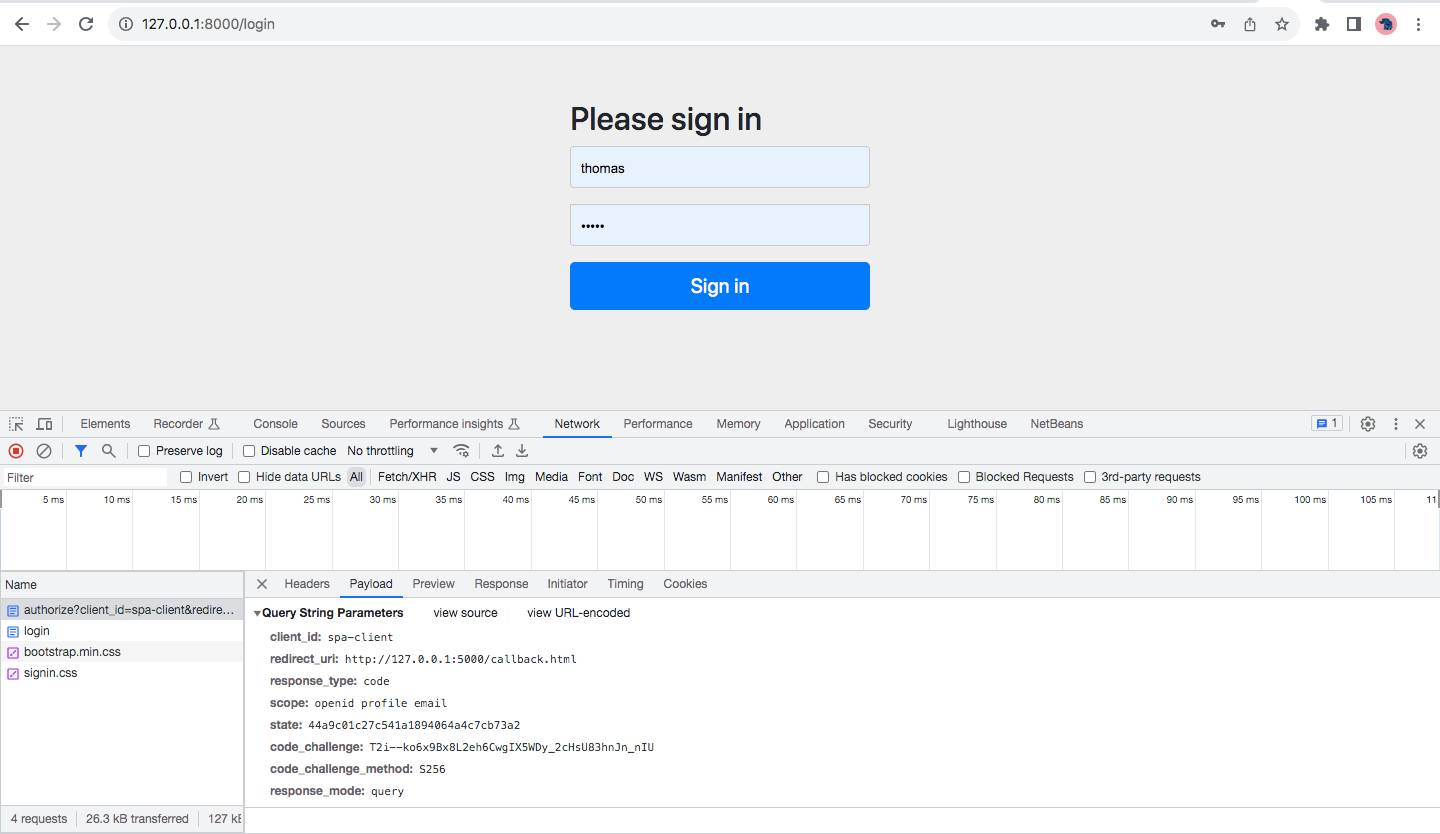
Authorization Server Login Page
You will be redirected to the Spring Authorization Server login page. Enter your credentials and click “Sign In.”. The SPA sends a request to the Spring Authorization Server with the code_challenge and code_challenge_method, as shown in the screenshot below.
Authorization Consent
If configured, the authorization server will prompt the user for consent to grant access to the requested scopes. Click “Submit Consent” to proceed.
Redirect Back to SPA
After successful authentication and authorization, you will be redirected back to the Vue.js application at http://localhost:5000/callback.html. The Callback component will handle the response, extract the user information, and store it.
Once authenticated, you should see a welcome message on the home page, displaying the user’s name or other profile information.
5. Conclusion
In this article, we explored how to secure authentication for Single Page Applications (SPAs) using PKCE with Spring Authorization Server. We covered the importance of PKCE in enhancing security by mitigating authorization code interception attacks. By following the outlined steps, you can implement a secure authentication mechanism that ensures the integrity and confidentiality of user data.
6. Download the Source Code
This article covered Spring authentication for a single page application using PKCE.