
包阅导读总结
1. 关键词:`Server-Side Rendering`、`Next.js`、`SEO`、`Data Fetching`、`Web Development`
2. 总结:本文主要介绍了在 Next.js 应用中使用服务端渲染(SSR)来提升 SEO 的方法,包括 SSR 的概念、Next.js 与 SSR 的结合步骤、数据获取方式、SSR 对 SEO 的益处及优化策略等内容。
3. 主要内容:
– 什么是服务端渲染(SSR):
– 与客户端渲染对比,SSR 在服务器生成完整 HTML 内容。
– Next.js 与 SSR 的起步:
– 安装 Next.js 并理解项目结构。
– 创建使用 SSR 的简单页面,包括处理数据获取和错误。
– Next.js 如何实现 SSR:
– 介绍默认的预渲染和 SSR 与 SSG 的选择。
– 说明页面组件和路由定义。
– 数据获取(getStaticProps 和 getServerSideProps):
– getStaticProps 用于静态生成,在构建时获取数据。
– getServerSideProps 用于服务器端渲染,每次请求时获取数据。
– SSR 对 SEO 的益处及优化:
– 改善搜索引擎索引,为重要页面使用 SSR。
– 加快加载速度,优化服务器响应时间。
– 优化社交分享的页面预览,管理元标签。
思维导图: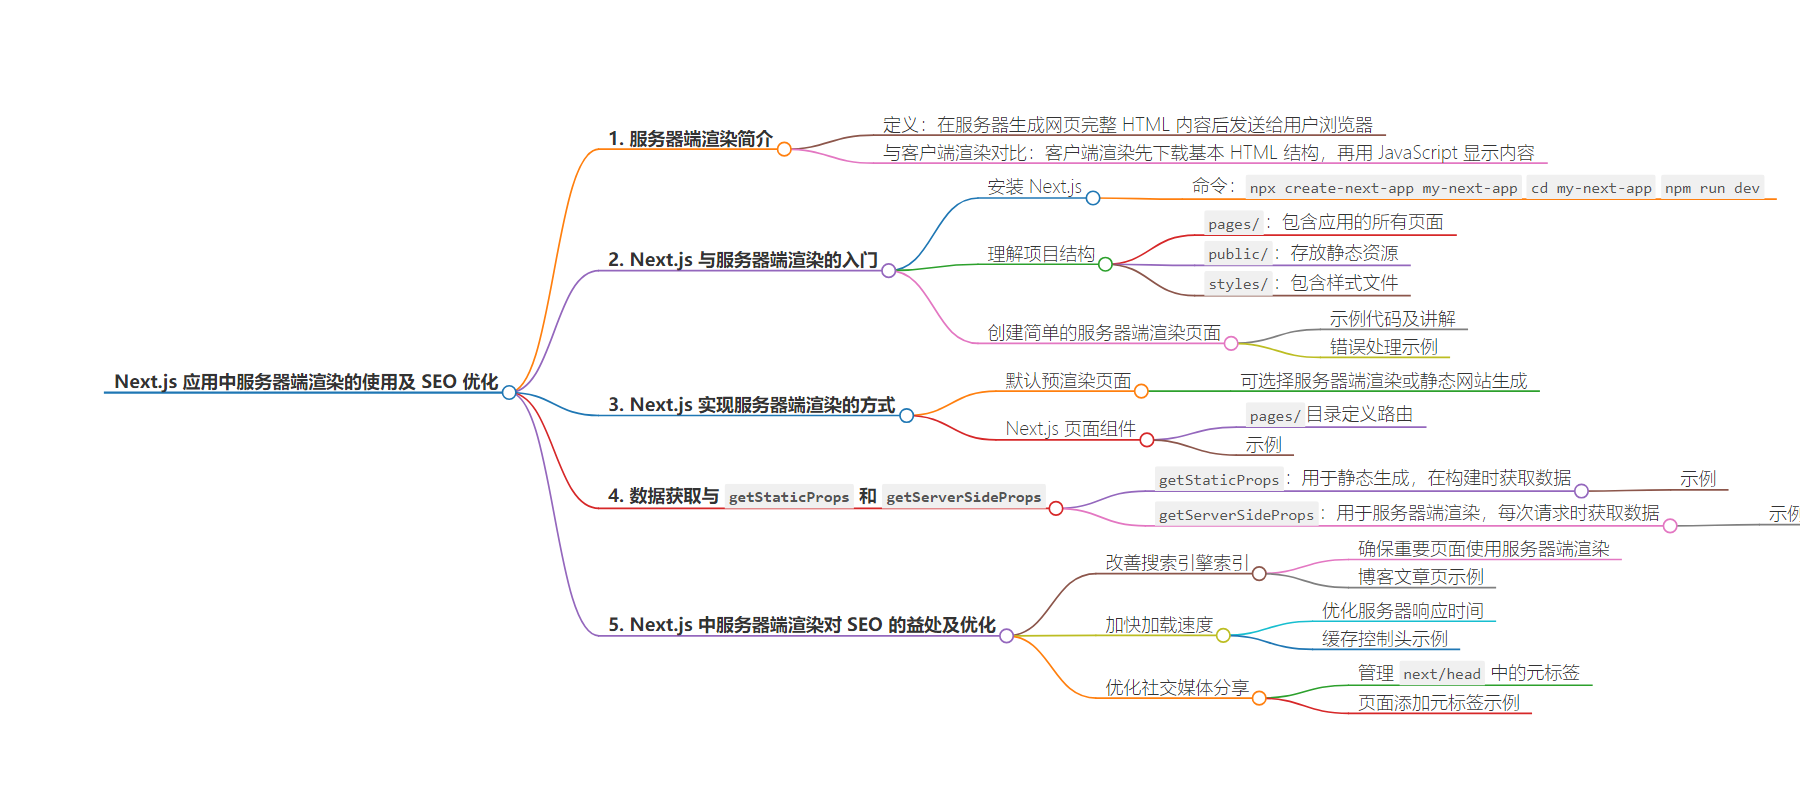
文章地址:https://www.freecodecamp.org/news/server-side-rendering-in-next-js-for-improved-seo/
文章来源:freecodecamp.org
作者:Joan Ayebola
发布时间:2024/7/17 18:02
语言:英文
总字数:1798字
预计阅读时间:8分钟
评分:86分
标签:服务器端渲染,Next.js,SEO 优化,React 框架,Web 开发
以下为原文内容
本内容来源于用户推荐转载,旨在分享知识与观点,如有侵权请联系删除 联系邮箱 media@ilingban.com
Server-side rendering (SSR) is a web development technique that can help improve your site’s SEO. It does this by generating HTML content on the server in response to a user’s request.
This approach contrasts with client-side rendering (CSR), where content is delivered as a basic HTML shell, and JavaScript fetches and displays data in the browser.
SSR offers significant SEO advantages, making it a perfect fit for Next.js, a popular React framework. Let’s discuss how using SSR with Next.js can elevate your website’s search engine visibility.
Table of Contents
- What is Server-Side Rendering?
- How to Get Started with Next.js and SSR
- How Next.js Enables Server-side Rendering
- Data Fetching with getStaticProps and getServerSideProps
- Benefits of SSR for SEO with Next.js and How to Optimize
- Conclusion
What is Server-Side Rendering?
Server-side rendering (SSR) is a technique in web development where the web server generates the complete HTML content of a web page before sending it to the user’s browser.
This is unlike client-side rendering (CSR), where the browser downloads a basic HTML structure and then uses JavaScript to fetch and display the content.
How to Get Started with Next.js and SSR
Getting started with Next.js and server-side rendering (SSR) involves a few steps. Here’s a step-by-step guide to help you set up a Next.js project and implement SSR.
Step 1: Install Next.js
First, you need to install Next.js. You can do this using create-next-app, which sets up a new Next.js project with a default configuration. Run the following command in your terminal:
npx create-next-app my-next-appcd my-next-appnpm run devThis command creates a new Next.js application in a folder called my-next-app and starts the development server.
Step 2: Understand the Project Structure
Next.js organizes the project with some default folders and files:
pages/: This folder contains all the pages of your application. Each file represents a route in your app.public/: Static assets like images can be placed here.styles/: Contains CSS files for styling your application.
Step 3: Create a Simple Page with SSR
Now, let’s create a simple page that uses SSR.
Create a new file pages/index.js:
// pages/index.jsimport React from 'react';const Home = ({ data }) => { return ( <div> <h1>Welcome to Next.js with SSR</h1> <p>Data fetched from the server: {data.message}</p> </div> );};export async function getServerSideProps() { // Fetch data from an API or other sources const res = await fetch('https://api.example.com/data'); const data = await res.json(); // Return the data as props to the Home component return { props: { data, }, };}export default Home;Let’s discuss this code in some detail. For the home component:
- The
Homecomponent is a functional component that acceptsprops. - The
dataprop contains the data fetched from the server. - Inside the component, we render a welcome message and the fetched data.
The getServerSideProps function:
- This function is exported from the
pages/index.jsfile. - It executes on the server for each request to this page.
- Inside this function, you can perform asynchronous operations such as fetching data from an external API.
- The fetched data is returned as an object with a
propskey. This object will be passed to theHomecomponent as props.
You can add error handling to the getServerSideProps function to manage any issues that might arise during data fetching. Here’s an example:
export async function getServerSideProps() { try { const res = await fetch('https://api.example.com/data'); if (!res.ok) { throw new Error('Failed to fetch data'); } const data = await res.json(); return { props: { data, }, }; } catch (error) { console.error(error); return { props: { data: { message: 'Error fetching data' }, }, }; }}Step 4: Run the Application
Start your development server if it’s not already running:
npm run devOpen your browser and go to http://localhost:3000. You should see the message fetched from the API displayed on the page.
How Next.js Enables Server-Side Rendering
Next.js provides a seamless way to enable SSR and Static Site Generation (SSG). It pre-renders every page by default. Depending on the use case, you can choose between SSR and SSG:
- Server-Side Rendering (SSR): Pages are rendered on each request.
- Static Site Generation (SSG): Pages are generated at build time.
Next.js determines which rendering method to use based on the functions you implement in your page components (getStaticProps and getServerSideProps).
Next.js Page Components
Next.js uses the pages/ directory to define routes. Each file in this directory corresponds to a route in your application.
pages/index.js→/pages/about.js→/aboutpages/posts/[id].js→/posts/:id
Here’s a basic example of a page component:
// pages/index.jsimport React from 'react';const Home = () => { return ( <div> <h1>Welcome to Next.js</h1> <p>This is the home page.</p> </div> );};export default Home;Data Fetching with getStaticProps and getServerSideProps
getStaticProps is used for static generation. It runs at build time and allows you to fetch data and pass it to your page as props. Use this for data that doesn’t change often.
Example:
// pages/index.jsimport React from 'react';const Home = ({ posts }) => { return ( <div> <h1>Blog Posts</h1> <ul> {posts.map(post => ( <li key={post.id}>{post.title}</li> ))} </ul> </div> );};// This function runs at build timeexport async function getStaticProps() { // Fetch data from an API const res = await fetch('https://jsonplaceholder.typicode.com/posts'); const posts = await res.json(); return { props: { posts, }, };}export default Home;getServerSideProps is used for server-side rendering. It runs on every request and allows you to fetch data at request time.
Example:
// pages/index.jsimport React from 'react';const Home = ({ data }) => { return ( <div> <h1>Server-Side Rendering with Next.js</h1> <p>Data fetched from the server: {data.message}</p> </div> );};// This function runs on every requestexport async function getServerSideProps() { // Fetch data from an external API const res = await fetch('https://api.example.com/data'); const data = await res.json(); return { props: { data, }, };}export default Home;Benefits of SSR for SEO with Next.js and How to Optimize
In this section, we will look at the main benefits of using SSR for SEO and give easy-to-follow tips on how to make the most of these benefits with your Next.js application.
1. Improved Indexing by Search Engines
Client-side rendering (CSR) can cause issues with search engines struggling to index content properly since it is rendered in the user’s browser using JavaScript.
SSR, however, renders content on the server before sending it to the user’s browser, ensuring the HTML is complete and can be easily crawled and indexed by search engines.
Use SSR for important pages: Ensure that key pages, such as landing pages, blog posts, and product pages, are rendered on the server to facilitate better indexing.
Example – Using SSR for a blog post page:
// pages/blog/[id].jsimport React from 'react';import { useRouter } from 'next/router';import Head from 'next/head';const BlogPost = ({ post }) => { const router = useRouter(); if (router.isFallback) { return <div>Loading...</div>; } return ( <div> <Head> <title>{post.title}</title> <meta name="description" content={post.excerpt} /> </Head> <h1>{post.title}</h1> <p>{post.content}</p> </div> );};export async function getServerSideProps({ params }) { const res = await fetch(`https://api.example.com/posts/${params.id}`); const post = await res.json(); return { props: { post, }, };}export default BlogPost- BlogPost Component: This component displays a blog post. It uses
next/headto manage meta tags, which are important for SEO. - getServerSideProps Function: This function fetches data for the blog post from an API. It runs on the server for every request to this page, ensuring the content is ready for search engines to index when they crawl the page.
2. Faster Load Times
Search engines like Google use page load speed as a ranking factor. SSR can improve initial load time because the server sends a fully rendered page to the browser, enhancing perceived performance and user experience.
Optimize server response time: Ensure your server is optimized for quick responses. Use caching strategies to reduce server load.
Example – cache-control header for SSR:
export async function getServerSideProps({ res }) { res.setHeader('Cache-Control', 'public, s-maxage=10, stale-while-revalidate=59'); const resData = await fetch('https://api.example.com/data'); const data = await resData.json(); return { props: { data, }, };}getServerSidePropsFunction: This function sets cache-control headers to cache the response for 10 seconds and serve stale content while revalidating for 59 seconds. This improves server response time and page load speed, contributing to better SEO.
When sharing links on social media, platforms like Facebook and Twitter scrape the URL content to generate previews. SSR ensures that necessary metadata is available in the initial HTML, resulting in better previews and increased click-through rates.
Manage meta tags with next/head: Use the next/head component to add meta tags for social media and SEO.
Example – Adding meta tags to a page:
import Head from 'next/head';const Page = ({ data }) => ( <div> <Head> <title>{data.title}</title> <meta name="description" content={data.description} /> <meta property="og:title" content={data.title} /> <meta property="og:description" content={data.description} /> <meta property="og:image" content={data.image} /> <meta name="twitter:card" content="summary_large_image" /> </Head> <h1>{data.title}</h1> <p>{data.content}</p> </div>);PageComponent: This component usesnext/headto add SEO meta tags, including Open Graph tags for social media previews. This ensures that when the page is shared, social media platforms can generate rich previews with the provided metadata.
4. Enhanced User Experience
A faster, more responsive website enhances the overall user experience, leading to longer visit durations and lower bounce rates. Both factors positively influence your SEO rankings.
Pre-render pages with static generation (SSG) for less dynamic content: Use SSG for pages that don’t change often to reduce server load and improve performance.
Example – Using SSG for a static page:
export async function getStaticProps() { const res = await fetch('https://api.example.com/static-data'); const data = await res.json(); return { props: { data, }, revalidate: 10, // Revalidate at most once every 10 seconds };}const StaticPage = ({ data }) => ( <div> <h1>{data.title}</h1> <p>{data.content}</p> </div>);export default StaticPage;StaticPageComponent: This component displays static content fetched from an API.getStaticPropsFunction: This function fetches data at build time and revalidates it every 10 seconds, ensuring the content is always fresh while reducing server load.
Conclusion
Using server-side rendering and Next.js together is like giving your website an extra boost for search engines. With pre-built content for search engines and a smooth experience for visitors, your site is set up to be seen by more people naturally.
This works great for any kind of website, from online stores to blogs. Next.js with SSR makes it easy to build a website that search engines love and users enjoy.
That’s all for this article! If you’d like to continue the conversation or have questions, suggestions, or feedback, feel free to reach out to connect with me on LinkedIn. And if you enjoyed this content, consider buying me a coffee to support the creation of more developer-friendly contents.