
包阅导读总结
1. 关键词:GraphRAG、Ollama、问答系统、本地模型、大语言模型
2. 总结:
– 介绍了 GraphRAG 可解决 RAG 在全局问答中的问题,但存在消耗大等缺陷。
– 提出在魔搭社区免费 Notebook 算力中,使用本地模型+Ollama+GraphRAG 的方案。
– 给出了代码修改、模型配置、安装及使用等详细操作流程。
3. 主要内容:
– GraphRAG 与问题:
– RAG 从外部知识库检索事实为 LLM 提供信息,但不完美,Graph RAG 方法被提出。
– Graph RAG 在生成答案的全面性和多样性方面有改进,但消耗大。
– 本地体验方案:
– 在魔搭社区免费 Notebook 算力中,使用本地模型+Ollama+GraphRAG。
– 操作流程:
– 下载并安装 Ollama。
– 配置并使用 embedding 模型。
– 创建 ModelFile,下载 Mistral 模型。
– clone Graphrag(ollama 版本)repo 并安装。
– 创建输入文件夹。
– 初始化,修改配置文件。
– 运行索引并创建图,运行 query 及生成可视化文件。
思维导图:
文章地址:https://mp.weixin.qq.com/s/BVw7rQz82SFHvTkmXMhjYQ
文章来源:mp.weixin.qq.com
作者:爱思考的
发布时间:2024/7/29 12:11
语言:中文
总字数:1525字
预计阅读时间:7分钟
评分:89分
标签:Graph RAG,Ollama,大语言模型,本地化问答系统,成本效益
以下为原文内容
本内容来源于用户推荐转载,旨在分享知识与观点,如有侵权请联系删除 联系邮箱 media@ilingban.com
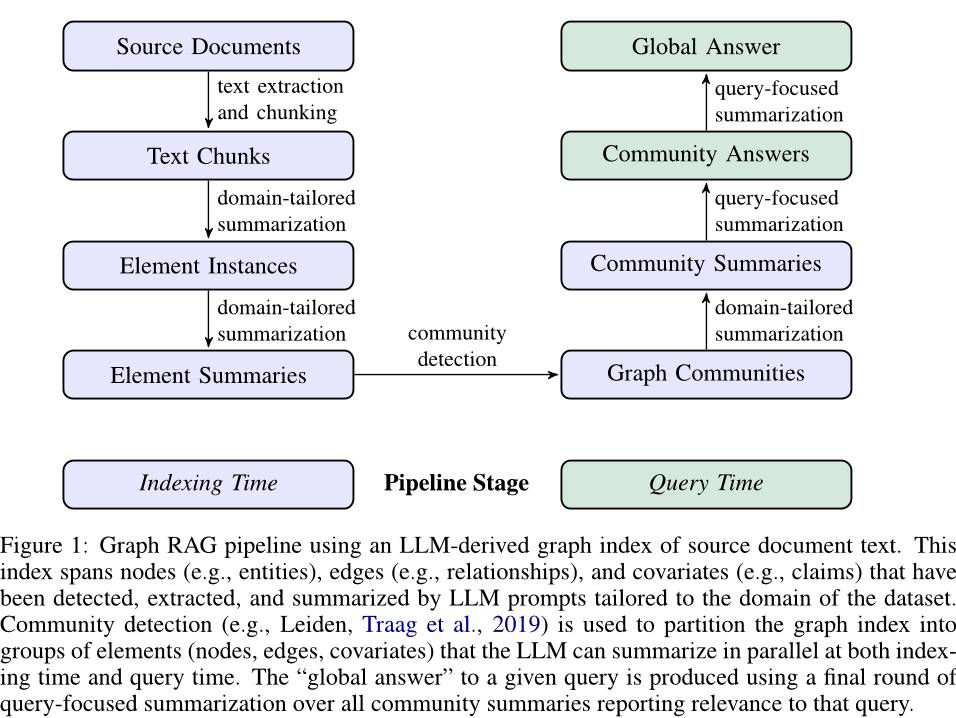
RAG 是目前大语言模型相关最知名的工具之一,从外部知识库中检索事实,以便为大型语言模型(LLM)提供最准确、最新的信息。但 RAG 并不完美,在更好的使用 RAG 方面仍存在许多挑战。例如当针对整个文本文档提出一个全局的问题时,RAG会失败,因为RAG本质是一个查询聚焦摘要任务,需要先基于index做检索,而且不是一个明确的检索全文任务。同时受限于大语言模型的上下文窗口限制,不可避免中间信息和关联信息丢失的问题。
为了解决这些问题,微软提出了Graph RAG方法,使用 LLM 在两个阶段构建基于图的文本索引:首先从源文档中推导出实体知识图,然后为所有密切相关的实体组预生成社区摘要。给定一个问题,每个社区摘要用于生成部分响应,然后对所有部分响应进行总结以提供最终响应。对于一类关于 100万个标记范围的数据集的全局理解问题,Graph RAG证明了图 RAG 在生成答案的全面性和多样性方面相对于简单的 RAG 基线有了显着改进。
但是,Graph RAG使用大语言模型从源文件抽取图entity和总结,并建设图索引,对token的消耗非常大,小编给大家算了一笔账,如果使用GPT-4o,一篇5万字左右的文档,Graph RAG的示例代码构建图的文本索引消耗27万左右 tokens,单次问答消耗约1万tokens,做个测试预计消费2-4美元,这也太贵了!
为了让更多的人更加容易体验Graph RAG,本文在魔搭社区的免费Notebook算力中,体验使用本地模型+Ollama+GraphRAG。
参考项目:
https://github.com/TheAiSingularity/graphrag-local-ollama
代码解析
该项目主要修改了文件路径/graphrag-local-ollama/graphrag/llm/openai/openai_embeddings_llm.py文件,将embedding的调用方式从OpenAI格式改为Ollama格式,大家也可以clone官方代码做如下修改,或者使用如Text-embedding-inference之类的支持OpenAI embedding API格式的库。
class OpenAIEmbeddingsLLM(BaseLLM[EmbeddingInput, EmbeddingOutput]):_client: OpenAIClientTypes_configuration: OpenAIConfigurationdef __init__(self, client: OpenAIClientTypes, configuration: OpenAIConfiguration):self._client = clientself._configuration = configurationasync def _execute_llm(self, input: EmbeddingInput, **kwargs: Unpack[LLMInput]) -> EmbeddingOutput | None:args = {"model": self._configuration.model,**(kwargs.get("model_parameters") or {}),}embedding_list = []for inp in input:embedding = ollama.embeddings(model="nomic-embed-text", prompt=inp)embedding_list.append(embedding["embedding"])return embedding_list
模型配置
安装Ollama
# 直接从modelscope下载ollama安装包modelscope download --model=modelscope/ollama-linux --local_dir ./ollama-linux# 运行ollama安装脚本cd ollama-linuxsudo chmod 777 ./ollama-modelscope-install.sh./ollama-modelscope-install.sh
embedding模型使用Ollama自带的nomic-embed-text
ollama pull nomic-embed-text #embeddingLLM使用ModelScope的Mistral-7B-Instruct-v0.3
模型链接:
https://modelscope.cn/models/LLM-Research/Mistral-7B-Instruct-v0.3-GGUF
modelscopedownload--model=LLM-Research/Mistral-7B-Instruct-v0.3-GGUF--local_dir.Mistral-7B-Instruct-v0.3.fp16.gguf创建ModelFile
FROM /mnt/workspace/Mistral-7B-Instruct-v0.3.fp16.ggufPARAMETER stop "[INST]"PARAMETER stop "[/INST]"TEMPLATE """{{- if .Messages }}{{- range $index, $_ := .Messages }}{{- if eq .Role "user" }}{{- if and (eq (len (slice $.Messages $index)) 1) $.Tools }}[AVAILABLE_TOOLS] {{ $.Tools }}[/AVAILABLE_TOOLS]{{- end }}[INST] {{ if and $.System (eq (len (slice $.Messages $index)) 1) }}{{ $.System }}{{ end }}{{ .Content }}[/INST]{{- else if eq .Role "assistant" }}{{- if .Content }} {{ .Content }}{{- else if .ToolCalls }}[TOOL_CALLS] [{{- range .ToolCalls }}{"name": "{{ .Function.Name }}", "arguments": {{ .Function.Arguments }}}{{- end }}]{{- end }}</s>{{- else if eq .Role "tool" }}[TOOL_RESULTS] {"content": {{ .Content }}} [/TOOL_RESULTS]{{- end }}{{- end }}{{- else }}[INST] {{ if .System }}{{ .System }}{{ end }}{{ .Prompt }}[/INST]{{- end }} {{ .Response }}{{- if .Response }}</s>{{- end }}"""
创建模型
ollama create mymistral --file ./ModelFilecloneGraphrag(ollama版本)repo并安装
git clone https://github.com/TheAiSingularity/graphrag-local-ollama.gitcd graphrag-local-ollama/pip install -e .
创建输入文件夹
将实验数据复制保存在./ragtest中,也可以增加自己的数据,目前仅支持.txt格式
mkdir -p ./ragtest/inputcpinput/*./ragtest/input
初始化
初始化ragtest文件夹,并存入配置文件
python -m graphrag.index --init --root ./ragtestmvsettings.yaml./ragtest
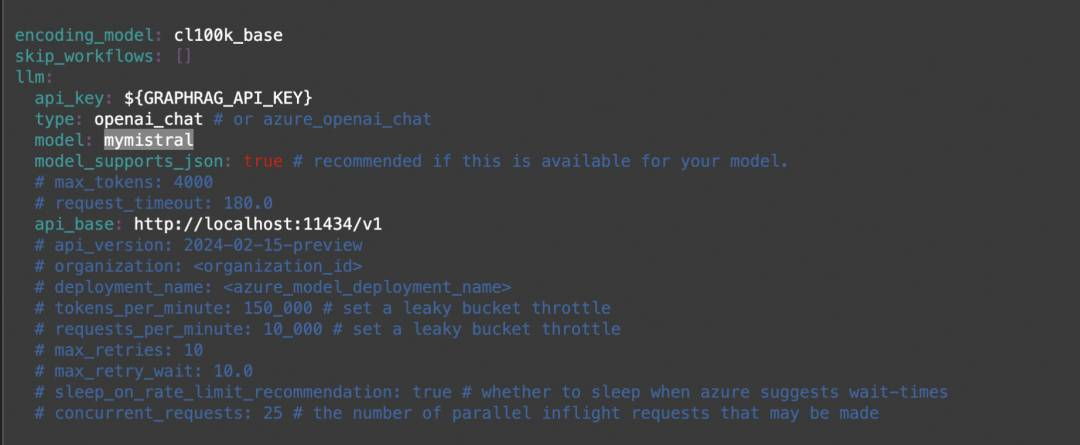
可以将配置文件中的模型文件和embedding模型按照需求做对应的修改,如:
运行索引并创建图:
这部分对LLM有蛮大的要求,如果LLM的输出json格式不稳定,创建图的过程将被中断,在过程中,我们也尝试了多个模型,mistral的json输出稳定性比较好。
python -m graphrag.index --root ./ragtest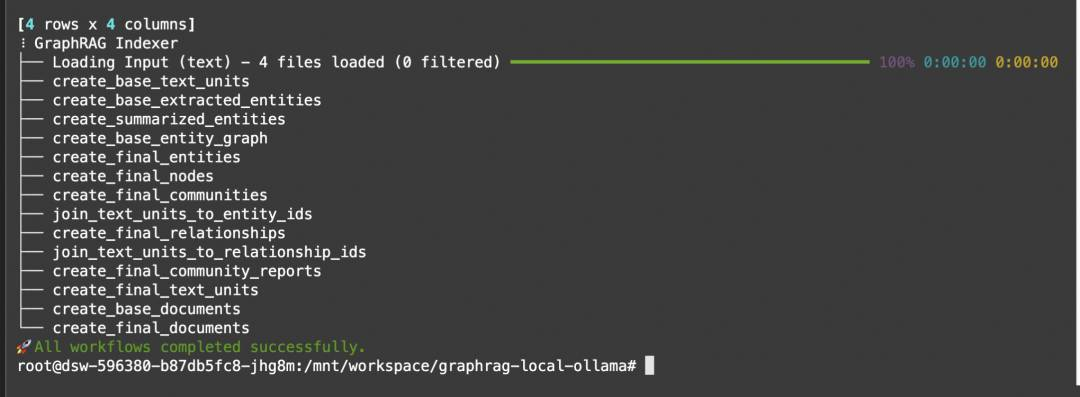
运行query,目前仅支持全局方式
python-mgraphrag.query--root./ragtest--methodglobal"Whatismachinelearning?"
同时,使用如下python代码,生成可视化的graphml文件
from pygraphml import GraphMLParserparser = GraphMLParser()g = parser.parse("./graphrag-local-ollama/ragtest/output/***/artifacts/summarized_graph.graphml")g.show()
点击阅读原文,跳转模型链接~