
包阅导读总结
1. 关键词:GitHub、Git、项目托管、Web 开发、版本控制
2. 总结:本文面向初学者,介绍如何使用 Git 和 GitHub 托管项目。涵盖了 Git 和 GitHub 的概念、安装配置、初始化仓库、跟踪更改、推送项目等步骤,并以“IP 地址跟踪器”项目为例进行讲解。
3. 主要内容:
– 引言
– 作者分享从学习到发现 Git 和 GitHub 用于项目分享的经历。
– 受众和前置知识
– 受众为初学者,需具备基本命令行操作、HTML、CSS、JavaScript 基础和类似 VS Code 的文本编辑器知识。
– 开始使用 Git 和 GitHub
– 解释 Git 用于跟踪项目代码更改,GitHub 是在线存储和共享代码的平台。
– 安装配置
– 包括在 Windows、macOS、Linux 上安装 Git,创建 GitHub 账户和配置 Git。
– 初始化 Git 仓库
– 下载并打开项目,在 VS Code 中操作,初始化仓库。
– 跟踪更改
– 使用 `git add` 准备更改,包括添加单个文件或所有更改。
– 使用 `git commit` 保存更改。
– 推送到 GitHub
– 在 GitHub 创建新仓库,链接本地仓库,推送本地更改并验证。
– GitHub 页面托管
– 介绍 GitHub Pages 及其启用、获取 URL 和更新站点的方法。
– 结论
思维导图:
文章地址:https://www.freecodecamp.org/news/host-your-first-project-on-github/
文章来源:freecodecamp.org
作者:Spruce Emmanuel
发布时间:2024/8/8 11:37
语言:英文
总字数:2276字
预计阅读时间:10分钟
评分:91分
标签:Git,GitHub,Web 开发,托管,代码版本管理
以下为原文内容
本内容来源于用户推荐转载,旨在分享知识与观点,如有侵权请联系删除 联系邮箱 media@ilingban.com
Seven years ago, I began my journey into web development with HTML and CSS. As soon as I got the hang of JavaScript, I built my first website. The excitement was overwhelming, and I wanted to share it with my friends and the world.
Like many beginners, I started researching hosting platforms, only to find out about the cost of domains and hosting. That’s when I discovered Git and GitHub, realizing I could share my projects without spending a dime.
If you’re in the same boat, unsure about Git and GitHub and how to share your projects, this article is for you. It’s the guide I wish I had seven years ago.
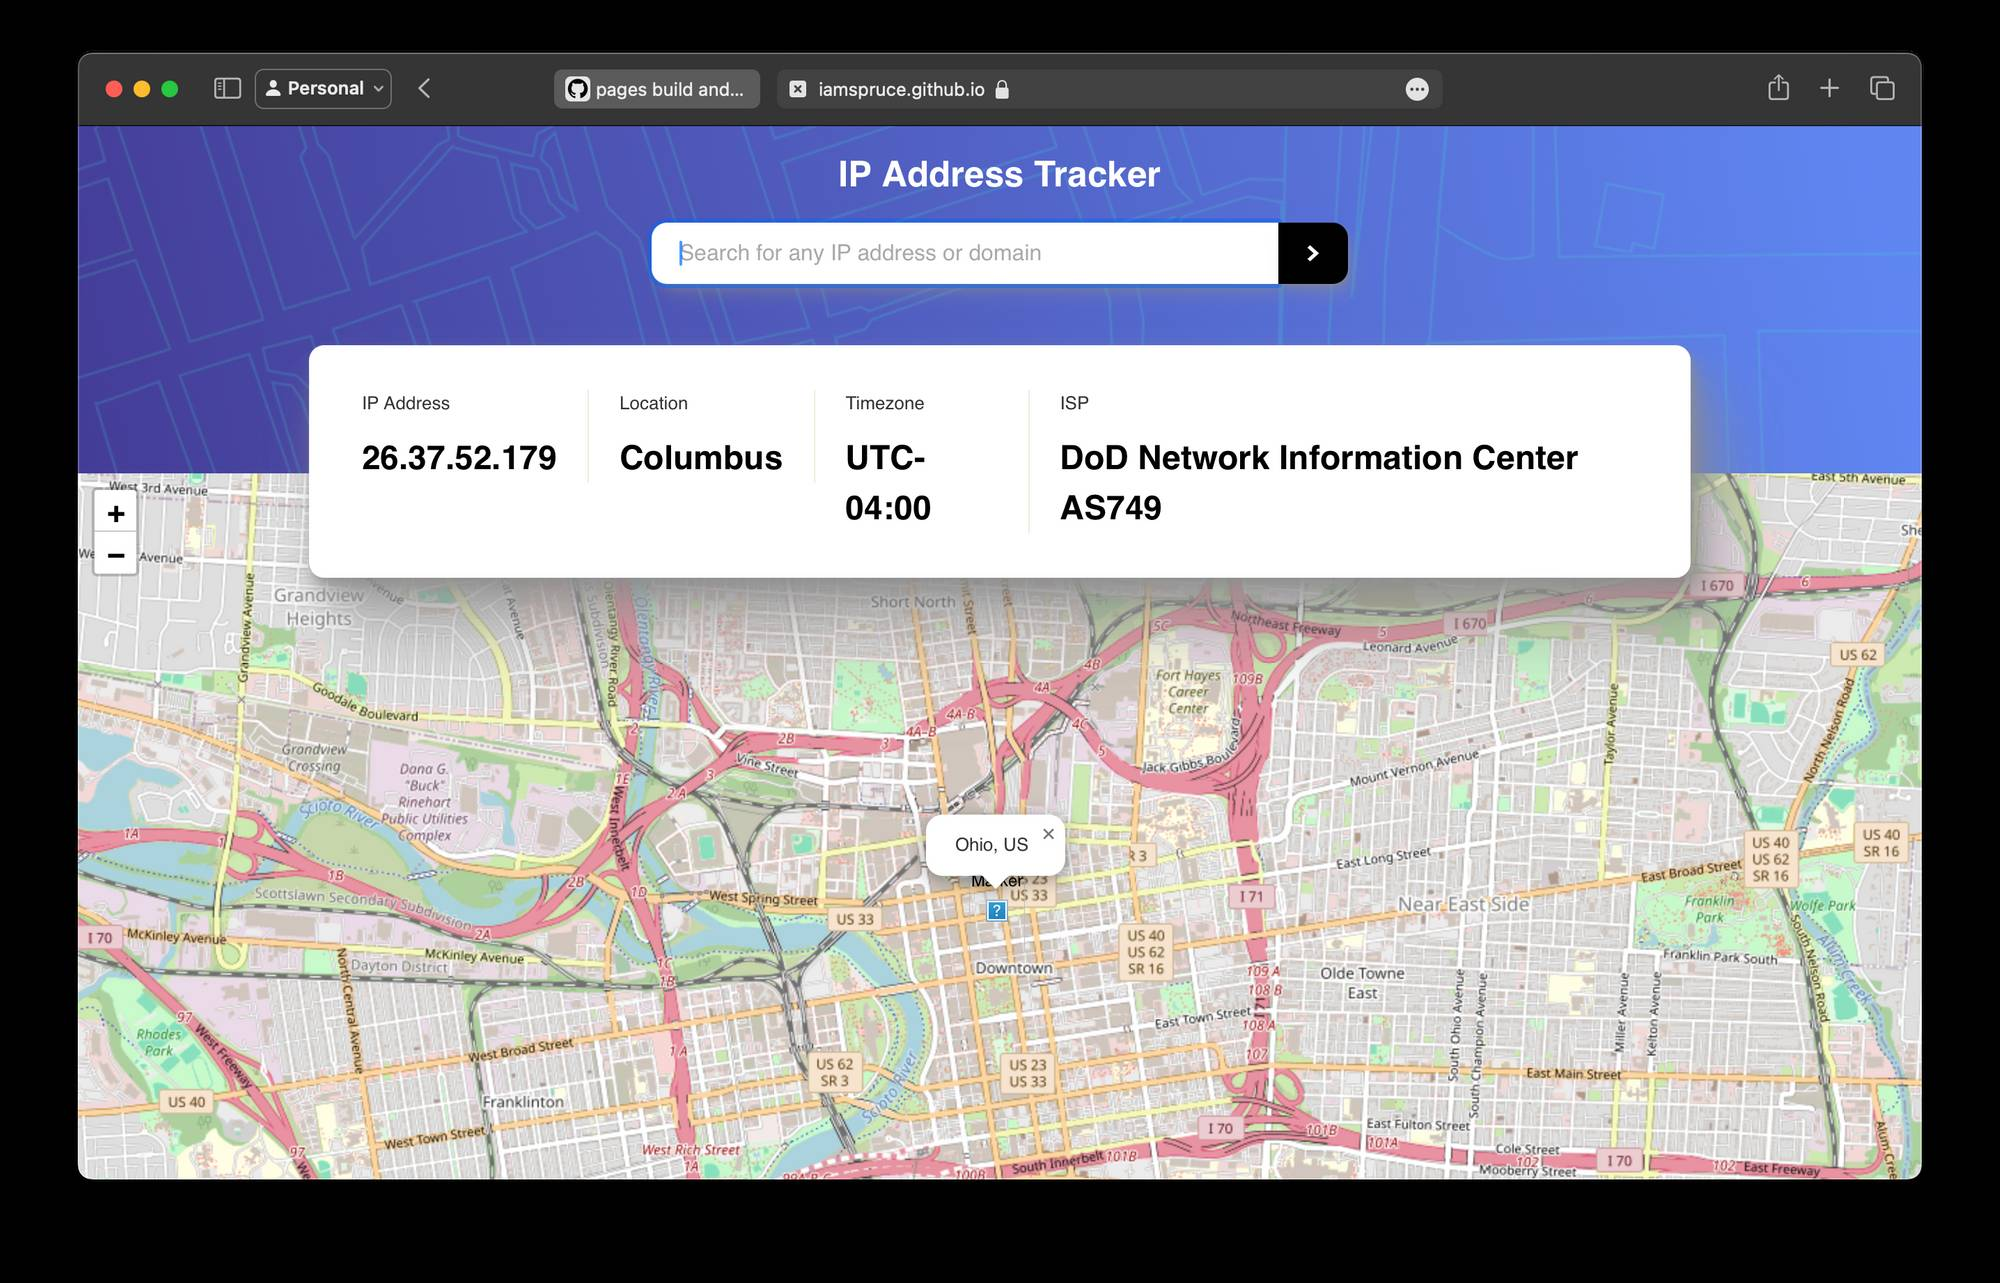
To demonstrate the power of Git and GitHub, we’ll be using a real-world project as an example. Let’s take the “IP Address Tracker application” project from this freeCodeCamp tutorial. You can download the source code for the project here.
If you’ve followed the tutorial and built the project, or if you have a project you’d like to share, this article is for you. We’ll walk you through the steps to host your project on GitHub, making it accessible to the world.
Table of Contents
- Audience
- Prerequisite Knowledge
- Getting Started With Git and GitHub
- What is Git?
- What is GitHub?
- How to Set Up Git and GitHub
- How to Install Git on Windows
- How to Install Git on macOS
- How to Install Git on Linux
- How to Create a GitHub Account
- How to Configure Git
- How to Initialize a Git Repository
- Step 1: Download and Open Your Project
- Step 2: Open the Project in VS Code
- Step 3: Open the Terminal in VS Code
- Step 4: Initialize a Git Repository
- How to Track Changes with Git
- Preparing Changes with git add
- Adding Individual Files
- Adding All Changes at Once
- Saving Changes with git commit
- Preparing Changes with git add
- How to Push Your Project to GitHub
- Step 1: Create a New Repository on GitHub
- Step 2: Link Your Local Repository to GitHub
- Step 3: Push Your Local Changes to GitHub
- Step 4: Verify Your Repository on GitHub
- How to Host Your Project on GitHub Pages
- What are GitHub Pages?
- How to Enable GitHub Pages
- How to Get Your GitHub Pages URL
- How to Update Your GitHub Pages Site
- Conclusion
Audience
This guide is for beginner developers who have started learning HTML, CSS, and JavaScript and want to learn how to share their projects using Git and GitHub.
Prerequisite Knowledge
Before diving in, ensure you are familiar with:
- Basic command-line operations.
- HTML, CSS, and JavaScript fundamentals.
- A text editor like VS Code.
Getting Started With Git and GitHub
I am not going to try to bore you with the differences between Git and GitHub. I am sure there are tons of resources in the world wide web already covering that but from a beginner’s point of view, here is what they are:
What is Git?
Git is a tool that helps you keep track of all the changes you make in your project’s code. Imagine building a website about cats. If you change the website’s title from “Cat Facts” to “All About Cats,” Git will remember the change. If you later decide that you prefer “Cat Facts,” Git lets you go back to that version easily.
It’s like having a record of every edit, addition, and deletion you make to your project, so you can always revisit previous versions and make changes with confidence.
What is GitHub?
GitHub is like a cloud-based scrapbook for your code. It’s an online record where you save every edit, addition, and deletion you make to your project, so you can access it from anywhere and share it with others.
Imagine having a digital filing cabinet where you can store and manage different versions of your website. You can invite friends to see and even help you with your project, making it easy to collaborate. GitHub tracks changes and keeps everything organized, so if something goes wrong, you can always go back to a previous version.
How to Set Up Git and GitHub
Now that we know what Git and GitHub are, let’s get them set up on your computer. Follow these step-by-step instructions:
How to Install Git on Windows
You can download the Git installer here.
Run the installer and follow the setup instructions, keeping the default settings.
How to Install Git on macOS
Open the Terminal on your Mac. You can find it in Applications > Utilities or use Spotlight to search for it.
Install Git using Homebrew by copying and pasting the following commands:
/bin/bash -c "$(curl -fsSL https://raw.githubusercontent.com/Homebrew/install/HEAD/install.sh)"brew install gitOutput:
==> Downloading https://github.com/Homebrew/brew/tarballs/...==> Installing git==> Pouring git-2.43.0.mojave.bottle.tar.gz🍺 /usr/local/Cellar/git/2.30.1: 1,434 files, 43.8MBHow to Install Git on Linux
Open Terminal on your Linux machine. Then use your distribution’s package manager to install Git.
For example, on Ubuntu, copy and paste the following commands:
sudo apt-get updatesudo apt-get install gitOutput:
Reading package lists... DoneBuilding dependency treeReading state information... DoneThe following additional packages will be installed:git-man liberror-perlSuggested packages:git-daemon-run git-daemon-sysvinit git-doc git-el git-email git-gui gitkgitweb git-mediawiki git-arch git-cvs git-svn git-hgThe following NEW packages will be installed:git git-man liberror-perl0 upgraded, 3 newly installed, 0 to remove and 0 not upgraded.Need to get 7,841 kB of archives.After this operation, 43.8 MB of additional disk space will be used.To verify the installation, open Terminal (if it’s not already open) and type the following command to verify the installation:
git --versionOutput:
git version 2.43.0You should see the installed Git version displayed.
How to Create a GitHub Account
- Go to GitHub and click on “Sign up.”
- Follow the instructions to create your account, choose a username and password, and verify your email.
- Once your account is set up, customize your profile with a bio, profile picture, and links to your personal website or social media.
How to Configure Git
Open Terminal and configure Git with the same username and email as your GitHub account:
git config --global user.name "Your GitHub Username"git config --global user.email "your.email@example.com"No output will be displayed, but Git will store your credentials for future use.
How to Initialize a Git Repository
Now that you have Git and GitHub set up, let’s start by initializing Git in a project. You can use any project of your choice or follow along with our example using the “IP Address Tracker” project.
Step 1: Download and Open Your Project
Download the source code for your chosen project or use the “IP Address Tracker” project from this link. Extract the downloaded ZIP file to a location on your computer. This will provide a concrete example to demonstrate Git concepts.
Step 2: Open the Project in VS Code
Open Visual Studio Code and click on “File” > “Open Folder” to select the folder where you extracted the project.
Step 3: Open the Terminal in VS Code
Click on “Terminal” > “New Terminal” to open the terminal in VS Code, where we’ll interact with Git using commands.
Step 4: Initialize a Git Repository
Initialize a Git repository by running the following command:
git initOutput:
Initialized empty Git repository in /Users/spruceemmanuel/Documents/IP Address Tracker/.git/This command creates a new hidden folder called .git in your project folder, which tracks changes to our project files. When you run git init, Git sets up the necessary files and directories to start versioning our project. This includes:
- A .git folder that stores all the metadata for your repository
- A main branch, which is the default branch for your repository
- A HEAD pointer, which points to the current branch (in this case, main).
By initializing a Git repository, you’re telling Git to start tracking changes to your project files. This allows you to version your code, collaborate with others, and maintain a record of changes.
How to Track Changes with Git
Now that we’ve set up Git, it’s ready to keep track of changes in our project.

Git notices change in our files, but before we can save these changes, we need to tell Git to do so.
Preparing Changes with git add
To get our changes ready to save, we use the git add command. Here’s how it works:
Adding Individual Files
If you want to add specific files, like index.html, script.js, or styles.css, you can use git add followed by the file name. For example:
git add index.htmlAdding All Changes at Once
If you want to add all modified files in the project to the staging area, use:
git add .Saving Changes with git commit
Once we’ve used git add, we use git commit to save our changes. Here’s how to do it:
git commit -m "Describe your changes here"Replace “Describe your changes here” with a brief description of what you’ve changed. For example:
git commit -m "Update index.html with new content"Output:
[master (root-commit) be9b1cd] Update index.html with new content3 files changed, 386 insertions(+)create mode 100644 index.htmlcreate mode 100644 script.jscreate mode 100644 styles.cssBy using git add and git commit, you’re instructing Git to track and save specific versions of your project. This helps you manage changes, collaborate with others, and maintain a record of your progress.
How to Push Your Project to GitHub
Now that we have our changes tracked and committed locally, it’s time to upload our project to GitHub so we can share it with the world.
Step 1: Create a New Repository on GitHub
- Go to GitHub and log in to your account.
- Click the “+” icon in the upper-right corner and select “New repository.”
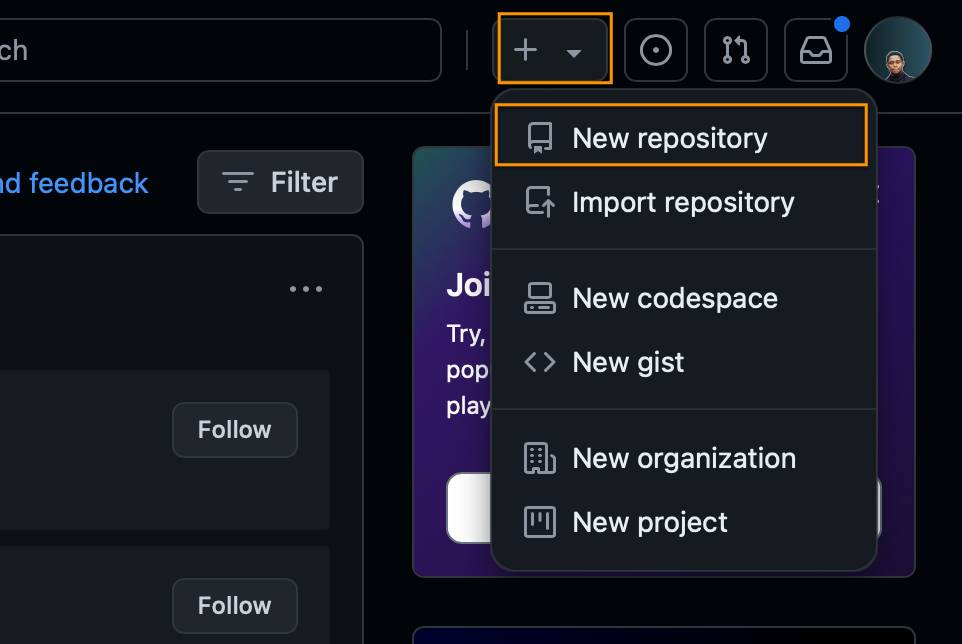
- Fill out the repository name (for example: “ip-address-tracker”), and add a description if you like.
- Choose whether you want the repository to be public or private.
- Do not initialize the repository with a README, gitignore, or license (since we already have a local repository set up).
- Click “Create repository.”
Step 2: Link Your Local Repository to GitHub
To connect your local repository with the new GitHub repository, you need to add a remote origin. Follow these steps:
- Copy the URL of your new GitHub repository. It should look something like this: https://github.com/yourusername/ip-address-tracker.git
- Open Terminal in Visual Studio Code and run the following command:
git branch -M maingit remote add origin https://github.com/yourusername/ip-address-tracker.gitStep 3: Push Your Local Changes to GitHub
Now, push your local commits to the GitHub repository with:
git push -u origin mainOutput:
Enumerating objects: 8, done.Counting objects: 100% (8/8), done.Compressing objects: 100% (4/4), done.Writing objects: 100% (6/6), 645 bytes | 645.00 KiB/s, done.Total 6 (delta 2), reused 0 (delta 0)To https://github.com/yourusername/ip-address-tracker.git* [new branch] main -> mainBranch 'main' set up to track remote branch 'main' from 'origin'.Step 4: Verify Your Repository on GitHub
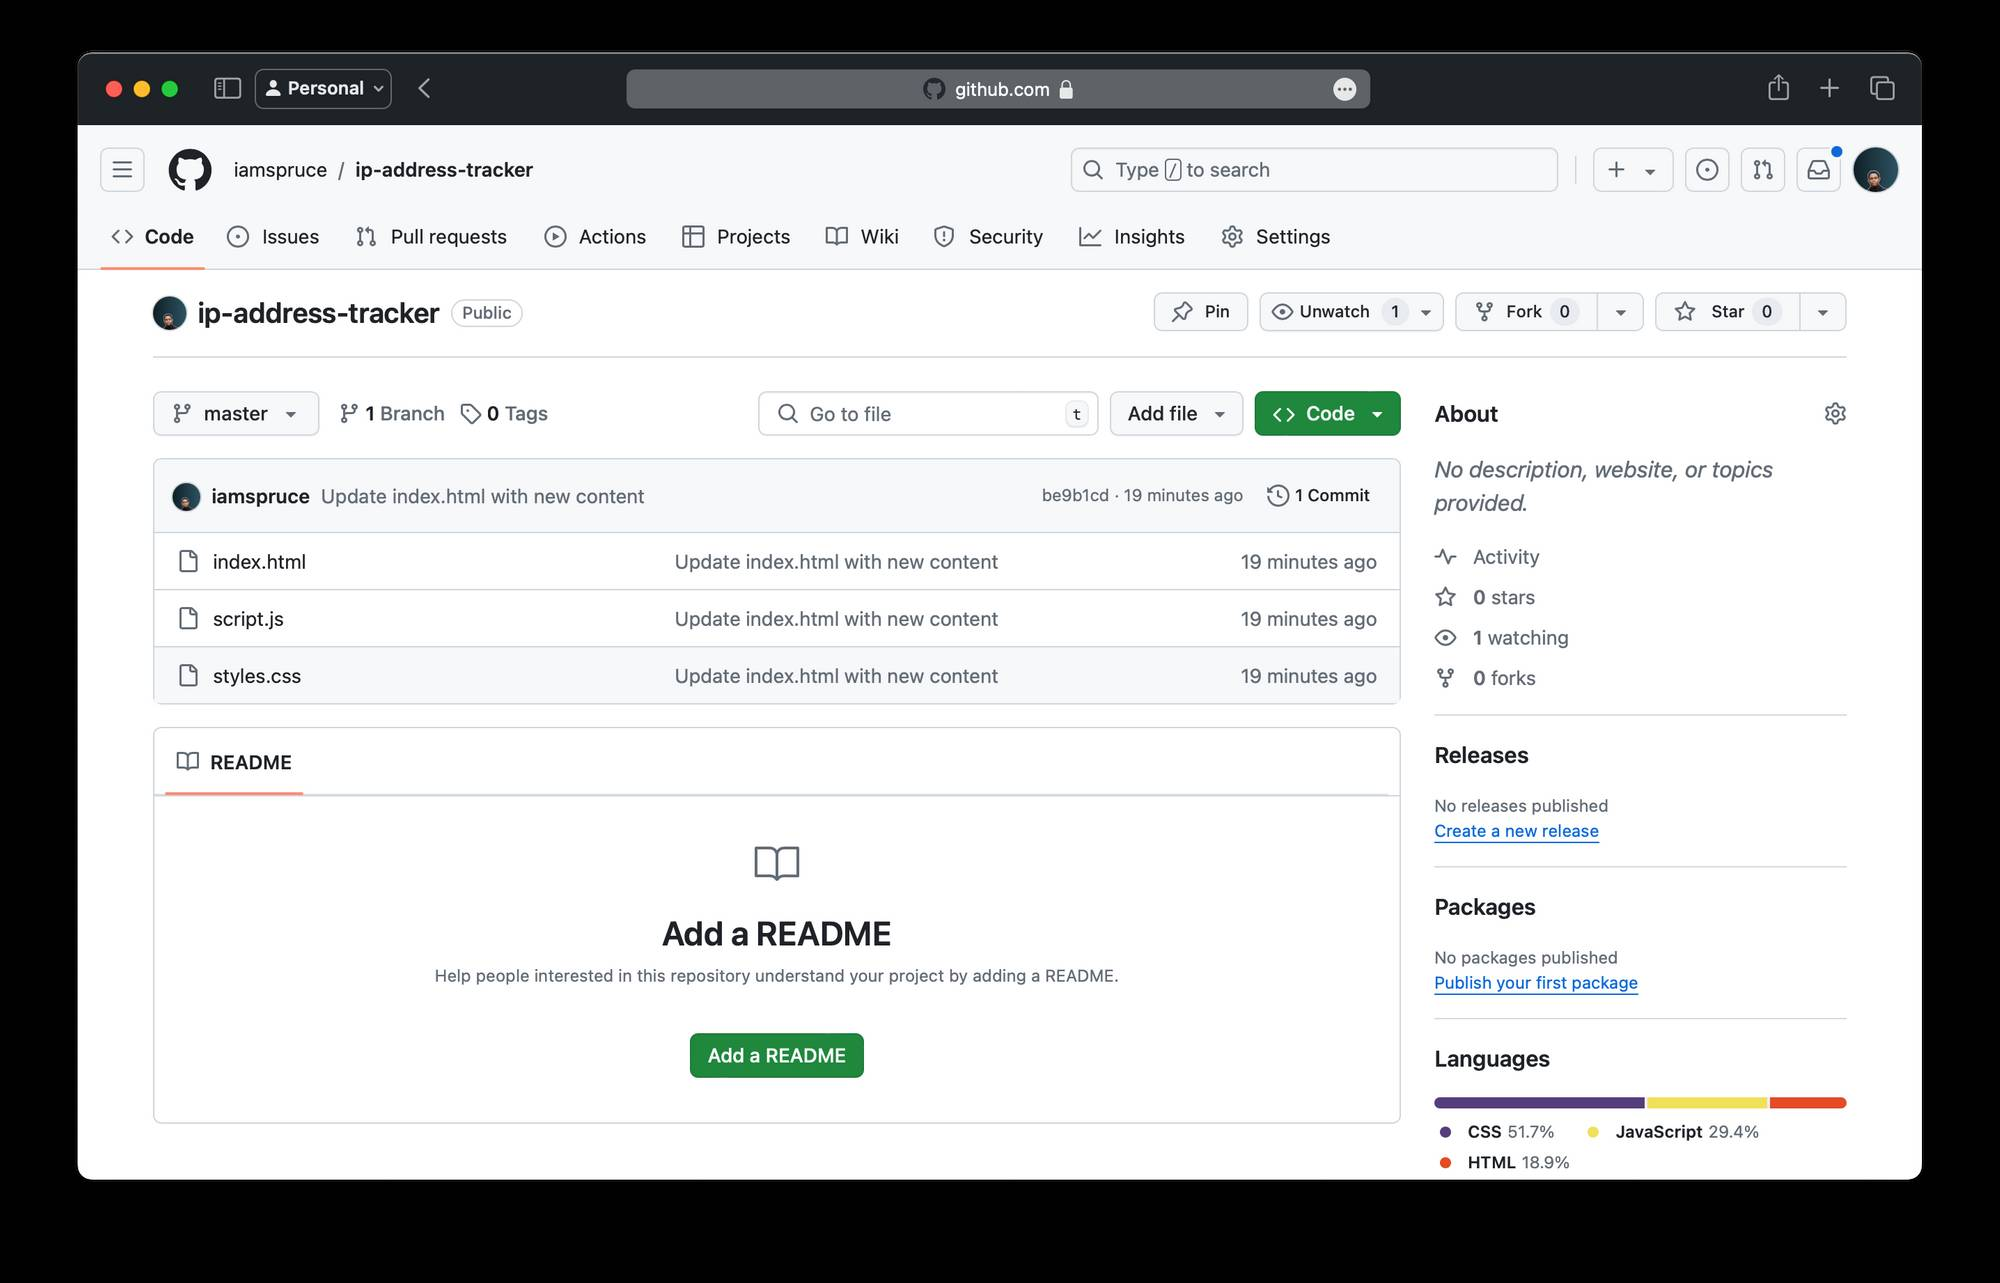
Go back to your GitHub repository page. You should see all your files and commit history available online.
How to Host Your Project on GitHub Pages
Now that your project has been initialized with Git and pushed to GitHub, let’s host it on GitHub Pages. GitHub Pages is a free service that allows you to publish web projects directly from a GitHub repository.
What are GitHub Pages?
GitHub Pages turns your GitHub repository into a website. It’s an easy way to showcase your projects without needing a separate hosting service. You can create static websites directly from your repositories.
How to Enable GitHub Pages
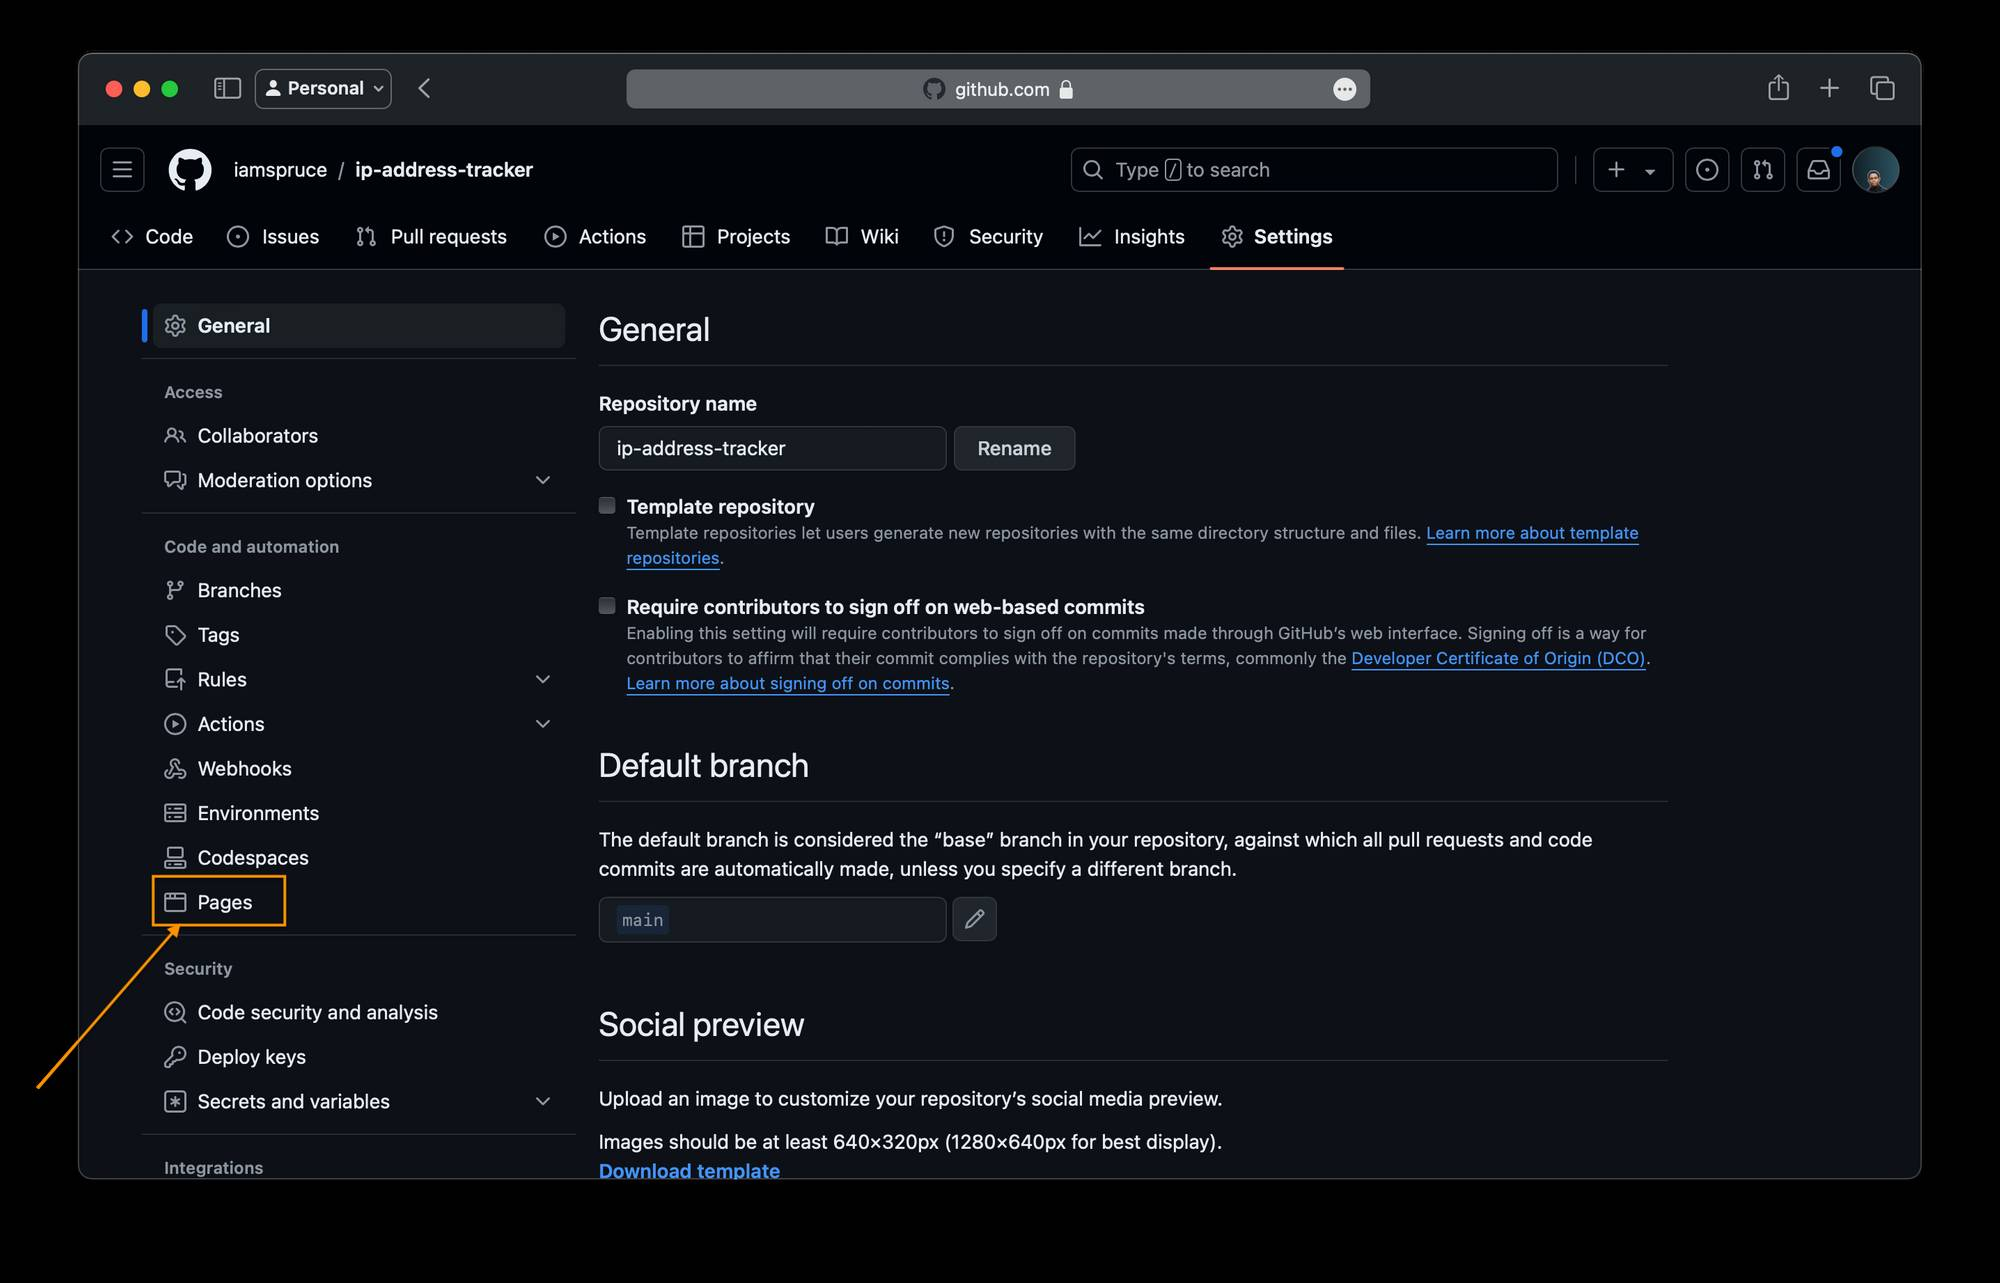
- Go to your GitHub repository in a web browser.
- Click on the “Settings” tab.
- Scroll down to the “Pages” section in the left-hand menu.
- Under “Source,” select the branch you want to publish from (typically main or master), and choose the root folder.
How to Get Your GitHub Pages URL
After enabling GitHub Pages, GitHub will provide you with a URL where your site is published. It usually follows this format:
https://<username>.github.io/<repository-name>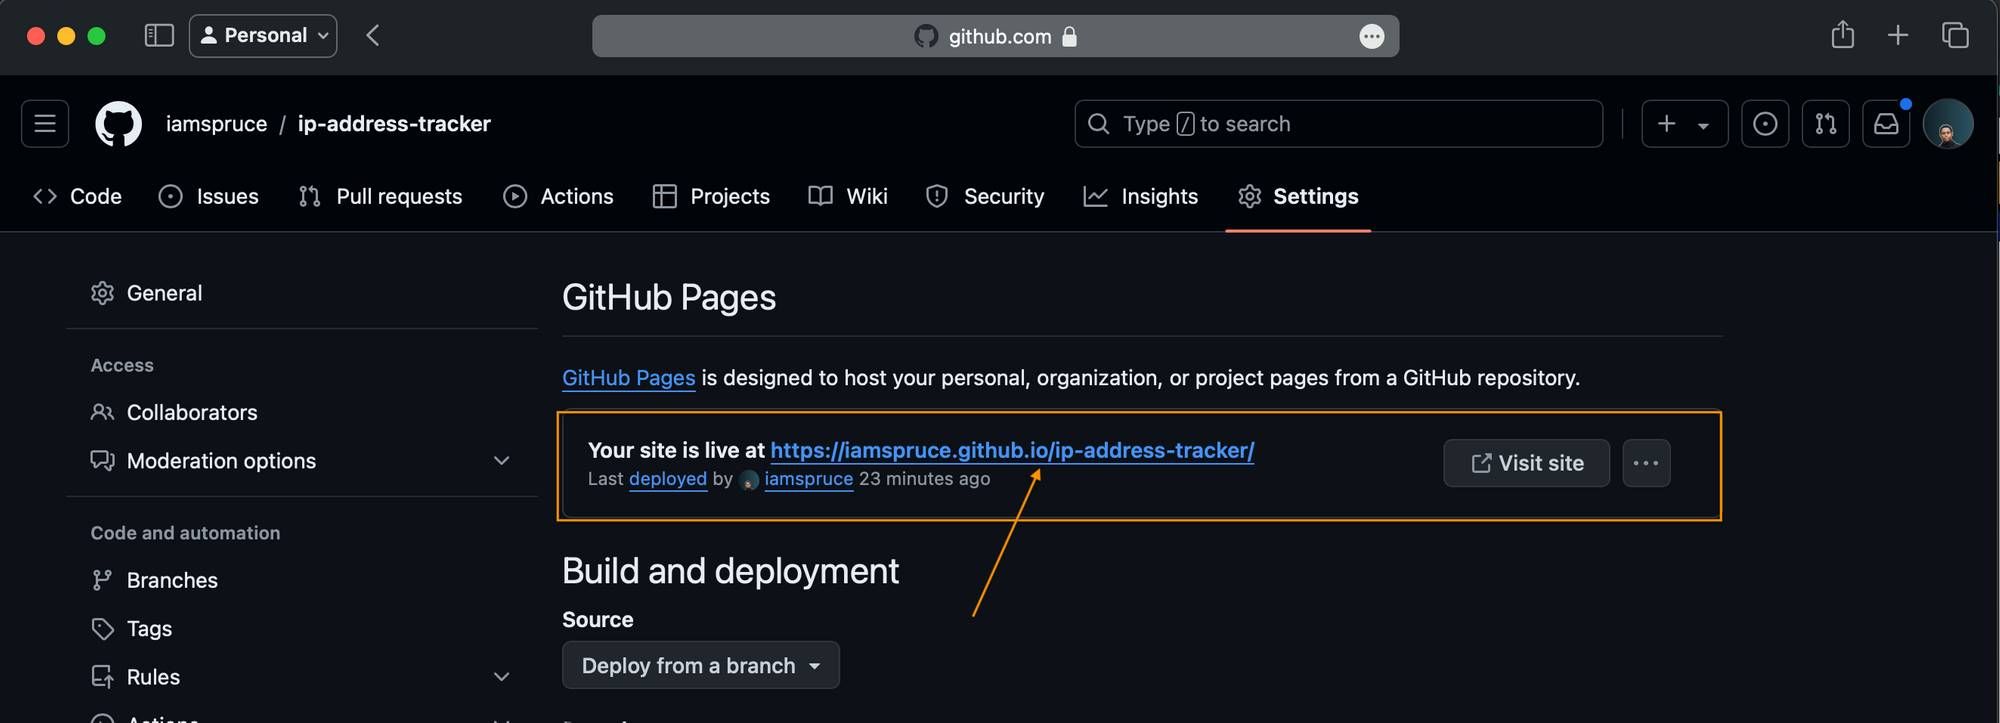
Open your browser and paste the URL to see your live website.
How to Update Your GitHub Pages Site
Every time you push changes to the selected branch in your repository, GitHub Pages will automatically update your live site. Here’s a quick reminder on how to push changes:
- Make changes to your project files.
- Add and commit your changes:
git add .git commit -m "Your commit message"- Push the changes to GitHub:
git push origin mainWith these steps, you’ve successfully hosted your project on GitHub Pages. Congratulations! Your project is now live and accessible to the world.
Conclusion
Just a few years ago, I was in your shoes—excited about building my first website but unsure how to share it with the world. Today, you’ve not only learned what Git and GitHub are but also how to use them to host your very own project.
Imagine your excitement when your project goes live, and you can share it with friends, family, and the global community. You’ve now set up Git, created a GitHub account, initialized a Git repository, and hosted your project on GitHub Pages. Each step has brought you closer to becoming a more confident and capable developer.
This is just the beginning. Git and GitHub have many more features for you to explore. As you continue building and sharing projects, you’ll discover new ways to collaborate and improve your workflow.
Keep experimenting, keep learning, and most importantly, keep coding. The world is waiting to see what you create next!
If you have any questions, feel free to find me on Twitter at @sprucekhalifa, and don’t forget to follow me for more tips and updates. Happy coding!